

Best Gingerbread Houses is a participant in the Amazon Associates program. As an Amazon Associate we earn from qualifying purchases, at no extra cost to you. A commission never affects what we recommend or how we rate it.
Halloween gingerbread goes wrong in a way Christmas gingerbread never does. The dough is the same. What changes is that you are cutting spiders and bats instead of stars, and icing them in black, orange and white on a cookie that is already dark brown.
So two things break. Thin shapes snap, and colours sink into the background. Most Halloween cookie recipes skip both and just hand you a dough.
Start with the part that surprises people. On gingerbread, black icing is the easy colour and white is the hard one, which is the reverse of a sugar cookie.
Halloween Gingerbread Cut-Out Cookies
Makes about 24 cookies with a 3.5 inch cutter · Easy · Prep 30 minutes · Chill and freeze 2 hours 30 minutes · Bake 10 minutes
Total time about 3 hours 10 minutes, of which roughly 55 minutes is hands on.
Equipment: a stand or hand mixer, a rolling pin, two light-coloured half sheet pans, parchment, Halloween cutters, a thin offset spatula, and freezer space big enough for a sheet pan.
Ingredients
- 3 cups (360g) all-purpose flour, spooned and levelled
- 1 teaspoon baking soda
- 1/2 teaspoon salt
- 1 tablespoon ground ginger
- 1 1/2 teaspoons ground cinnamon
- 1/2 teaspoon ground cloves
- 1/4 teaspoon ground nutmeg
- 3/4 cup (170g) unsalted butter, softened but still cool
- 3/4 cup (150g) packed dark brown sugar
- 1/2 cup (170g) unsulphured molasses
- 1 large egg
- 1 teaspoon vanilla extract
Method
- Whisk the flour, baking soda, salt and spices together in a medium bowl.
- Cream the butter and brown sugar on medium until lightened, about 2 minutes.
- Beat in the molasses, egg and vanilla until smooth, then work in the dry ingredients on low until no dry flour remains.
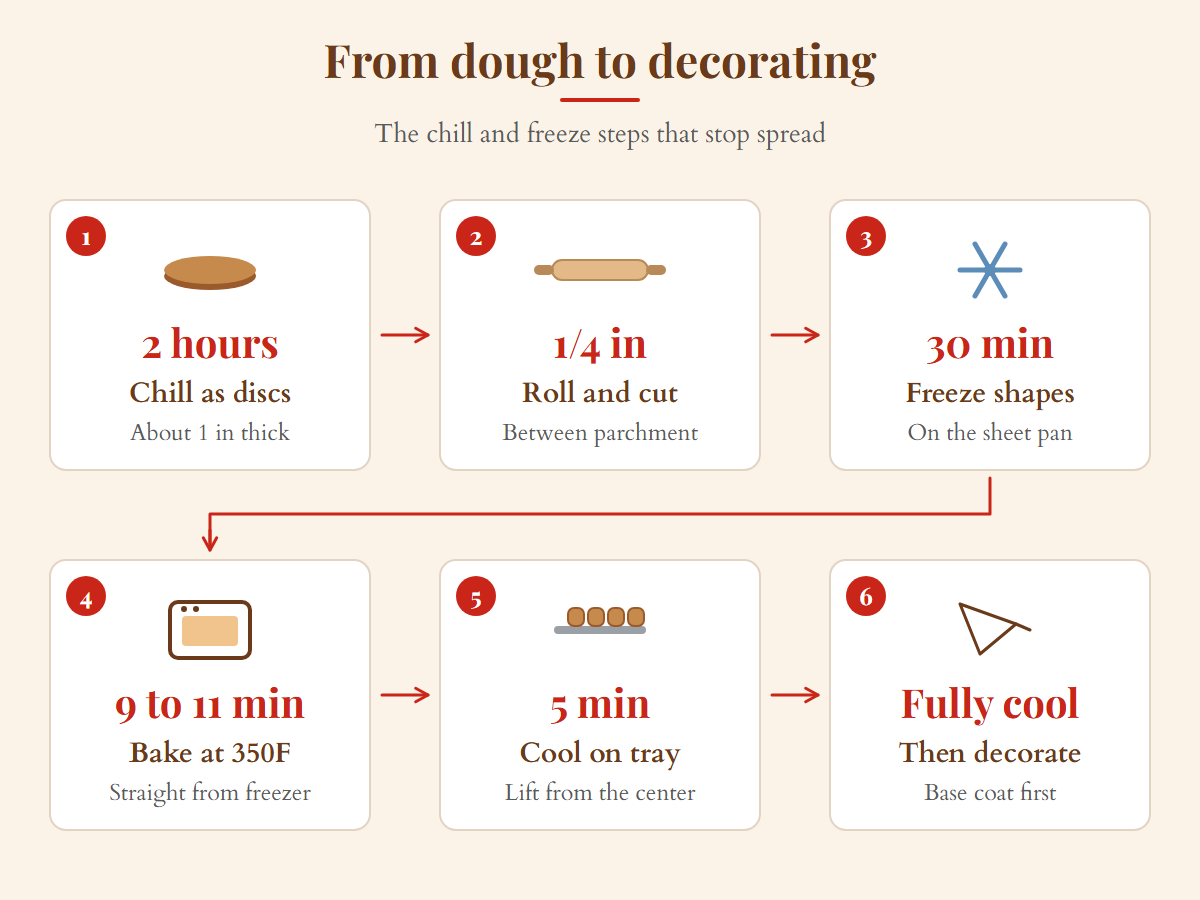
- Chill the dough as two flattened, wrapped discs for 2 hours.
- Roll one disc at a time to a quarter inch between parchment, then cut your Halloween shapes.
- Freeze the cut shapes on the sheet pan for 30 minutes, then bake at 350F for 9 to 11 minutes.
- Decorate once the cookies are completely cool, base coat first.
Notes: the dough is the Best Gingerbread Houses cut-out formula, adapted from King Arthur Baking’s gingerbread cut-outs with the leavening restrained and a freezer step added for shape retention. Yield is calculated from dough weight at a quarter inch, not counted from a bake. Nutrition is approximate, about 155 calories per cookie, calculated from USDA FoodData Central energy values and divided by the calculated yield rather than laboratory tested.
Why Halloween Gingerbread Is Harder Than Christmas Gingerbread
It is worth being precise about this, because the fix depends on it. The dough is not the problem. The same dough that makes a clean gingerbread man in December makes a clean bat in October.
The two things that change are both downstream of the dough.
The shapes get thinner. Christmas shapes are solid: stars, trees, hearts, circles, the gingerbread man with his stubby limbs. Halloween shapes are spindly. A spider is mostly legs. A bat is mostly wing tip. A cat has a tail that sticks out into open air. Cutter makers know this, and the advice from people who sell the things is blunt: designs with extremely narrow parts, like spider legs, are difficult to use, especially in smaller sizes.
The colours get harder. Christmas gingerbread is decorated in white, red and green, and mostly in thin piped lines where the cookie is meant to show. Halloween decorating floods whole surfaces in black, orange, purple and white, and it wants those colours to read as themselves. On a dark brown base, most of them do not.
Everything below is aimed at those two problems. For why the dough itself spreads or stays soft, the gingerbread house recipe works through the same mechanics in more depth, and it is the same dough family.
Ingredient Notes
Only three of these carry a real decision.
Molasses. Unsulphured, not blackstrap. Blackstrap is a third boiling and it is far more mineral and bitter, which matters more at Halloween than at Christmas because you are about to add black pigment on top of an already bitter base.
Dark brown sugar. Worth using over light. It is simply sucrose with molasses added back, so it deepens the colour of the baked cookie. Normally that is a flavour choice. Here it is also a decorating choice, because a darker cookie makes black icing easier and white icing harder, and you should pick your side knowingly.
Spices. Ground spices lose their volatile oils within about a year. If the ginger in your cupboard is older than that, the cookie will taste flat no matter what the icing does.
How to Make Halloween Gingerbread Cookies Step by Step
1. Whisk the dry ingredients and the spices
Flour, baking soda, salt, ginger, cinnamon, cloves and nutmeg in a medium bowl. Whisk until the colour is even, with no darker streaks of spice left sitting on top.
2. Cream the butter and brown sugar
Two minutes on medium. You want it lightened and fluffy, but the butter should still feel cool to the touch. Butter that has gone soft and greasy is the most common reason a dough turns to sludge later.
3. Beat in the molasses, then work in the flour
Add the molasses, egg and vanilla and beat until smooth, scraping the bowl once. Then add the dry ingredients on low and stop the moment no dry flour remains. The dough should pull together in a single mass and look matte rather than glossy.
4. Chill the dough as two flat discs
Flatten into two discs about an inch thick, wrap, and refrigerate for 2 hours. Flat discs chill through in a fraction of the time a ball takes, and they roll out without a fight.
5. Roll to a quarter inch and cut your shapes
Roll one disc at a time between two sheets of parchment. A quarter inch is the number to hit, and for Halloween shapes it is not a suggestion. Thinner dough cuts fine detail more crisply but bakes into something far more fragile, and fragile is exactly what a spider leg cannot afford. Press the cutter straight down and lift straight up, with no twist.
6. Freeze the shapes, then bake them straight from the freezer
Thirty minutes in the freezer on the sheet pan. Re-solidifying the butter is the most reliable way to stop spread, and spread is what closes the gap between a bat’s wings. Bake at 350F for 9 to 11 minutes. Pull them when the edges look set and the centres have lost their wet shine. Thin protrusions brown before the body does, so the first sign of dark wing tips means they are done.
7. Decorate once the cookies are completely cool
Completely cool means room temperature all the way through, not warm in the middle. Icing on a warm cookie will not crust, and everything below depends on crusting. Base coat first, then detail.
Choosing Shapes That Survive the Oven
Every Halloween cookie post you will find defaults to a gingerbread man cutter and draws a skeleton on it. That is not laziness. It is the shape most likely to survive, and the ones people actually want are the ones most likely to break.
That default is worth doing properly rather than in passing, because the bones are white line work on a dark cookie and that is the hardest icing job on the tray. Our skeleton gingerbread cookies cover the two pass method and why the first pass always looks gray.
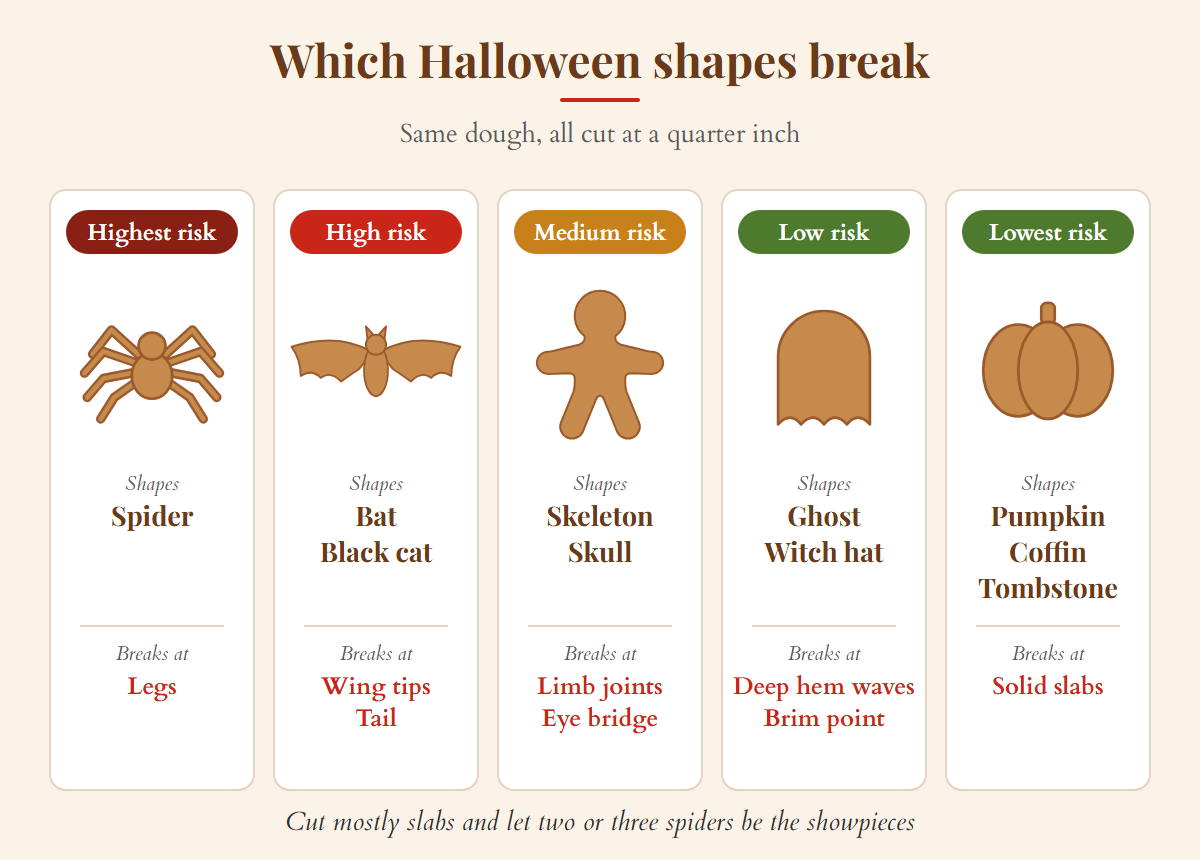
Fragility comes down to one thing: how narrow the narrowest part is, and whether it sticks out into open air. A pumpkin is solid all the way through. A spider is a body with eight cantilevers. Both are cut from the same dough at the same thickness, and only one of them arrives intact.
Use the checker to see where the shape you have in mind sits, and what to do about it.
Pick the shape you are cutting
The pattern is worth noticing. The shapes that read as Halloween at a glance, the spider and the cat and the bat, are the fragile ones. The shapes that survive, the pumpkin and the coffin and the tombstone, are solid slabs. If you want a tray that looks unmistakably Halloween and still arrives in one piece, cut mostly slabs and let two or three spiders be the showpieces.
For a deeper look at why limbs specifically fail, the same problem drives our gingerbread house templates, where a narrow chimney tab breaks for exactly the same reason a cat's tail does.
Gingerbread Bats, and Why the Wing Tips Break
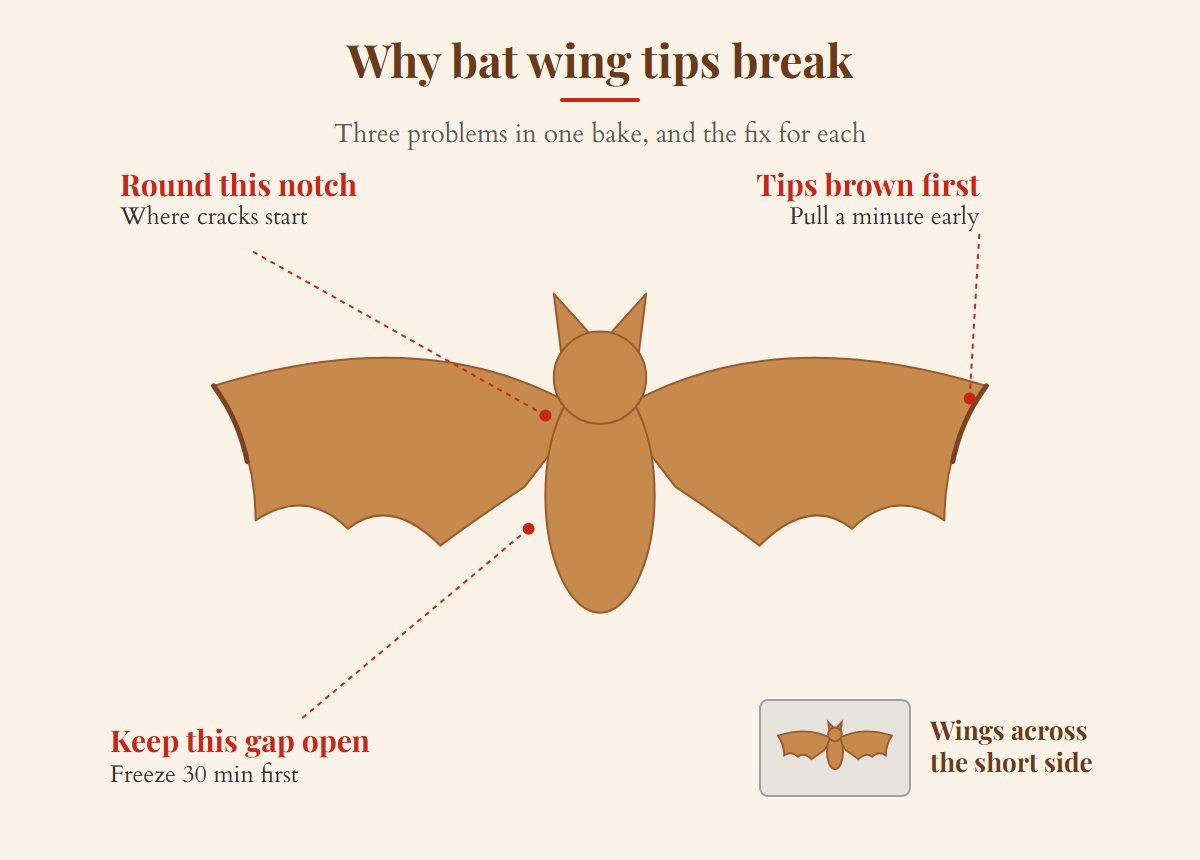
Bats are the shape people ask about most, and they are the one that fails most, for a reason that has nothing to do with your dough. A bat is mostly wing tip. The two thinnest points on the cookie are also the two furthest from its mass, and that combination causes three separate problems in one bake.
The wing tips bake faster than the body. They are thinner in every direction, so they are done while the centre is still soft. Left in until the body is set, the tips are over-baked, and over-baked gingerbread does not bend before it breaks. This is why a bat can look perfect on the tray and snap when you lift it.
The notch between the wings is an inside corner. As gingerbread bakes it pulls very slightly toward its own mass, and an inside corner is the one place on a cookie where that pull works against itself from two directions. It is where a crack starts, and once it starts it runs. Round that notch off by a couple of millimetres with the tip of a knife before baking and the crack has nothing to open along.
Spread closes the gap between the wings. A bat with a narrow gap between its wing and its body will lose that gap entirely if the dough moves, and you get a shape that reads as a blob rather than a bat. The freezer step in this recipe is the fix, and it matters more for bats than for any other shape here.
The practical version. Choose a cutter with blunt wing tips rather than sharp ones, cut bats from the coldest dough in the batch because thin points warm fastest under your hands, lay them on the tray with the wings running across the short side so the heat reaches both tips at the same time, and pull them a minute before you think they are done. If a wing does snap, it snaps clean, and royal icing along the break is invisible once the bat is iced black.
Why Black Icing Is Easy Here and White Icing Is Hard
This is the part no Halloween cookie recipe tells you, and it changes how you plan a tray.
Royal icing is not fully opaque. What is underneath shows through it, which is why cake decorators put a layer of marzipan under royal icing in the first place: it is there to prevent discolouration of the icing by what sits below. A gingerbread cookie is a dark base with no marzipan on it.
So every colour you flood onto a gingerbread cookie is being pulled towards brown. For most colours that is a problem. For two of them it is a gift.
Black gets easier. The usual complaint about black royal icing is that it takes an enormous amount of dye, still lands on dark grey, and tastes bitter for the trouble. That is all true on a white sugar cookie. On gingerbread, the brown base is already doing a large part of the darkening for you, so you reach black with noticeably less pigment, and less pigment is the whole solution to the bitterness.
White gets hard. A single coat of white over dark brown does not read as white. It reads as a dull grey, because the brown is showing through. This is the failure that ruins ghosts and skeletons, and it is the reason so many published Halloween gingerbread recipes quietly reach for an edible marker instead of white icing.

The tool below shows how each colour lands on gingerbread against the same colour on a pale sugar cookie.
Pick an icing colour
The practical takeaway is a planning rule. Decide before you mix which cookies need a white base coat, because those need an extra hour of crusting time that the others do not. Ghosts and skeletons need it. Pumpkins, coffins and tombstones do not.
For getting royal icing to the right consistency in the first place, our royal icing recipe and consistency guide covers the flood and outline stages in detail, and all of it applies here unchanged.
Making Black Icing That Is Not Bitter
Black is the colour Halloween runs on, and it is where most trays go wrong. The complaint is consistent across decorating forums: it takes a huge amount of colour, it still lands on dark grey rather than black, and it tastes awful.
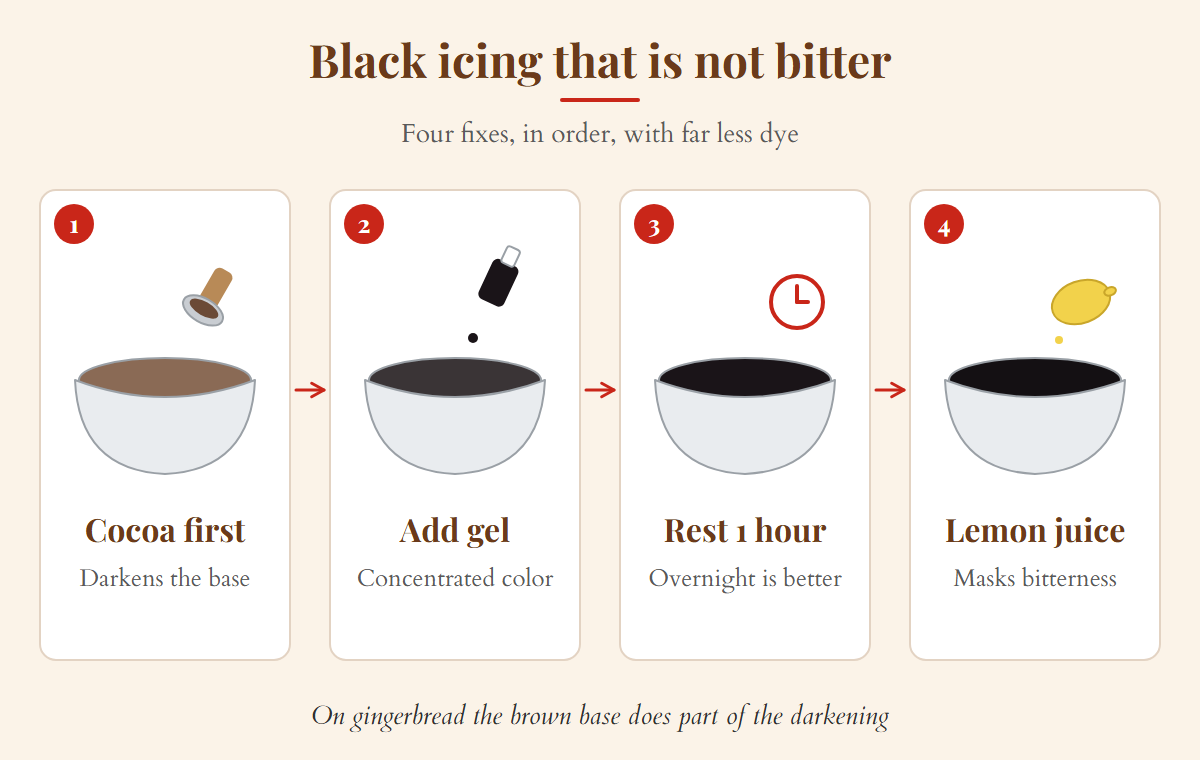
Four things fix it, and on gingerbread you need fewer of them than you would on a sugar cookie.
1. Start with cocoa, not with dye. Stir cocoa powder into the white icing first, then add black gel. The cocoa darkens the base so the pigment has far less work to do. It does add a mild chocolate note, which on a spiced gingerbread cookie is no loss at all. Our haunted gingerbread house guide uses the same technique at structural scale, where the icing is doing a mortar job as well as a colour one.
2. Use a concentrated gel or a powder. Chefmaster, AmeriColor and Wilton Color Right are all concentrated enough that a small quantity moves the colour a long way. Powdered colour goes further still, and it has the advantage of not thinning your icing, which matters when you are flooding.
3. Let it rest. Royal icing darkens as it sits. Mix it to what looks like a deep charcoal, cover it, and leave it for an hour before you decide it is not black enough. Overnight is better. Most of the bitterness people taste comes from pigment added in the last ten minutes of impatience.
4. Add a little acid. A squeeze of lemon juice masks residual bitterness well, and it does not affect how the icing sets.
Troubleshooting
| Symptom | Cause | Fix |
|---|---|---|
| Spider legs and bat wings snapped coming off the tray | Lifted while still warm, or lifted by the protrusion | Cool on the tray 5 minutes, then slide a thin spatula under the whole body and lift from the centre |
| Shapes lost their outline and merged | Butter melted before the structure set | Freeze the cut shapes 30 minutes and bake straight from the freezer. Do not skip this at Halloween, where a closed notch ruins a bat |
| White icing looks grey | One coat over a dark base, showing the brown through | Flood, crust for an hour, flood again. There is no way to shortcut this with a thicker single coat |
| Black icing tastes bitter | Too much dye, added too fast | Rebuild with cocoa as the base and rest the icing for an hour before judging the colour |
| Black icing is really dark grey | Judged too early | Rest it. Colour deepens for hours after mixing |
| Orange looks like brick | The brown base pulling the colour down | Either accept the deeper orange or lay a white base coat first |
| Dough turned to sludge after chilling | Butter was too warm at creaming, or the molasses was over-measured | Chill it again as flat discs, and next time use butter that is cool to the touch |
| Cookies are tough | Re-rolled too many times | Limit re-rolls to two or three. Cut the scraps into tombstones, which are forgiving |
Make-Ahead and Timeline
This build spans more than one evening if you are doing white base coats, which is the part people underestimate.
- Up to a month ahead: the dough freezes well as wrapped discs. Thaw overnight in the fridge.
- Two or three days ahead: bake the cookies and keep them airtight, undecorated.
- The night before: mix your black icing so it has overnight to develop, and lay any white base coats so they crust fully.
- On the day: flood the remaining colours and pipe detail. Allow a full day for decorated cookies to dry hard before you stack or bag them.
The compressed version, if you have one evening: bake, cool, flood everything that does not need a base coat, and pipe black detail straight onto the bare cookie. Skipping white entirely is a legitimate plan, and a tray of black-on-brown cookies looks deliberate rather than unfinished.
Storage Instructions
Undecorated cookies keep about a week in an airtight tin at room temperature, and about three months frozen. Decorated cookies need the icing fully hard before they go anywhere, which takes a day at room temperature.
Do not refrigerate them. Fridge air is dry, so it pulls moisture out of the cookie faster than a sealed tin on the counter does, and condensation on the way back out can make royal icing weep and colours bleed. Our guide to how long gingerbread lasts works through the moisture side of this in more detail.
FAQ
Can I use a Christmas gingerbread recipe for Halloween cookies?
Yes, and you should. The dough is identical. What changes is the shapes you cut and how you handle colour, which is what this page is about.
Why does my white icing look grey on gingerbread?
Because royal icing is not fully opaque and the dark cookie shows through it. Two coats with a full crust between them is the fix. This is the same reason cake decorators put marzipan under royal icing.
Do I need black food colouring for Halloween gingerbread?
Less than you would think. Cocoa powder plus a concentrated gel gets you to black on a brown cookie with far less pigment than the same job on a sugar cookie, and less pigment is what stops it tasting bitter.
Which Halloween cookie cutters break the most?
Spiders first, because of the legs, then cats with raised tails, then bats with narrow wing tips. Pumpkins, coffins and tombstones almost never break.
Should I roll the dough thinner for detailed Halloween shapes?
No. It is tempting because thin dough cuts crisper detail, but thin dough bakes brittle, and brittle is what breaks a spider leg. Stay at a quarter inch and choose a cutter with wider parts instead.
Can I make these with children?
Yes, with shape choice doing the work. Give them pumpkins, ghosts, coffins and tombstones, which survive rough handling, and keep the spiders for yourself.
How far ahead can I decorate them?
Two to three days, kept airtight once the icing has hardened for a full day. Any longer and the cookie softens under the icing.
More Gingerbread Cookie Recipes
- Pumpkin gingerbread cookies, for a fall drop cookie that carries the season without a cutter.
- The gingerbread house recipe, for the structural version of this dough and why panels spread.
- Gingerbread and royal icing recipes, for flood and outline consistency, which every colour above depends on.
- Haunted gingerbread house ideas, if the cookies are a warm-up for a whole haunted build.
- Halloween gingerbread house kits, for the shortcut version.
- Our full gingerbread house kit guide, rated by how well each kit actually holds together.
- Tombstone cookies, which use the structural dough rather than this one, because a headstone has to stand up in soft ground.