A Nightmare Before Christmas gingerbread house is not a harder build than an ordinary one. It is a crooked house, a hill that curls over at the top, and a big round moon, done in black and white with one shot of purple or orange. Get those three shapes right and it reads as the film from across the room. Get them wrong and no amount of candy will save it from looking like a dark cottage.
Search this and you find two tutorials, both by professional decorators. One uses an airbrush and a page of color-by-color icing consistencies, the other took forty hours across five days and a rotary tool. Everything else is pictures of finished houses, coverage of the display Disneyland builds each year, and lighted ornaments for sale. Nobody covers the version most people will actually build: a plain kit, one weekend, a household that wants it to look right. That is this guide.
By a Nightmare Before Christmas house we mean both a from-scratch build cut to the film’s crooked proportions and a supermarket kit converted with icing, a hill and a moon. Both routes are here, and for most kitchens the second one is the better answer.
If you are building with teenagers who have outgrown the friendly pumpkin house, this is the one that finally interests them. If you love the film and want the house to read as the film rather than as generic spooky, the shape section is written for you. And if you are reading this in December wondering whether a Halloween house can do Christmas duty, it can, and there is a section on exactly how.
You will get the three shapes and why each one matters, a way to build the lean without the roof fighting you, how to cut and stand the curled hill, an icing order that keeps the black from ruining the white, the one technique that turns every crooked joint into part of the design, and a re-dressing plan that carries the same house from October to Christmas.
We have grouped it into four parts: the shapes, the build, the icing, and the two holidays. The shapes come first, because they decide everything after them.
1. Three Shapes and Two Colors Make It Read as the Film
The film’s look is a silhouette, not a color scheme. A tall, narrow house that leans. A hill that curls over at its peak like a breaking wave. A full moon, larger than feels sensible, sitting behind the hill so the curl crosses it. Black and white carry the palette, and a single accent, purple or orange, does the rest.
Here is the test. Photograph your house against a plain wall with the light behind it, so all you see is the outline. If the outline says the film, you are finished, whatever the candy looks like. If it does not, no detail you add afterwards will fix it, because the detail is not what people are recognizing.
That is why the two ranking tutorials are not the map for most builders. Both are decorator-grade: character faces flooded in royal icing, a different consistency for every color, an airbrush. They are lovely and they are optional. The silhouette is what does the work, and the silhouette is cheap.
One thing this guide will not do is hand you printable character art, because this is a Disney property and a commercial site. The shapes, the palette and the techniques are yours to use. The characters belong to the studio, and the house does not need them. We also could not find a licensed gingerbread kit for sale under the film’s name at the time of writing. What the shopping results show under that search are lighted ornaments and figurines, not baking kits, so treat every kit route on this page as converting a plain one.
Where your three shapes come from depends on whether you are baking panels at all. If you are converting a kit, the walls are what they are, so the lean comes from a trim, the hill is a separate cookie or a piece of card, and the moon is a cookie or a round white candy. If you are cutting from scratch, you cut the lean into the walls themselves and you can make the house as tall and narrow as the film’s, within the limit the next section explains.
2. Kit or From Scratch
For most people converting a plain kit wins. The panels of a Christmas kit and a Halloween kit are identical; only the icing color, the candy and a few structural decisions change, and our haunted house guide carries the full swap table for turning one into the other. From scratch wins in one case: you want the tall, narrow tower, because kits ship a cottage shape, not a tower.
Converting also wins on availability. Halloween kits sell out by the middle of October, and by December very little themed is left on any shelf. A plain kit that holds together plus a bottle of black gel is a route that exists in every week of the season.
The hill and the moon are the exception to “no baking.” A converted kit still needs both, and you have two ways to get them. Bake a small batch of stiff dough, roll it a quarter inch thick, and cut the two shapes flat. Or cut them from corrugated card and cover them in black icing, which is exactly the method on our cardboard gingerbread house page, and it costs nothing and cannot crack.
Picture a parent on October 20th who finds every Halloween kit in three stores gone. A plain Christmas kit, one bottle of black gel, a quarter batch of dough for the hill and moon, and the house is on the table by Sunday evening. Nobody looking at it will know which box it came in.
3. Build the Lean Without the Roof Fighting You
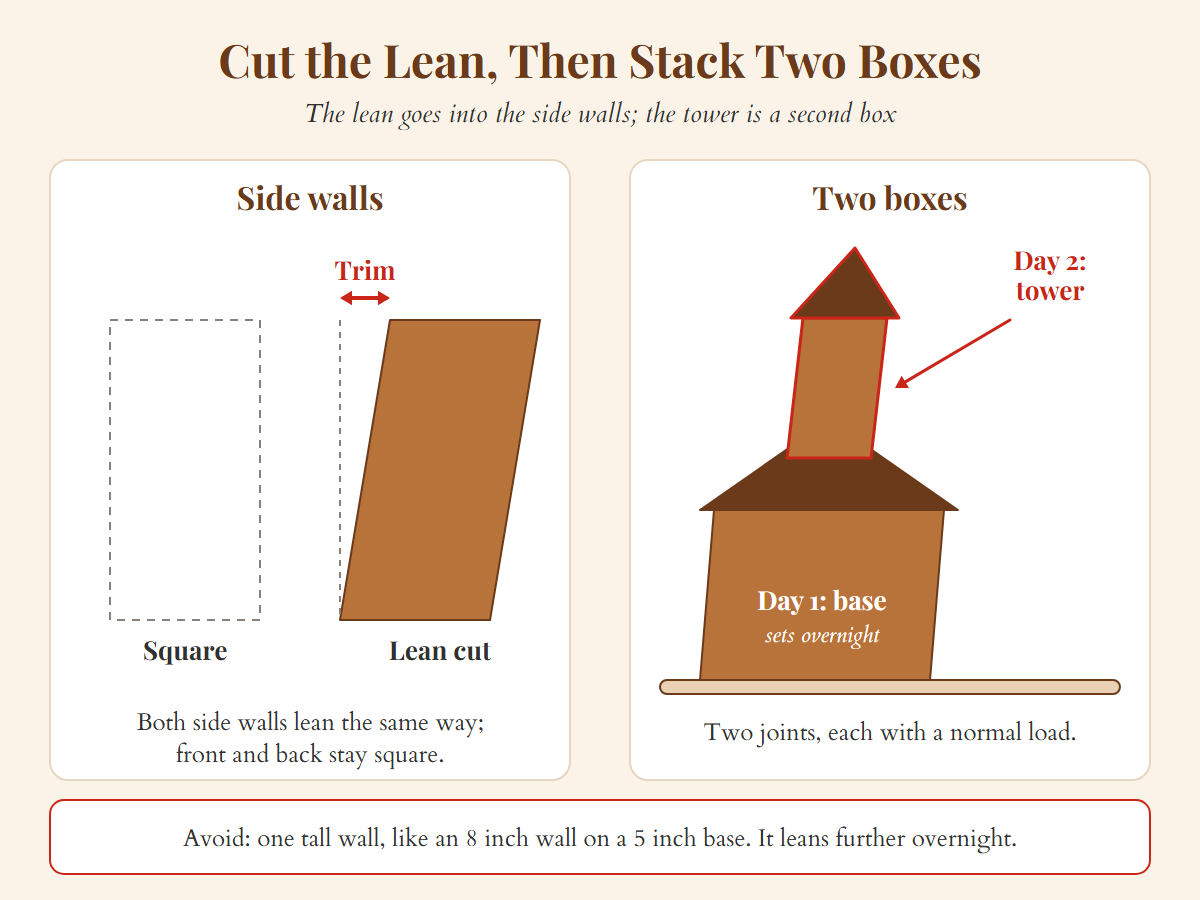
Cut the lean into the walls, not into the assembly. The two side walls become parallelograms, both leaning the same way by the same amount, while the front and back stay rectangles. The house then stands up leaning with no joint under strain. Tilt a square house during assembly instead and you get a structure fighting itself, which usually loses at the roof before the icing has set. Our Grinch house guide covers this same cut for the Whoville lean, and the geometry is identical here.
The part that is different about this build is the tower. The film’s house is tall and narrow, and the temptation is to bake one tall wall. Do not. Doubling the height of a wall adds nothing to the joint at its base, so the same seam carries far more leverage, and a tall single wall leans further overnight than you cut it, then keeps going. Our gingerbread house layouts section calls this a layout failure wearing an icing failure’s clothes, and it is the single most common way this particular house dies.
Build it as two boxes instead. The base house at ordinary kit height goes up first and sets overnight. The tower is a second, smaller box, glued on top of the base roof the next day. Two joints, each carrying a normal load, in place of one tall wall carrying a tall roof. It also happens to look more like the film, whose house is a stack of mismatched stories rather than one straight tower.
Say a family cuts an eight inch wall on a five inch wide base and stands it in one go. It looks right at nine in the evening. By morning it has leaned a further finger’s width, the roof has slid, and the front joint has opened. Nothing about the icing changed overnight. The wall was simply taller than the joint could argue with.
How much lean is enough? Less than you think. A few degrees reads as crooked from across the room, because a straight house is what the eye expects and any departure from it is loud. The planner below turns a lean angle into the exact trim to take off each side wall and warns you when the proportions are heading for the overnight collapse.
The Lean Planner
Enter the wall you are cutting and how crooked you want the house. It returns the trim that puts the lean into the panels, and it tells you when the proportions are heading for the overnight collapse.
What to cut
Geometry only. The trim is the wall height times the tangent of the lean, and the tower advice follows the same joint leverage rule as any two storey house. Bake to a firm panel before trusting any of it.
If you are working from a kit, the cheapest version is the one on our haunted house page: trim two or three millimeters off the bottom of one wall before assembly and the whole house sits out of true. To trim a proper parallelogram on kit panels, use a serrated knife with the panel flat on a board, go gently, and accept that you may lose one. Kit panels are brittle, and buying a second box is cheaper than the argument.
4. Spiral Hill: Cut It Flat, Bake It on a Skewer, Stand It Last
The hill is a flat cookie, not a sculpture. Draw the curl on paper, cut it from dough rolled a quarter inch thick, and lay a wooden skewer into the dough along the spine before it goes in the oven. The skewer bakes in, and it is what you push into a mound of stiff royal icing behind the house, or into a block of florist's foam under the board, to stand the hill up. Decorators have used the skewer method for years and it is the one part of the expert tutorials worth copying exactly.
Two rules keep it in one piece. First, the curl is a cantilever: everything past the neck hangs off the neck. Keep the neck wide and the hook short and the shape has the best chance of surviving being lifted; a thin neck under a long hook is the piece most likely to snap. Second, re-cut the outline while the cookie is still hot on the tray, because gingerbread only cuts clean while it is hot, and a curl that has spread in the oven loses the very outline it exists for.
Decorate it flat, before it stands. Flood the whole face black and let it dry overnight, then pipe the white spiral line up the hill on the dry black. Stand it last, after the house is finished, so nothing knocks it while you are working.
Picture lifting the hill off the tray at ten minutes, still warm, by its hook. The neck folds, the hook comes away in your fingers, and the base stays on the parchment. Cooled fully on the tray and lifted from underneath with a spatula, the same cookie comes off whole. The hill is the piece most likely to break on this build, and it breaks in the hand, not in the oven.
If you would rather not bake at all, cut the hill from corrugated card and ice it black. It is lighter, it will not crack, and from three feet away nobody can tell.
5. The Moon
The moon is a round white disc, and the only thing that matters about it is size. Make it large, somewhere around a third the width of the house as a starting point, because the film's moon is enormous and a small one reads as a dinner plate. Cut a round cookie and flood it white, or skip the oven and use a large white chocolate disc, a round white candy melt, or a circle of white card.
Position is the whole effect. The moon stands behind the hill so that the curl crosses it, and that single overlap is the frame everyone recognizes. Stand it on its own skewer or a wedge of icing a couple of inches behind the hill. If you want it to glow, a battery tea light set on the board behind the moon lights the edges. Never a real candle near gingerbread and card.
6. Black First, White Last, Purple Only Where It Shows
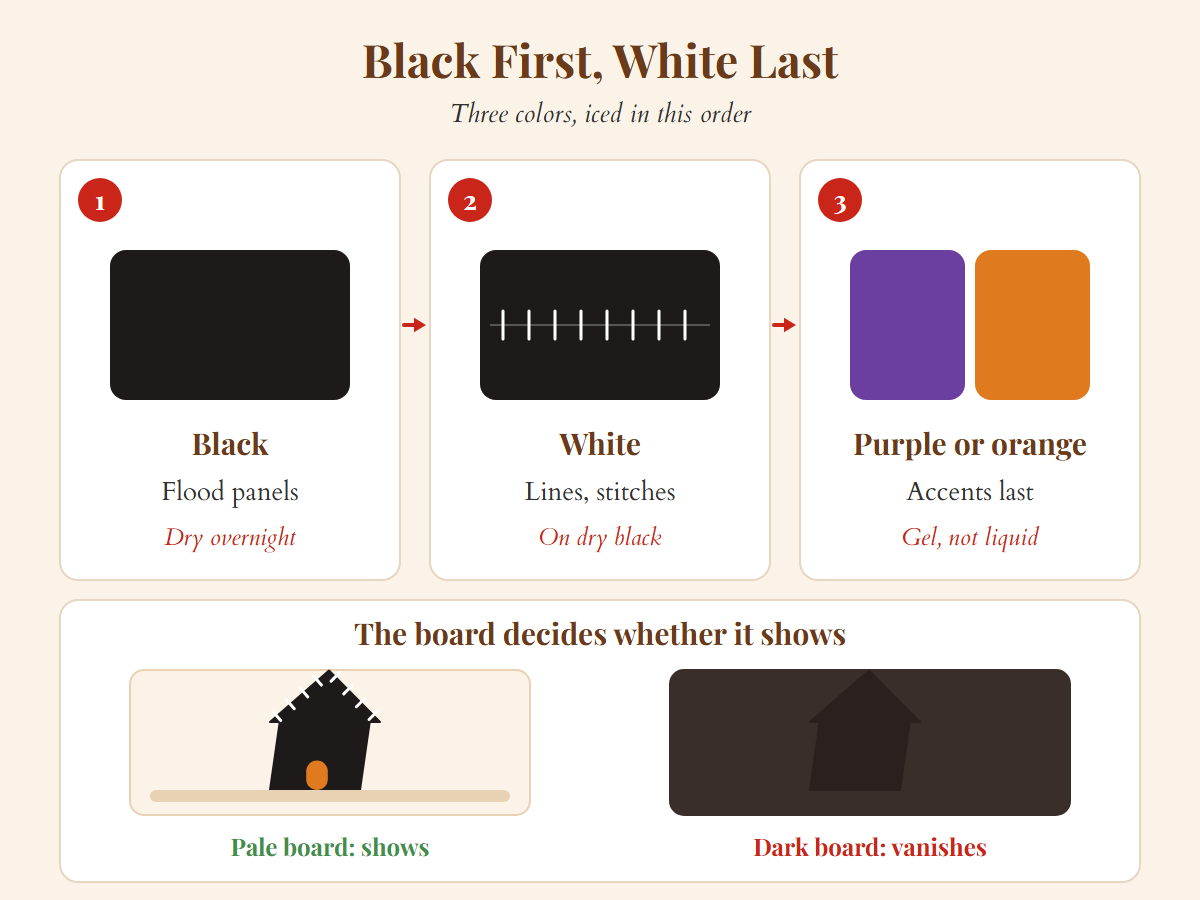
Ice in this order and the colors stay clean: black flood on the flat panels, dry overnight; white lines and stitches on the dry black; purple or orange accents last. Break the order and the black wins every time, because a dark icing bleeds into a light one while either is wet, and white piped onto wet black turns gray by morning.
Black icing that does not taste bitter is a solved problem on this site. Dissolve black cocoa into a paste and stir that in before you add any gel, and you use a fraction of the coloring. Our Halloween gingerbread cookies page covers the method and why black is the easy color on gingerbread while white is the hard one, so the white stitches here need two thin coats rather than one thick one.
Purple is a gel color, never a liquid, because liquid coloring is mostly water and enough of it to reach a deep purple thins royal icing until it will not hold a line. If you only have pink and blue gels, purple mixes from them, pink first and blue a drop at a time. Whatever you buy, the FDA regulates which color additives may be used in food and how each one is declared on the label, so the bottle tells you what is in it.
One decision decides whether the finished house is visible at all. A black house on a black or dark board disappears. Set it on a pale board, white icing or plain cream, and the silhouette you worked for shows against it. It is an easy mistake to make and it costs nothing to avoid.
If you are building with children under about six, skip black icing entirely. It stains hands, mouths and tablecloths, and a four year old cannot pipe a stitch. Use a purple wash instead, let them spread it with the back of a spoon, and give them candy eyeballs to press into the windows. If the builders are older, black is the color that makes the house, and it is worth the stained fingers.
7. Stitch Every Seam You Can See
Pipe a short white stitch line, in dashes rather than a continuous line, along every joint, crack and edge that shows. Much of the film's world is sewn and patched, so a stitched seam reads as a design choice and a crooked, unstitched one reads as a mistake. Adopt the rule and no joint on the house has to be neat.
This is the single technique that makes the build forgiving. A wall that met its neighbor a millimeter off, a roof panel that sat slightly proud, a joint where the icing squeezed out: stitch across it and it becomes the point. Use piping consistency icing, a small round tip, and pipe onto dry black. Each stitch is two short strokes crossing the seam, not a line along it, with a gap between stitches.
Say a roof panel cracks in half as you lift it off the tray, which happens more often than anyone admits. Glue the two halves to the house separately, leave the crack showing, and run stitches across it from end to end. The crack is now a patch, the patch is now the theme, and the person who broke it will point it out as their favorite part.
The same rule fixes the chimney, the door frame and the base of the tower. Anywhere two pieces meet is a place to stitch, and the more stitches the house carries, the more it reads as the film and the less any of the joints matter.
8. Build It for Halloween, Re-Dress It for Christmas
The house is black and white. The yard is the holiday. In October the yard carries orange candy pumpkins, a candy corn path, crushed chocolate cookie soil and a bare pretzel tree. In December the same house gets sifted powdered sugar snow, white icing along the roof edges, a white icing wreath on the door and one red and white striped candy for the single Christmas note. The film itself is a Halloween town trying on Christmas, so the house looks correct in both, and it looks most like the film in the second.
The trick that makes the change take ten minutes is planning it in October. Do not glue yard pieces to the board. Set the pumpkins, the tree and the path onto the cookie soil so they lift off, and keep the board itself pale. In December the soil brushes away, the snow goes on, and the house never moves.
If you are building in October and want it to last to Christmas, bake it from a proper construction dough, keep it away from heat and steam, and treat it as a decoration rather than food. If you are building fresh in December, skip the pumpkins altogether and dress it in snow from the start, which also removes every orange from the shopping list.
A house built in mid October and re-dressed in December is on display for about ten weeks, which is well inside the decorative life of gingerbread; our guide to how long gingerbread lasts covers what changes over that time and how to store it between the two holidays. Nobody will be eating a house that has been iced black and sat out for two months, so build it to be looked at.
Picture a household that builds on October 18th, leaves it on the sideboard through Halloween, and on the first of December brushes the cookie soil into the bin, sifts sugar over the roof and swaps three pumpkins for one candy cane. The same house, fifteen minutes, and the guests at both parties think it was made for the occasion.
The dresser below gives you the shopping and swap list for whichever holiday you are building for, or for both.
The Two-Holiday Dresser
Tell it which holiday the house is for, who is building, and what you are starting from. It returns the icing colors, the yard, and the swap list for moving the same house from October to December.
Icing to make
Shapes and yard
The December swap
Decorating suggestions only. Check packaging for allergens before anything goes on a house children will eat, and keep hard candy and small parts away from under-fives.
9. Doing It With Young Children
Under about six, change the plan. Start from a house that arrives already built, use a purple wash rather than black, give them candy eyeballs and a spoon rather than a piping bag, and let the hill and the moon be flat cookies they decorate at the table while an adult does the standing up. A small child can own the moon completely, and it is the piece that matters least if it goes wrong.
The build also shrinks well. A mini gingerbread house in black and white with a hill the size of a playing card finishes before attention runs out, and three of them in a row along a windowsill do more for the film's look than one large house that never got its roof.
Questions People Ask About This Build
Is there a Nightmare Before Christmas gingerbread house kit?
Not a gingerbread one that we could find on sale. The products listed under that name are lighted ornaments and figurines. The route that works is a plain gingerbread kit, black icing, and a hill and moon you bake or cut from card.
Can you eat it?
Treat this one as a decoration. Black icing carries a lot of coloring, the house is usually on display for weeks, and the dough that survives a lean is not the dough that tastes best. If you want an edible version, keep the black to accents, use the eating dough from our sturdy gingerbread house recipe, and eat it inside the first week.
How do I make the hill stand up?
Bake a wooden skewer into it and push the skewer into a mound of stiff royal icing behind the house, or into a block of foam under the board. Stand it last, after everything else is dry.
How long does it take?
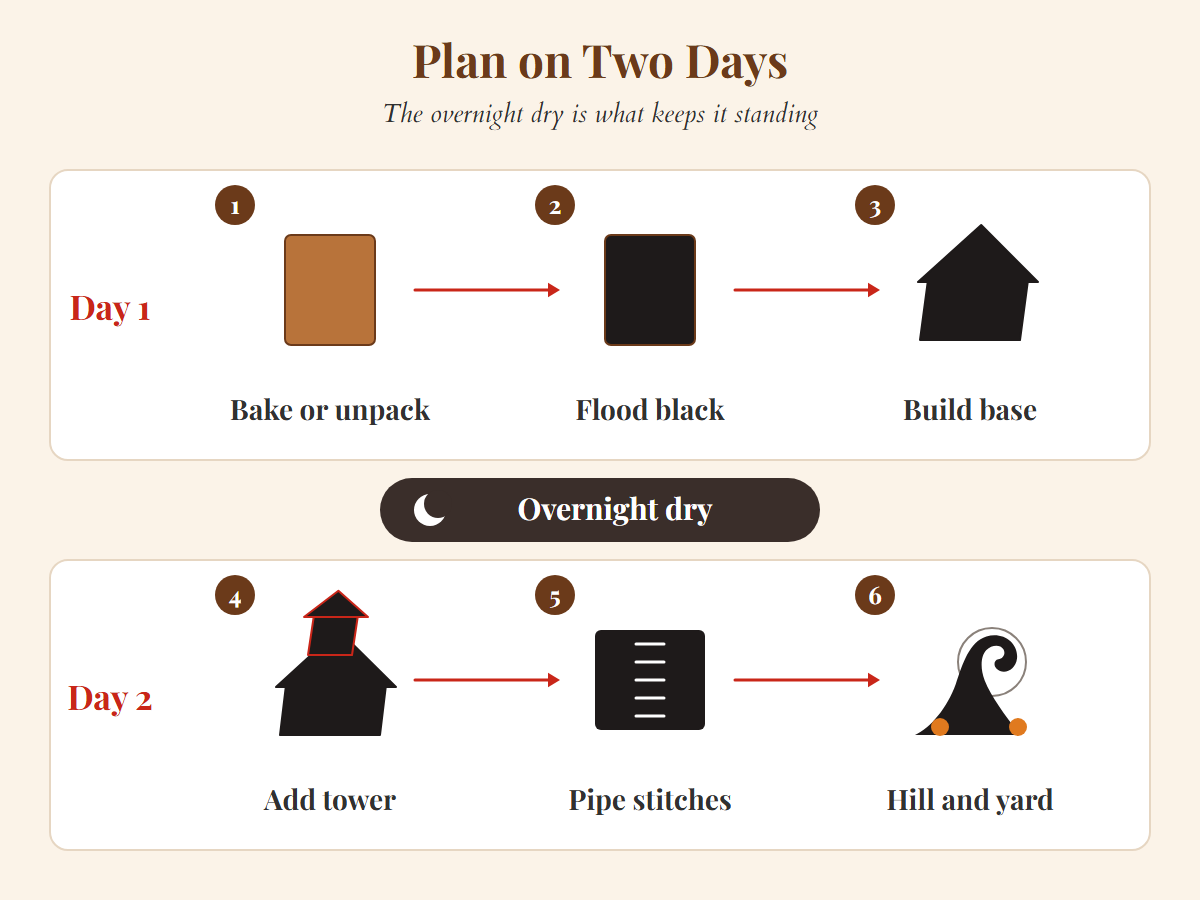
Plan on two days. One afternoon to bake or unpack, flood the panels black and assemble the base, an overnight dry, then a second session for the tower, the stitches, the hill and the yard. The two overnight dries are what keep it standing.
Build Your Nightmare Before Christmas House With Best Gingerbread Houses
Three shapes, two colors, one rule about seams. Get the silhouette right, ice in the right order, and stitch every joint you can see, and the rest of this build is an ordinary gingerbread house that happens to lean.
If you are starting from a box, the starting point matters, so our guide to the best gingerbread house kits rates all 31 we have reviewed on how well they hold together, which is the quality that survives being iced black and cut crooked.