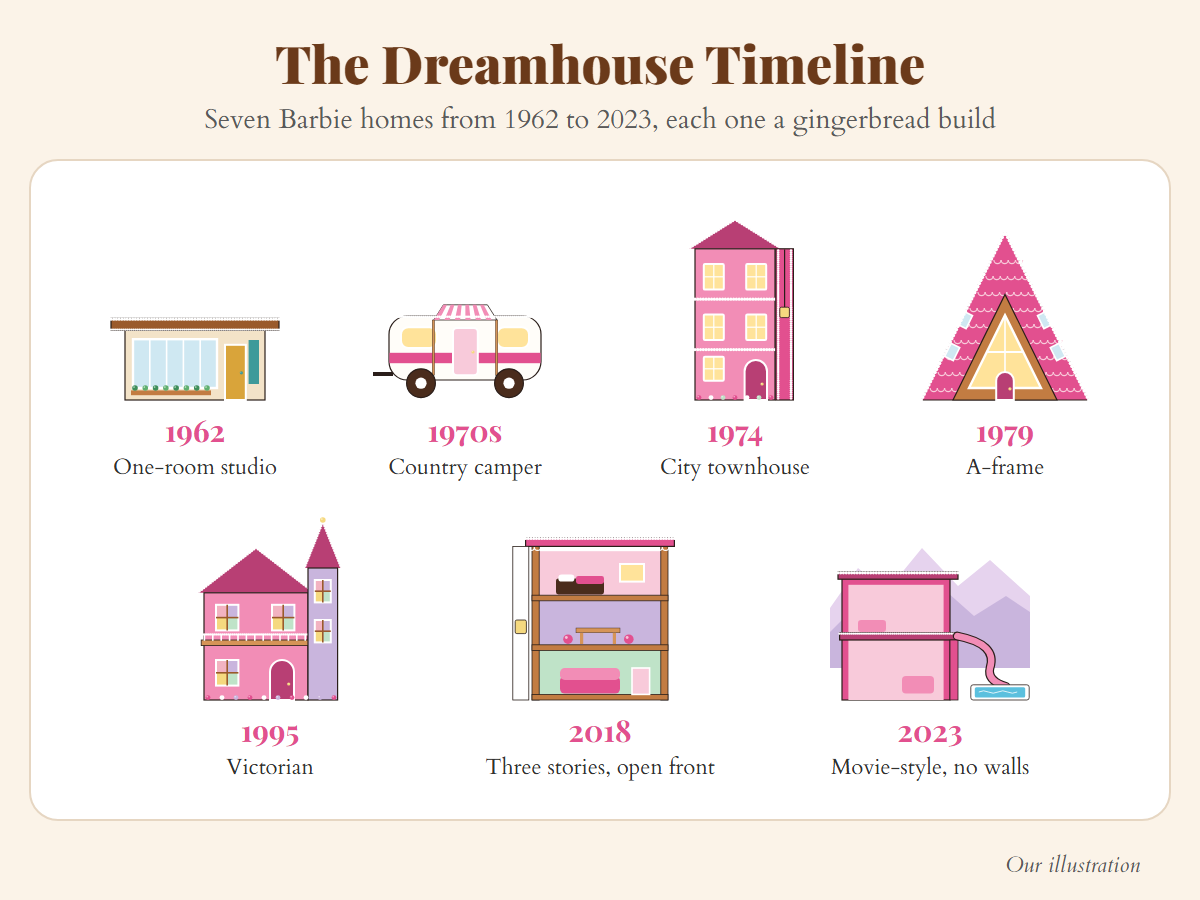
Barbie’s first Dreamhouse was cardboard. The 1962 house kept by The Henry Ford is made of cardboard and metal, and it folds shut into a case just 8 inches wide. Later Dreamhouses grew to three stories, hid under an A-frame roof, went Victorian and finally got a pool with a slide. Every one of them makes a great Barbie gingerbread house.
Each house reads as Barbie from two or three signature details, not from a doll or a logo. Copy those details on a plain kit or one of our free templates, and people know the house from across the room. This guide covers both the bright pink gingerbread house everyone pictures and the older shapes most people have forgotten.
If you are planning a Thanksgiving weekend build with kids, start with the camper or the A-frame. If you grew up with one of these houses, find your decade and build it back. And if you are entering a gingerbread house competition, the last three are the showpieces.
First comes the free template, then a pink icing method that stays pink. Then come seven houses in order from 1962 to the 2023 movie, each with its details, a difficulty call, its template pages and full build steps. A picker, a build planner and a note on the store-bought Barbie kit close it out. Every house starts with the same bowl of pink icing, so let’s mix that first.
Free Printable Barbie Gingerbread House Template
Every house below has its own pieces in one free template. Download the PDF: 16 US Letter pages, drawn at true size. Page 1 is an index, and each house starts on a new page, so you print only the pages for the house you are building.
Print at Actual Size or 100 percent, never Fit to Page, and put a ruler on the red 1 inch bar at the bottom of the page before you cut. If the bar measures an inch, every piece is right. Solid black lines are cuts, red dashes are openings you cut out, and grey dots are guides you never cut. Every piece is drawn for dough rolled 1/4 inch thick.
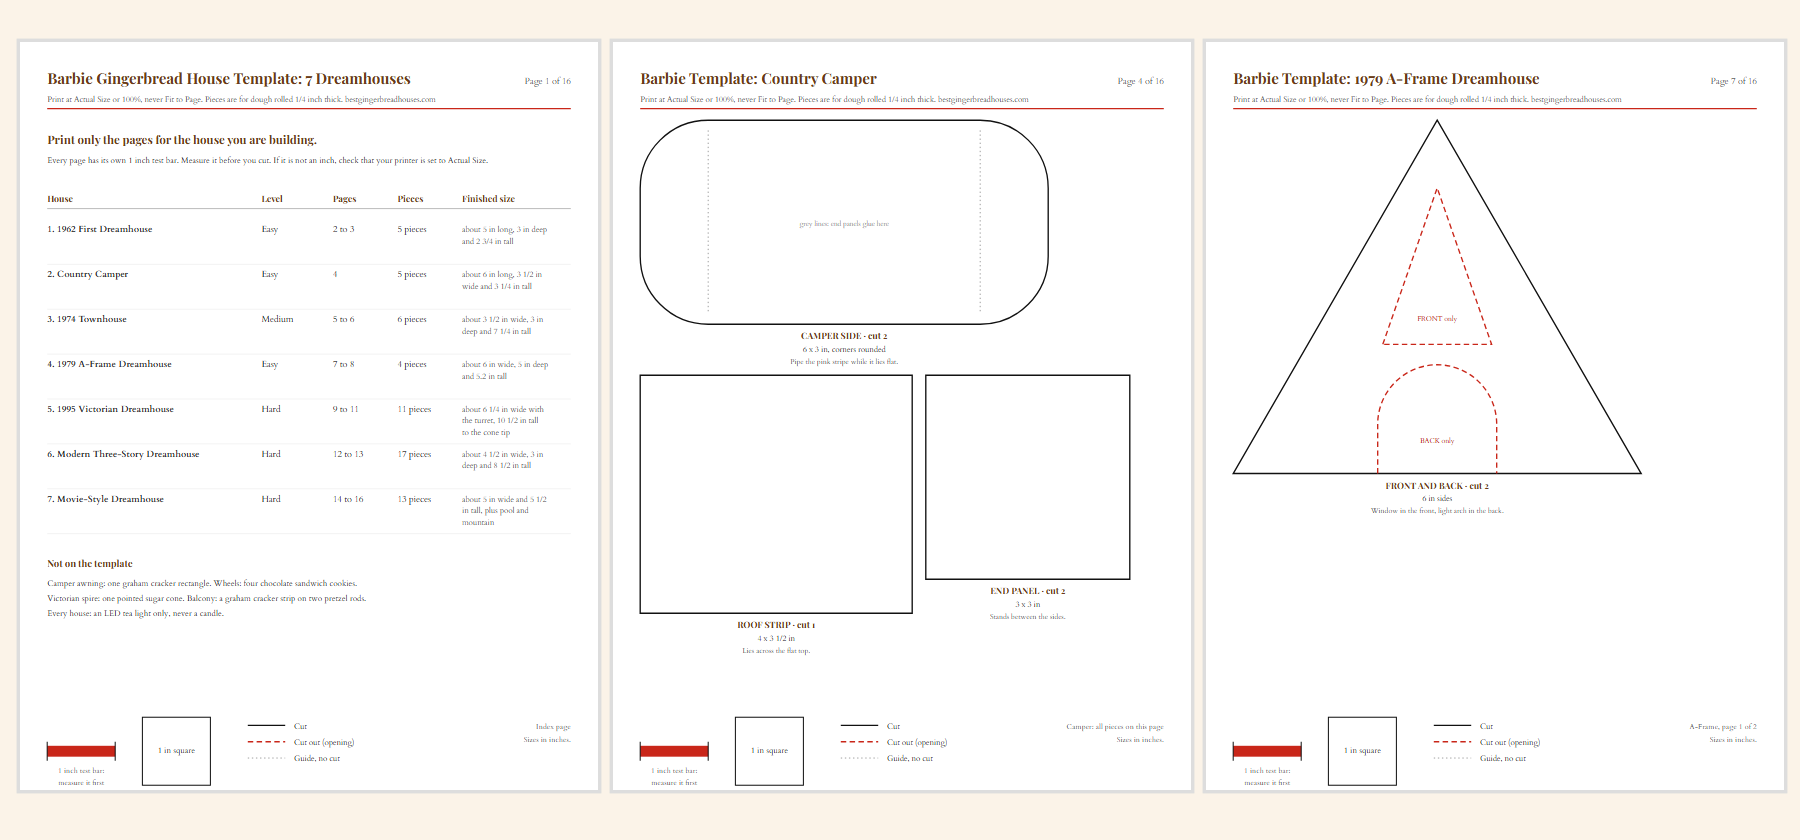
| House | Pages | Pieces | Level |
|---|---|---|---|
| 1962 First Dreamhouse | 2 and 3 | 5 | Easy |
| Country Camper | 4 | 5 | Easy |
| 1974 Townhouse | 5 and 6 | 6 | Medium |
| 1979 A-Frame | 7 and 8 | 4 | Easy |
| 1995 Victorian | 9 to 11 | 11 | Hard |
| Modern Three-Story | 12 and 13 | 17 | Hard |
| Movie-Style | 14 to 16 | 13 | Hard |
Want a classic gabled house instead? Our true-size house templates print the same way.
How to Mix Barbie Pink Icing That Stays Pink
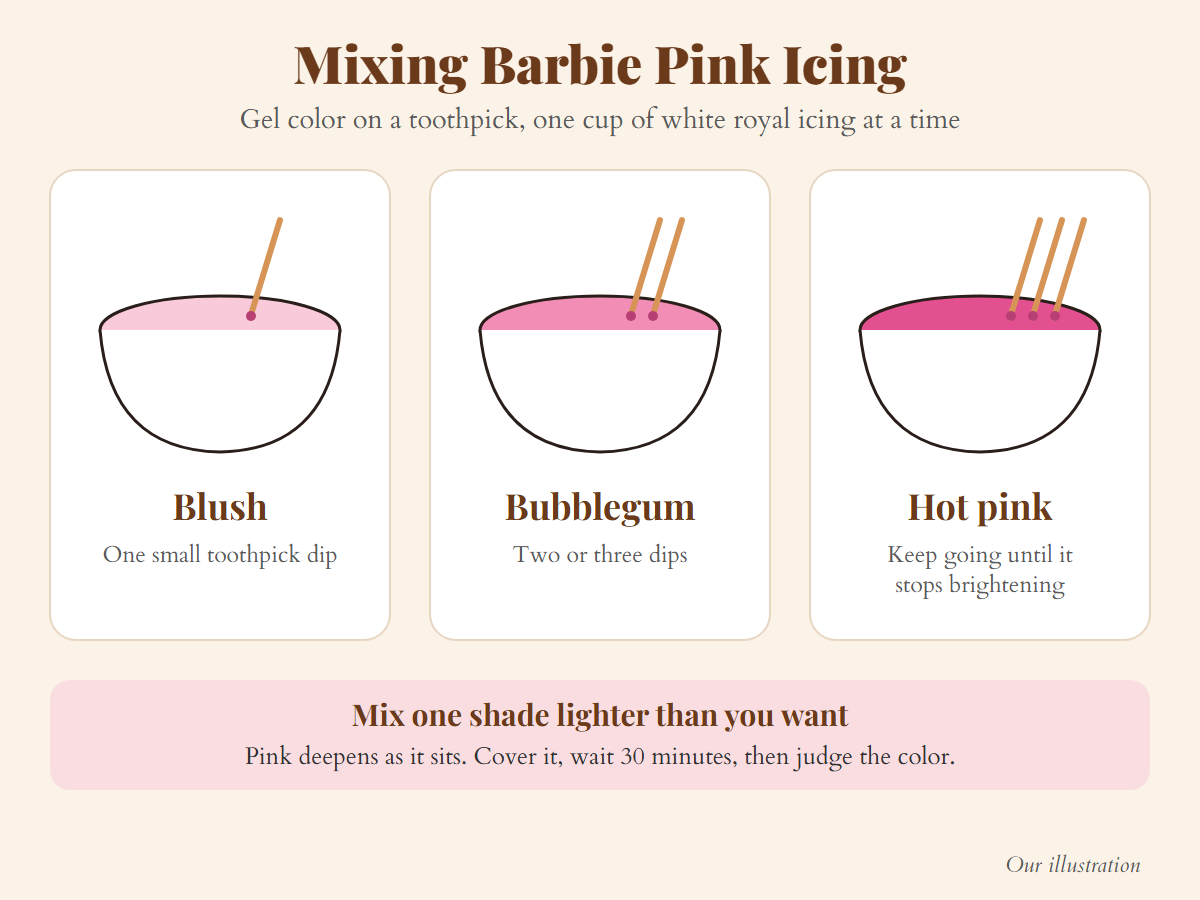
A pink gingerbread house lives or dies on its icing. Tint it with gel food coloring added on a toothpick, never liquid color. Gel is concentrated, so it colors the icing without thinning it, while liquid color waters the icing down long before it gets bright, and thin icing will not hold a wall or a piped line.
Start with a batch of stiff white royal icing and color one cup at a time. One toothpick dip makes blush, two or three make bubblegum, and hot pink takes more, a dip at a time, until the color stops getting brighter. Mix each batch one shade lighter than you want. Pink deepens as it sits, so cover the bowl, wait 30 minutes and judge it then.
Two more habits keep it pink: let each pink section crust over before you pipe white beside it, or the colors bleed, and keep the finished house out of a sunny window, because pinks can fade in strong light.
Picture a ten-year-old who wants the whole house hot pink, right now. She squeezes in liquid color until the bowl looks perfect, and the icing slides down the wall in a pink puddle. Switch to gel, wait the 30 minutes, and the same color holds a crisp ridge.
1. The 1962 First Dreamhouse
Barbie’s first Dreamhouse was a one-room studio, and The Henry Ford’s record describes sleek, modern furniture and a combined TV and stereo console. In gingerbread it reads as 1962 from three details: a long, low box, a flat roof that overhangs the front, and one whole wall of windows.
The trick is the window wall: cut one big opening in the front wall, fill it with crushed clear hard candy and bake it into glass. White lines piped across the glass make it mid-century. We ice this one ivory with a mustard door and a teal panel, a nod to mid-century style, so it is the one house on the list that is not pink.
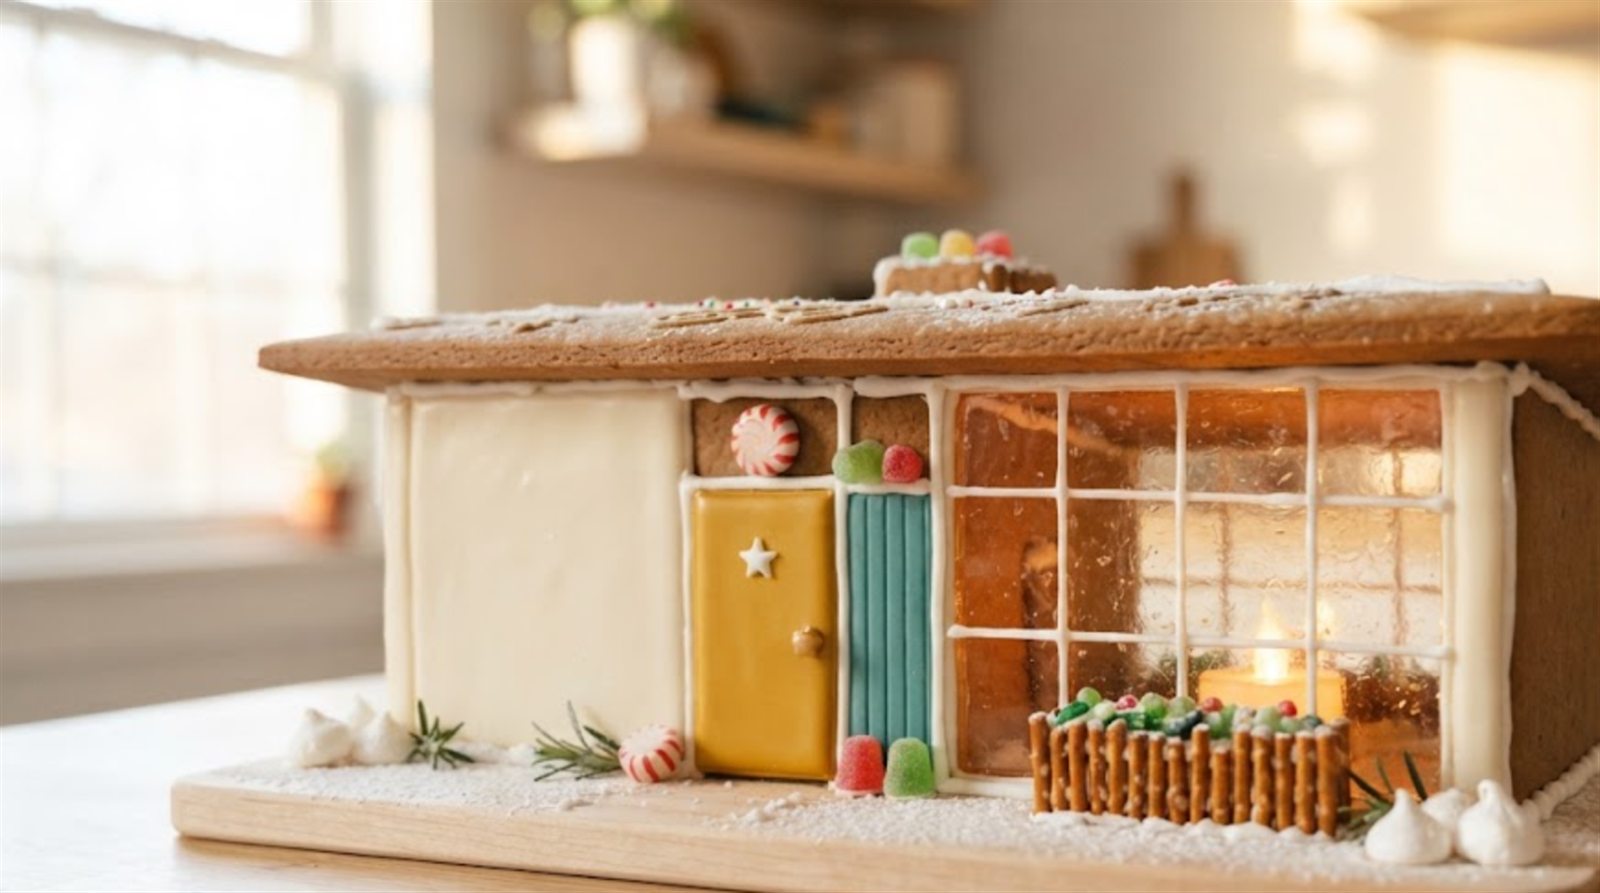
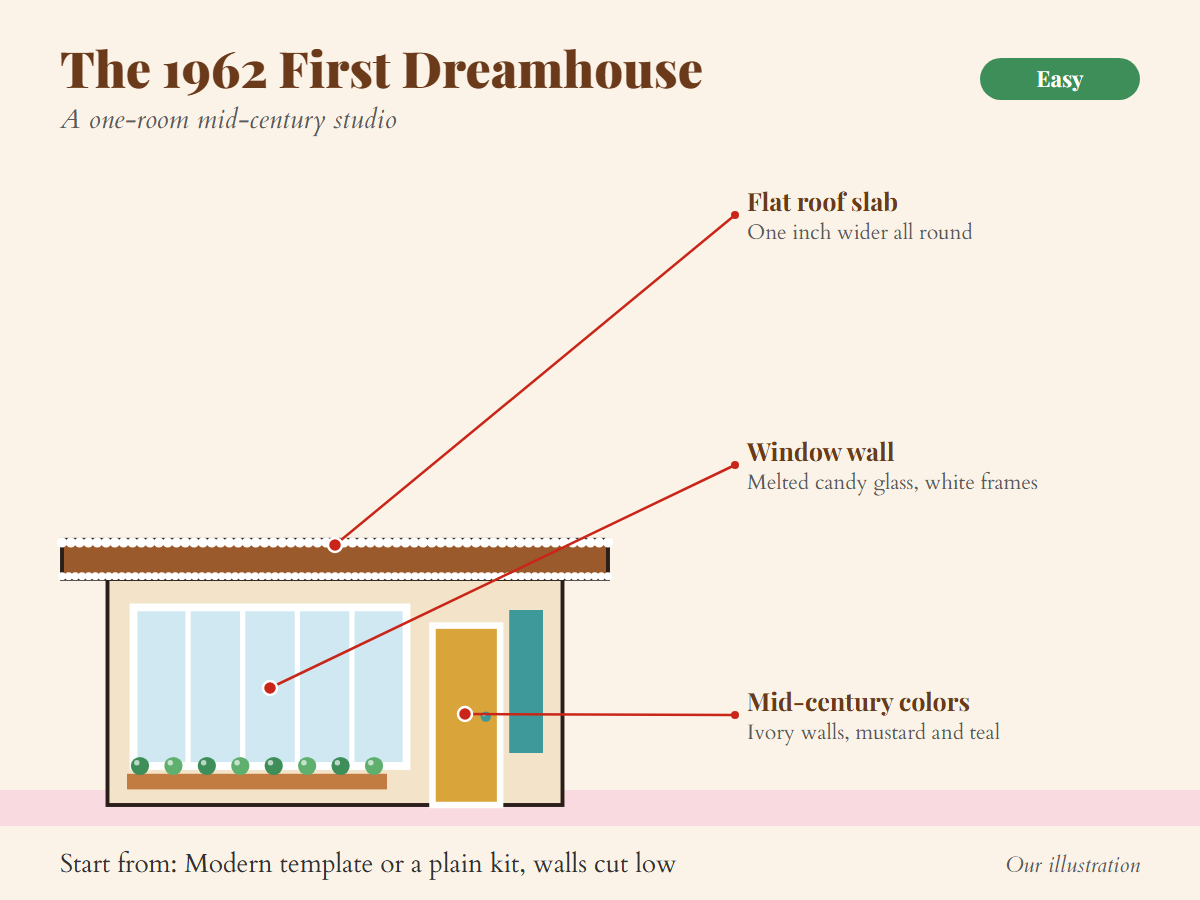
Difficulty: Easy. Start from: pages 2 and 3 of the free Barbie template: front, back, two sides and the flat roof slab.
How to build it, step by step
Time: About 2 hours, plus cooling.
You need:
- Template pages 2 and 3, or a plain kit with the walls cut low
- The flat roof slab from page 2
- Crushed clear or pale blue hard candy
- Ivory royal icing: white with a tiny drop of brown or yellow
- Mustard and teal royal icing
- White royal icing in a bag with a small round tip
- Pretzel sticks, green candies and a battery LED tea light
- Cut the front, back, two sides and the flat roof slab from the template. Cut out the window wall in the front and the light arch in the back.
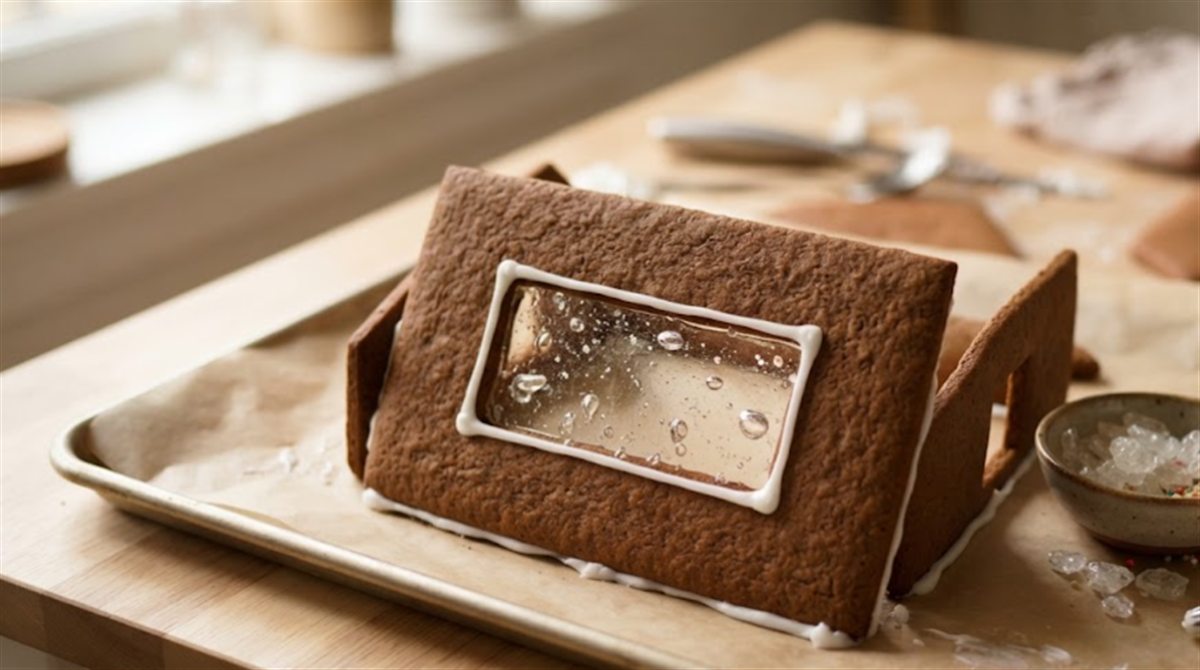
- Bake. Fill the window opening with crushed candy and bake a few minutes more, until it melts flat. Let the panel cool on the tray before you move it.

Step 2: crushed candy melted into the window opening, cooling on the tray. AI rendering. - Flood the walls ivory while they lie flat, working around the window.
- Pipe thin white lines down the glass about an inch apart, then pipe a mustard door and a teal panel beside it.
- Assemble the four walls and let them set for an hour.
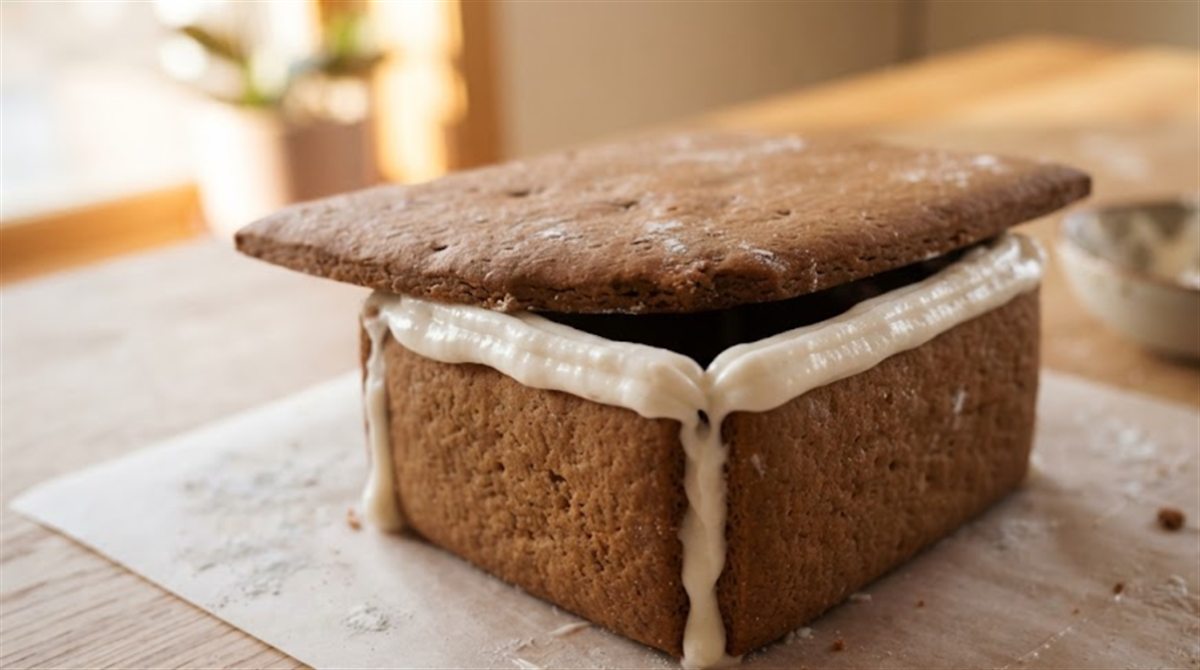
- Pipe a thick ring of stiff icing along the top of the walls and lower the roof slab on, with the extra overhang at the front.
Step 6: the flat roof slab going onto a thick ring of icing. AI rendering. - Pipe a white line along the roof edge and set green candies in a pretzel planter under the window.
If it goes wrong: If the roof slab rocks, the wall tops are uneven. Lift it off, rub the high edges level on a fine grater and set it back on fresh icing.
Tip: Put a battery LED tea light inside. A glass wall glows more than any other house on this list.
2. The Country Camper
Barbie has had a camper since the early 1970s, and it is the friendliest shape on this list. It reads as a camper from three details: rounded corners, a bold stripe down the side and a striped awning over the door. Round cookie wheels finish it.
The rounded corners are the whole trick, and the template already has them drawn. Cut them, and the box turns into a trailer. Pipe the hot pink stripe while the wall lies flat, so it stays level.
Picture a seven-year-old in charge of the wheels. Chocolate sandwich cookies are already the right shape, and pressing four of them on is a job small hands finish in two minutes. That is why the camper is the best first Barbie house for young kids.
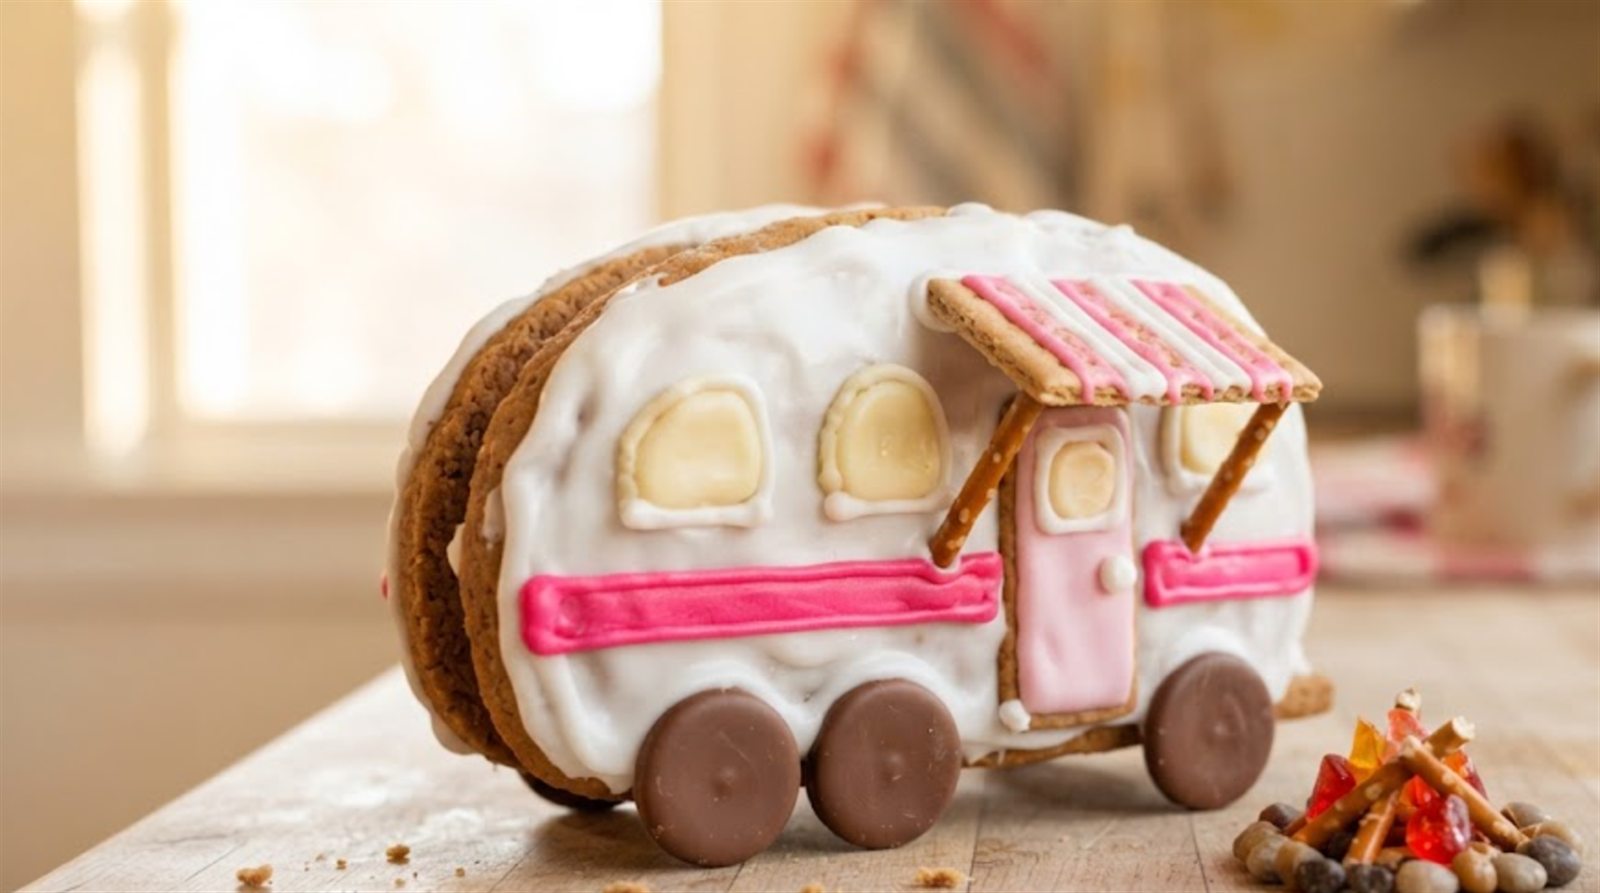
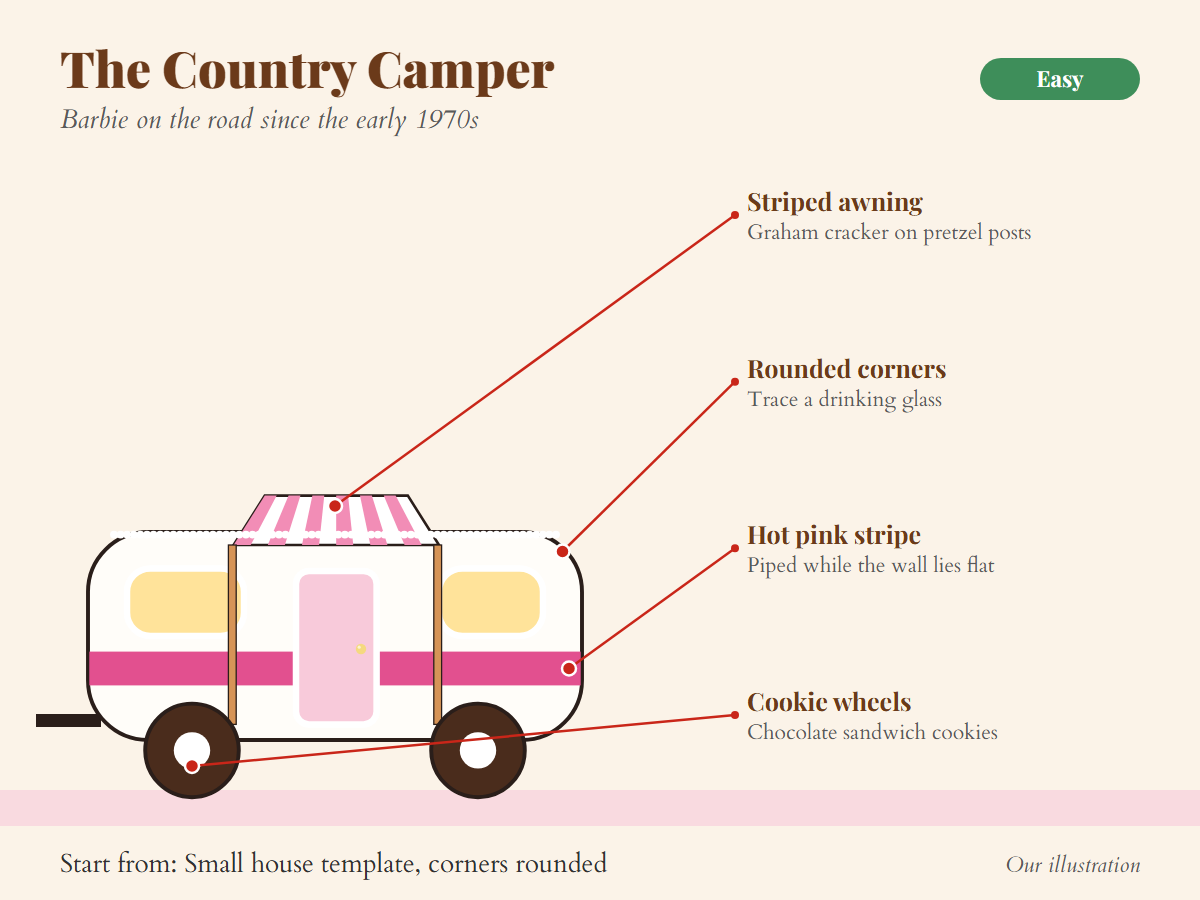
Difficulty: Easy. Start from: page 4 of the free Barbie template, with the rounded side panels already drawn.
How to build it, step by step
Time: About 2 hours.
You need:
- Template page 4: two rounded side panels 6 inches long and 3 inches tall, two end panels and one roof strip
- White and hot pink royal icing, each in a bag with a small round tip
- Pale yellow icing for the windows
- Four chocolate sandwich cookies
- One graham cracker rectangle and two pretzel rods for the awning
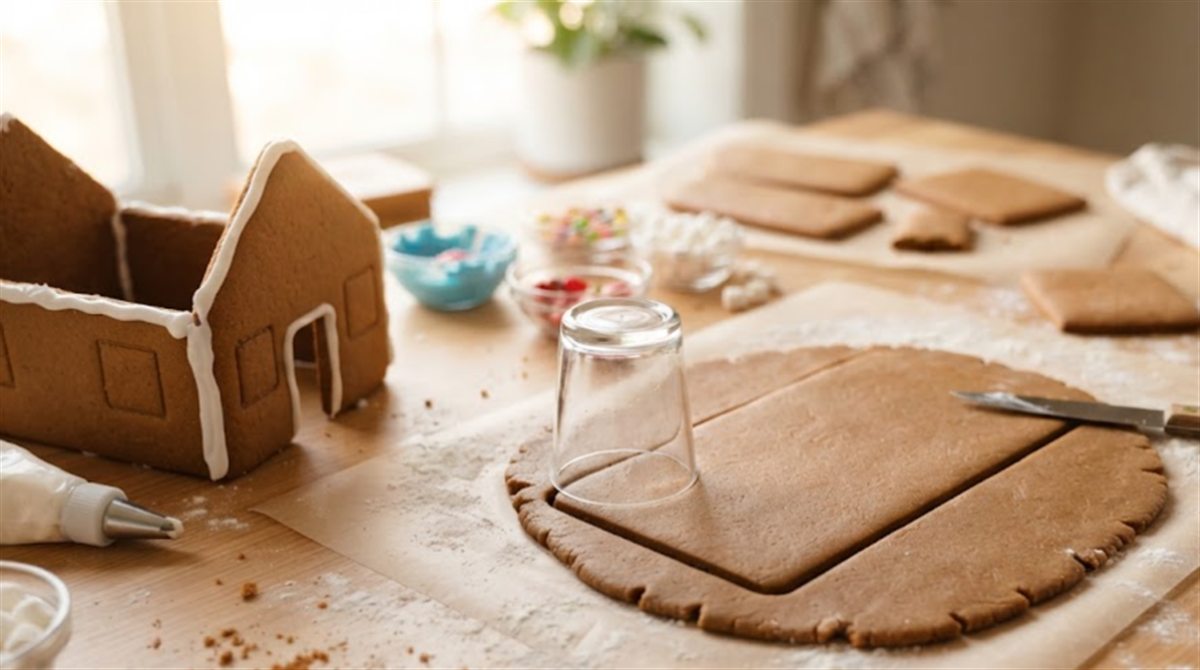
- Cut the two side panels, two end panels and the roof strip from the template, then bake. No printer? Trace a drinking glass at each corner of a 6 by 3 inch rectangle.
Step 1: rounded corners traced around a drinking glass. AI rendering. - Flood the sides white and pipe a wide hot pink stripe across the lower third while they lie flat. Let it crust.
- Pipe rounded windows and fill them with pale yellow icing, then pipe a door.
- Assemble the sides and ends, with the ends on the grey guide lines, and lay the roof strip on top. Fill the small gaps at the rounded corners with white icing and smooth them with a damp finger.
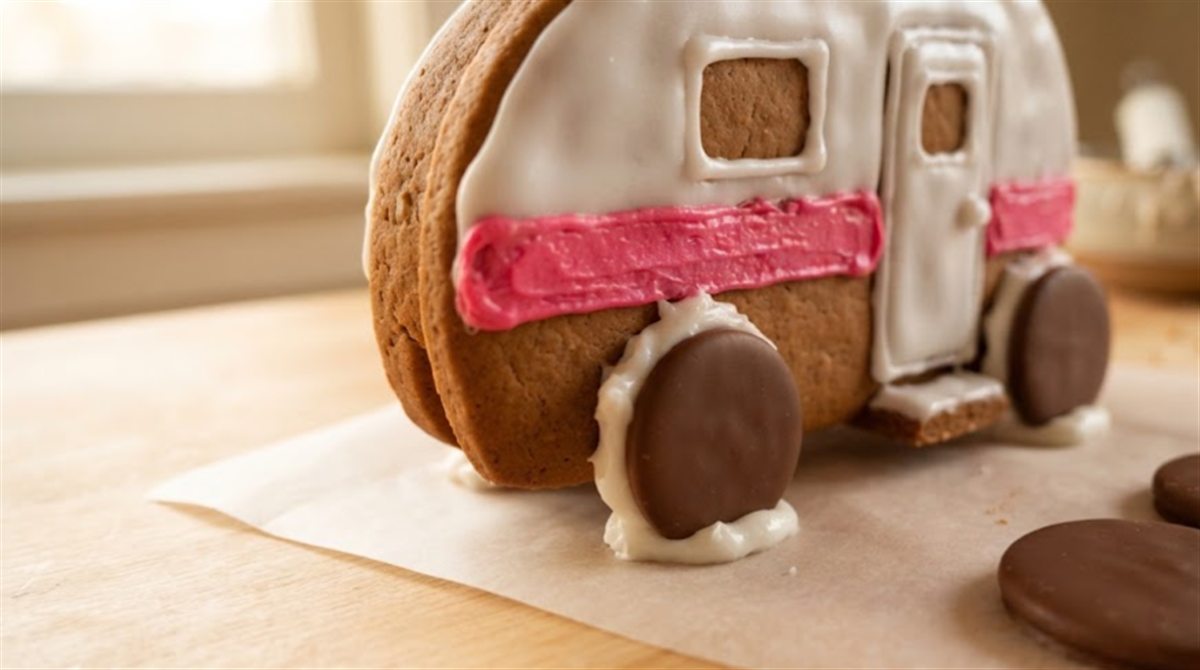
- Glue on the wheels with stiff icing, two per side, and hold each one for a minute.
Step 5: cookie wheels glued on with stiff icing. AI rendering. - Pipe pink and white stripes on the graham cracker and let it dry flat. Glue it above the door and prop it on the two pretzel rods.
If it goes wrong: If a wheel slides, the icing is too soft. Push a toothpick through the wheel into the wall to hold it until the icing sets.
Tip: Build a little campsite on the board, with a pretzel-stick campfire and red and orange candies for flames. Never a real flame.
3. The 1974 Townhouse
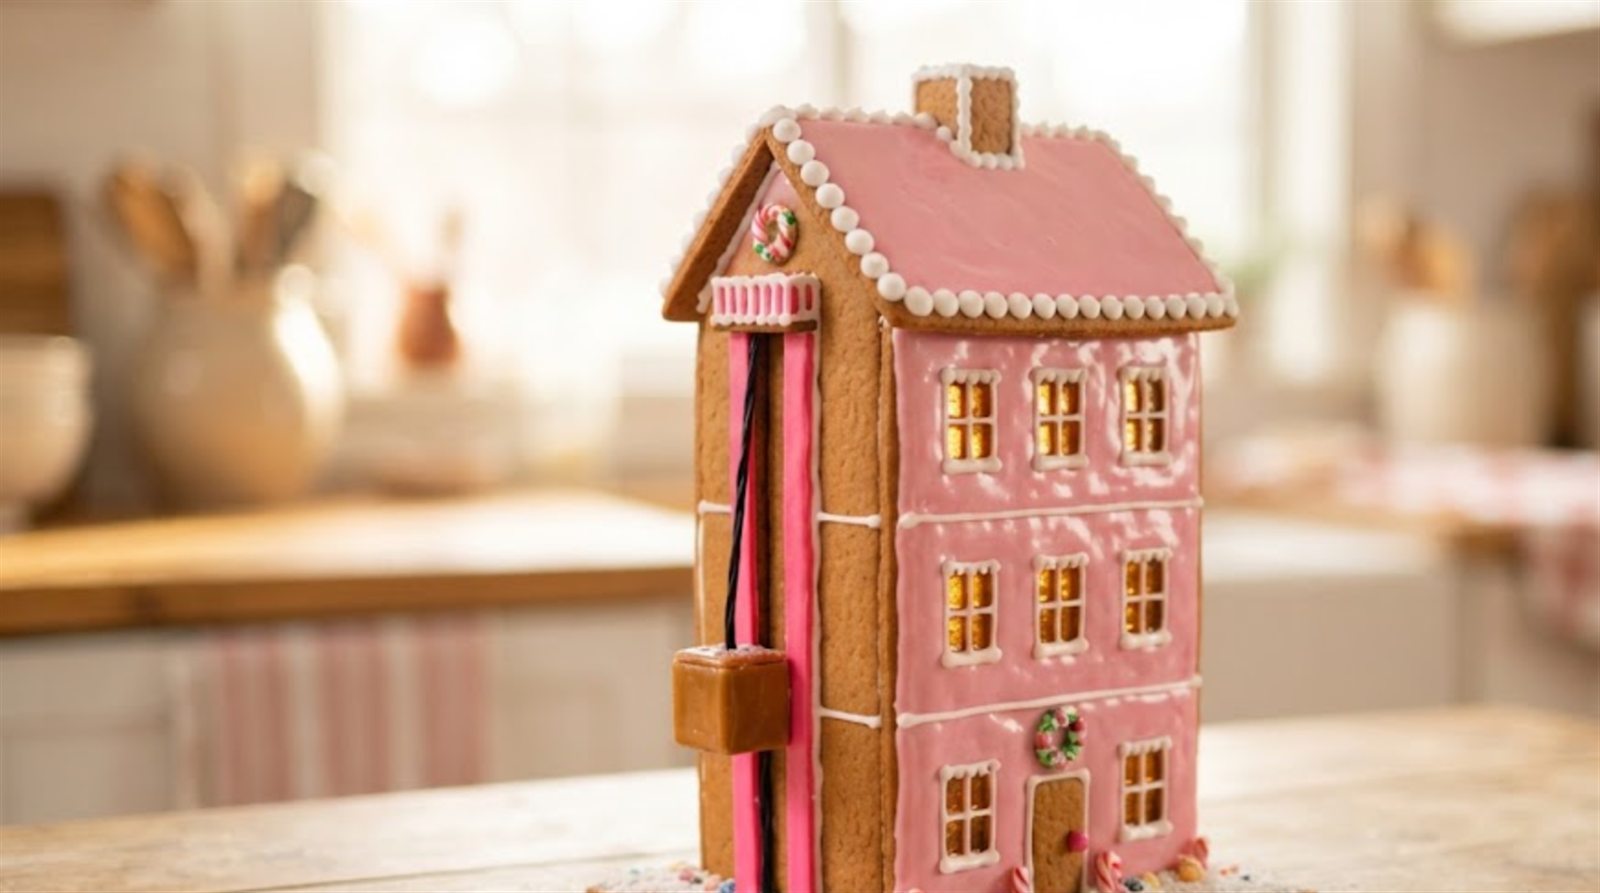
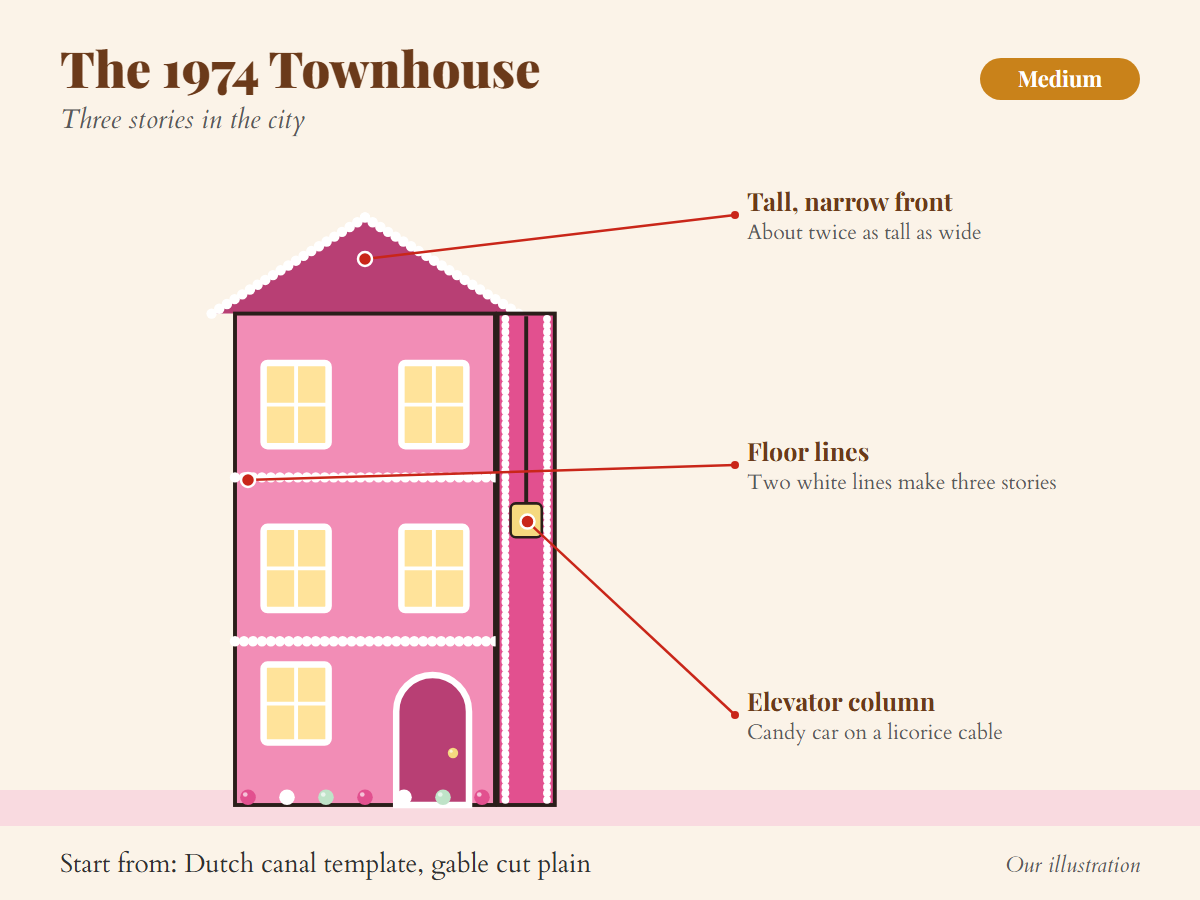
In 1974 the Dreamhouse moved to the city as a three-story townhouse with six rooms. The shape came back in pink in 2008, and the 2009 version added a pull-string elevator. It reads as a townhouse from three details: a tall, narrow front, two white floor lines that split it into three stories, and an elevator column up one side.
Height is the risk, because a tall, thin wall bows when the dough is thin, so roll it a little thicker than usual and let the iced front dry overnight before you assemble.
Difficulty: Medium. Start from: pages 5 and 6 of the free Barbie template, with the plain point and all six windows drawn.
How to build it, step by step
Time: About 4 hours, plus overnight drying.
You need:
- Template pages 5 and 6: a front and back about twice as tall as they are wide, two sides and two roof panels
- Bubblegum and hot pink royal icing
- White royal icing in a bag with a small round tip
- Crushed yellow hard candy for the windows
- A square caramel or chocolate for the elevator car
- A strand of black licorice lace
- Two cans for propping
- Roll the dough a full 1/4 inch thick for walls this tall. Cut the front and back with their three rows of windows, plus the sides and the two roof panels.
- Bake, melt crushed candy into the window holes and let the panels cool on the tray.
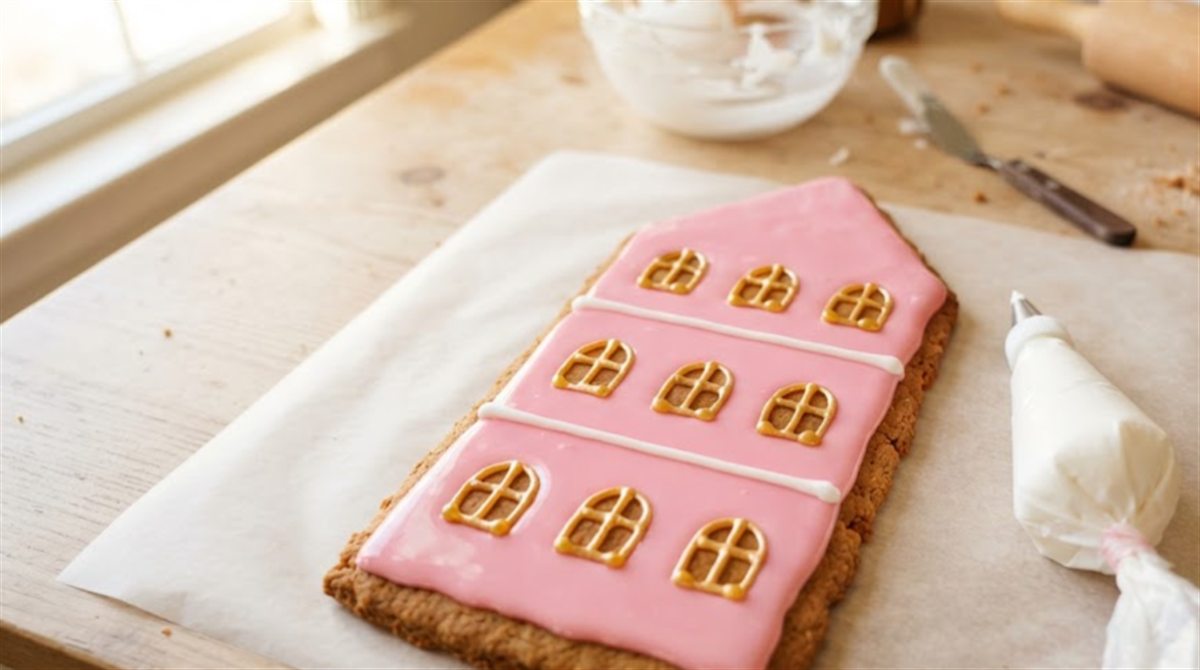
- Flood the front bubblegum around the windows and let it dry flat overnight.
- Pipe two white floor lines across the front, one between each row of windows. Those two lines are what make it read as three stories.
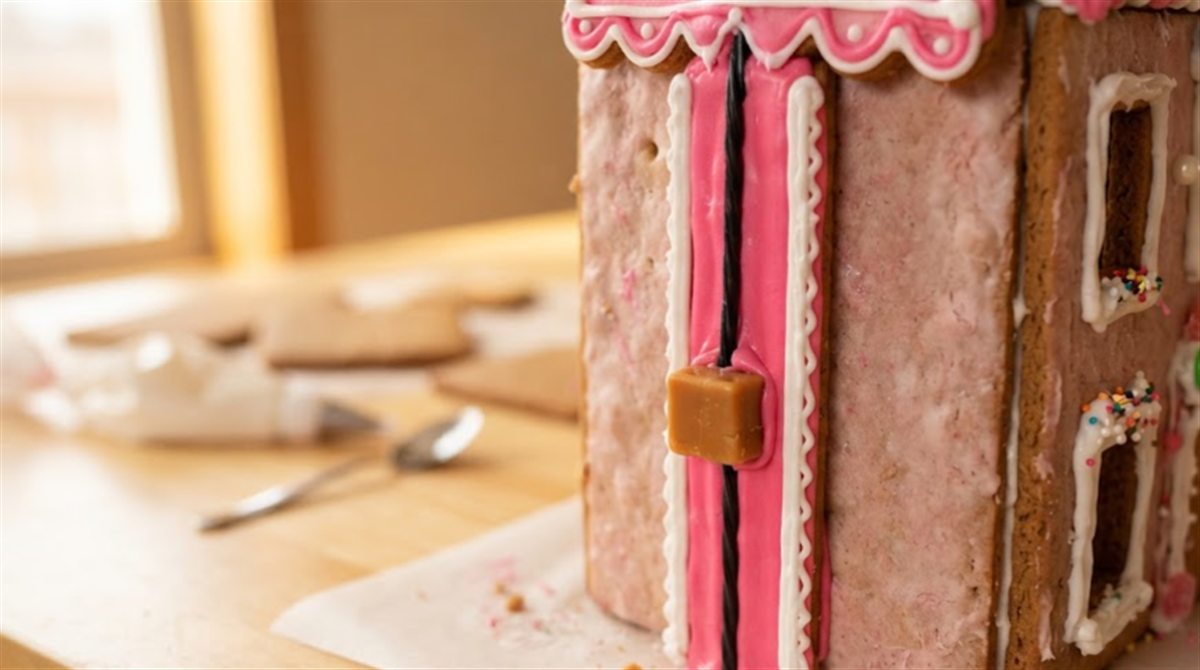
Step 4: two white floor lines make three stories. AI rendering. - Flood a narrow hot pink strip down one side as the elevator column and pipe white rails along both edges.
- Glue the candy car halfway up the column, then run the licorice lace from the car to the roofline as the cable.
Step 6: the candy car and licorice cable on the elevator column. AI rendering. - Assemble the house and prop both sides with cans while it sets for an hour.
If it goes wrong: If a tall wall bows or cracks, the dough was rolled too thin. Glue a flat gingerbread strip across the inside as a brace and keep it propped.
Tip: Stand the townhouse at the back of a display. The tallest house always goes behind the short ones.
4. The 1979 A-Frame Dreamhouse
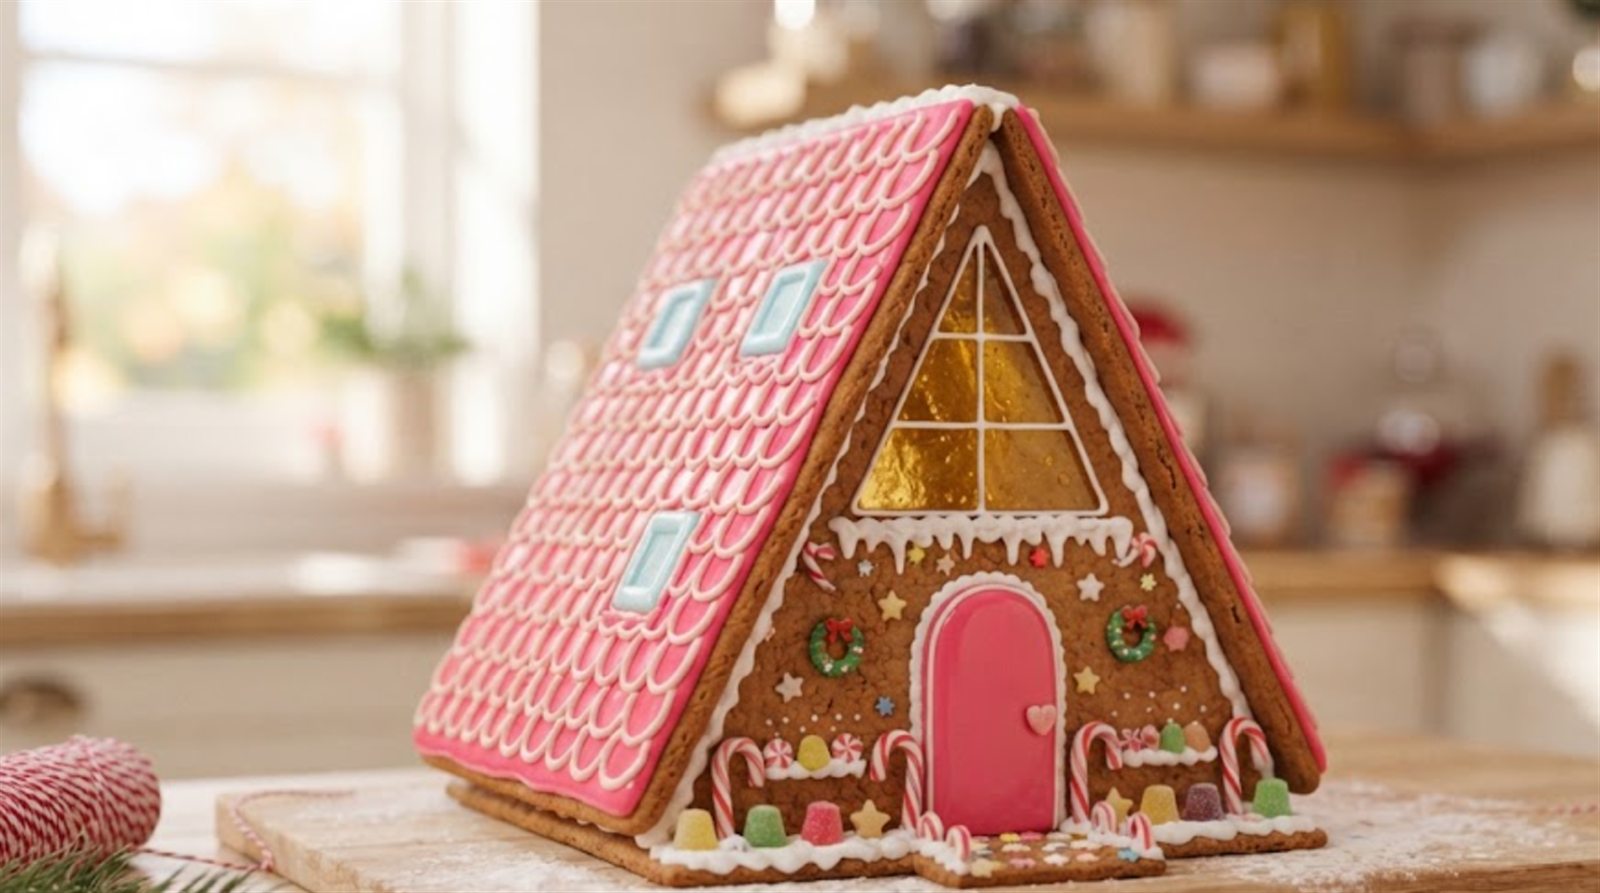
The 1979 Dreamhouse was a two-story A-frame with an open plan, large skylights and three sections kids could pull apart and rearrange. In 1986 the same house came back in a pink color scheme. It reads as an A-frame from three details: a roof that runs to the ground, a tall triangle of windows at the front, and skylights in the roof.
This is the easiest house on the list, because the roof does the work of the walls and four pieces make the whole thing: two triangles and two rectangles.
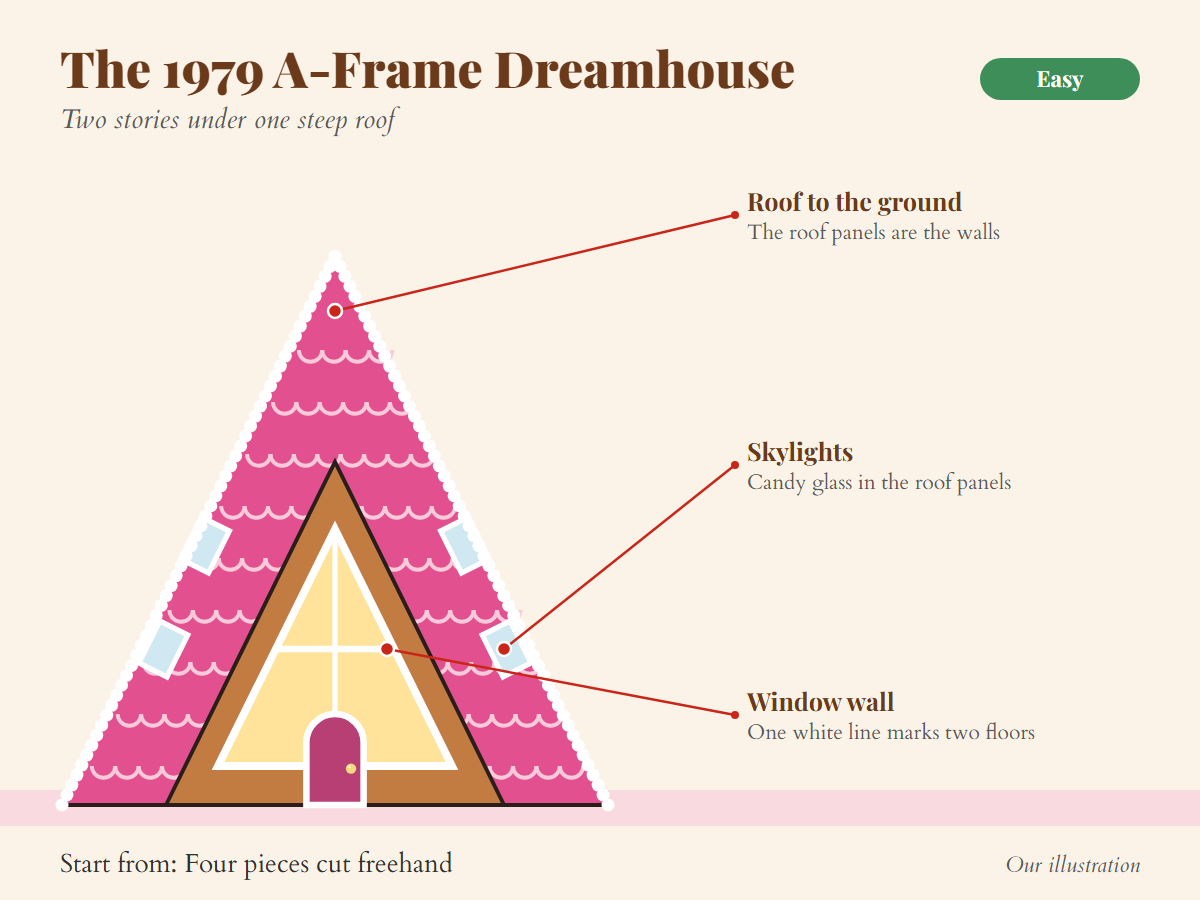
Difficulty: Easy. Start from: pages 7 and 8 of the free Barbie template: two triangles and two roof panels.
How to build it, step by step
Time: About 2 hours.
You need:
- Template pages 7 and 8: two triangles with 6-inch sides
- Two roof rectangles, 6 by 5 inches
- Crushed yellow and pale blue hard candy
- Hot pink and blush royal icing
- White royal icing in a bag with a small round tip
- A battery LED tea light
- Cut the two triangles and two roof panels from the template, with the tall window in the front triangle, the light arch in the back one and two skylights in each roof panel.
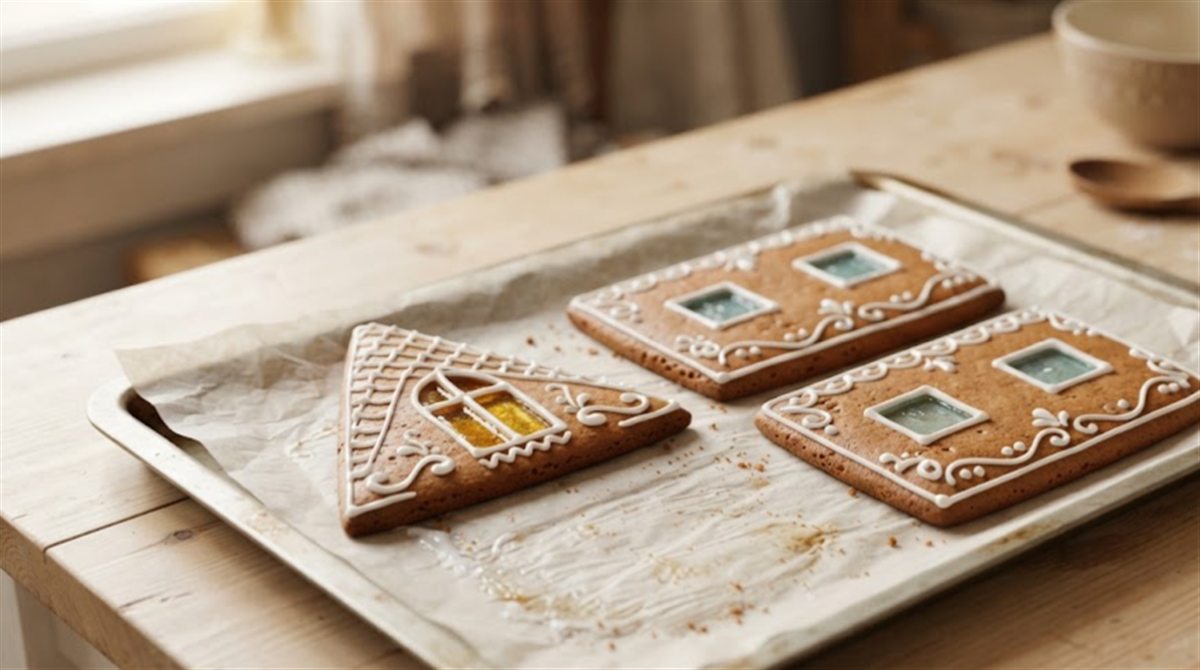
- Bake. Melt yellow candy into the window and blue candy into the skylights, then cool the pieces on the tray.
Step 2: candy window and skylights cooling on the tray. AI rendering. - Pipe white lines down the front window and one line across the middle, so the house reads as two floors.
- Flood the roof panels hot pink around the skylights. Once they crust, pipe rows of blush scallops from the bottom row up.
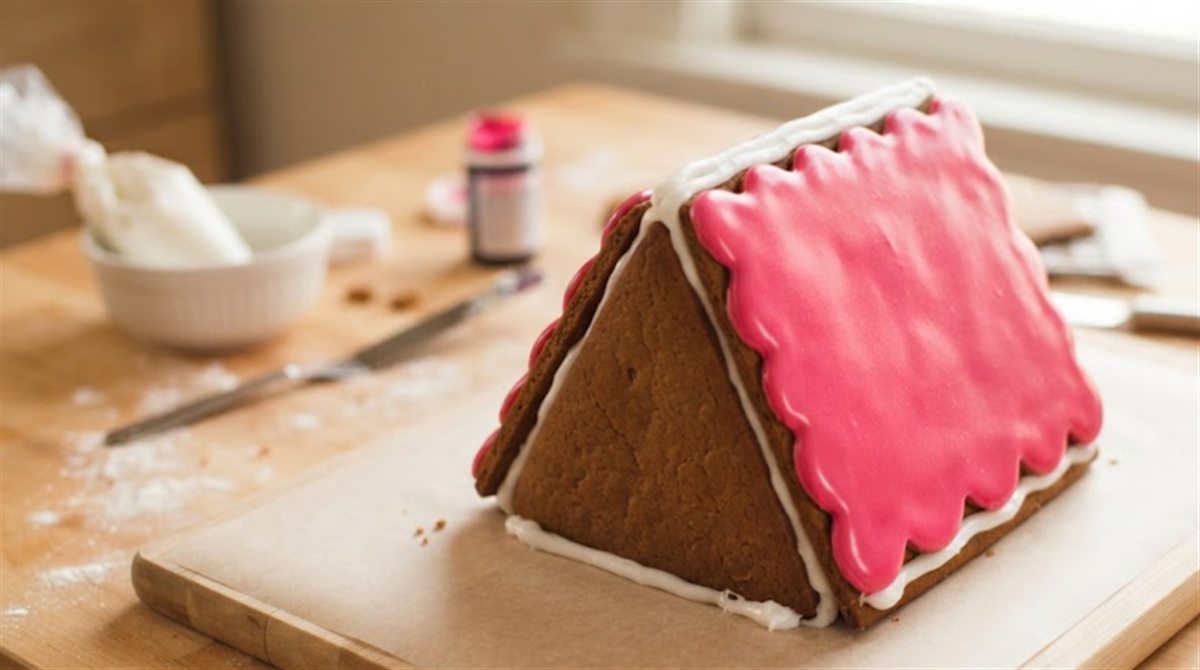
- Stand the two triangles on the board, lean the roof panels against them and glue the ridge. Hold for 2 minutes, then let it set for an hour.
Step 5: roof panels leaning on the triangles, glued at the ridge. AI rendering. - Pipe white dots along the ridge and both roof edges.
If it goes wrong: If the roof panels slide outward at the bottom, pipe a thick line of stiff icing on the board along each bottom edge and press the panels into it.
Tip: A tea light under an A-frame lights the skylights from below. Our guide shows how to light the house from inside with battery lights only.
5. The 1995 Victorian Dreamhouse
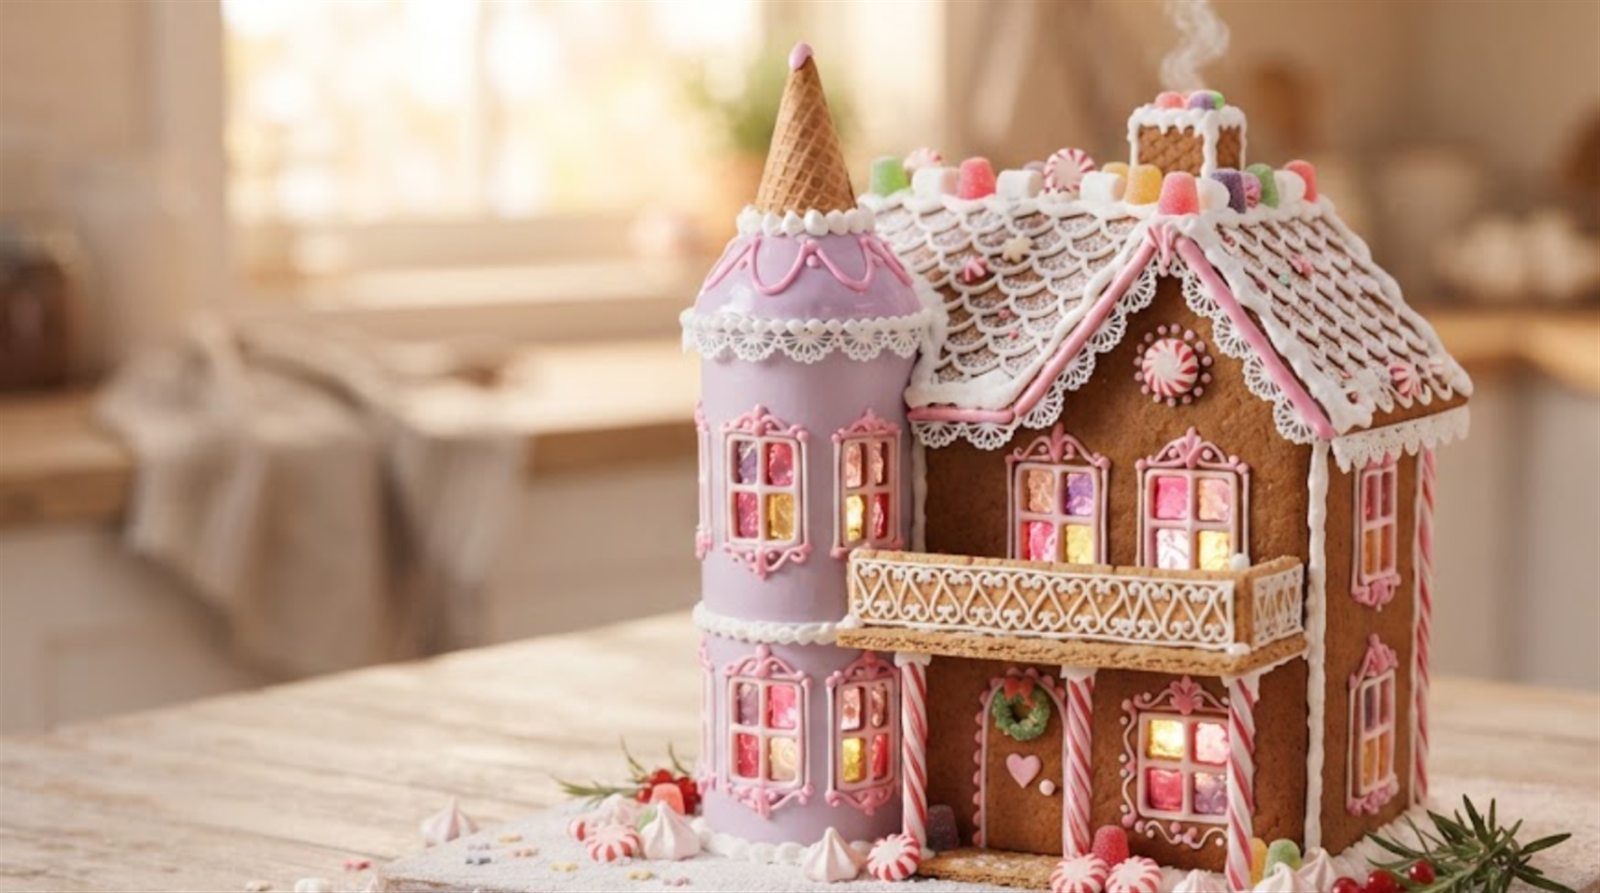
In 1995 the Dreamhouse turned Victorian: two stories with a balcony, a turret, stained glass windows and an elevator. It reads as Victorian from the first three. Build the turret from the square tower pieces on the template, top it with a sugar cone, and bake the stained glass right into the walls. It glows from inside the same way our lighthouse build does.
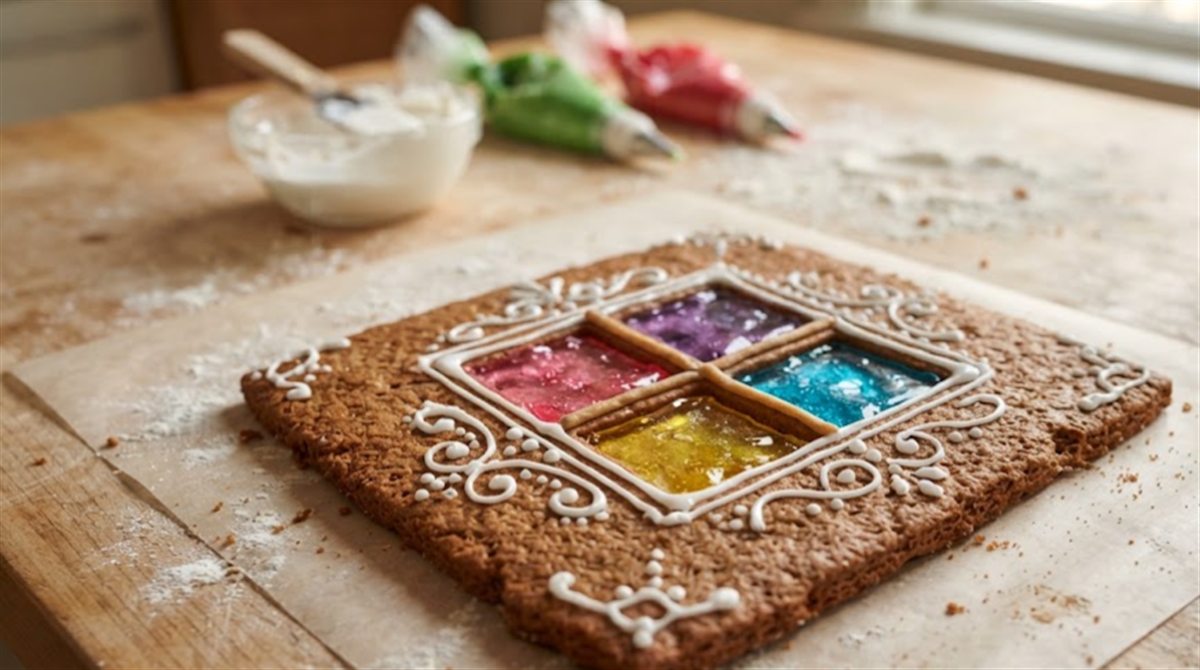
For stained glass, cut each window as four small panes with thin bars of dough between them. Fill each pane with a different crushed candy, pink, purple and yellow, and the colors melt side by side without mixing.
Say you are building this one for an office competition. Judges take in a gingerbread house in seconds, and a lit turret with colored glass is the detail they remember. Spend your time there and keep the rest of the trim simple.
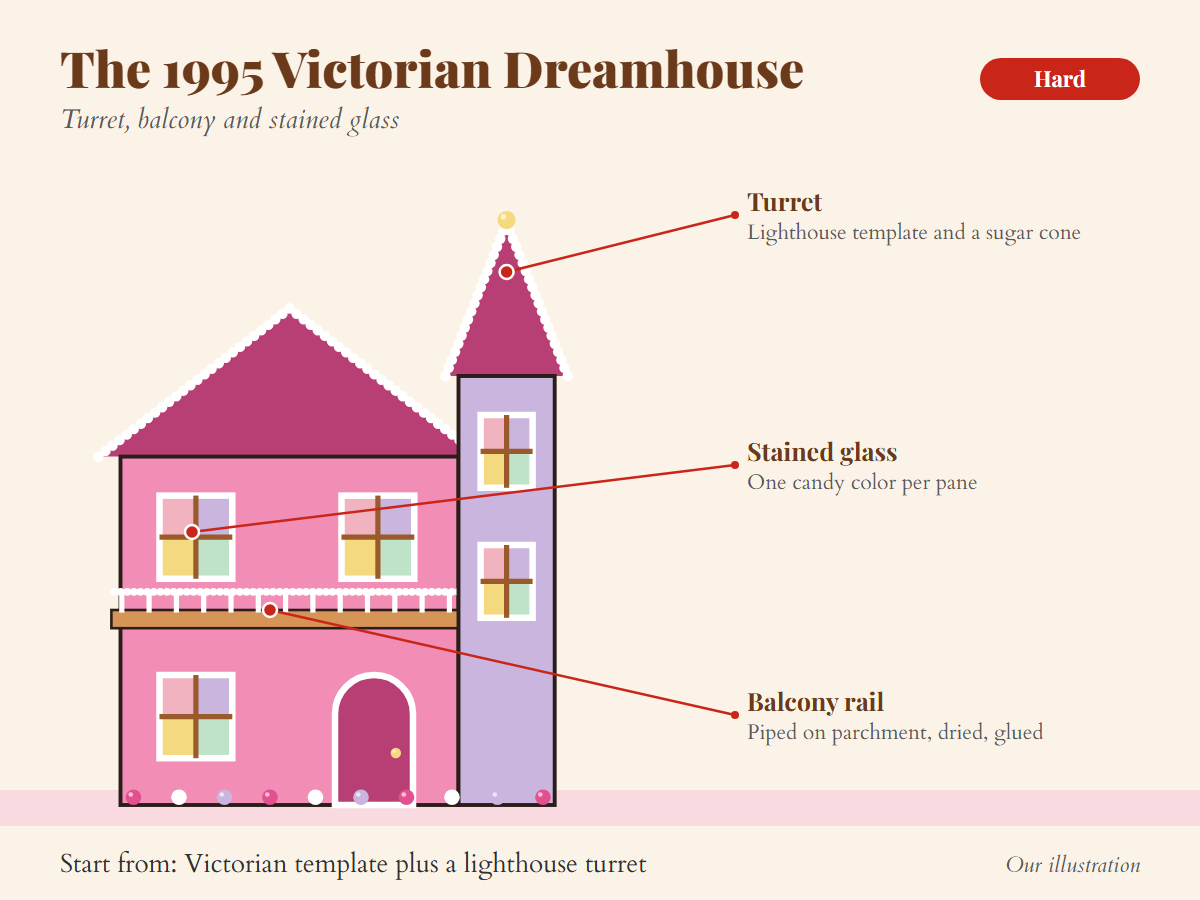
Difficulty: Hard. Start from: pages 9 to 11 of the free Barbie template, turret included.
How to build it, step by step
Time: A weekend.
You need:
- Template pages 9 to 11: the house walls and roof, plus the square turret and its lid
- Crushed hard candy in pink, purple and yellow, each kept separate
- Bubblegum and lilac royal icing
- White royal icing in a bag with a very small round tip
- One pointed sugar ice cream cone
- A graham cracker strip and two pretzel rods for the balcony
- Parchment paper and a battery LED tea light
- Cut the house and turret pieces from the template. Every window is drawn as four small panes with thin dough bars between them, so cut out each pane.
- Bake, fill each pane with one candy color, bake until the candy melts flat and cool on the tray.
Step 2: one candy color in each pane. AI rendering. - Flood the walls bubblegum and the turret lilac, working around the windows. Dry flat overnight.
- Pipe white scallops along the gables. Pipe the balcony railing onto parchment and let it dry overnight too.
- Assemble the main house and let it set for an hour.
- Build the turret, ice the sugar cone pink and set it on top, then glue the turret to a front corner and prop it.
Step 6: the turret with its pink-iced sugar cone. AI rendering. - Glue the graham strip across the front at the second floor, rest it on the pretzel rods and peel the dried railing off the parchment onto it.
- Set the LED tea light inside so the stained glass glows.

If it goes wrong: If the candy windows turn cloudy or bubbly, they baked too long. Pull the tray as soon as the candy melts flat.
Tip: Use LED tea lights only. Home candle fires peak in December and January, according to the Illinois State Fire Marshal, and a gingerbread house burns.
6. The Modern Three-Story Dreamhouse
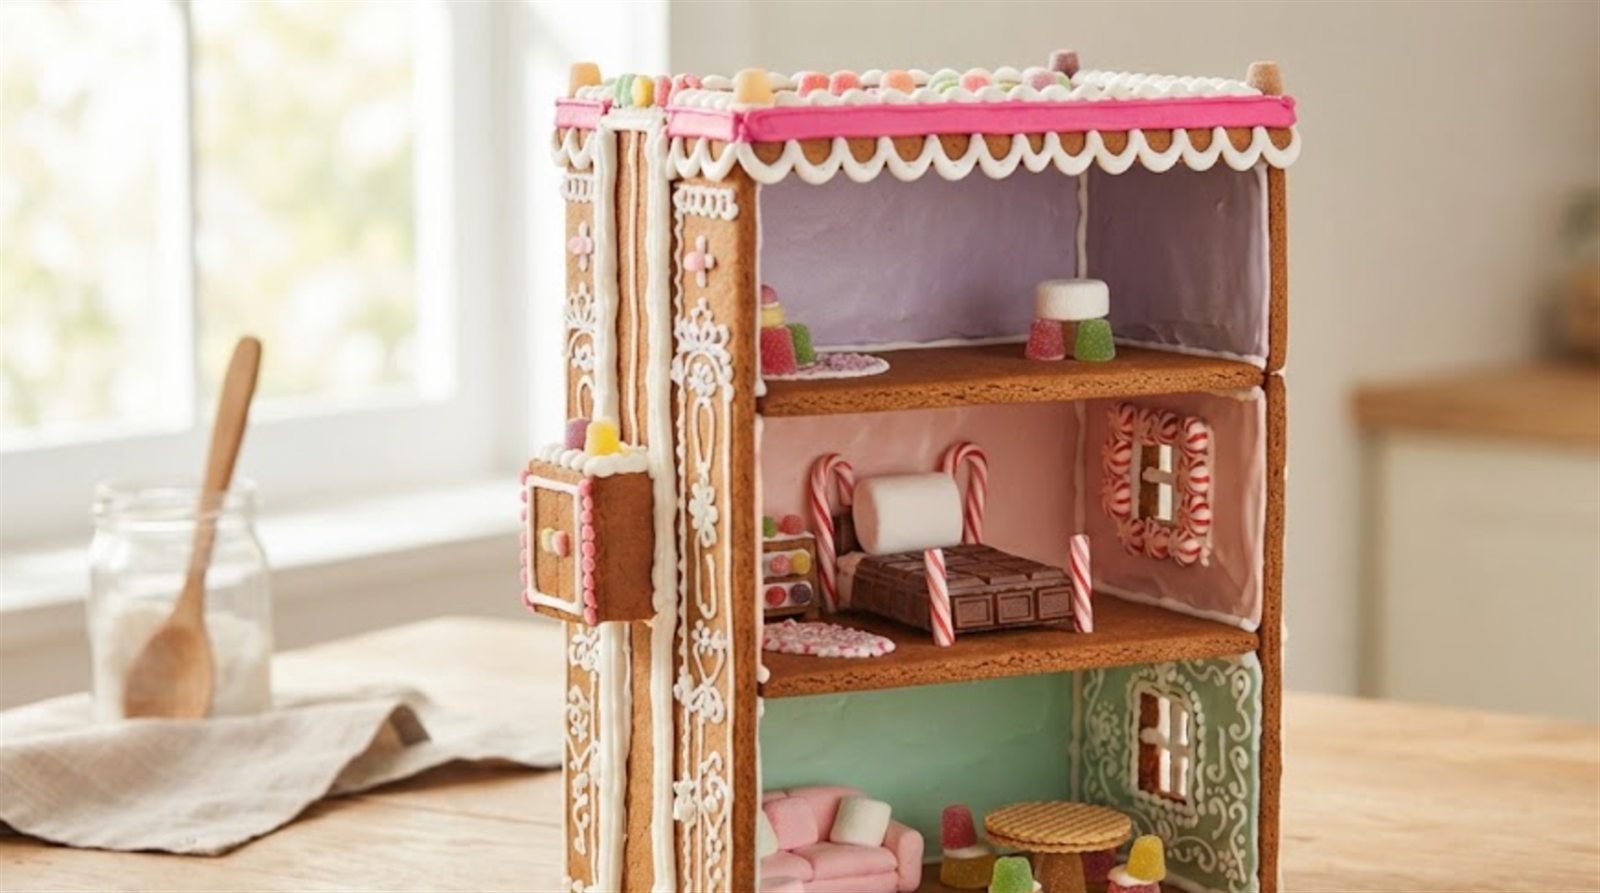
The 2018 Dreamhouse has three floors, eight rooms, a pool and a waterslide. Around 2020, its elevator was redesigned to fit a doll in a wheelchair. In gingerbread it reads from three details: an open front you can see into, a different pastel in every room, and an elevator up the side.
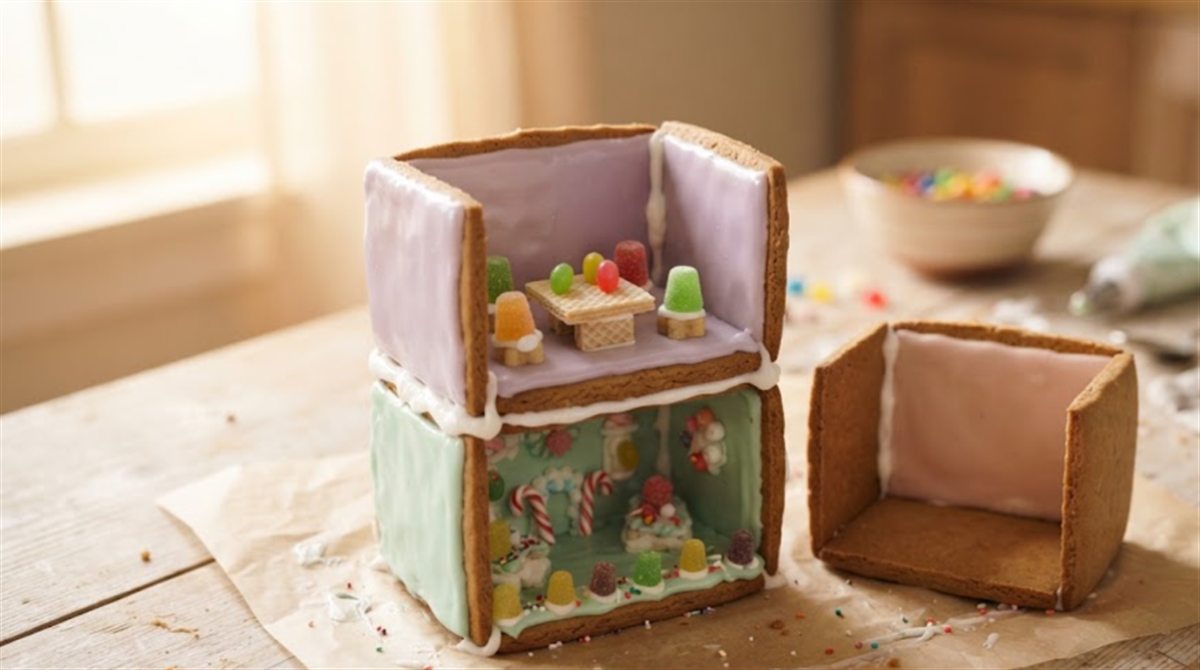
Build it as three open boxes stacked on top of each other, each with a back wall, two side walls and a floor but no front. Furnish each room with candy before the next box goes on, because you cannot reach inside once it is stacked.
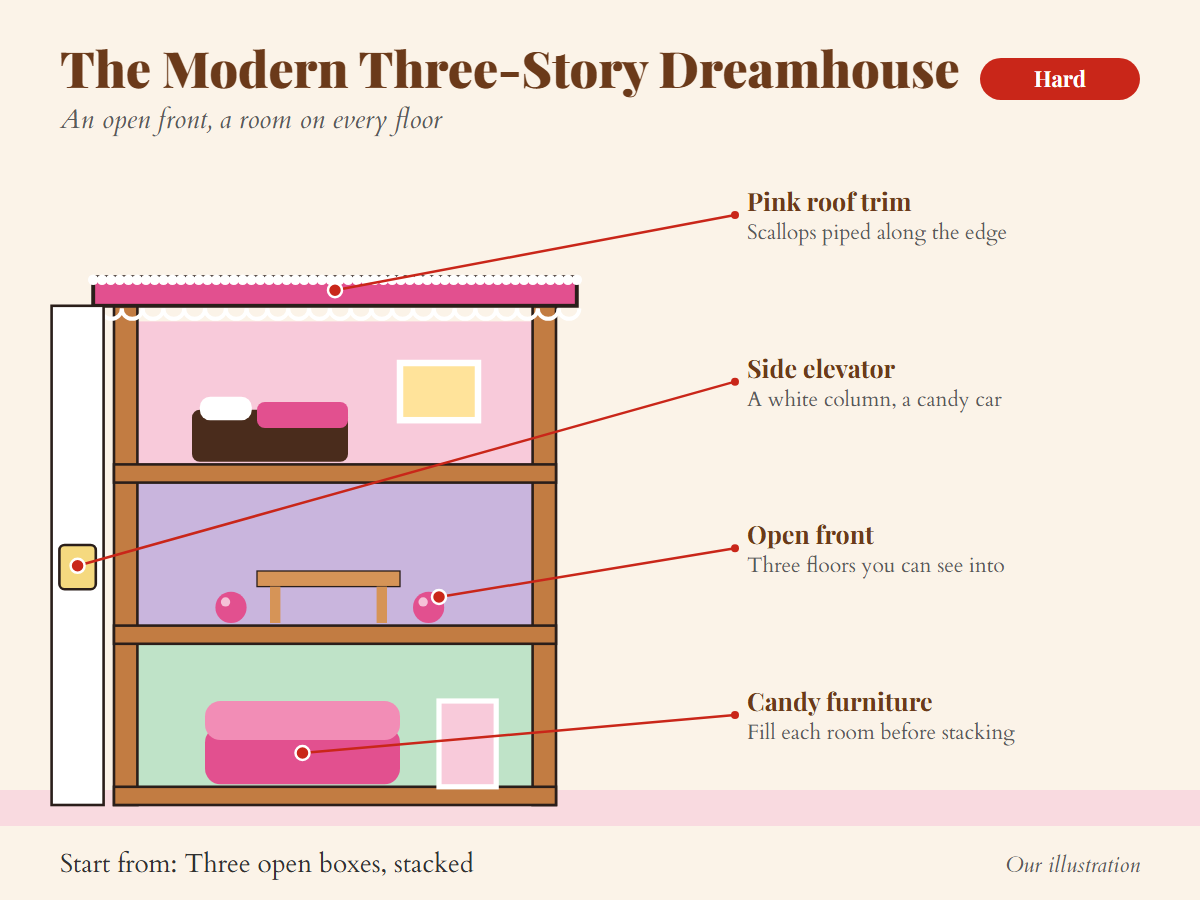
Difficulty: Hard. Start from: pages 12 and 13 of the free Barbie template: three open boxes cut to one size.
How to build it, step by step
Time: A full day, most of it waiting.
You need:
- Template pages 12 and 13: three open boxes, each a back wall, two side walls and a floor of the same width, plus one flat roof slab
- Blush, lilac and mint royal icing
- Hot pink and white royal icing, each in a bag with a small round tip
- Candy furniture: a chocolate bar bed, a marshmallow pillow, wafer cookie tables and gumdrop chairs
- A tall gingerbread strip iced white and a square candy for the elevator
- Cut all the pieces from the template and bake them.
- Flood each back wall a different pastel while it lies flat, and let them dry.
- Assemble the bottom box and let it set for an hour.
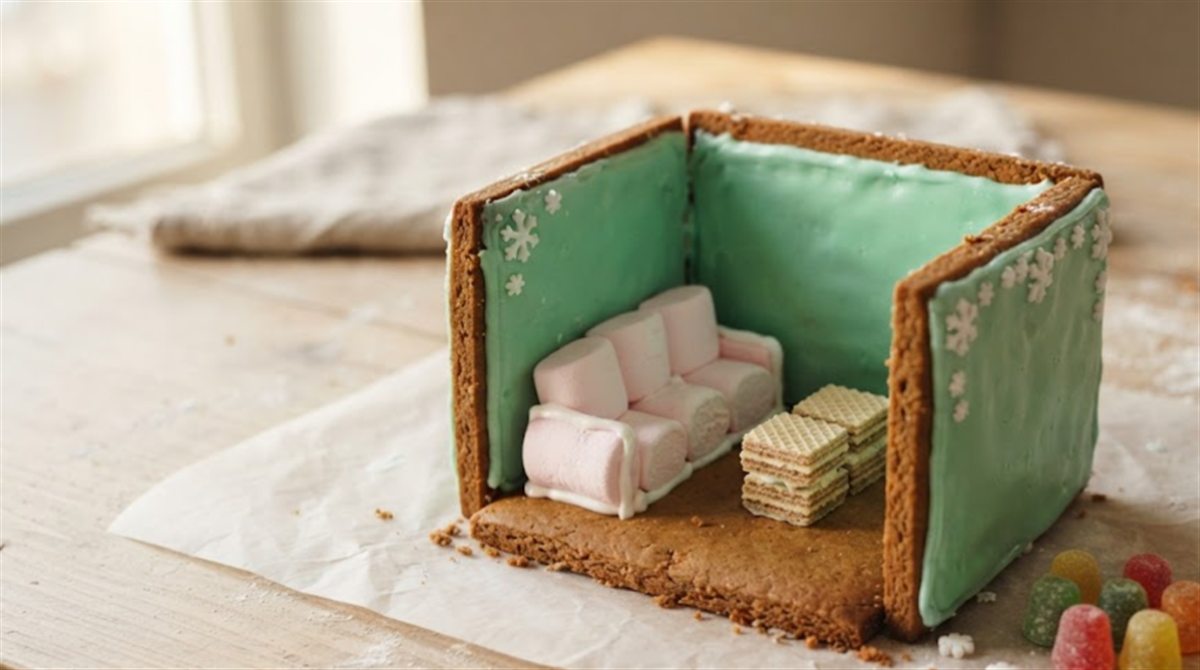
- Furnish the bottom room now, while your hands still fit.
Step 4: furnishing the bottom room before stacking. AI rendering. - Glue the next box on top, let it set for an hour and furnish it. Repeat for the top floor.
Step 5: the second open box set on top of the first. AI rendering. - Glue the roof slab on, then pipe a hot pink edge and white scallops along it.
- Glue the white strip up one side as the elevator and press the candy car onto it.
If it goes wrong: If the boxes lean sideways, they have no front wall to brace them. Glue a thin gingerbread strip across the top front of each box as a beam.
Tip: Furniture is the fun part, so save it for helpers. Let kids fill each room before you stack it.
7. The Movie-Style Dreamhouse
The Dreamhouse set for the 2023 Barbie film was built with no windows and no doors, so every room is on show. It had a slide down to a pool and a painted backdrop of the San Jacinto Mountains behind it. Those details make the gingerbread version: open walls, a curved slide into a pool, and a mountain cookie standing behind.
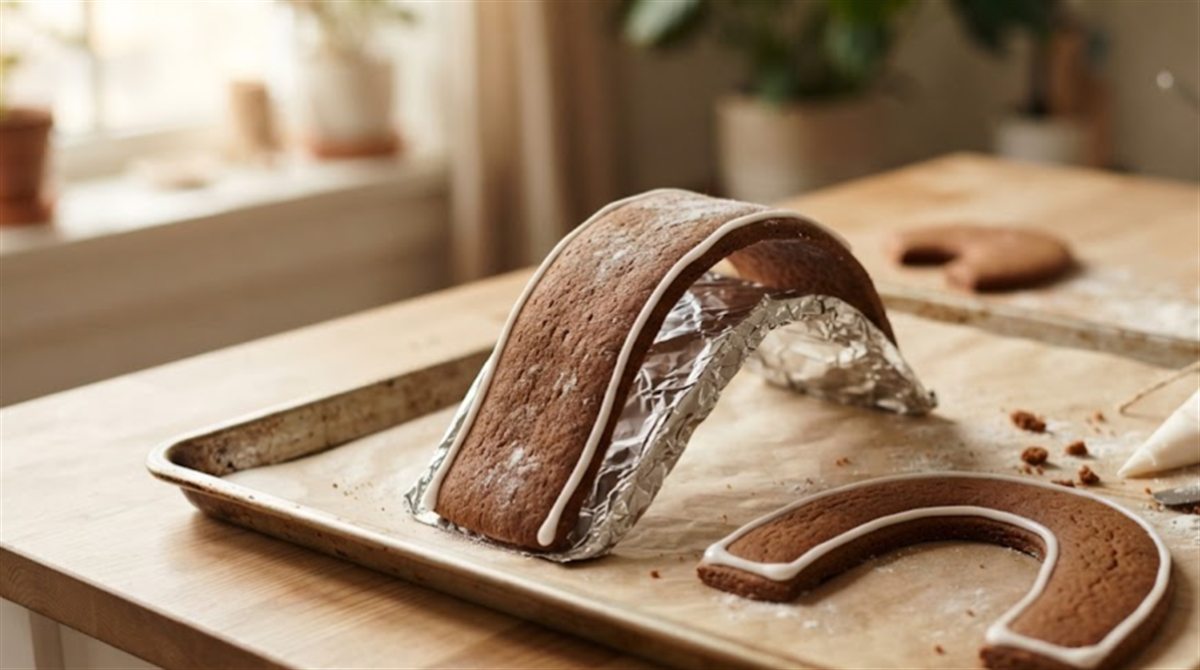
The slide is the trick: shape a ramp from crumpled foil on your baking tray, drape a strip of dough over it and bake it in that curve. Bake two, because thin curves snap.
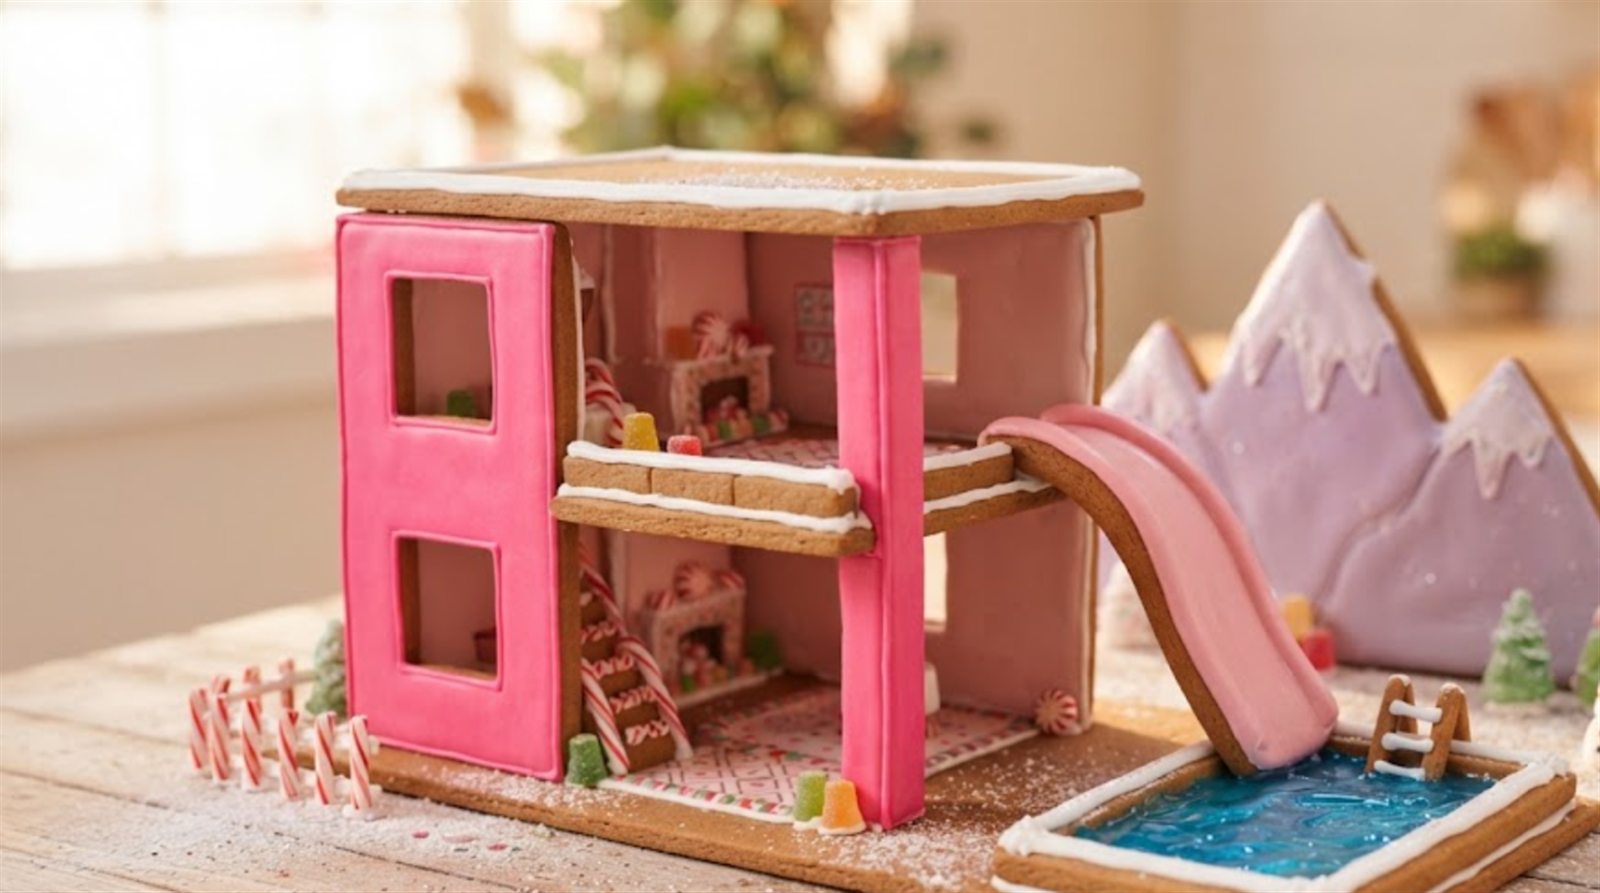
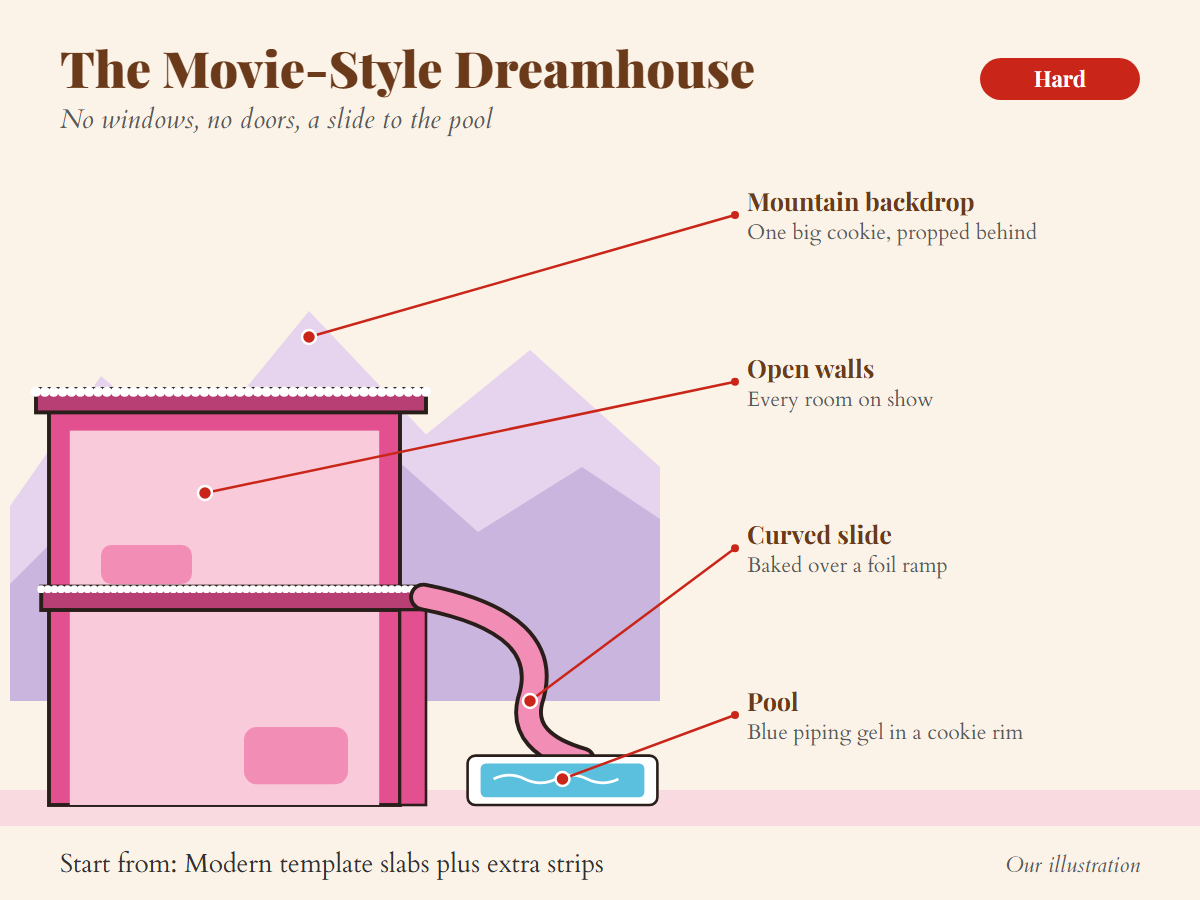
Difficulty: Hard. Start from: pages 14 to 16 of the free Barbie template, with the slide strips, pool rim and mountain.
How to build it, step by step
Time: A weekend.
You need:
- Template pages 14 to 16: two tall walls with no openings, an upper floor, a roof slab and a two-layer front pillar
- Two slide strips about 1 1/2 inches wide
- A large cookie cut as a mountain outline
- Hot pink, blush and lilac royal icing
- Four gingerbread strips for the pool rim
- Piping gel tinted blue with gel color
- Aluminum foil and a can for propping
- Crumple foil into a gentle curved ramp on the tray, lay each slide strip over it and bake with the other pieces.
Step 1: a slide strip baked over a crumpled foil ramp. AI rendering. - Flood the walls hot pink outside and blush inside, and ice the mountain cookie lilac. Let everything dry flat.
- Stand the two walls in an L and let them set for an hour.
- Glue the floor slab across the walls at mid-height, with the pillar under the open corner. Let it set for an hour, then add the roof slab.
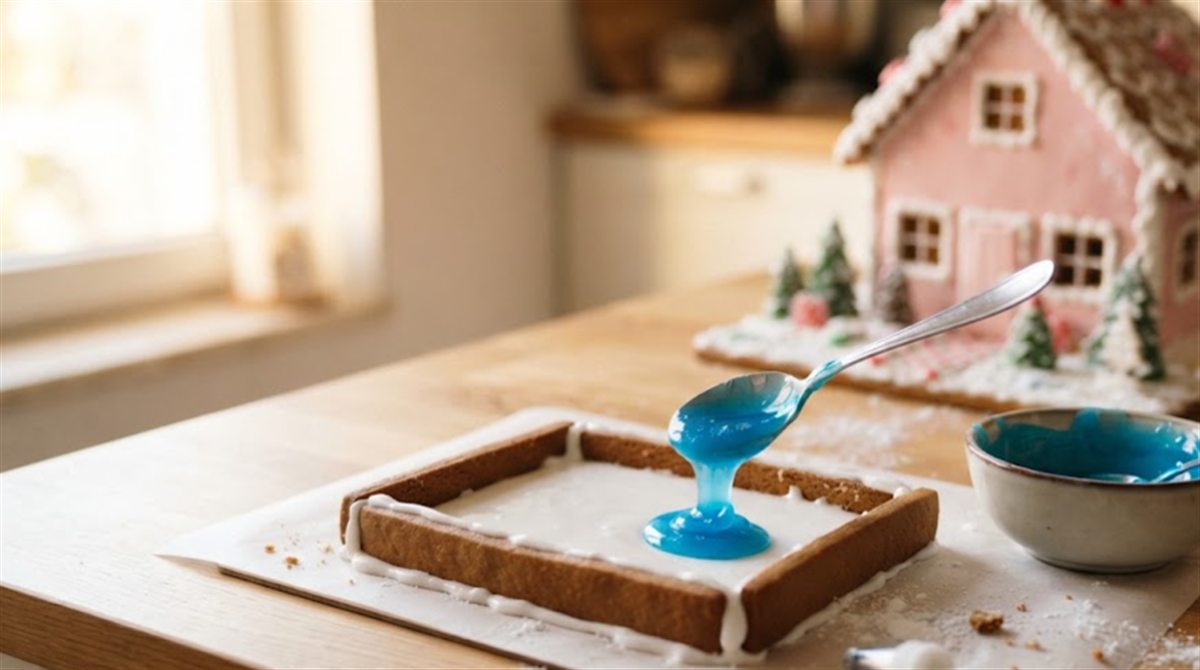
- Glue the four strips into a rectangle on the board beside the house. Flood the bottom white, let it set, then fill it with the blue piping gel.
Step 5: blue piping gel poured into the cookie pool rim. AI rendering. - Glue the slide from the edge of the upper floor down to the pool rim with stiff icing, and prop it for 30 minutes.
- Stand the mountain cookie behind the house, propped by a can you cannot see from the front.
If it goes wrong: If the slide snaps, the curve was too tight or the strip too thin. Use the spare, and roll the next one 1/4 inch thick with a gentler curve.
Tip: Piping gel keeps a glossy, wet look, so the pool still reads as water on the board.
Which Barbie House to Build First
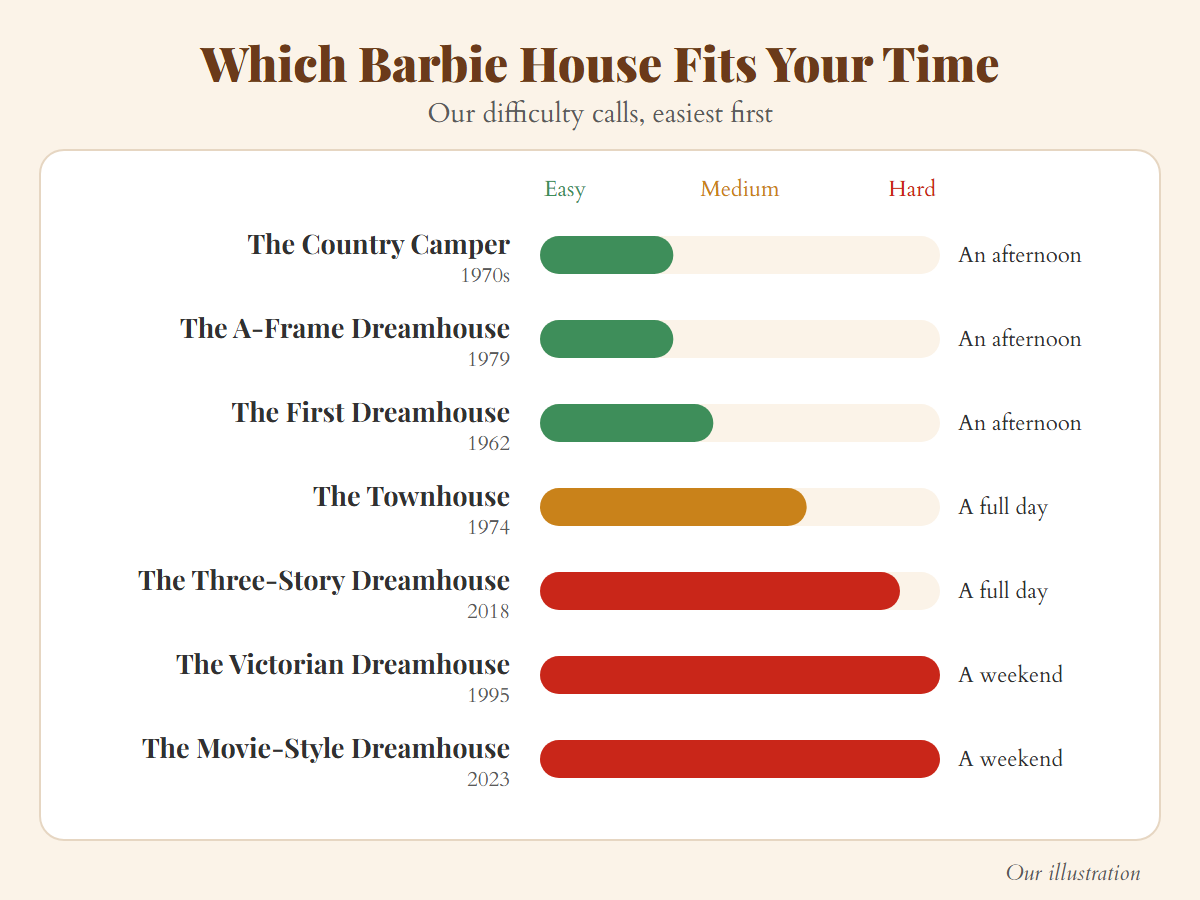
If you have one afternoon and helpers under eight, build the camper or the A-frame. If you have a full day, try the 1962 house, the townhouse or the three-story house. If you have a weekend and steady hands, take on the Victorian or the movie-style house.
Say you have a grocery-store kit and two kids on the Saturday after Thanksgiving. Ice the kit walls hot pink, add a striped graham awning over the door and press on four cookie wheels, and the box becomes a camper by dinner.
Which Barbie Dreamhouse Should You Build?
Answer three questions and we will match you to a house from this list.
How much time do you have?
Who is helping?
What look do you want?
For fun and planning only; your build time will vary with your dough, your icing and your helpers. Not professional advice. Your answers stay in this browser tab and are never sent anywhere.
Plan Your Dreamhouse Build
Pick a house and the day you want it finished. We will count back the drying time for you.
For planning only; drying times vary with humidity and how thick your icing is. Not professional advice. Your choices stay in this browser tab and are never sent anywhere.
Whichever you pick, three habits save it:
- Use gel color and stiff icing for every pink.
- Let the walls set before the roof goes on.
- Do the signature details last, when the structure is dry.
The rest of the basics are in our beginner tips, and our gallery has more pink house ideas that are not Barbie at all. Build two or three eras and line them up like a gingerbread village street, oldest on the left, and you have the Dreamhouse Timeline on one board.
If You Would Rather Start From the Barbie Cookie Kit
Create-A-Treat makes a Barbie Cookie Dreamhouse kit with pre-baked vanilla cookie walls and roof, pink and white icing and candies. That makes it a decorating kit rather than gingerbread, and it builds one fixed shape. Pick it when you want a quick pink house with small kids, and bake your own when you want a particular era from this list.
If you buy the kit, pipe the seams with your own stiff icing for a sturdier house. Our Create-A-Treat review covers how the brand’s other kits hold up.
Find a Kit for Your Barbie House With Best Gingerbread Houses
Every Barbie house here starts as a plain box, and two or three details turn it into a Dreamhouse. We compare kits so you can start from a sturdy one and save your time for the pink. When you are ready, browse our sturdy gingerbread house kits and pick the box your Dreamhouse starts from.