
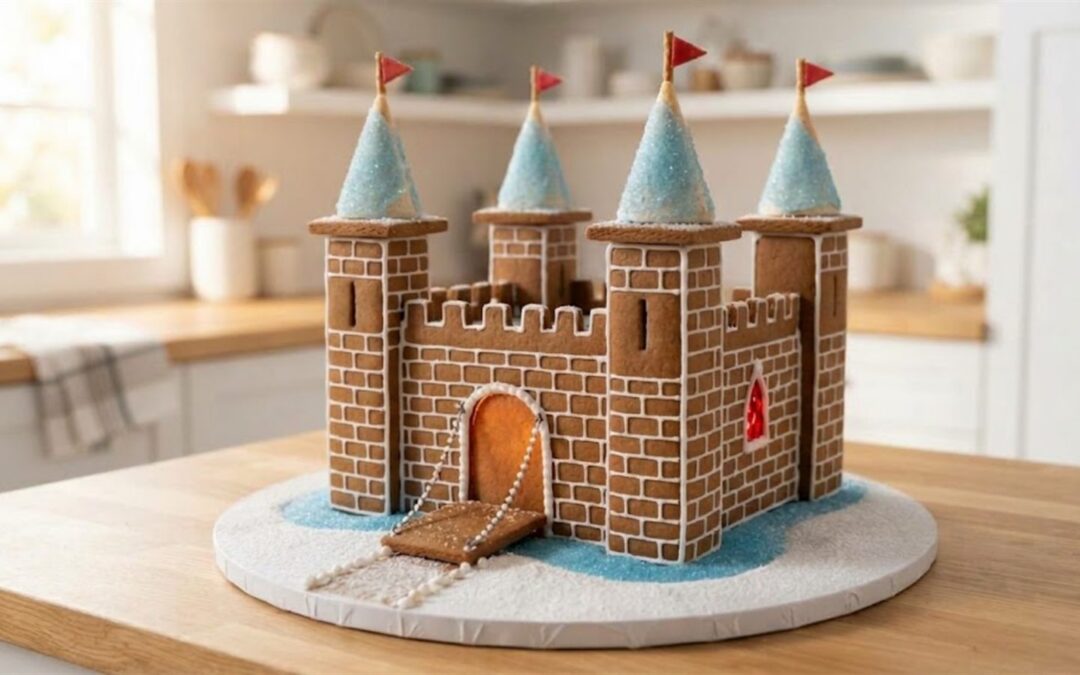
A castle gingerbread house is not a cottage with a taller roof, it is a fortress. Four corner towers with pointed roofs, notched walls between them, a gate with a drawbridge and a moat around the outside are what make anyone see a castle, from a storybook keep to the fairy-tale kind with flags.
Our house dough and royal icing recipes set every bake temperature and wait, and the free template was checked so every tower closes square. If you are building with kids, every step has a photo. If you want it to glow, a tea light drops into the open courtyard and lights the red windows. And the tall pointed roofs are store-bought sugar cones, so the hardest-looking part of the castle is the easiest.
You will end up with a castle about 10 inches tall and 6 1/2 inches square, made in four short sessions plus a finishing morning, and two easier versions. Start with the template, then the shopping list, the day-by-day plan and 16 photographed steps.
Castle Gingerbread House: At a Glance
- Difficulty: Medium. Every piece is a straight rectangle and there are no roof angles, but there are 25 pieces and four towers to stand.
- Total time: about 2 days, in four sessions plus a finishing morning. Most of it is icing setting.
- Active time: about 4 1/2 hours.
- Makes: one castle about 10 inches tall and 6 1/2 inches square, on a 12 inch round board. 25 baked pieces and 4 sugar cones.
- Template: free 2-page PDF, US Letter, true size with a 1 inch test bar.
Tools: printer, ruler, scissors, rolling pin with 1/4 inch guides, parchment, 3 half sheet pans, paring knife, 2 piping bags with small round tips, offset spatula, sieve, small cups or cans for propping, 12 inch round cake board, 1 battery LED tea light.
Materials
- 1 batch of sturdy gingerbread house dough
- 2 batches of stiff royal icing
- About 8 red hard candies
- 4 sugar cones, 4 thin pretzel sticks, 1 strip of red fruit leather, blue sanding sugar, light blue gel food coloring, powdered sugar
Steps
- Print the template at Actual Size and measure the test bar.
- Make the dough and chill it for at least an hour.
- Roll the dough 1/4 inch thick and cut the four castle walls.
- Cut the tower walls, tower lids and drawbridge.
- Bake at 300 degrees F, then melt red candy into the windows.
- Trim every piece against the template while it is warm.
- Stand the four towers on the board and wait 2 hours.
- Set the four walls between the towers and wait 2 hours.
- Set the tower lids and wait 4 hours.
- Pipe the stone lines on the walls and towers.
- Lay the drawbridge and pipe its chains.
- Frost the sugar cones and set them on the towers as roofs.
- Top each roof with a pretzel flag.
- Pipe the window frames, gate trim and arrow slits.
- Pour a blue sugar moat around the castle.
- Snow the board and light the courtyard with an LED tea light.
Notes: times are worked out from the set times on our icing page, not timed on a build. Ovens and doughs vary, so treat every bake time here as a starting point: check early, go by the matte surface and firm edge, and bake a test strip before you build.
Free Printable Castle Gingerbread House Template
The template is two US Letter pages with 25 pieces, drawn at true size. Download the PDF, print it at Actual Size or 100 percent, and put a ruler on the red 1 inch bar before you cut anything. If the bar measures an inch, every piece is right.
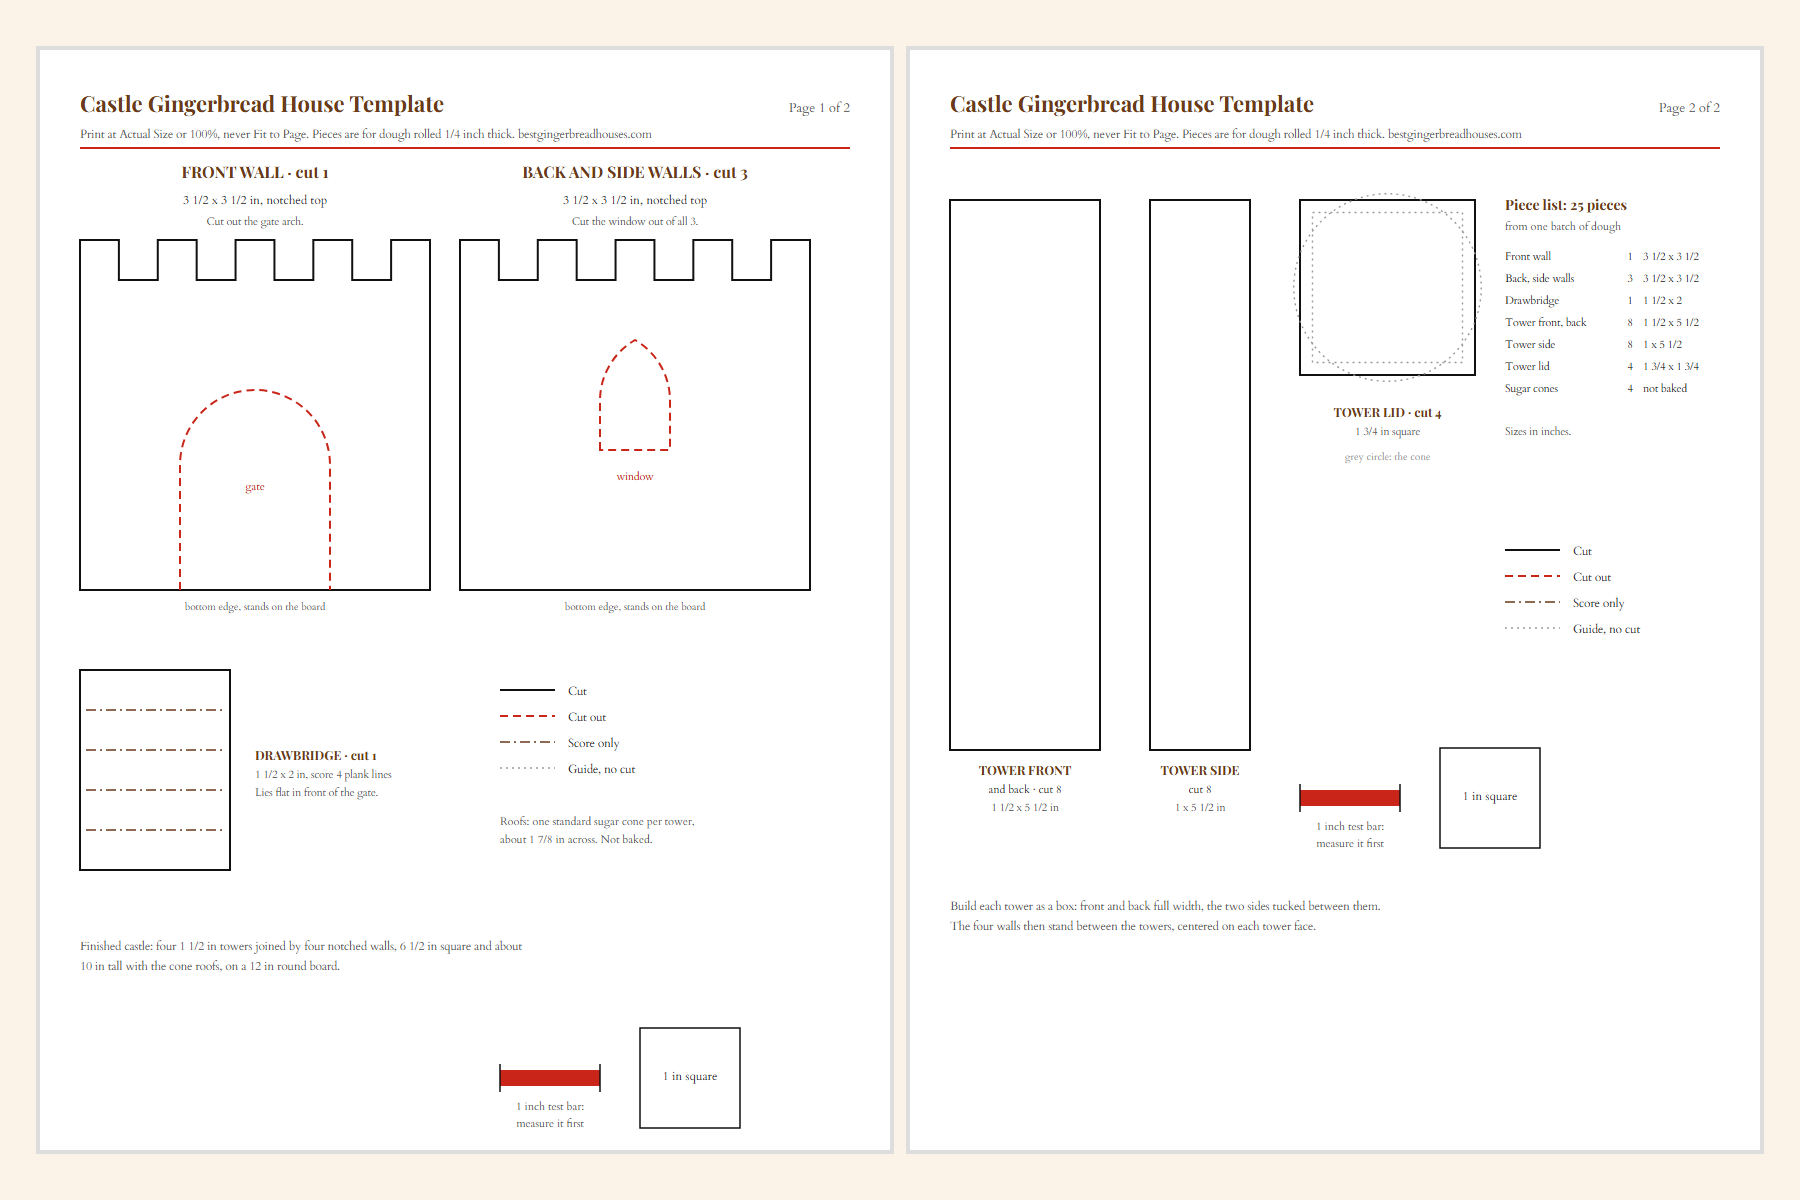
| Piece | Cut | Size | What it does |
|---|---|---|---|
| Front wall | 1 | 3 1/2 x 3 1/2 in, notched top | Carries the gate, a round-top arch 1 1/2 inches wide cut out at the bottom. |
| Back and side walls | 3 | 3 1/2 x 3 1/2 in, notched top | Each has one small pointed window for red candy glass. |
| Drawbridge | 1 | 1 1/2 x 2 in | Lies flat in front of the gate, across the moat. Four scored lines make the planks. |
| Tower front and back | 8 | 1 1/2 x 5 1/2 in | Two for each tower, running the full width. |
| Tower side | 8 | 1 x 5 1/2 in | Two for each tower, tucked between its front and back so the tower is a true 1 1/2 inch square. |
| Tower lid | 4 | 1 3/4 in square | Caps each tower and carries its cone roof. |
| Sugar cones | 4 | store-bought | The roofs. Not baked and not on the template. |
The sizes are worked out so the build goes together without trimming. The notched tops come out even because a 3 1/2 inch wall divides into nine equal steps of a little under 1/2 inch, five raised and four cut down, so both ends of every wall finish high where they meet a tower. The towers stand 2 inches taller than the walls, and the four of them with a wall between each pair make a castle 6 1/2 inches square with a 3 1/2 inch courtyard in the middle. A full-size sugar cone, like the Joy #310 that WebstaurantStore lists at 4 5/8 inches tall and 1 7/8 inches across, is a hair wider than a 1 3/4 inch lid, so it overhangs a little like a real turret roof. Measure yours, because cone sizes vary.
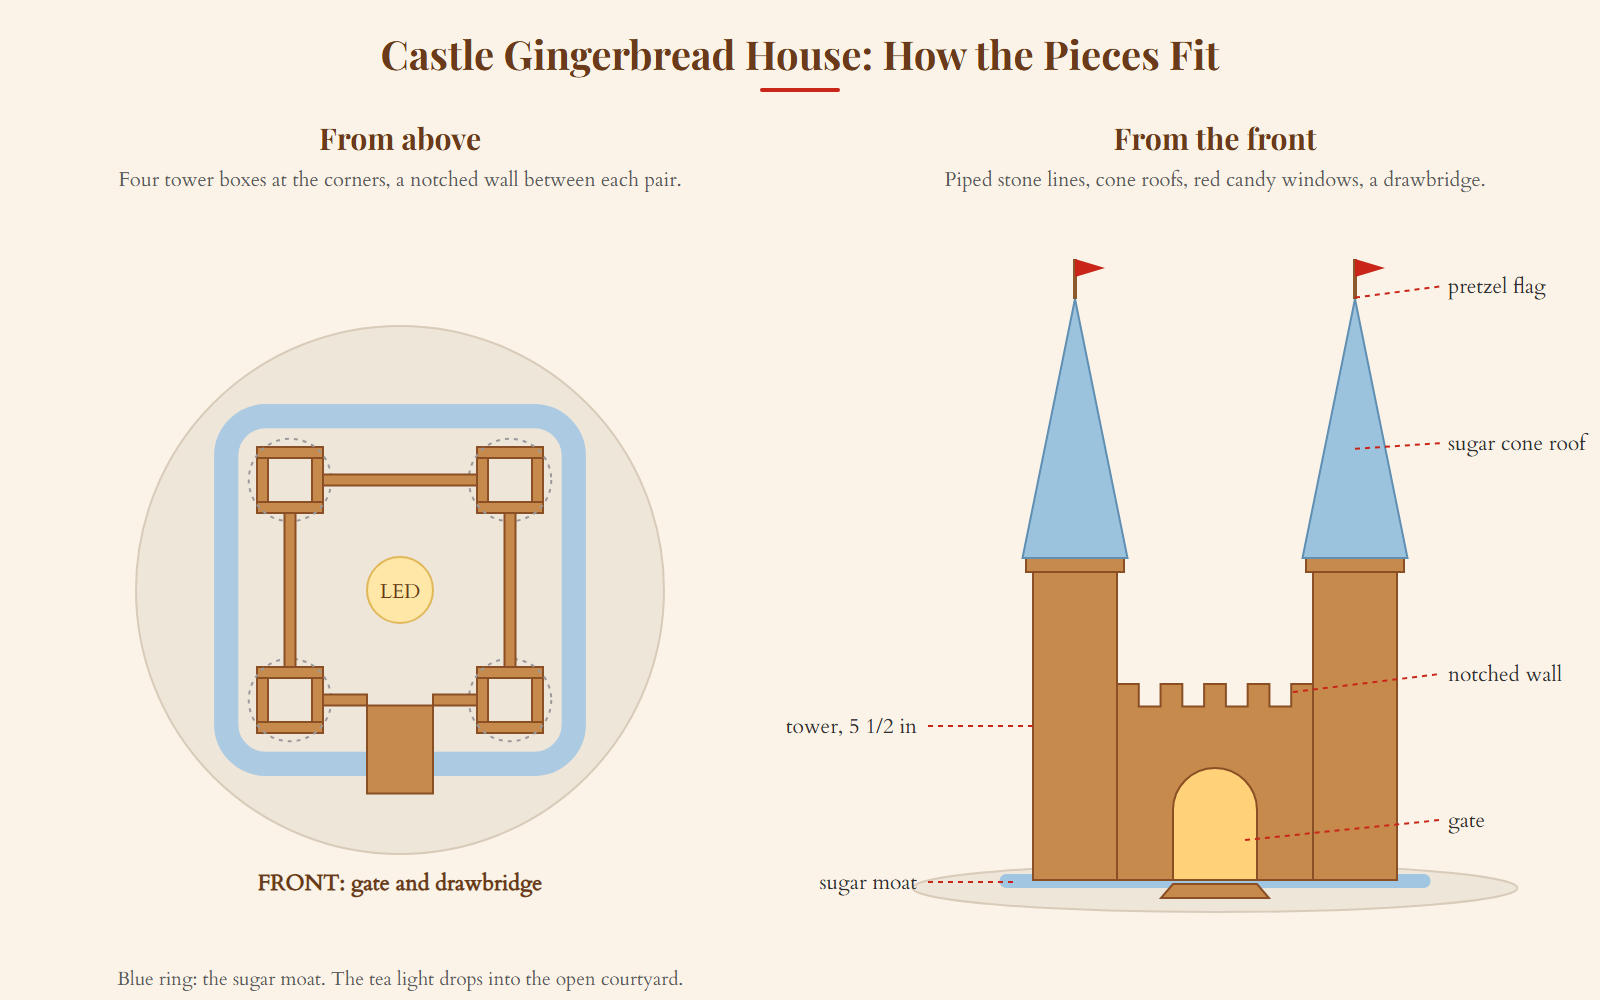
Solid black lines are cuts and red dashes are openings you cut out, while the brown dash and dot lines on the drawbridge are score lines that you press halfway in and never cut through. If you want a house with a classic roof instead, our other printable gingerbread house plans work the same way.
What You Need for the Castle
You need one batch of dough, two batches of royal icing, a few red candies, four sugar cones and a little blue sugar. Everything else is kitchen gear you probably own.
For baking
- 1 batch of construction-grade gingerbread dough. The 25 pieces come to about 170 square inches, which one batch covers with scraps left for a test strip.
- About 8 red hard candies for the three windows, unwrapped and crushed in a zip bag.
For the icing
- 2 batches of stiff piping icing, made one at a time. Most of it stays white, for gluing and the stone lines.
- Light blue gel food coloring, for the icing that coats the cone roofs.
- About 1 teaspoon of unsweetened cocoa powder, stirred into a few spoonfuls of icing for the dark arrow slits.
For the roofs, flags and moat
- 4 standard sugar cones, the pointed kind.
- 4 thin pretzel sticks for flagpoles.
- 1 strip of red fruit leather for the flags.
- About 1/2 cup of blue sanding sugar for the moat, plus white sanding sugar for the roofs if you like sparkle.
- Powdered sugar for snow.
Tools
- Rolling pin with 1/4 inch guide strips, parchment and 3 half sheet pans
- Paring knife, scissors and a ruler
- 2 piping bags with small round tips and an offset spatula
- A few small cups or cans for propping
- A 12 inch round cake board
- 1 battery LED tea light, 1.5 inches across
How Long It Takes, Day by Day
Plan on four short sessions over two days, plus a morning to finish, for about 4 1/2 hours of hands-on work. The rest is waiting, because royal icing needs time to harden completely before it can carry any weight, and a castle stands four towers before anything joins them.
| When | What you do | Hands-on | Then wait |
|---|---|---|---|
| Day 1, afternoon | Print, make and chill the dough, cut, bake and trim, and melt the candy windows. | About 1 1/2 hours, inside 3 1/2 hours with chilling and baking | Overnight, pieces flat |
| Day 2, morning | Stand the four towers. | 25 minutes | 2 hours |
| Day 2, late morning | Set the walls between them. | 20 minutes | 2 hours |
| Day 2, early afternoon | Set the tower lids. | 15 minutes | 4 hours |
| Day 2, evening | Pipe the stone lines, lay the drawbridge, set the cone roofs and flags. | About 1 1/4 hours | Overnight |
| Day 3, morning | Pipe the trim, pour the moat, snow the board and light it. | About 40 minutes | Overnight before you move it |
The waits are the ones our icing guide gives for any house: 2 hours before anything sits on or leans against new walls, 4 hours before decoration, and overnight, 8 to 12 hours, for a full cure. In a damp kitchen, add time. In a dry one with the heat on, it goes a little faster.
Say you want it on the table for a party at 2 PM on Saturday, so you bake on Thursday afternoon. On Friday you stand the towers at 9, set the walls at 11, the lids at 1 and decorate at 5, which leaves only the trim, the moat and the snow for Saturday morning, with hours to spare. The planner below does that arithmetic for any date you choose.
Castle Build Day Planner
Pick when you want the castle finished. The planner counts back through every drying time and tells you when to start baking.
For planning only: icing sets faster or slower with the weather, so treat each wait as a minimum and check that joints feel firm before moving on. Not professional baking advice. Nothing you enter leaves your browser.
How to Make a Castle Gingerbread House Step by Step
Each step does one job and has one photo, and the “why this matters” lines explain the reasoning behind the steps that keep four towers standing.
1. Print the template and measure the test bar
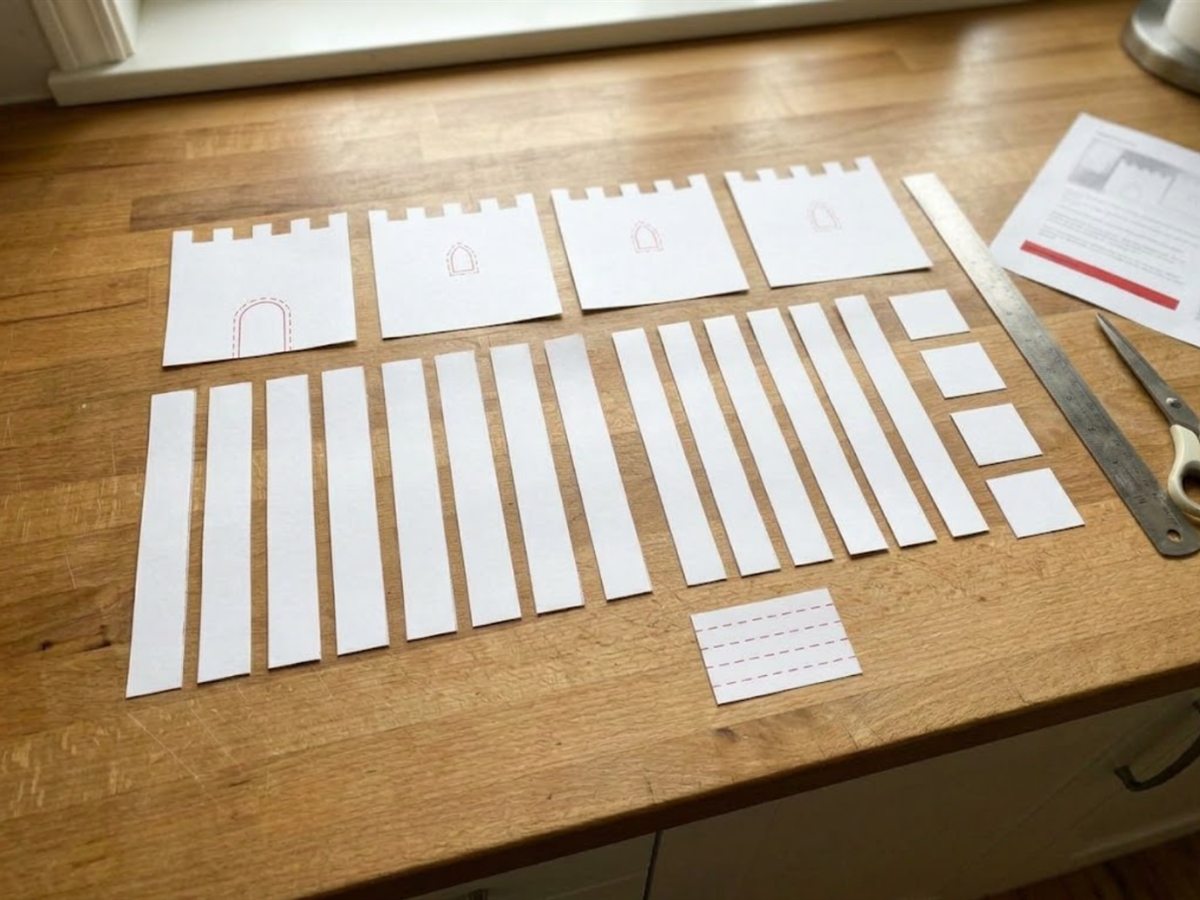
Print both pages at Actual Size or 100 percent, never Fit to Page, and put a ruler on the red bar, which should read exactly 1 inch. Then cut out the paper pieces, including the gate on the front wall and the window on the other wall.
Why this matters: the bar is the only way to know the page printed true before you spend an afternoon on dough.
2. Make the dough and chill it
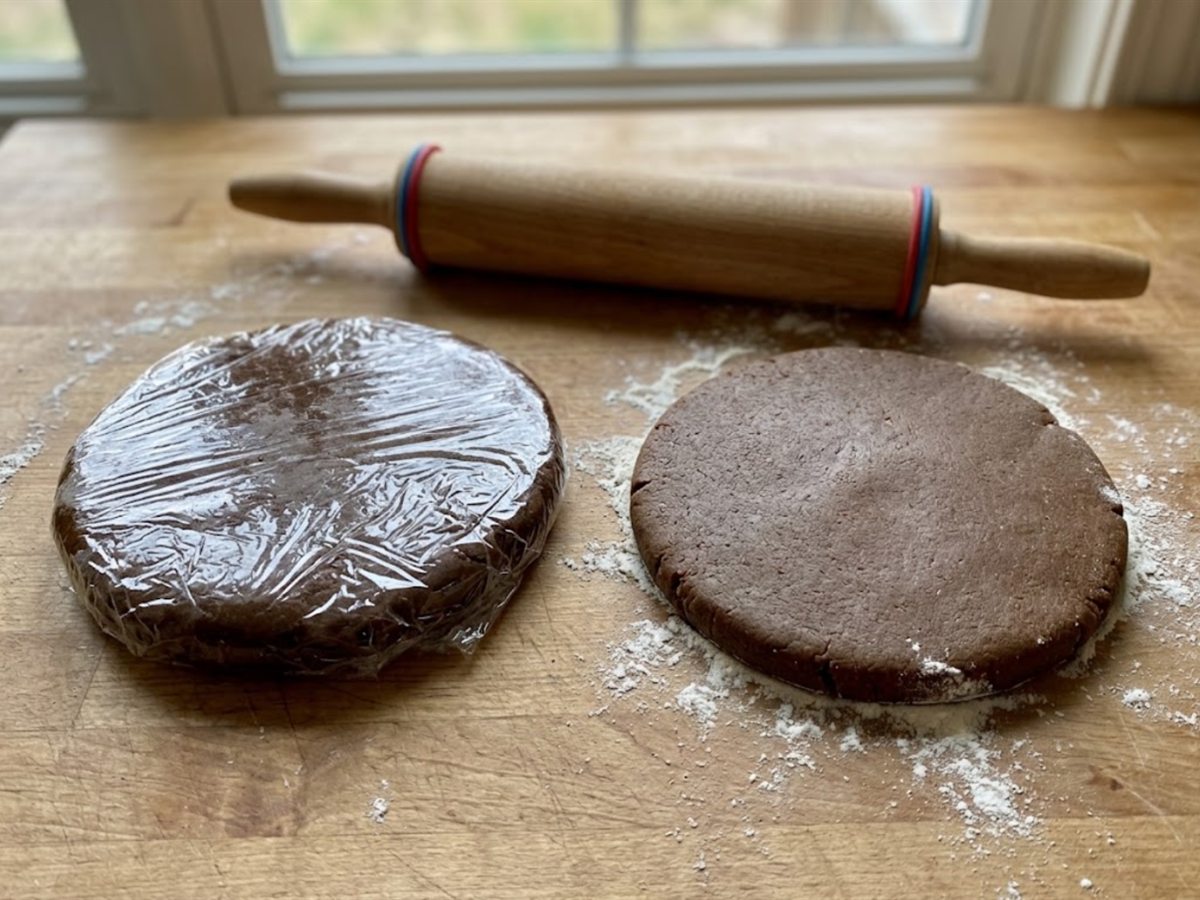
Make one batch of the house dough, split it in two, and flatten each half into a disc about an inch thick, then wrap the discs and chill them for at least an hour. It is ready when a poked disc dents and stays dented.
Why this matters: cold dough cuts with clean edges and spreads less in the oven, so the walls stay the size of the template.
3. Roll the dough and cut the four castle walls
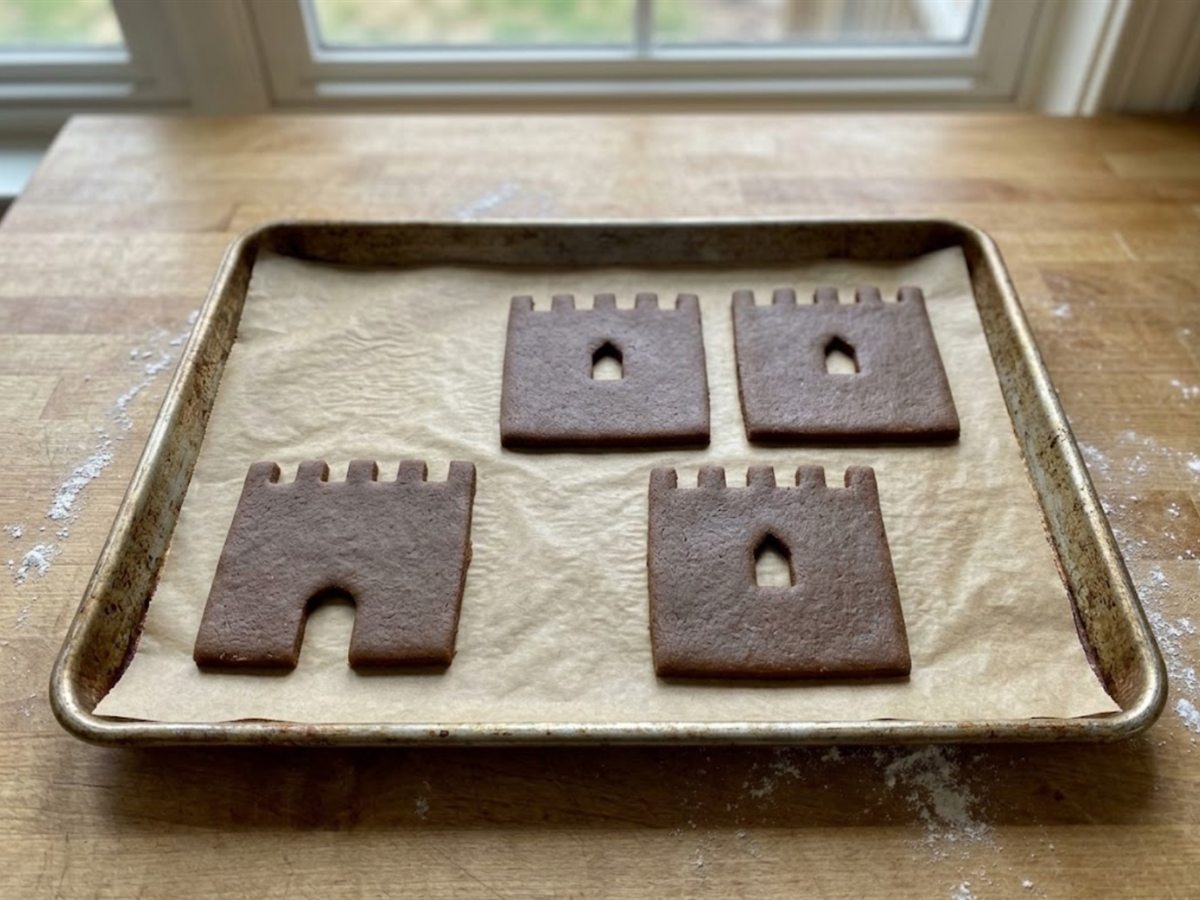
Roll a quarter of the dough at a time on parchment, to an even 1/4 inch between guide strips. Cut the front wall and its gate, then the other three walls and their windows, following the notched tops carefully with the tip of the knife. Pull away the scraps and slide the parchment straight onto a pan.
Why this matters: cutting on the parchment means you never lift a soft wall, and the notches stretch out of shape the moment a wall is lifted.
4. Cut the tower walls, tower lids and drawbridge
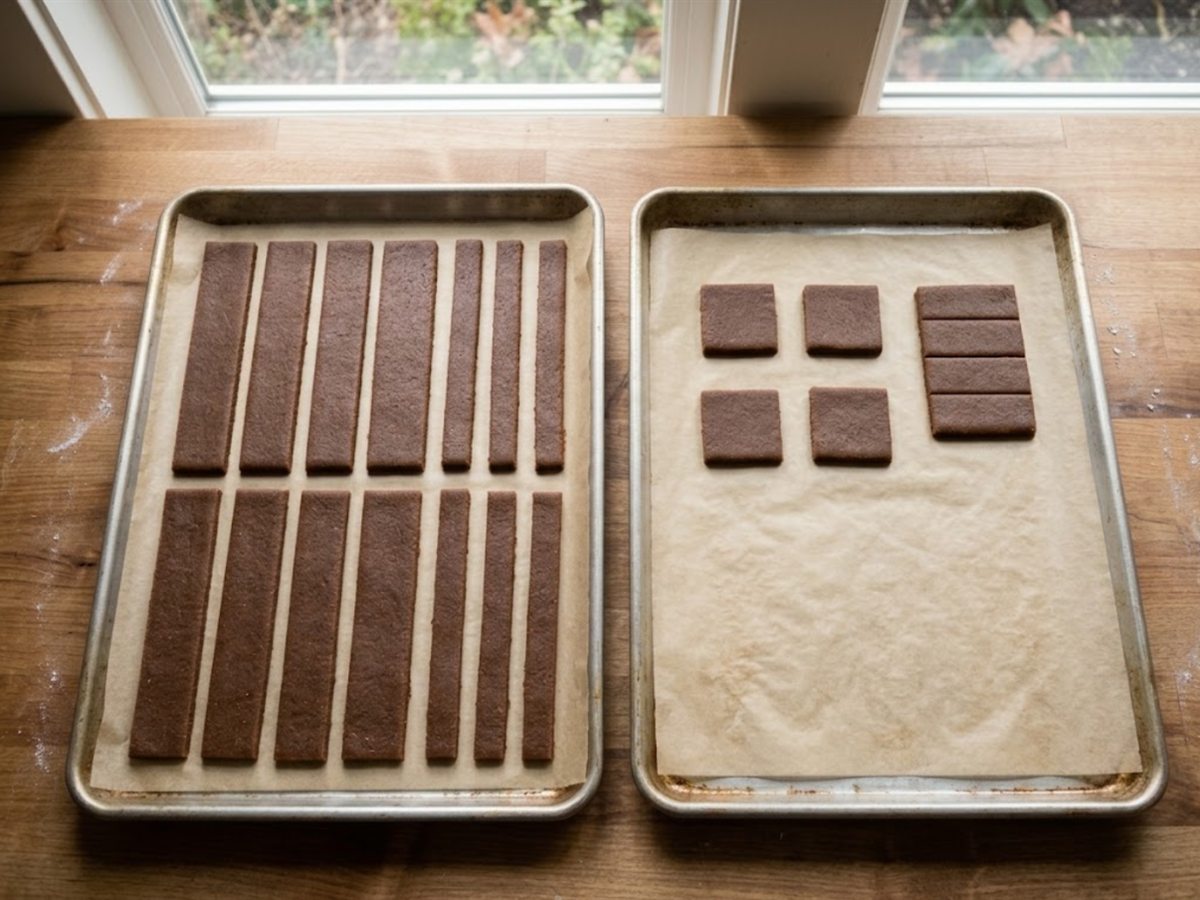
Roll the rest of the dough and cut the 16 tower walls, 8 wide and 8 narrow, then the four small lids and the drawbridge. Press the back of a knife along the four dashed lines on the drawbridge, about halfway through, for the planks. Keep the tall tower walls on one pan and the lids and drawbridge on another.
Why this matters: the lids and drawbridge bake much faster than the walls, so on a shared pan either they burn or the walls come out underbaked.
5. Bake the pieces, then melt candy into the windows
Check as you go: every oven runs a little hot or cool, so use these times as a guide, not a timer. Look through the oven door often, and trust the matte surface and firm edge over the clock.
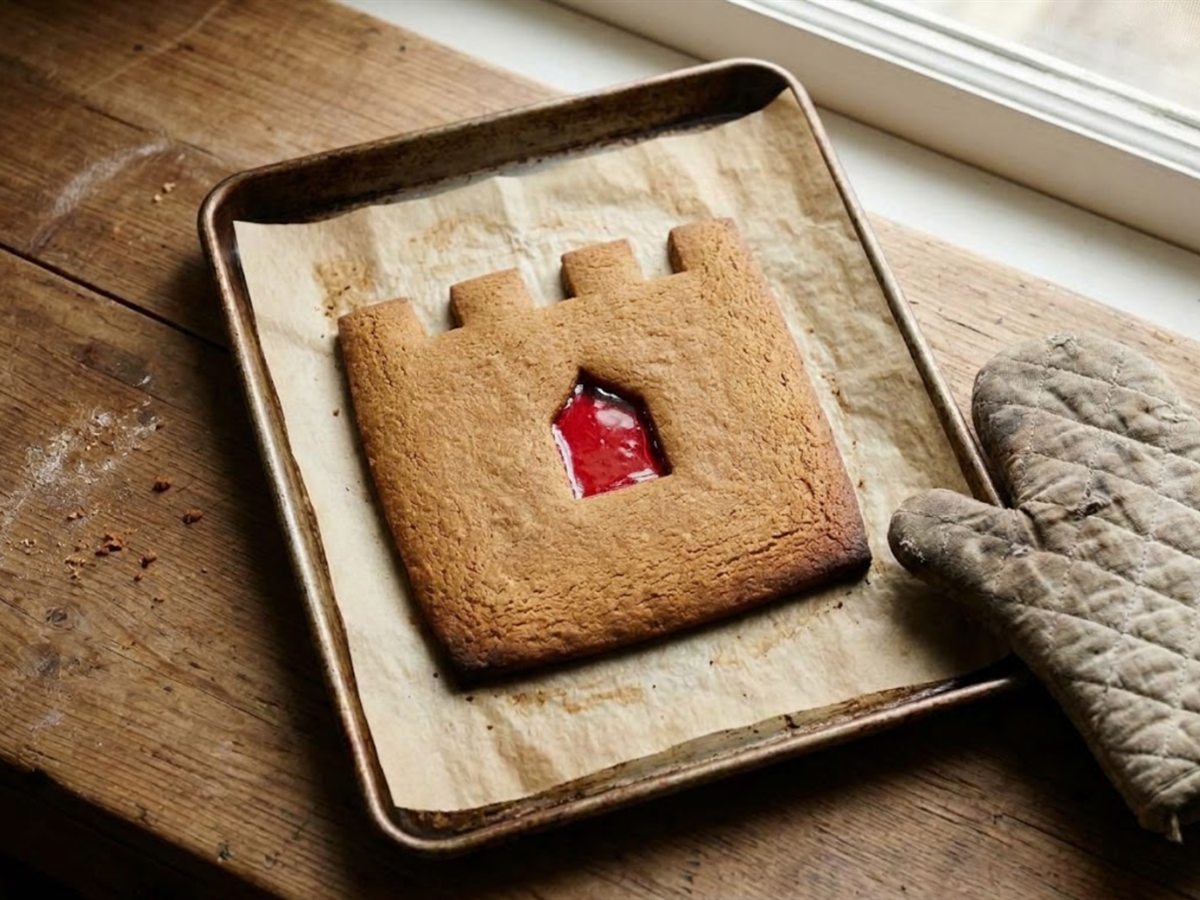
Bake at 300 degrees F. The walls take 22 to 30 minutes, until the surface looks matte and the edge feels firm under a fingertip. The lids and drawbridge are much smaller, so start checking them at about 12 minutes. Pull the pan with the three window walls out about 5 minutes early, fill each window two candies deep with crushed red candy, and bake again until it has melted flat and glassy, checking after 5 minutes.
This works like any melted candy glass: the candy flows once it reaches the hard crack stage, which Colorado State University Extension puts at 300 to 308 degrees F at sea level. That is right at this oven’s temperature, so it melts slowly. If the candy is still lumpy after about 10 minutes, raise the oven to 325 degrees F and watch it closely. At high altitude, the target drops about 2 degrees for every 1,000 feet, so check sooner, because candy that melts early can brown.
Why this matters: melted candy is far hotter than the cookie around it, and it burns fast once it pools.
6. Trim every piece while it is warm
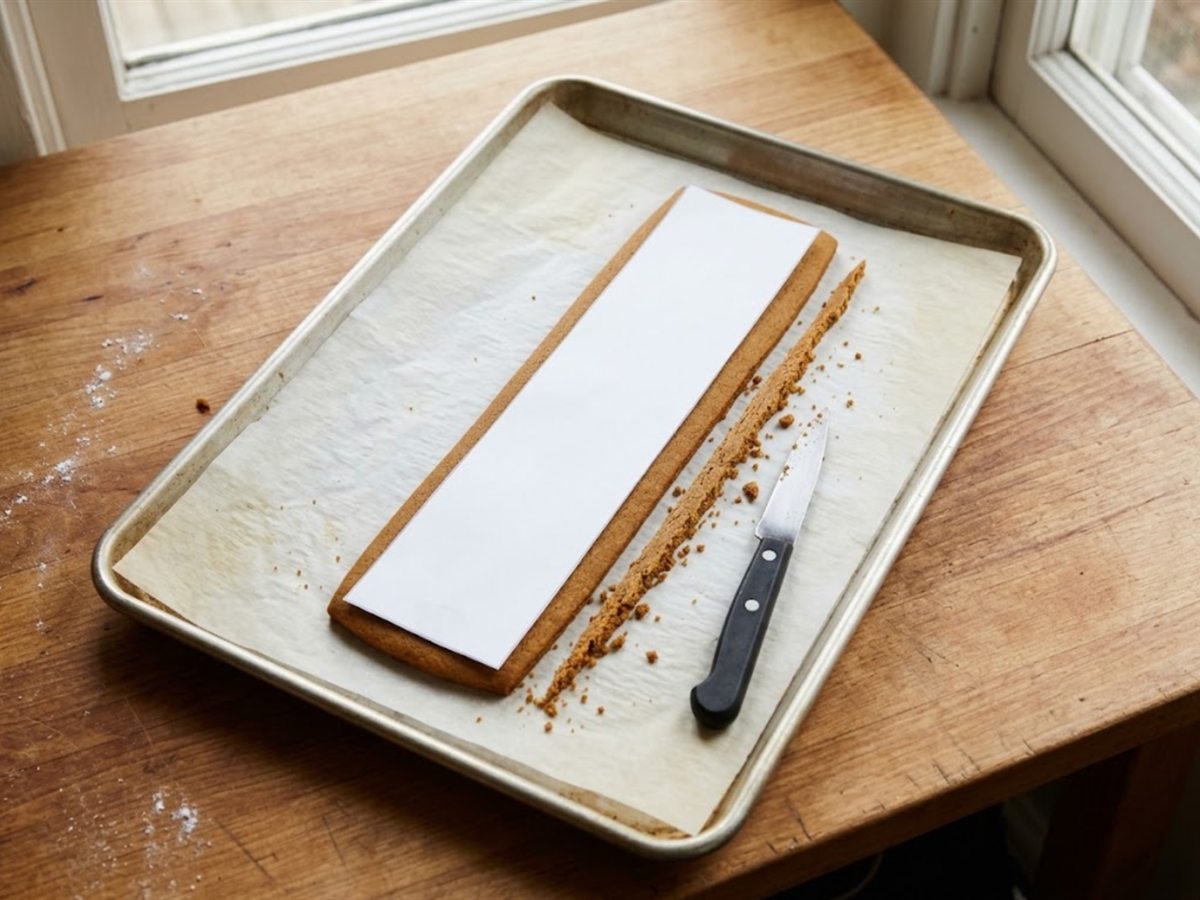
Within two minutes of each pan coming out, lay the paper piece back on top and trim any edge that spread past it, including the notches. Then leave everything on the pan until it is completely cool and flat. Do not lift a window wall until the candy has hardened. When a cooled scrap bends a little and then snaps cleanly, the pieces are ready to build with.
Why this matters: warm gingerbread trims cleanly with a knife, while cooled gingerbread tends to snap exactly where you did not want it to.
7. Stand the four towers on the board
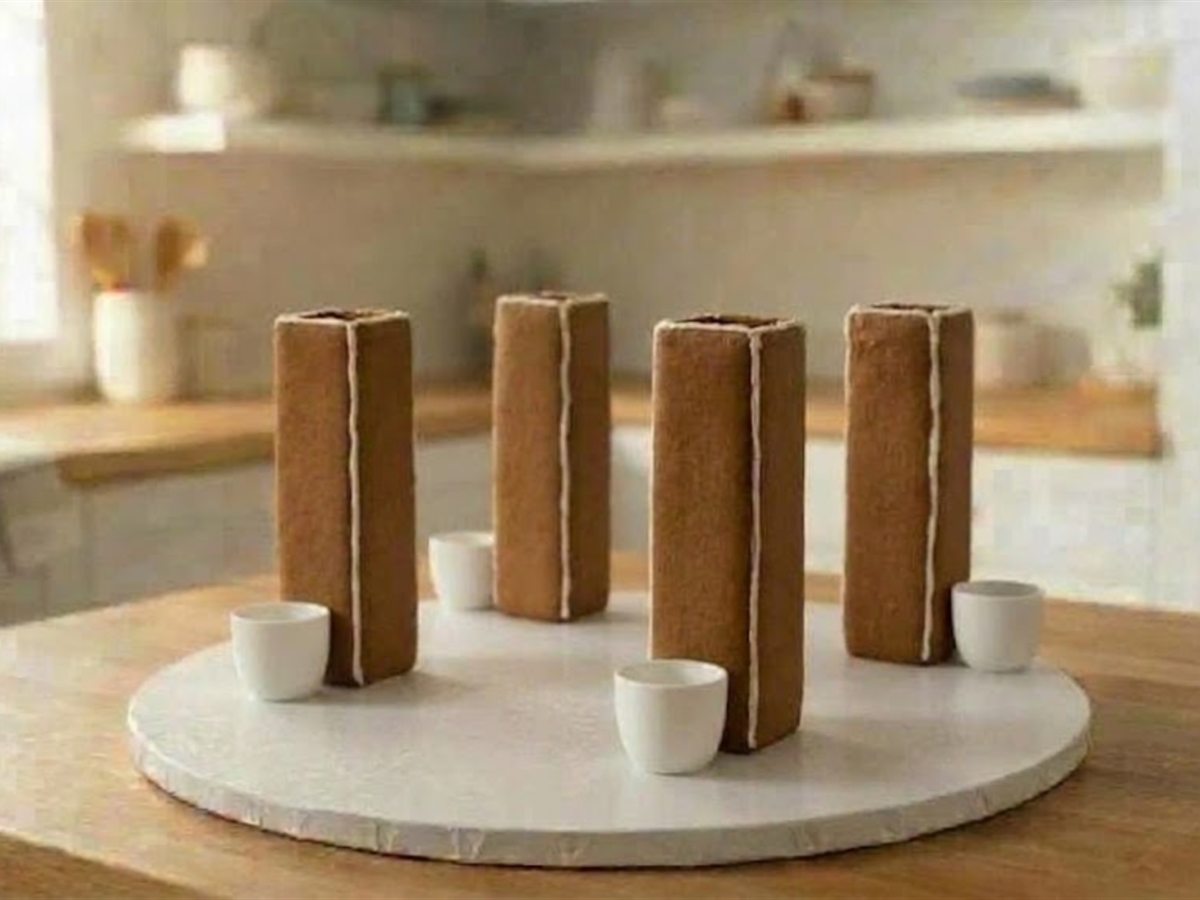
First lay the four castle walls flat on the board in a square, with a gap at each corner, to see where the towers go, then move them aside. Build each tower as a box: pipe icing along the bottom and side edges of a wide wall, stand it up, tuck the two narrow walls in behind its edges, and close it with the second wide wall. Stand one tower at each corner of a 6 1/2 inch square, prop them with cups and leave them for 2 hours.
Why this matters: the towers are the frame of the whole castle, so they get to set on their own before any wall leans on them.
8. Set the four walls between the towers
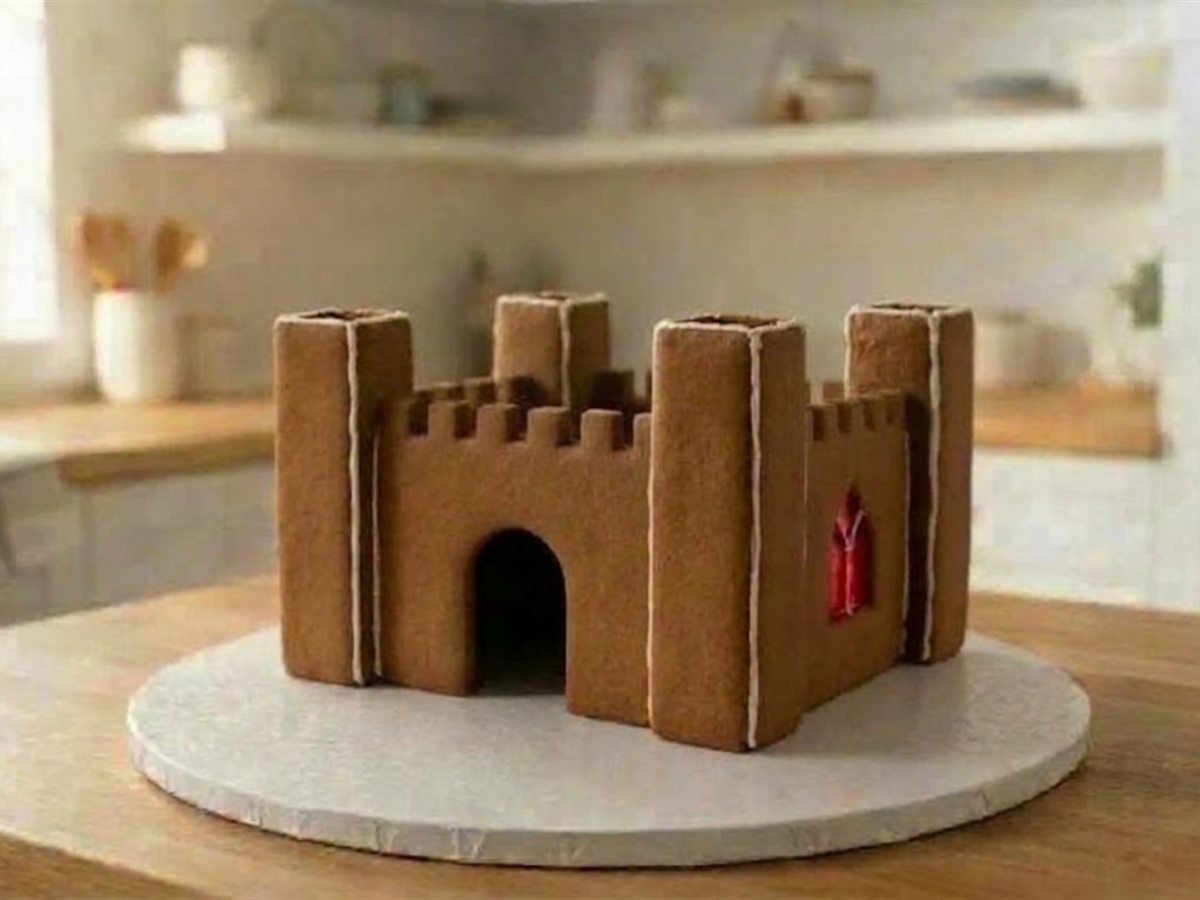
Pipe icing along the bottom and both short edges of a wall and press it in between two towers, centered on the tower faces, with its notches at the top. Put the front wall, with the gate, between the two front towers and the three window walls on the other sides. Leave it for 2 hours.
Why this matters: each wall is glued to two towers, so once it sets the whole castle locks into one square frame.
9. Set the tower lids
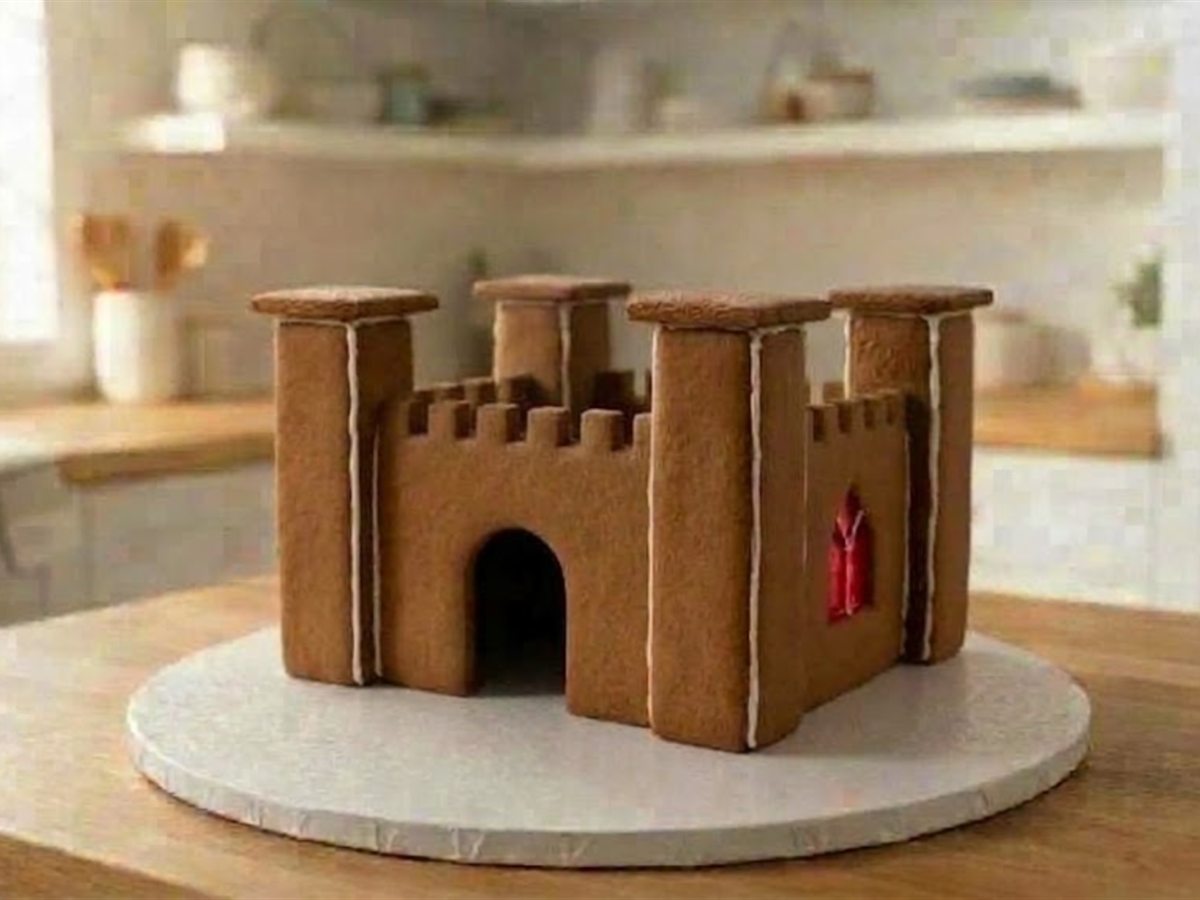
Pipe a line of icing along the top edges of each tower and lower its lid on, centered, so it overhangs a little on every side. Leave them for 4 hours before anything goes on top.
Why this matters: the lids carry the cone roofs, so they need a firm joint before you load them.
10. Pipe the stone lines on the walls and towers
With white icing and a small round tip, pipe rows of stones across every wall and tower: a horizontal line every half inch or so, then short upright lines between them, staggered from row to row like bricks. Leave the gate and windows clear, and pipe a line along each notched top.
Why this matters: the stone lines are what turn plain gingerbread into castle walls, and they hide small gaps at the joints too.
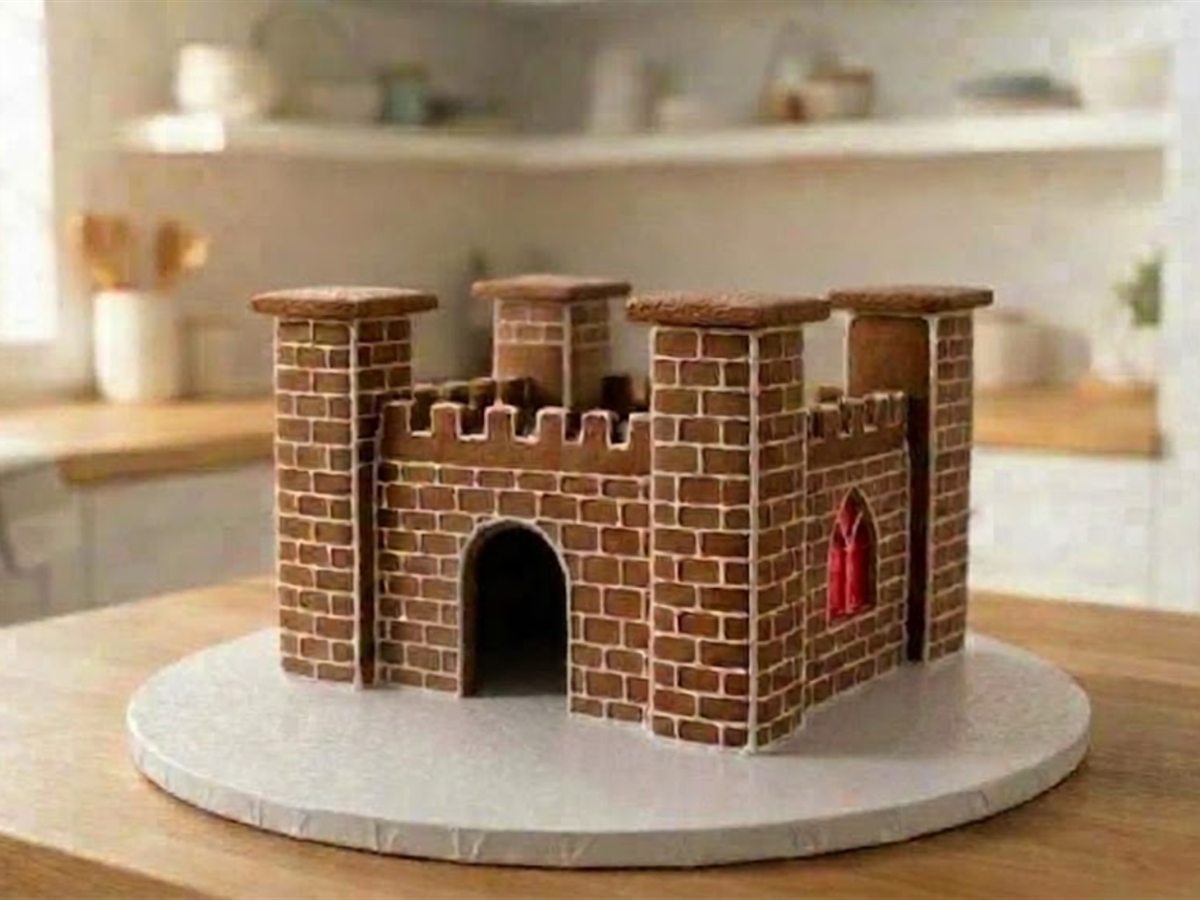
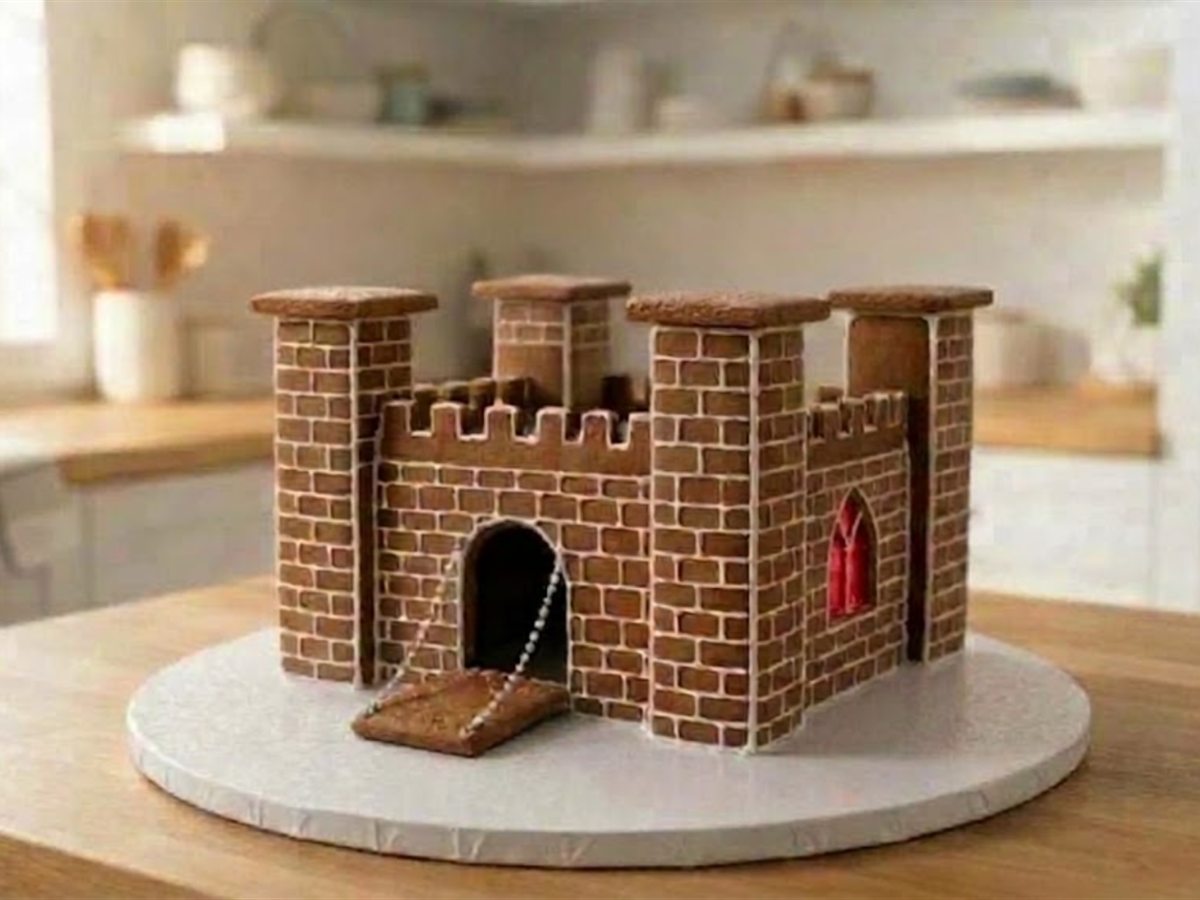
11. Lay the drawbridge and pipe its chains
Pipe icing along one short edge of the drawbridge and lay it flat on the board in front of the gate, planks up, with that edge touching the bottom of the gate. Then pipe a chain from each top corner of the gate down to the far corners of the drawbridge, as a row of small dots.
Why this matters: a drawbridge lying down tells everyone the castle is open, and the open gate is also how the light shows through.
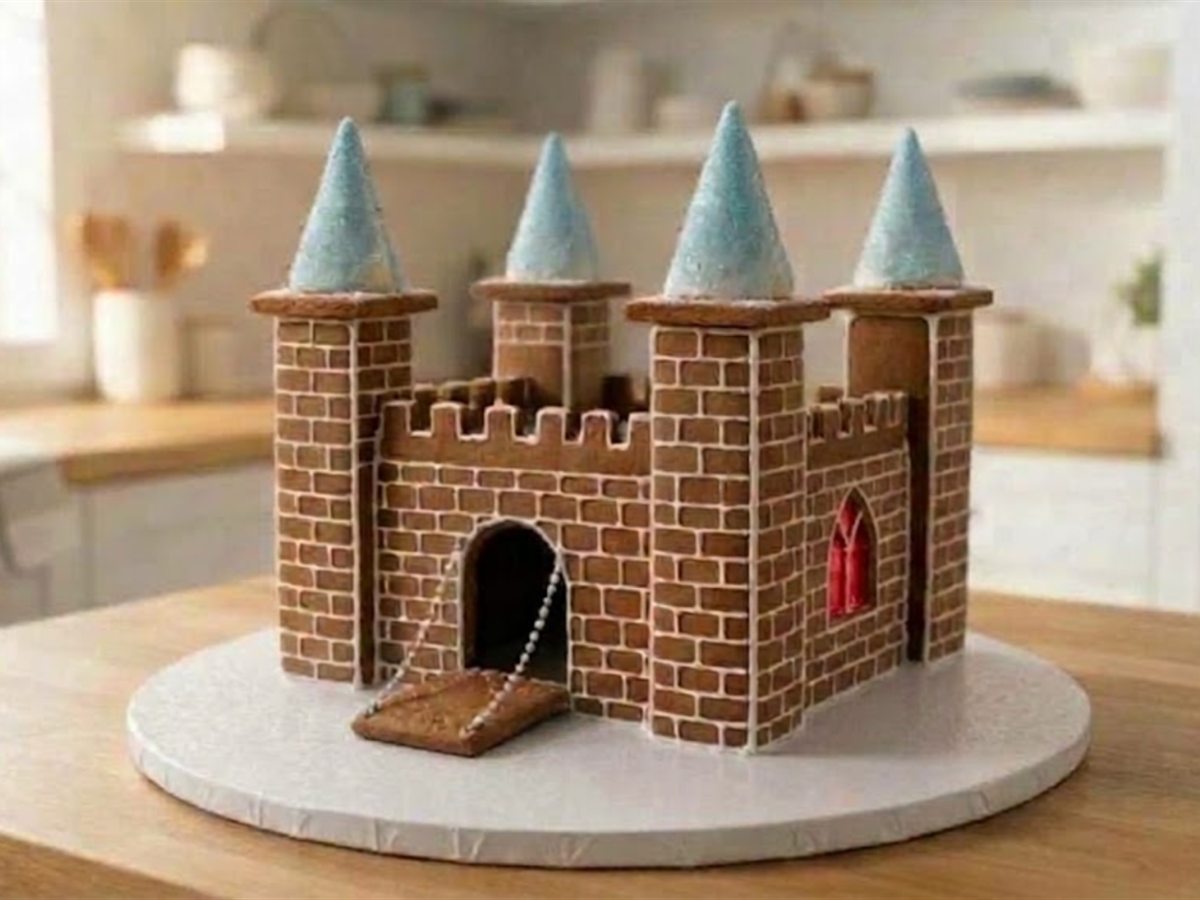
12. Frost the sugar cones and set them as roofs
Snip the very tip off each cone with scissors, leaving a hole just big enough for a pretzel stick. Tint some icing pale blue, spread it over the outside of each cone in upward strokes and dust it with sanding sugar if you like. Pipe a ring of icing on each tower lid, press a cone on, open end down, and hold it for a minute.
Why this matters: a cone glued over a set lid stands straight on its own, which is how the castle gets four tall turret roofs with no curved baking at all.
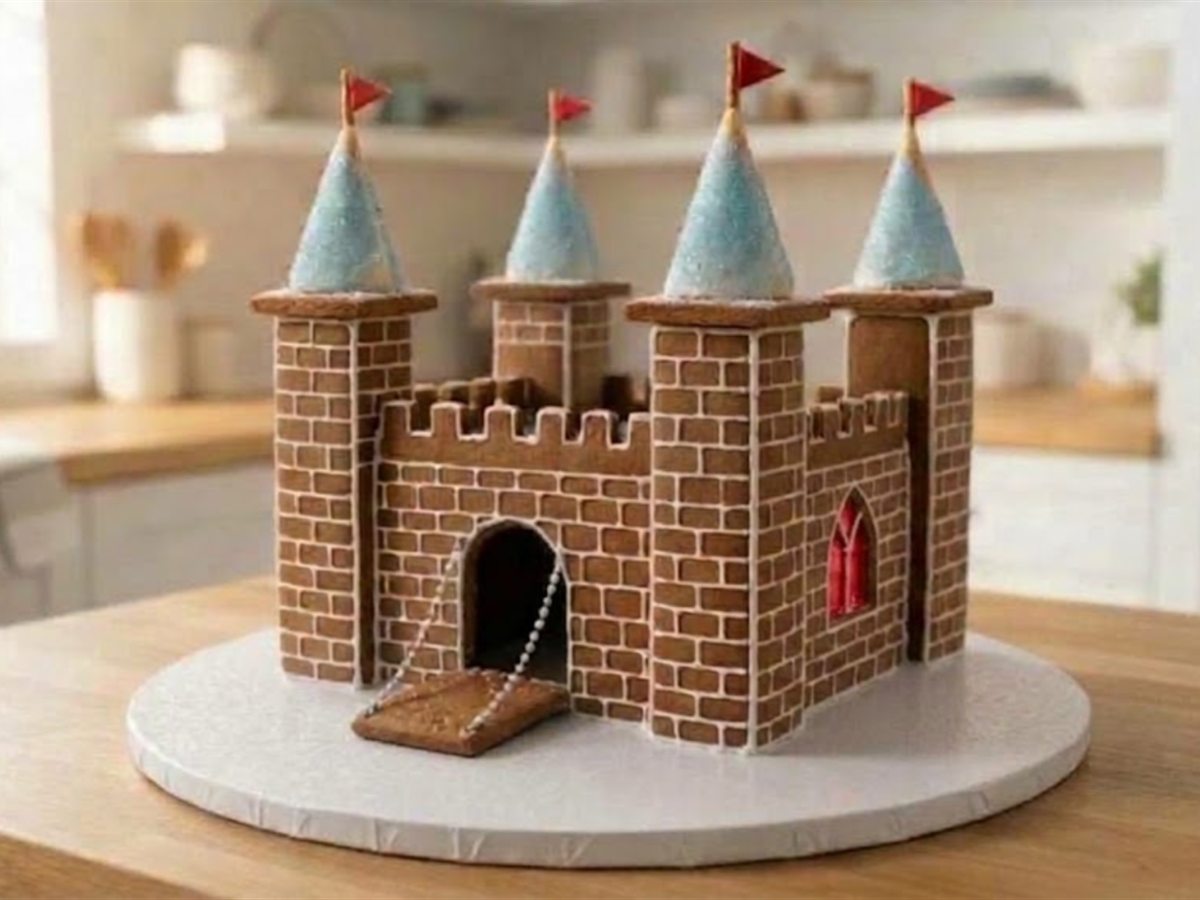
13. Top each roof with a pretzel flag
Cut four small triangles from the fruit leather, about 3/4 inch long. Wrap the short edge of each one around the top of a pretzel stick and press it to stick. Dab icing on the bottom of each pretzel and push it into the hole at the top of a cone.
14. Pipe the window frames, gate trim and arrow slits
Pipe a white frame around each candy window and a double line around the arch of the gate. Then stir the cocoa into a few spoonfuls of icing and pipe a short, thin upright line on the front of each tower, about halfway up, for an arrow slit.
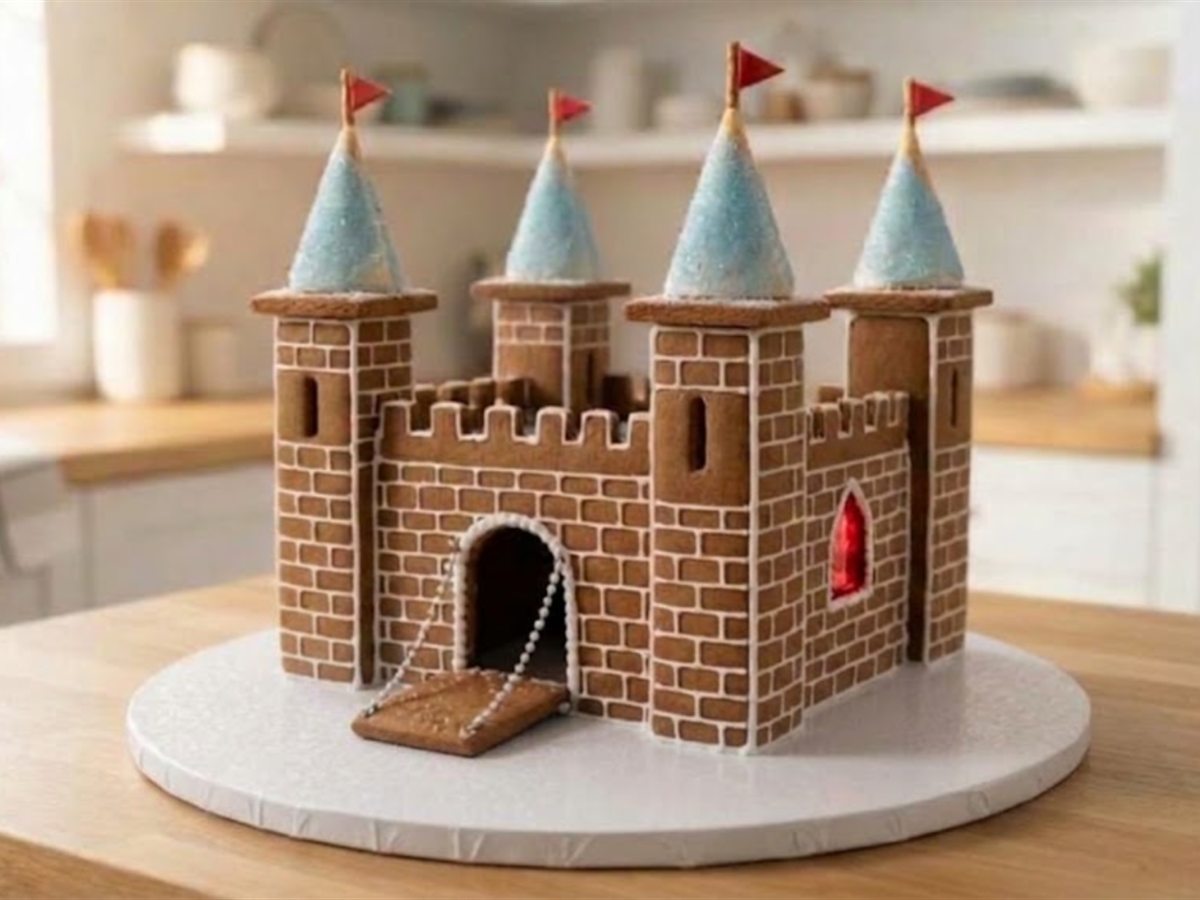
15. Pour a blue sugar moat around the castle
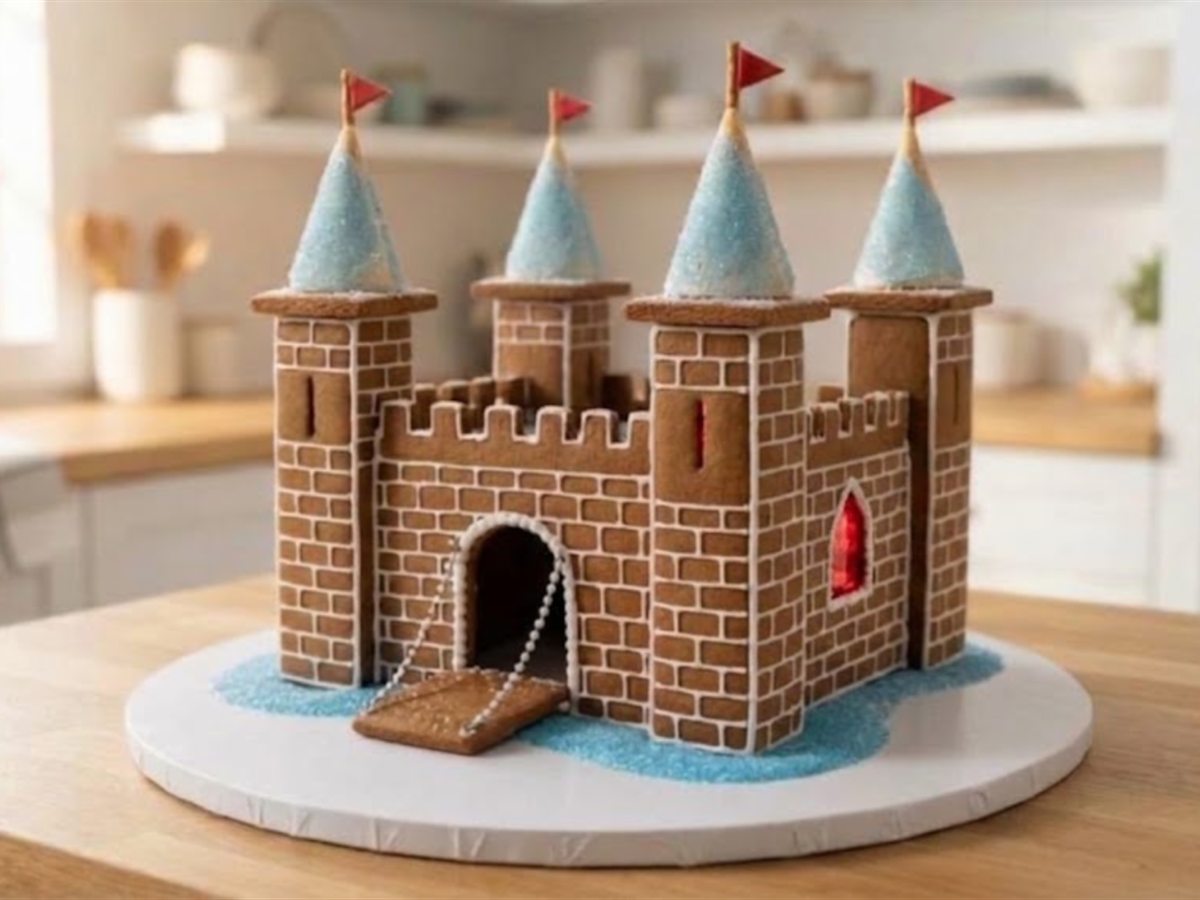
Pipe a band of icing on the board about half an inch out from the castle, all the way around, and spread it into a ring about 3/4 inch wide, rounding it at the corners so it stays on the board. Spoon blue sanding sugar over it while it is wet, then tip off the extra. Leave a bare gap where the drawbridge crosses, so the bridge rests on the board.
Why this matters: the moat is the detail that makes the drawbridge make sense, and the sugar sparkles like water when the light hits it.
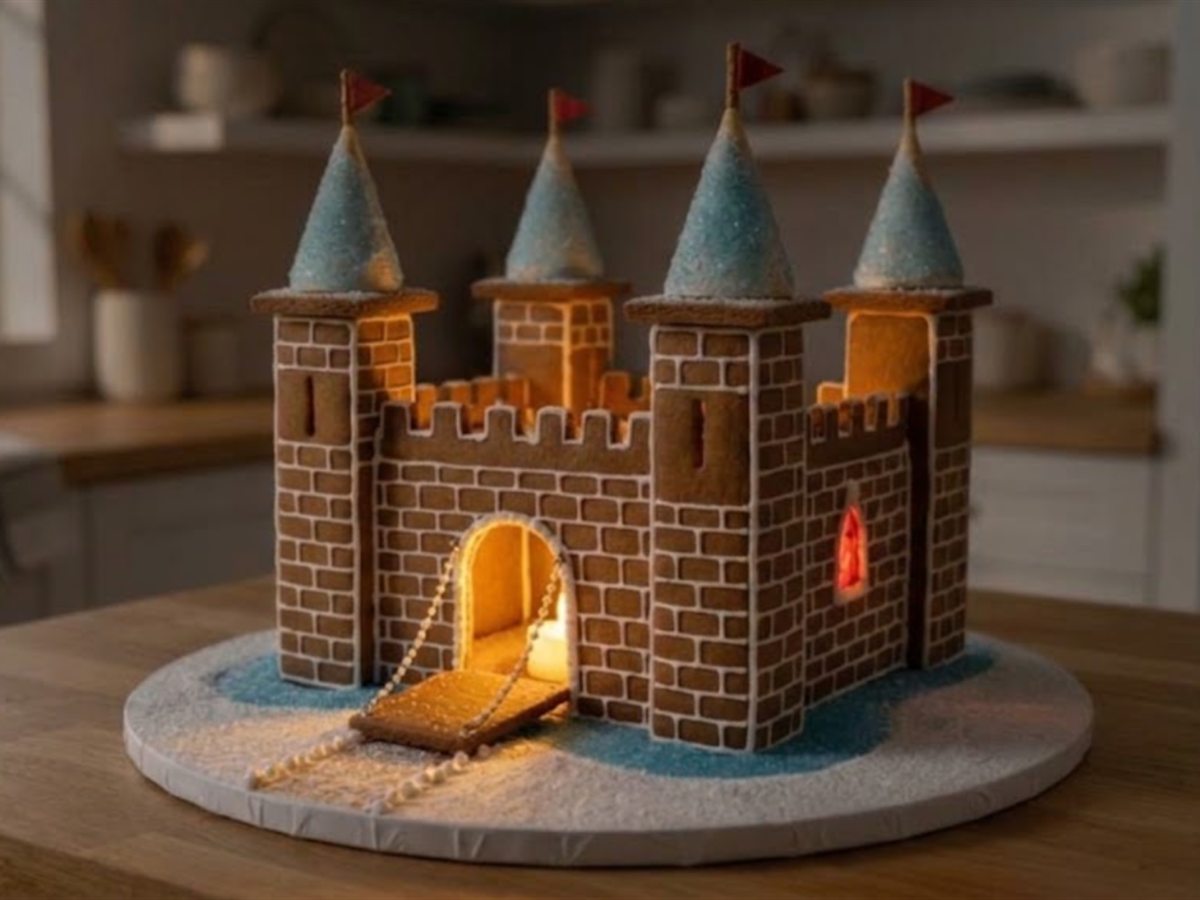
16. Snow the board and light the courtyard
Spread a thin layer of white icing over the bare board outside the moat, then sift powdered sugar over it. Switch on the LED tea light and lower it into the open courtyard, and the red windows and the gate glow. Use only a battery light. A real candle inside a ring of sugar and butter walls can scorch them, which is why our guide to battery lights for gingerbread houses sticks to LEDs. Let the finished castle stand overnight before you move it.
Keep track as you go with the checklist below, which remembers your ticks on this device and tells you exactly when each wait is over.
Castle Build Checklist
Tick each step as you finish it. When a step needs icing to set, the checklist tells you the time it is safe to carry on. Your ticks are saved on this device.
0 of 16 steps done
No waits running yet.
For planning only: set times change with the weather, so press a joint gently before you load it. Not professional baking advice. Your progress is saved in this browser only and never sent anywhere.
Why the Castle Uses Square Towers and an Open Courtyard
Gingerbread cannot bend once it is baked, so a round tower is not an option without a curved mold. Square towers are the easiest box there is, and four of them at the corners do what round towers do on a real castle: they hold the corners and rise above the walls. Each wall is glued to two towers, so once everything sets, the castle is one locked frame that no single piece can push out of square.
The courtyard stays open for two reasons. A flat roof across a 3 1/2 inch gap would have to sit on ledges inside the notched walls, which is fiddly to build and hides the notches. And an open top is the simplest light switch there is: the tea light drops straight in, and you lift it out to turn it off or change the battery. Picture a family that seals a light inside a closed house on Friday for Saturday’s party. It glows all weekend, nobody can reach the switch, and by Tuesday the windows are dark. Here, the light goes in when guests arrive and comes out at bedtime.
The look comes from three cheap details instead of hard baking: cones for roofs, piped lines for stone and blue sugar for water. The same square-and-flat-roof approach runs through our farmhouse with its wide walls, so if you have built one, this castle will feel familiar.
Troubleshooting
If it goes wrong, most problems come from loading icing before it has set, or from heat and humidity, so here is what to look for and what to do about it.
| What you see | Why it happens | What to do |
|---|---|---|
| A tower leans or slides while setting | The icing was too soft, or the props came off early | Push it back, prop it again, and wait the full 2 hours. Stiffer icing holds its peak when you pull a spoon out. |
| A wall will not fit between two towers | The towers drifted apart or together while setting | If the gap is wide, fill it with icing and pipe stone lines over it. If it is tight, shave the wall’s short edge with a knife. |
| The notches came out ragged | The dough was warm, or the wall was trimmed after it cooled | Pipe a line along the notched top. It evens out small chips. |
| A window candy browned or bubbled | It stayed in too long, or you are at high altitude | Check from 5 minutes. A browned red window still glows, just darker. |
| The candy did not melt | A 300 degree oven sits right at the candy’s melting point | Give it a few more minutes at 325 degrees F and watch it. |
| A cone roof tips over | The lid icing was wet, or the cone went on before the lid set | Lift it off, pipe a fresh ring and hold it for a minute. Prop it with a cup for 30 minutes if it still leans. |
| A cone cracked when you snipped the tip | Too much was cut at once | Use it anyway: frosting hides a crack, and the flag covers the top. |
| The moat sugar slid into the drawbridge gap | Too much sugar was tipped on at once | Brush it away with a dry pastry brush before the icing sets. |
| The flags droop | The fruit leather is too long or too warm | Trim each flag shorter and press it again once it is cool. |
Easier Versions: No-Bake and Kit Shortcuts
If baking from scratch is too much this year, the same castle works two simpler ways.
A No-Bake Graham Cracker Castle for Small Kids
Graham crackers make a smaller castle with no oven at all. For each tower, stand four half sheets on end in a small square box, glued with royal icing, and set a sugar cone on top. Then stand a full sheet on its long edge between each pair of towers as a wall, and press a square cracker down in front of the middle wall for a drawbridge. A graham cracker shortcut of any shape lives or dies on the glue, so use royal icing, not tub frosting, for the walls.
Picture a five year old who wants to help but cannot wait two days. Build the graham towers with them in the morning, let them set over lunch, and they add the cones, flags and blue sugar moat that afternoon. The gingerbread castle can be the grown-up project for the weekend.
The Kit Shortcut
Ready-made castle kits are sold in some seasons, and a plain kit works too. Build the house from a kit as usual, then stand four towers from a second kit’s cut-down walls at the corners, or use four cardboard tubes frosted white if the castle is for display only, and top every tower with a frosted sugar cone. Then use the stone lines, drawbridge, flags and moat from the steps above.
Storage Instructions
Humidity is what softens gingerbread and makes sugar and candy sticky, so keep the castle in a cool, dry room, away from the stove, the dishwasher and sunny windows. Cover it loosely with a clean cloth if dust is a worry. Switch the tea light off when no one is looking, and lift it out before you put the castle away.
Treat it as a decoration once it has stood out for a few days. Royal icing made with raw egg whites is not cooked at any stage. If you plan to eat some, make the icing with meringue powder instead.
FAQ
Is this Cinderella’s castle?
No. It is our own fairy-tale castle, with no logos or film artwork, so it can be Cinderella’s, a knight’s or your family’s. Paint the cones pink instead of blue for a princess castle, or leave the flags off for a storybook fortress.
How tall is the finished castle?
About 10 inches to the tips of the cone roofs, a little more with the flags. The towers are 5 1/2 inches tall, the walls 3 1/2 inches, and the castle is 6 1/2 inches square, so it fits a 12 inch round board with room for the moat.
Can I use a real candle inside?
No. Use a battery LED tea light, because the courtyard is ringed by sugar and butter walls, and a flame inside it can scorch them.
Can you eat a gingerbread castle?
The gingerbread and cones are edible when fresh, but this is built as a display piece, and the pretzel flagpoles are a choking risk for very small children. Royal icing made with raw egg whites is never cooked, so if you want to nibble it, use meringue powder icing and eat it soon after it is finished.
Can I make it bigger?
Yes. Print at 125 percent for a castle about 8 inches square, but cut each tower side 1/2 inch narrower than its printed front instead of using the printed side piece, because the dough is still 1/4 inch thick at any size. The same cones still fit the larger lids. Plan on a second batch of dough.
What can I use instead of sugar cones?
Pointed wafer cones work, and so does a tall swirl of stiff icing piped straight up from each lid with a large star tip. For a medieval fortress, skip the roofs and give the towers notched tops like the walls.
More Gingerbread House Builds and Recipes
If the castle made you want another shaped build, try the ring of tapered panels in our tapered tower template, or set the castle on a hill at the edge of a village using our gingerbread village layouts. And when a tower leans or a joint gives way, our fixes for leaning walls work on any house.
Build Your Next House With Best Gingerbread Houses
The castle proves the point we come back to on every build: a few strong details tell the whole story. When you want a head start next time, our guide to the boxed kits that hold up sorts the ones that stay standing from the ones that do not, so you can spend your time on the towers, the flags and the moat.