

A Fortnite gingerbread house sounds like it should be everywhere, and it is mostly videos. Search for one and you get creators racing a timer, gingerbread outfits from the item shop and a few photos nobody explains.
Our house dough and royal icing recipes set every bake temperature and wait, and the free template was checked by a script so the floors, ramp and roof fit. The house is a build fort made only of the game’s own building pieces: square plank walls, flat floors, a 45 degree ramp and a steep cone roof.
You will end up with a fort about 8 3/4 inches tall on a 10 inch board, from one batch of dough over two days, with a loot chest and two glowing floors. Start with the template, then the plank work, the plan and 16 steps.
Fortnite Gingerbread House: At a Glance
- Difficulty: Easy to medium. Every piece is a rectangle, a square or a triangle, and every wall is the same height. The patience goes into stacking the second floor.
- Total time: about 1 1/2 days, in seven sessions. Most of it is icing drying.
- Active time: about 7 hours, counting the dough chill and the bake.
- Makes: a two-floor fort 3 inches square, about 8 3/4 inches tall, with a ramp that reaches 3 inches out, on a 10 inch square board.
- Template: free 3-page PDF, US Letter, true size with a 1 inch test bar on every page.
Tools: printer, ruler, scissors, rolling pin with 1/4 inch guides, parchment, 2 half sheet pans, paring knife, 5 piping bags, two small round tips and a small star tip, toothpicks, small cups or cans for propping, a sheet of foil, 10 inch square cake board, 2 battery LED tea lights.
Materials
- 1 batch of sturdy gingerbread house dough
- 2 batches of royal icing
- Gel food coloring: brown, ivory or yellow, blue, green and a little gold or yellow
- About 6 clear blue or clear hard candies, such as blue raspberry drops or clear mints
- 4 sugar ice cream cones for the trees
Steps
- Print the template at Actual Size and measure the test bar.
- Make the dough and chill it for at least an hour.
- Roll the dough 1/4 inch thick and cut the eight walls.
- Cut the two plates, the ramp and the brace.
- Cut the four roof triangles and the seven little chest pieces.
- Bake at 300 degrees F, then melt crushed blue candy into the windows.
- Trim every piece against the template while it is warm.
- Flood the walls, plates and ramp light wood, the roof darker and the chest blue.
- Pipe the planks, wood grain and nail heads, the ramp steps and the chest bands, and leave everything overnight.
- Snow the board and stand the ground floor, then start the roof.
- Set the floor plate on the ground floor and lean the ramp on its brace.
- Stand the upper floor on the plate.
- Finish the cone roof on the roof deck.
- Set the roof on the upper floor.
- Place the loot chest and the trees.
- Light both floors with battery tea lights.
Notes: times are worked out from the set times on our icing page, not timed on a build. Ovens and doughs vary, so treat every bake time here as a starting point: check early, go by the matte surface and firm edge, and bake a test strip before you build. Not an official Fortnite product. Not approved by or associated with Epic Games. This is our own fan build.
Free Printable Fortnite Gingerbread House Template
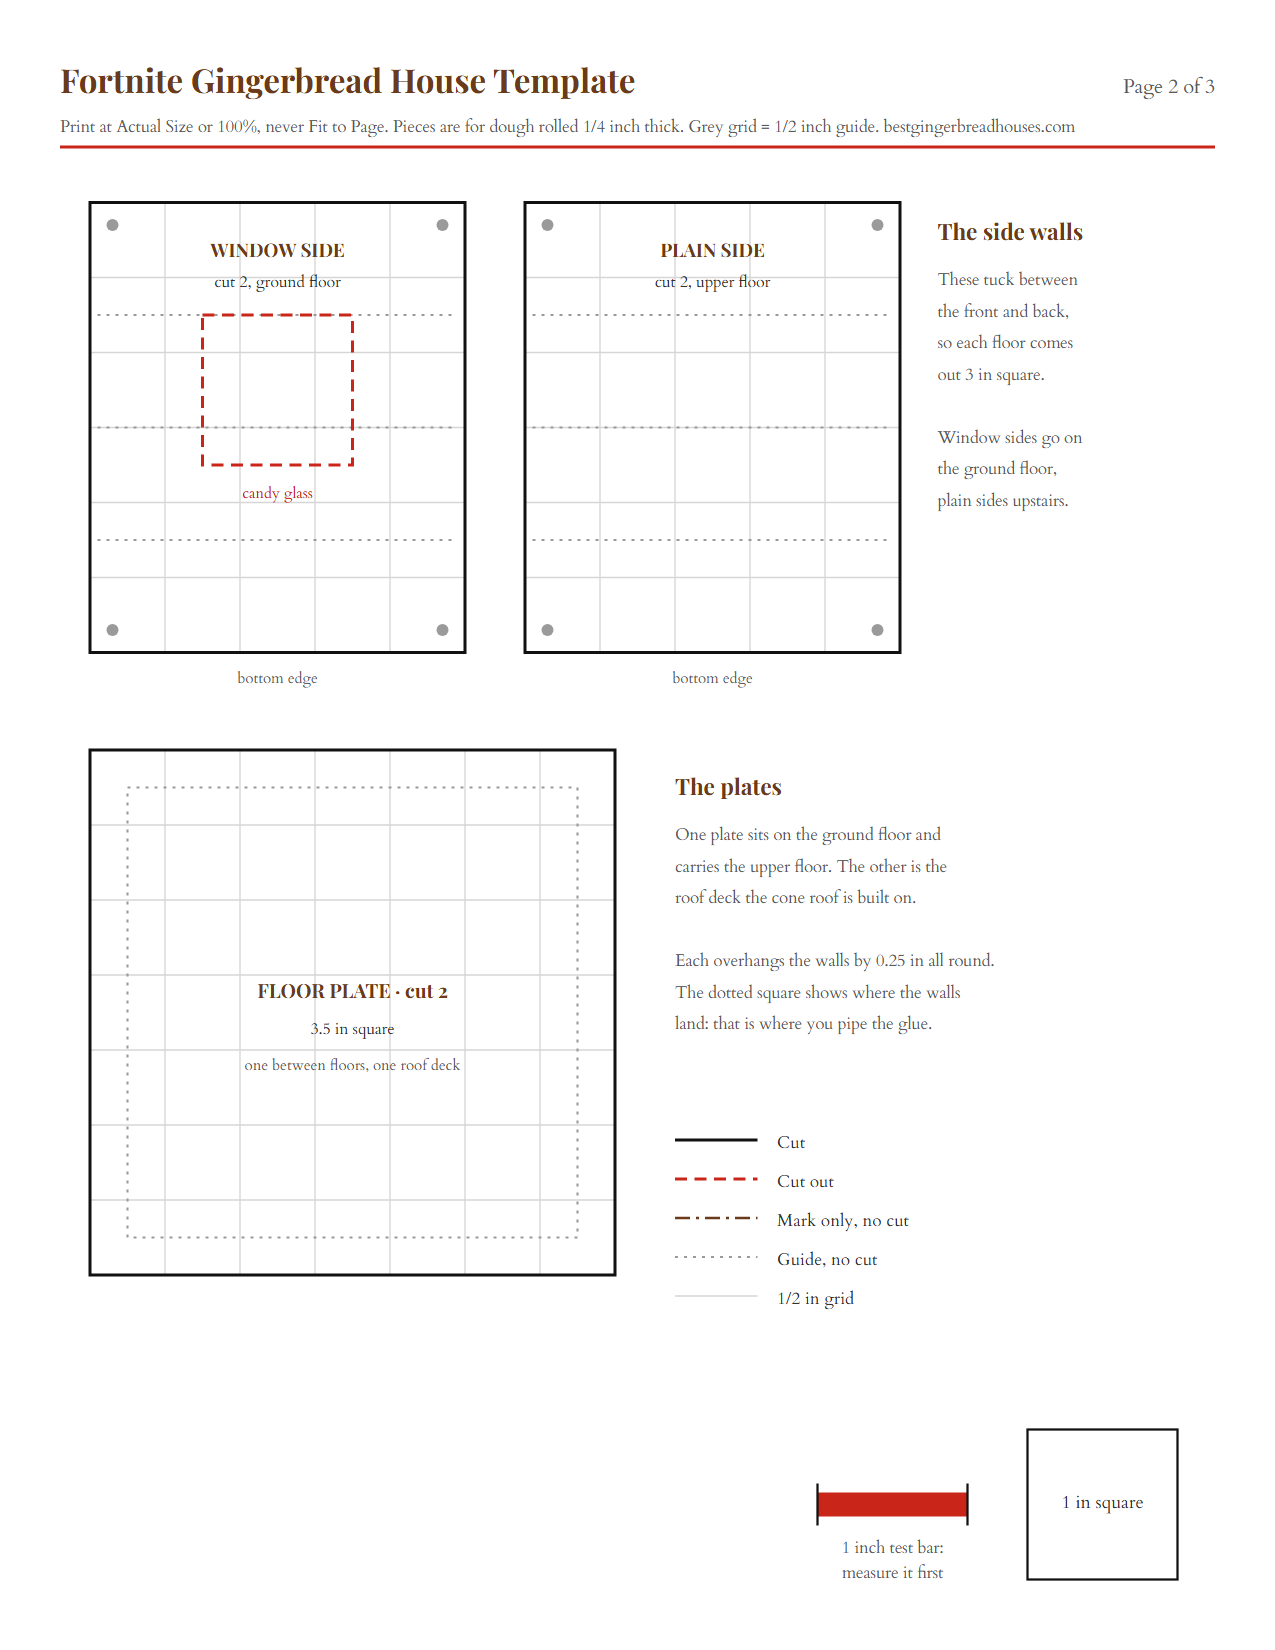
The template is three US Letter pages with twelve shapes, drawn at true size over a faint 1/2 inch grid. Download the PDF, print it at Actual Size or 100 percent, and put a ruler on the red 1 inch bar before you cut anything. If the bar measures an inch, every piece is right.

| Piece | Cut | Size |
|---|---|---|
| Ground front | 1 | 3 x 3 in |
| Back wall | 2 | 3 x 3 in |
| Upper front | 1 | 3 x 3 in |
| Window side | 2 | 2 1/2 x 3 in |
| Plain side | 2 | 2 1/2 x 3 in |
| Floor plate and roof deck | 2 | 3 1/2 in square |
| Roof triangle | 4 | 3 1/2 in base, 2 7/8 in tall |
| Ramp | 1 | 2 1/2 x 4 1/4 in |
| Brace | 1 | Right triangle, 2 5/8 in legs |
| Chest | 1 | 1 1/4 x 1 in, rounded top |
Each floor is a 3 inch box, the plates overhang it by 1/4 inch as a ledge for the next floor, and at 45 degrees the ramp’s top edge lands right under the plate. The roof triangles rise at about 52 degrees, steep like the game’s cone piece.

Black lines are cuts, red dashes are openings, and dotted grey lines guide the planks, roof rows and ramp steps. Our other house templates that print true to size fit together the same way.
Why a Build Fort
Fortnite has no famous house, but it has a famous way of building, and a quick tower with a ramp up the side is the shape every player has built a hundred times. Every piece is flat, so nothing has to bend.
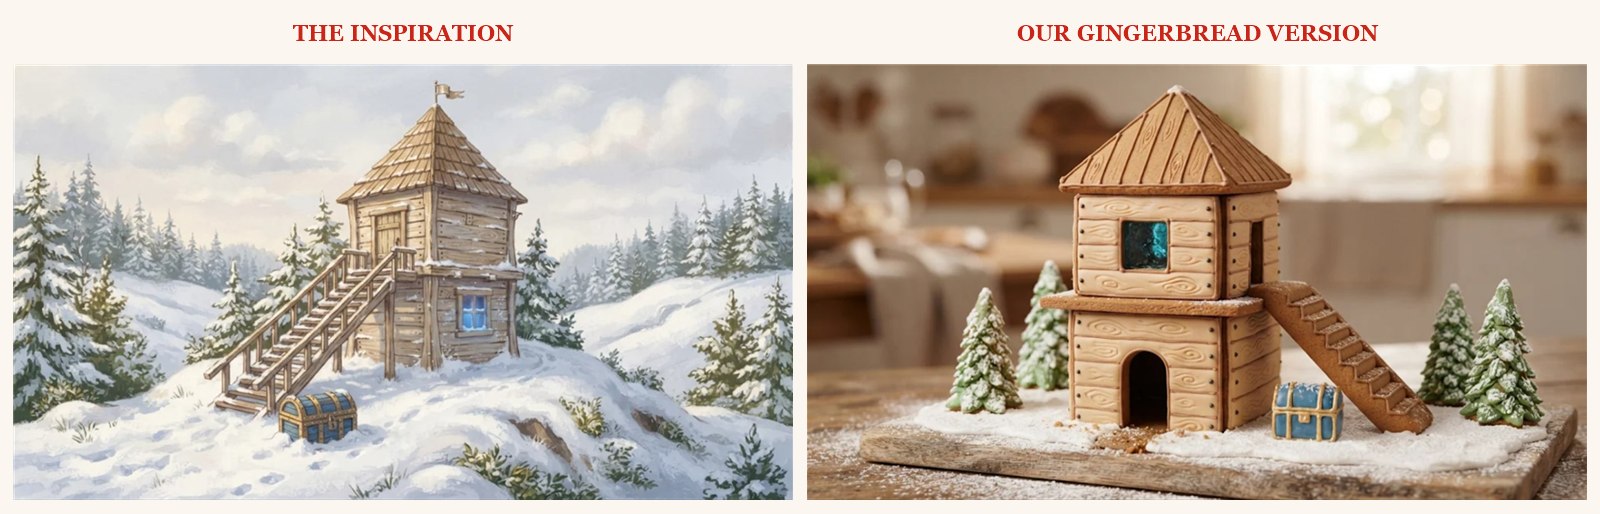
The look comes from three details: plank walls with a nail head in every corner, a ramp with stair steps, and a blue chest with gold bands out front.
Is There a Fortnite Gingerbread House in the Game?
Not one you can build or buy. In December 2019, the v11.30 update added a frozen gingerbread house to the map, east of Weeping Woods, just before Winterfest, and holiday item shops have sold gingerbread outfits such as Merry Marauder and Ginger Gunner. That is why this page builds the fort from the pieces every season shares.
The Planks, the Nails and the Ramp: The Icing Work
All three icing jobs happen while the pieces lie flat.
The planks. A light tan flood, then darker brown lines every 3/4 inch split each wall into four planks.
The grain and the nails. Short wavy grain lines and a nail dot in every corner make a plain wall read as a build piece.
The ramp and the roof. Stair steps every 1/2 inch on the ramp and plank rows on the roof. Try a brick or metal fort below.
Build Fort Material Studio
Forts in the game go up in wood, brick or metal. Pick a finish for the walls and the roof and a color for the chest, and get the icing colors and piping for your fort.
Roof
Chest
A preview to plan colors, not a promise of the exact shade: gel brands and icing batches vary, so test a dot on parchment and let it dry before you flood. Nothing you pick leaves your browser.
What You Need for the Build Fort
For baking
- 1 batch of a dough that bakes flat and holds its edges, with room for a spare wall.
- About 6 clear blue or clear hard candies, unwrapped, for the three square windows.
For the icing
- 2 batches of the royal icing recipe we tint for every color, made one at a time: the first thinned for flooding, the second thick for gluing, piping and snow.
- Gel food coloring in brown, ivory or a touch of yellow, blue, green and a little gold.
- Two small round tips, one finer for the planks and nails, plus a small star tip for the trees.
Tools
- Rolling pin with 1/4 inch guide strips, parchment and 2 half sheet pans
- Paring knife, scissors and a ruler with a clean straight edge
- 5 piping bags, the tips and toothpicks
- A sheet of foil and a few small cups or cans for propping
- A 10 inch square cake board
- 4 sugar ice cream cones
- 2 battery LED tea lights, 1.5 inches across
How Long It Takes, Day by Day
Plan on seven sessions over two days, about 7 hours hands-on. The rest is waiting, because each floor carries the next.
| When | What you do | Hands-on | Then wait |
|---|---|---|---|
| Day 1, morning | Dough, cutting, baking, candy windows, trimming. | About 3 hours | Until cool |
| Day 1, early afternoon | Flood every piece. | 50 minutes | About 1 hour |
| Day 1, afternoon | Pipe planks, nails, steps and chest bands. | 45 minutes | Overnight, pieces flat |
| Day 2, morning | Snow the board, stand the ground floor, start the roof. | 45 minutes | 2 hours |
| Day 2, late morning | Floor plate, ramp, last roof triangle. | 20 minutes | 2 hours |
| Day 2, early afternoon | Stand the upper floor on the plate. | 20 minutes | 2 hours |
| Day 2, afternoon | Roof, chest, trees and lights. | About 50 minutes | Overnight |
New walls get 2 hours before anything sits on them, and a full cure takes 8 to 12 hours, longer in a damp kitchen. The planner below sets the sessions for any date.
Fortnite Gingerbread House Build Day Planner
Pick when you want the build fort finished. The planner counts back through every drying time and tells you when to start baking.
For planning only: icing sets faster or slower with the weather, so treat each wait as a minimum and check that joints feel firm before moving on. Not professional baking advice. Nothing you enter leaves your browser.
How to Make a Fortnite Gingerbread House Step by Step
Each step does one job, and the “why this matters” lines explain the reasoning.
1. Print the template and measure the test bar
Print all three pages at Actual Size or 100 percent, never Fit to Page, and check that the red bar reads exactly 1 inch. Cut out the paper pieces, openings included.
Why this matters: walls printed a little small leave the plates hanging too far over, and the floors look wobbly.

2. Make the dough and chill it
Make one batch of house dough, split it into two discs about an inch thick, wrap and chill for at least an hour, until a poked disc stays dented.
Why this matters: cold dough cuts clean and spreads less, so every wall comes out the same height.
3. Roll the dough and cut the eight walls
Roll a disc on parchment to an even 1/4 inch between guide strips. Cut one ground front, two backs, one upper front, two window sides and two plain sides with a paring knife, using a ruler on every edge. Cut out the round-top doorway, both light doorways and the three square windows, pull away the scraps and slide the parchment onto a pan.
Why this matters: you never lift a cut wall, so the windows stay square and the edges straight.
4. Cut the two plates, the ramp and the brace
From the second disc, cut two 3 1/2 inch square plates, the long ramp and the triangle brace. Keep the plate edges dead straight with the ruler.
Why this matters: square, flat plates let the upper floor and the roof sit level.
5. Cut the roof triangles and the chest
From the re-rolled scraps, cut four roof triangles from page 3, turning every other one point down so they nest. Then cut the chest: two sides, two ends with a rounded top and three lid planks, grouped on their own corner of the pan.
Why this matters: the small chest pieces bake fast, so you can lift them off early without disturbing the walls.

6. Bake the pieces, then melt blue candy into the windows
Bake at 300 degrees F for 22 to 30 minutes, until matte with a firm edge. The ramp may need a minute more, and check the chest pieces from 12 minutes. Crush the blue candies in a zip bag with the rolling pin. Pull the window walls about 5 minutes early, fill each square window two crushed candies deep, right into the corners, and bake again until the candy melts flat and glassy, checking after 5 minutes.
This is how you melt crushed candy into window glass on any house: the candy flows at the hard crack stage, which Colorado State University Extension puts at 300 to 308 degrees F at sea level, so it melts slowly here. Still lumpy after 10 minutes? Raise the oven to 325 degrees F and watch closely. At altitude the target drops about 2 degrees per 1,000 feet.
Why this matters: candy in all four corners gives a square pane, not a round blob.

7. Trim every piece while it is warm
Within two minutes of each pan coming out, lay the paper piece on top and trim any edge that spread, above all the wall tops and bottoms. Leave everything on the pan until cool and flat, and do not lift a window wall until the candy has hardened.
Why this matters: warm gingerbread trims cleanly and cool gingerbread snaps. A plate only sits level if all four walls under it match, and a two-floor fort doubles any lean.
8. Flood the walls, plates and ramp, the roof and the chest
Make the first batch of icing and thin most of it until a knife line closes in about 10 seconds. Tint a big share light tan, a smaller share darker tan and a small cup blue. Flood the outside of all eight walls light tan, leaving the windows clear, then the top of both plates and the ramp. Flood the roof triangles darker tan and the outside of the chest sides, ends and lid planks blue.
Why this matters: the flood has to crust before you pipe on it, or the plank lines sink and blur.

9. Pipe the planks, grain and nails, the steps and the chest bands
Once the floods look matte, about an hour, pipe plank lines across every wall with thick darker brown icing and the finer tip, every 3/4 inch. Add short wavy grain lines and a nail dot in each corner. Pipe a step line across the ramp every 1/2 inch and rows across each roof triangle. On the chest, pipe two gold bands down the front and across the lid planks, a gold edge along the ends and a small square lock on the front. Leave everything flat overnight.
Why this matters: piping flat keeps every line straight, and the walls need the night to cure before they carry a second floor.

10. Snow the board, stand the ground floor and start the roof
Spread white icing snow over the board, leaving a bare 4 inch patch left of center for the fort and a bare strip to its right for the ramp. Pipe icing along the bottom of the ground front and stand it on the patch, facing front. Glue a window side to each end, tucked behind the front, then the back wall with its light doorway at the back. Pipe icing into each inside corner, prop with cups and check the box is square.
Meanwhile, lay one plate flat on parchment as the roof deck and set a loose ball of foil about 2 inches tall in the middle. Glue three triangles along their bottoms and long sides and lean them against the foil on three edges. Leave everything for 2 hours.
Why this matters: icing glues best to bare board, and the foil holds the lean until the icing grabs.

11. Set the floor plate, lean the ramp and close the roof
Pipe icing along the top edge of all four ground floor walls and lower the second plate on, tan side up, overhanging 1/4 inch all round. Stand the brace upright on the bare strip, long leg on the board and short leg against the middle of the side wall. Pipe icing along the brace’s slope and the ramp’s bottom edge, then lay the ramp on the brace, steps up, foot on the board and top edge tucked under the plate. At the roof, slide the foil out through the open side and glue on the fourth triangle. Leave everything for 2 hours.
Why this matters: the brace sets the ramp at 45 degrees and takes its weight off the wall.

12. Stand the upper floor on the plate
Build the upper floor the same way: the upper front with its window forward, the plain sides tucked behind it and the second back wall behind them, all inside the dotted square on the plate. Pipe icing into the inside corners, check it is square and leave it for 2 hours.
Why this matters: the upper floor sits right over the walls below, so its weight runs straight down.
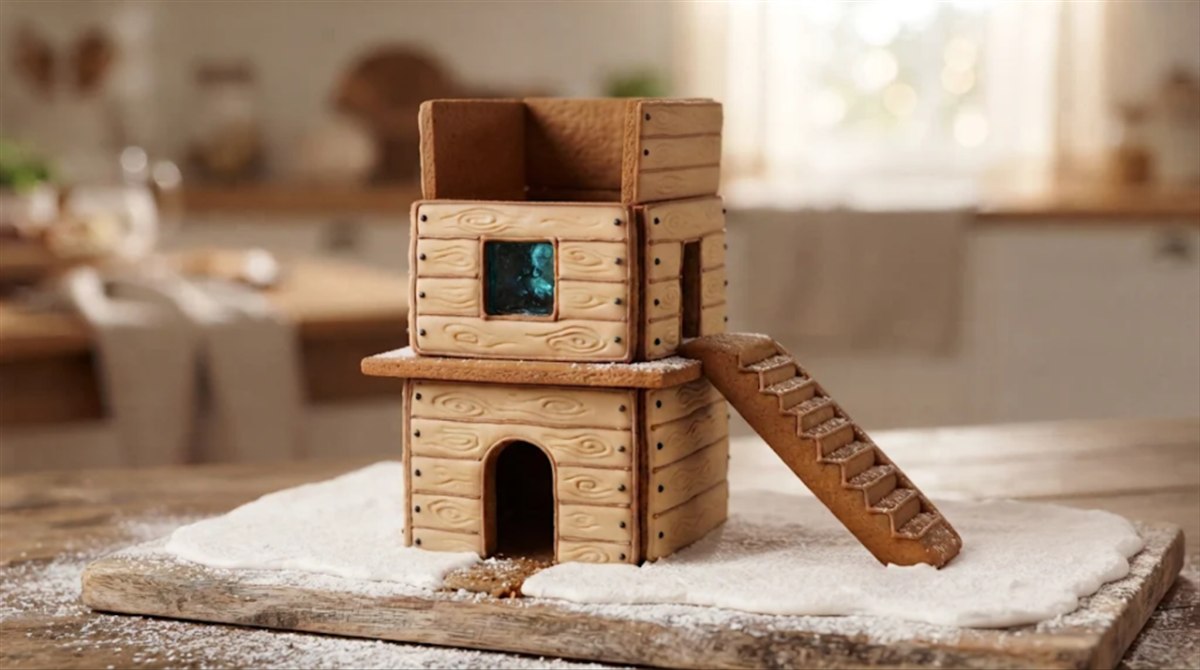
13. Finish the cone roof on its deck
Check that all four triangles meet at one point. Fill the point with a small swirl of icing, and pipe and smooth a line along each outside seam with a damp finger.
Why this matters: once the roof is on the fort, you cannot reach the back seams.

14. Set the roof on the upper floor
Pipe icing along the top edge of all four upper floor walls, lift the roof by its deck and lower it on so the deck overhangs evenly. Hold it for a minute and check it is level, then pipe snow along the deck edges and dab a little on the point.
Why this matters: the deck spreads the roof’s weight across all four walls, and the snow hides the joint.

15. Place the loot chest and the trees
Glue the chest into a box: the two ends stand between the two sides, rounded tops up, with thick icing in every seam. Lay one lid plank across the ends and lean the other two down to the sides, like a barrel lid. Fill the gaps blue, let it set 20 minutes and stand the chest at the foot of the ramp. For the trees, turn four sugar cones upside down, pipe green rows of short pulls up them with the star tip, and set them at the board’s corners.
Why this matters: the chest is the detail that names the game.

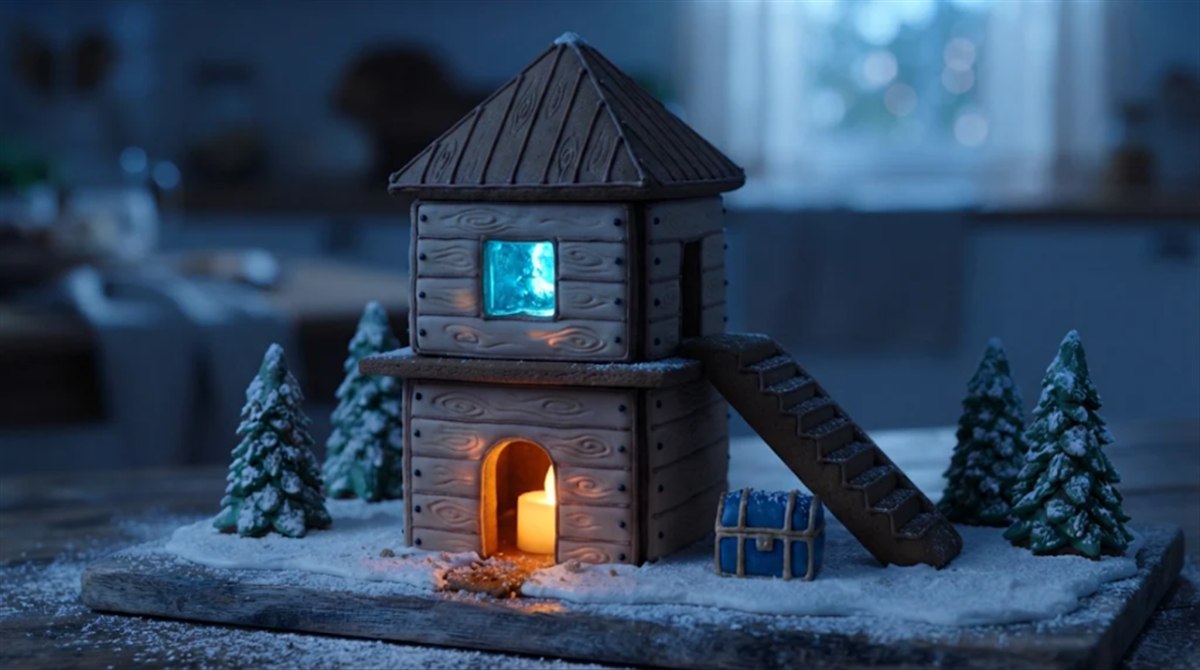
16. Light both floors
Switch on two LED tea lights and slide one through each light doorway at the back, so the doorway and both floors’ windows glow. Use only battery lights, because a real candle can scorch sugar and butter walls, which is why our guide sticks to LED lights that make a house glow. Let the fort stand overnight before you move it.
Troubleshooting
| What you see | Why it happens | What to do |
|---|---|---|
| The fort leans | The walls on one side came out taller | Trim warm next time. Now, pipe thicker icing under the low side of the plate and hold it level for a minute. |
| The box will not close square | A side wall spread wider than the others | Shave the edge with a fine grater. The corner seams hide small gaps. |
| The ramp slides down | The brace moved, or the icing was too thin | Set the brace first and let it grab for a few minutes, then lay the ramp with thick icing. |
| The ramp will not reach the plate | It spread short in the oven, or the brace sits too far out | Push the brace back against the wall. A small gap under the plate fills with icing. |
| The roof will not close at the point | A triangle spread in the oven or printed small | Trim the long sides warm against the template. A small gap at the point fills with an icing swirl. |
| The upper floor cracked the plate | It went on before the plate joints set | Pipe icing into the crack from the sides and prop the plate with cans. Wait the full 2 hours next time. |
| The plank lines sank and blurred | They went on before the flood crusted | Wait until the tan looks matte, about an hour, or pipe a new line beside the blurred one. |
| A square window came out round | The candy did not reach the corners | Push the crushed candy into all four corners before it melts. |
| The candy glass browned or bubbled | It stayed in too long, or you are at high altitude | Check from 5 minutes. Small bubbles at the edges hardly show once the fort is lit. |
| The chest lid planks slide off | The icing in the seams is too thin | Use thick icing, hold each plank for a minute, and fill the gaps once the box has set. |
Want a Bigger Fort or a Different Material?
Add a box, the way the game does: a third set of walls and a third plate make a tower about 12 inches tall, with a second ramp facing the other way and a 12 inch board. For brick, flood terracotta and pipe white mortar; for metal, flood grey with rivets and tread lines. Or start from a four-tower castle template and pipe the walls as brick.
Easier Versions: No-Bake and Kit Shortcuts
A No-Bake Graham Cracker Fort for Small Kids
Pipe planks and nail dots on 16 graham cracker squares and let them dry for 30 minutes. Glue four into a box, lay two flat on top as the floor, build a second box on that, lean a long cracker up as the ramp, and saw four cracker triangles for the roof. A graham cracker house with no oven needs royal icing, not tub frosting. Our video game gingerbread houses roundup has it step by step.
The Kit Shortcut
Build a plain kit with the roof off, pipe planks and nails, stack a small cracker box on top and lean a cracker ramp up the side. Our guide to where to buy kits covers the boxes that stay standing.
Storage Instructions
Keep the fort in a cool, dry room away from the stove and sunny windows. Treat it as a decoration. If you plan to eat some, make the icing with meringue powder, not raw egg whites.
FAQ
How do you make a gingerbread ramp that stays up?
Give it a brace: a right triangle with 2 5/8 inch legs stands under the ramp at 45 degrees. Set the brace with thick icing first, then lay the ramp on it.
How do you make a pointed gingerbread roof?
Build four triangles on a square deck around a loose ball of foil, slide the foil out before the fourth goes on, then lift the roof on by its deck.
Can I make it bigger?
Yes. Print at 125 percent for a fort about 11 inches tall on a 12 inch board. One batch still covers it.
More Gingerbread House Builds and Recipes
For another game build, our blocky Minecraft cottage uses the same flat-piece thinking. Browse more gingerbread house ideas by theme, and when something sags, our fixes for leaning walls and sliding roofs work on any house.
Build Your Next House With Best Gingerbread Houses
A few strong details tell the whole story: planks with nail heads, a stepped ramp, a cone roof and a blue chest. For a head start next time, the kits we have tested and ranked sort the good boxes from the wobbly ones.