

Every December, a new gingerbread house goes on show in the State Dining Room of the White House, and the photos travel fast. Few of the people who see them know how the tradition started, or that a simple version fits on a kitchen table.
We pulled the history from the White House Historical Association and news coverage of recent years, and our house dough and royal icing recipes set every bake time and wait. The template was checked by a script, so the walls, roof, balustrade and portico fit together the first time.
You will learn where the tradition started, how the pastry team builds the official house, and how to make your own: a long white block with candy glass windows, a railed roof and a columned portico, from one batch of dough over two days.
White House Gingerbread House: At a Glance
- Difficulty: Medium. Every dough piece is a flat rectangle or one triangle. The patience goes into the windows and the four columns.
- Total time: about 1 1/2 days, in six sessions. Most of it is icing drying.
- Active time: about 6 hours, counting the dough chill and the bake.
- Makes: a house 7 1/2 inches wide, 3 1/2 inches deep and about 3 1/2 inches tall, with a portico that adds about 1 3/4 inches at the front, on a 12 x 9 inch board.
- Template: free 3-page PDF, US Letter, true size with a 1 inch test bar on every page.
Steps
- Print the template at Actual Size and measure the test bar.
- Make the dough and chill it for at least an hour.
- Roll the dough 1/4 inch thick, cut the four walls and cut out the windows.
- Cut the roof slab, the balustrade strips and the portico pieces.
- Bake at 300 degrees F, then melt crushed yellow candy into the windows.
- Trim every piece against the template while it is warm.
- Flood the walls, balustrade strips and portico roof white.
- Pipe the window frames, balusters, door and pediment, and dip the pretzel-rod columns.
- Stand the four walls on the board and wait 2 hours.
- Set the roof slab on top and wait 4 hours.
- Stand the balustrade and set the portico floor and step.
- Stand the four columns on the portico floor.
- Lay the portico roof across the columns and wait 2 hours.
- Stand the pediment on the portico roof.
- Spread the coconut lawn and pipe the wreaths.
- Light the house with a battery tea light.
Notes: times are worked out from the set times on our icing page, not timed on a build. Ovens vary, so check early and bake a test strip before you build. This is our own simplified model, not a scale replica, and it is not connected to the White House or the White House Historical Association.
A Short History of the White House Gingerbread House
According to the White House Historical Association, a gingerbread cottage was given to the White House in 1968 and shown in the State Dining Room. In 1969, Assistant Executive Chef Hans Raffert made the first traditional German A-frame gingerbread house for the Nixons, and it became an annual tradition.
In 1992, Executive Pastry Chef Roland Mesnier took over the design, and in 1993 he made a nearly 100 pound gingerbread replica of the White House itself, built to scale. It is the first gingerbread White House in the association’s account of the tradition. Since then the houses have followed the first lady’s holiday theme, from first families’ pets in 2002 to the White House as it looked in the 1800s and 1900s. The display spot has stayed the same: a 1902 mahogany eagle console table in front of a gilded pier mirror in the State Dining Room.

How the Official House Is Made
The 2025 house, unveiled with the holiday decorations on December 1, 2025, used 120 pounds of gingerbread, 100 pounds of pastillage, more than 10 pounds of chocolate and 5 pounds of royal icing, according to the Associated Press report carried by Global News. It showed the mansion’s South Portico with a view into the Yellow Oval Room. Pastillage is a stiff sugar paste that dries hard and white, good for thin columns and railings. At home, royal icing and white chocolate do the same job.
The 2026 house had not been shown when we published this guide. If the schedule follows recent years, it appears with the rest of the decorations around the start of December. We will add it here once it is public.
Free Printable White House Gingerbread House Template
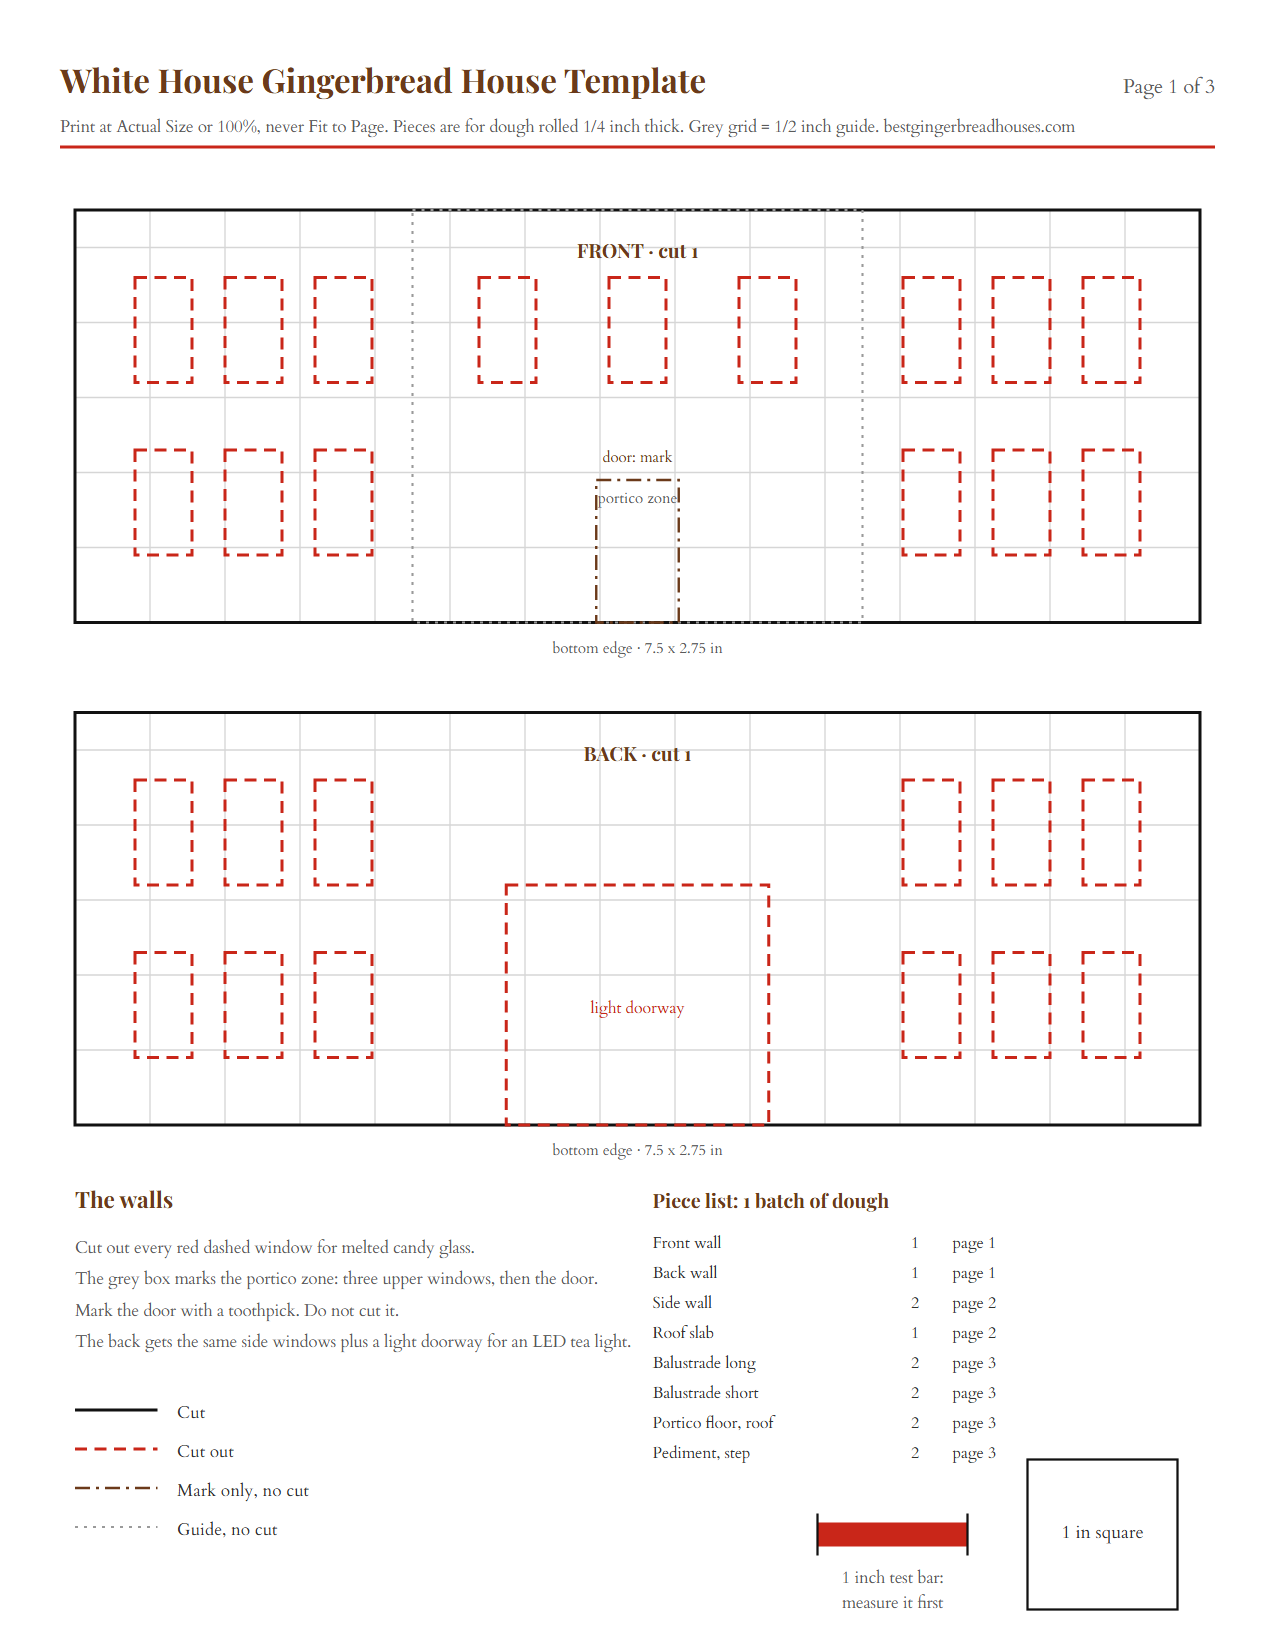
The template is three US Letter pages with nine shapes at true size. Download the PDF, print it at Actual Size, and check that the red bar measures 1 inch before you cut anything.

| Piece | Cut | Size | What it does |
|---|---|---|---|
| Front wall | 1 | 7 1/2 x 2 3/4 in | Two rows of three windows each side, three upper windows in the middle, and a marked door. |
| Back wall | 1 | 7 1/2 x 2 3/4 in | The same side windows, plus a light doorway for a tea light. |
| Side wall | 2 | 3 x 2 3/4 in | Two windows each, tucked between the front and back. |
| Roof slab | 1 | 8 x 4 in | A flat roof that reaches 1/4 inch past every wall. |
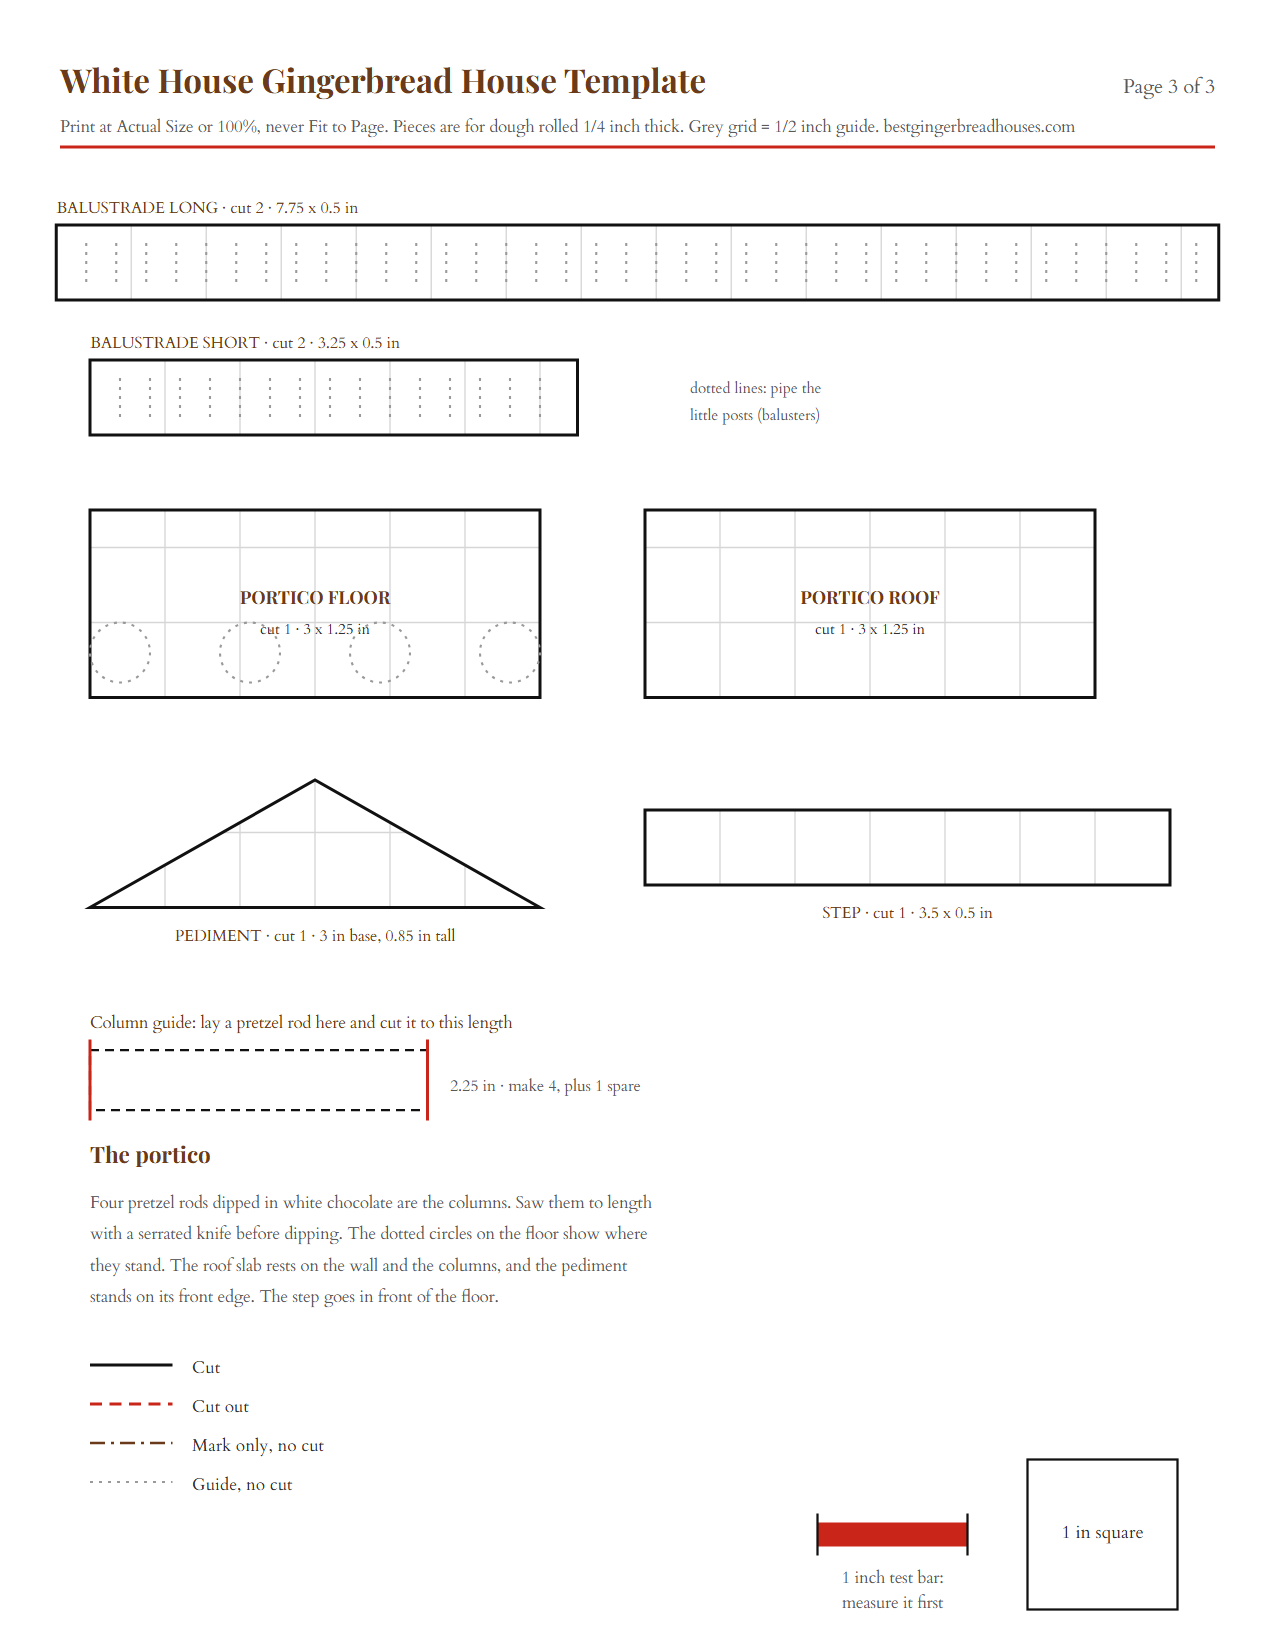
| Balustrade long | 2 | 7 3/4 x 1/2 in | The roof railing, front and back. |
| Balustrade short | 2 | 3 1/4 x 1/2 in | The railing at the ends. |
| Portico floor and roof | 2 | 3 x 1 1/4 in | The floor the columns stand on and the slab they carry. |
| Pediment | 1 | 3 in base, 7/8 in tall | The triangle over the portico. |
| Step | 1 | 3 1/2 x 1/2 in | A single step in front of the portico. |
The four columns are pretzel rods cut to 2 1/4 inches, so they hold the portico roof level with the top of the wall. The pediment’s low slope, about 30 degrees, is the shallow angle of a classical porch roof. All the pieces come to about 100 square inches, so one batch of dough is plenty.

Solid lines are cuts, red dashes are windows to cut out, the brown outline is the door you only mark, and dotted grey lines are guides. Our printable house templates in other shapes fit together the same way.
Why a Simplified White House Works in Gingerbread
The real building has curved porches, wings and dozens of windows. A kitchen version only needs three details: white walls, a columned portico with a triangle on top, and a flat roof with a railing. Our house is modeled loosely on the north front, where the portico has a triangular pediment, because a flat triangle is far easier in gingerbread than the rounded portico on the south side. Everything else is a flat rectangle, and a long white box with candy windows reads as the White House the moment the columns and railing go on.
The Windows, the Railing and the Columns: The Detail Work
Three jobs give this house its look, and two of them happen while the pieces lie flat, where piping is far easier.
The candy glass windows. Melted yellow hard candy fills the narrow windows and looks like lamplight when the house is lit. The strips between windows are only about 1/4 inch wide, so cut gently and trim warm.
The balustrade. Flood the four railing strips white, let them crust, then pipe short vertical lines along the dotted guides. Each one is a little post, called a baluster.
The columns. Saw four pretzel rods to 2 1/4 inches, then dip each in melted white chocolate. Dipped rods come out smooth and round, which piped icing columns never quite do. Try your window glass, wreaths and lawn below before you buy the candy.
White House Gingerbread House Holiday Trim Studio
Pick the window glass, wreaths, lawn and roofline. The preview changes as you go, and the list below tells you what to buy.
A planning helper, not a recipe test: candy brands melt a little differently, so try one window first. The preview is a simplified drawing of this gingerbread build. Nothing you pick leaves your browser.
What You Need for the White House
- 1 batch of our sturdy house dough recipe, which leaves room for re-rolled scraps.
- 2 batches of the royal icing recipe we use for every house, made one at a time: most of the first thinned for flooding, the second kept thick for gluing and piping.
- About 12 yellow hard candies, for the window glass.
- 1 bag of pretzel rods and about 1 cup of white chocolate or white candy melts.
- About 1 cup of sweetened shredded coconut, green and brown gel coloring, and 2 sugar cubes for the rooftop blocks if you want them.
- Tools: rolling pin with 1/4 inch guides, parchment, 2 half sheet pans, paring and serrated knives, a ruler, 5 piping bags with two small round tips, a few cups for propping, a 12 x 9 inch board and 1 battery LED tea light.
How Long It Takes, Day by Day
Plan on six sessions over two days. Most of the time is waiting, because royal icing needs to harden before it can carry weight.
| When | What you do | Hands-on | Then wait |
|---|---|---|---|
| Day 1, morning | Print, make and chill the dough, cut every piece and the windows, bake, melt the candy glass and trim. | About 3 hours with chilling and baking | Until the pieces are cool |
| Day 1, early afternoon | Flood the walls, the railing strips and the portico roof white. | 50 minutes | About 1 hour |
| Day 1, afternoon | Pipe the window frames, balusters, door and pediment outline, and dip the columns. | 45 minutes | Overnight, pieces flat |
| Day 2, morning | Stand the four walls, then set the roof slab 2 hours later. | 40 minutes | 4 hours after the roof |
| Day 2, early afternoon | Stand the railing, set the portico floor and step, stand the columns and lay the portico roof. | 45 minutes | 2 hours |
| Day 2, late afternoon | Stand the pediment, spread the lawn, pipe the wreaths and light it. | About 50 minutes | Overnight before you move it |
In a damp kitchen, add time to every wait. The planner below works out the schedule backward from the day you want it on the table.
White House Gingerbread House Build Day Planner
Pick when you want the White House finished. The planner counts back through every drying time and tells you when to start baking.
For planning only: icing sets faster or slower with the weather, so treat each wait as a minimum and check that joints feel firm before moving on. Not professional baking advice. Nothing you enter leaves your browser.
How to Make a White House Gingerbread House Step by Step
1. Print the template and measure the test bar
Print all three pages at Actual Size, never Fit to Page, and check that the red bar reads exactly 1 inch. Cut out the paper pieces, including the windows and the light doorway, with a craft knife.
Why this matters: a front wall printed a little small will not meet the sides.
2. Make the dough and chill it
Make one batch of house dough, split it into two discs about an inch thick, wrap them and chill for at least an hour.
Why this matters: cold dough cuts cleanly and spreads less, which matters with this many narrow strips between windows.
3. Roll the dough, cut the four walls and cut out the windows
Roll a disc on parchment to an even 1/4 inch. Cut around the front, back and side patterns with a paring knife, using a ruler on the long edges. Cut out every window and the light doorway with short, straight strokes, but only trace the front door with a toothpick. Pull away the scraps and slide the parchment onto a pan.
Why this matters: cutting on the parchment means you never lift a wall full of holes.

4. Cut the roof slab, the balustrade strips and the portico pieces
From the second disc, cut the roof slab onto its own pan. From the scraps, cut the four railing strips, the portico floor and roof, the pediment and the step, and put them on a pan together.
Why this matters: the small pieces bake fast, so on their own pan you can pull them early.
5. Bake the pieces, then melt yellow candy into the windows
Bake at 300 degrees F. The walls take 22 to 30 minutes, until the surface looks matte and the edge feels firm. The roof slab may need a few minutes more, and the railing strips and portico pieces are much smaller, so start checking them at about 12 minutes. While the walls bake, crush the candies in a zip bag. Pull the walls out about 5 minutes early, fill each window with crushed candy right to the corners, and bake again until it melts flat and glassy, checking after 5 minutes.
This is the candy glass method from our candy guide. The candy flows at the hard crack stage, which Colorado State University Extension puts at 300 to 308 degrees F at sea level, so it melts slowly at this oven temperature. If it is still lumpy after about 10 minutes, raise the oven to 325 degrees F and watch it closely.

6. Trim every piece while it is warm
Within two minutes of each pan coming out, lay the paper piece back on top and trim any edge that spread. Check the top edges of the walls most carefully. Leave everything on the pan until it is cool and the candy has hardened.
Why this matters: warm gingerbread trims cleanly, and the roof only sits flat if all four walls are the same height.
7. Flood the walls, the railing strips and the portico roof white
Thin most of the first batch of icing until a knife line through it closes in about 10 seconds. Flood the outside of each wall to the edges, working around the windows, then the railing strips and the portico roof. Leave the roof slab, portico floor, step and pediment bare.
Why this matters: the flood has to crust before anything is piped on top, or the frames sink and blur.

8. Pipe the frames, balusters, door and pediment, and dip the columns
Once the floods look matte, about an hour, pipe a thin white frame around every window with thick icing. Pipe the balusters along the dotted guides, flood the door brown with a white outline, and outline the pediment in white. Then saw four pretzel rods to the 2 1/4 inch guide, dip each in melted white chocolate and lay them on parchment. Leave everything flat overnight.
Why this matters: piped details stay sharp on a flat piece. Saw the rods before dipping, because chocolate cracks when you cut through it.

9. Stand the four walls on the board
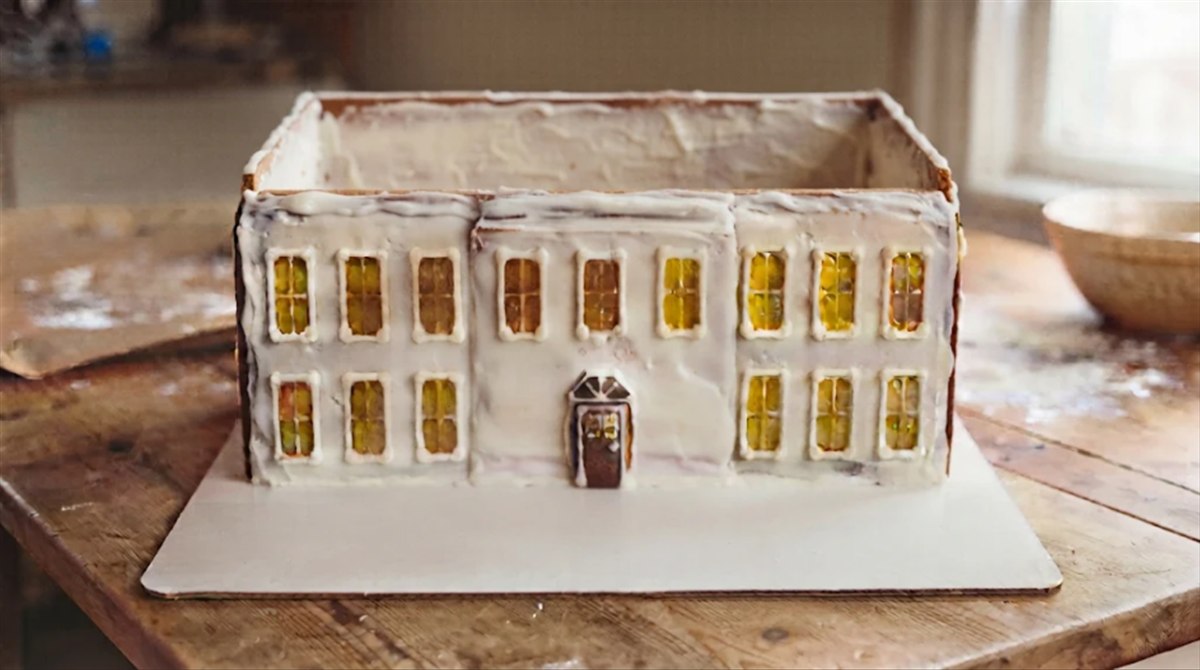
Pipe thick icing along the bottom of the front wall and stand it about 2 1/2 inches from the front of the board, leaving room for the portico and lawn. Add a side wall tucked behind its end, then the back and the other side. Pipe icing into every inside corner, prop the walls with cups and wait 2 hours.
Why this matters: tucking the sides between the front and back gives clean corners on the face everyone looks at.
10. Set the roof slab on top
Pipe icing along the top edges of all four walls and lower the roof slab straight down, so it reaches about 1/4 inch past every wall. Pipe a thin white line along its front edge and wait 4 hours.
Why this matters: the flat roof locks the walls square, and the full wait lets it carry the railing without sliding.

11. Stand the balustrade and set the portico floor and step
Ice the bottom of each long railing strip and stand them just inside the front and back edges of the roof, with the short strips tucked between them at the ends. Then ice the portico floor against the front wall, centered on the door, with the step in front. Glue two sugar cubes on the roof for the small rooftop blocks, if you like.
Why this matters: setting the railing and portico floor now gives them time to grab while you get the columns ready.

12. Stand the four columns
Dab thick icing on the bottom of each column and stand it on the dotted circles on the portico floor, two near the ends and two either side of the door. Check each with the edge of a ruler so it stands straight.
Why this matters: a column that leans now pushes the portico roof off later.

13. Lay the portico roof across the columns
Ice the column tops and the back edge of the portico roof, then set it so its back edge rests against the front wall and its front edge on the columns, level with the top of the wall. Prop it with a small cup if it tips, and wait 2 hours.
Why this matters: resting on both the wall and the columns spreads the weight, so no single column carries it all.
14. Stand the pediment on the portico roof
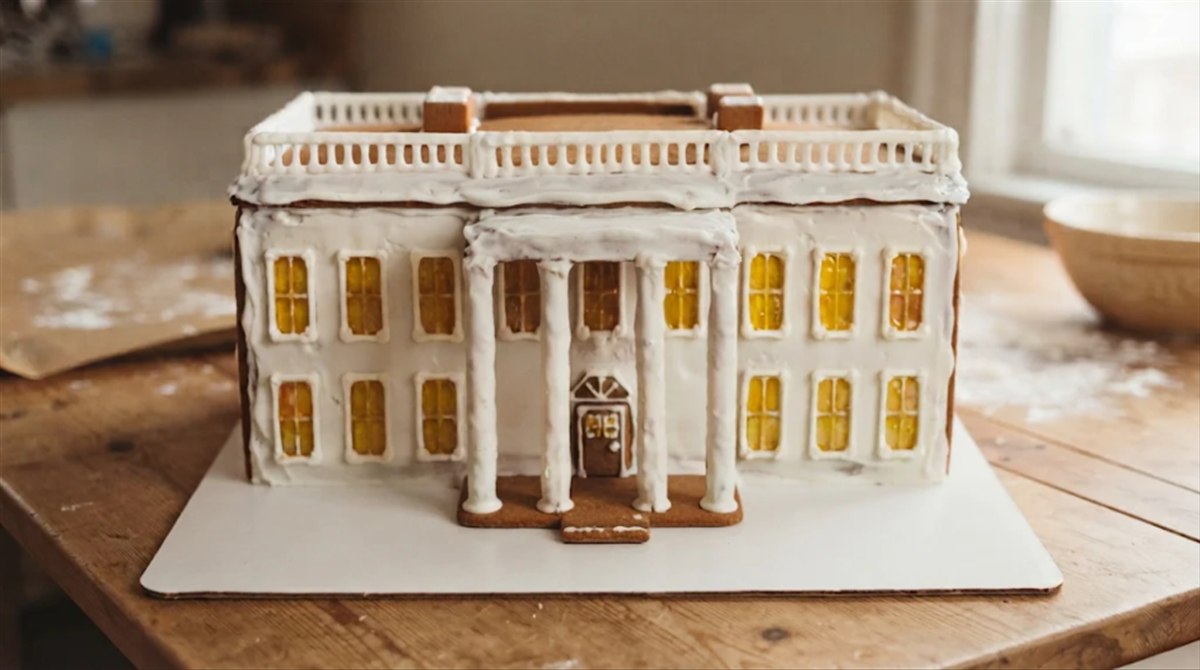
Pipe thick icing along the bottom of the pediment and stand it on the front edge of the portico roof, leaning back slightly against the wall. Hold it for a minute until it grabs.
Why this matters: the lean keeps the most recognizable shape on the house from tipping forward while it dries.

15. Spread the lawn and pipe the wreaths
Toss the coconut with a few drops of green gel in a zip bag. Spread thin icing over the board either side of the portico and press the coconut in, leaving a path to the step. Pipe two small green wreaths on the front wall, one either side of the door, with a red dot for each bow.
Why this matters: the green lawn makes the white walls look whiter, and the clear path sends the eye to the columns.
16. Light the house
Slide a battery LED tea light through the light doorway in the back wall and switch it on. Every candy window glows at once.
Why this matters: a real candle can scorch the walls and melt the candy glass. Our guide to battery lights that make the windows glow covers stronger options for a bigger display.

Troubleshooting
| Problem | Why it happens | Fix |
|---|---|---|
| A strip between two windows broke | The strips are only about 1/4 inch wide, and the wall was lifted or cooled before trimming | Glue it with thick icing from the back. The flood and frames hide the crack. Next time, cut on the parchment and never lift the wall warm. |
| The candy glass is cloudy or bubbled | It stayed in too long, or the candy had stripes or fillings | Check from 5 minutes and use plain hard candy. Small bubbles hardly show once the house is lit. |
| The roof slab rocks | The walls are not the same height | Trim warm next time. Now, pipe thicker icing on the low side and press the slab level. |
| The railing strips lean | They went up before the roof icing set, or the line of icing was too thin | Prop them with toothpicks pushed into the roof for an hour, then pull them out. |
| A column is too short | The rod was cut before measuring against the guide | Stand it on a small dab of thick icing to make up the height, or cut a spare. |
| The portico roof tips forward | It went on before the columns set, or it rests only on the columns | Make sure its back edge is iced to the wall, and prop the front with a cup for an hour. |
| The white chocolate is streaky | It got too hot or picked up a drop of water | Melt it slowly in short bursts, stirring between them, and keep it dry. |
| The white icing looks grey | It picked up crumbs or was thinned too far | Brush the crumbs off before flooding, and add a spoon of thick icing to tighten it. |
Easier Versions: No-Bake and Kit Shortcuts
No-bake. Stand graham cracker halves in a long box with royal icing and lay more on top for a flat roof. Ice it white, pipe yellow windows, and stand four dipped pretzel rods in front under one more cracker. A no-oven graham cracker house needs royal icing, not tub frosting, for the walls.
Kit shortcut. Build a plain kit with a flat slab of gingerbread or a stiff cracker in place of its roof. Flood it white, pipe the windows and a roof railing, and add pretzel columns and a small triangle at the door. Our rundown of which store kits hold up will save you a wobbly box.
Storage Instructions
Humidity softens gingerbread and makes candy glass sticky, so keep the house in a cool, dry room away from the stove and sunny windows. Treat it as a decoration once it has stood out for a few days, and if you plan to eat some, make the icing with meringue powder instead of raw egg whites.
FAQ
When did the White House gingerbread house tradition start?
The White House Historical Association dates the annual tradition to 1969, when Hans Raffert made the first A-frame house for the Nixons.
Who makes the White House gingerbread house?
The White House pastry team, led over the years by chefs including Hans Raffert and Roland Mesnier.
Can I make a White House gingerbread house at home?
Yes. The template on this page makes a simplified version 7 1/2 inches wide from one batch of dough.
Can I make it bigger?
Yes. Print at 125 percent for a house about 9 3/8 inches wide. One batch is still enough, but use a 15 x 11 inch board and cut the columns to about 2 13/16 inches.
More Gingerbread House Builds
If the White House made you want another landmark, our turreted castle build uses the same flat-panel approach, and a Victorian house with piped trim takes the detail work further. Browse more gingerbread house ideas sorted by theme, and when something sags, our gingerbread house troubleshooting tips work on any house. For a head start next time, our ranked list of tested kits sorts the good boxes from the wobbly ones.