

A Mario gingerbread house is easy to picture and hard to find instructions for. Search for one and you mostly get a castle kit, plus photos of builds nobody explains.
Our house dough and royal icing recipes set every bake temperature and wait, and the free template was checked by a script so the stem, brim and cap fit. The house is a mushroom cottage: a cream six-sided stem, a wide brim with piped gills underneath, and a red cap with big white spots.
You will end up with a house about 6 1/4 inches tall on a 12 inch board, from one batch of dough over two days. Start with the template, then the icing work, the plan and 16 steps.
Mario Gingerbread House: At a Glance
- Difficulty: Medium. Every piece is a flat rectangle, hexagon or triangle. The patience goes into the cap, which is glued upside down in a bowl.
- Total time: about 1 1/2 days, in six sessions. Most of it is icing drying.
- Active time: about 6 1/2 hours, counting the dough chill and the bake.
- Makes: a mushroom house 7 1/2 inches across the cap and about 6 1/4 inches tall, with a stem 4 1/3 inches across, on a 12 inch square board.
- Template: free 3-page PDF, US Letter, true size with a 1 inch test bar on every page.
Tools: printer, ruler, scissors, rolling pin with 1/4 inch guides, parchment, 2 half sheet pans, paring knife, 6 piping bags, two small round tips and a small star or grass tip, toothpicks, small cups or cans for propping, a mixing bowl at least 8 inches across and about 3 inches deep, plastic wrap, 12 inch square cake board, 1 battery LED tea light.
Materials
- 1 batch of sturdy gingerbread house dough
- 2 batches of royal icing
- Gel food coloring: red, yellow, ivory or a touch of brown, and green
- About 8 yellow or orange hard candies, such as lemon drops or butterscotch
Steps
- Print the template at Actual Size and measure the test bar.
- Make the dough and chill it for at least an hour.
- Roll the dough 1/4 inch thick and cut the six stem panels.
- Cut the ceiling plate.
- Cut the six cap triangles, the block pieces and ten coins.
- Bake at 300 degrees F, then melt crushed yellow candy into the windows.
- Trim every piece against the template while it is warm.
- Flood the stem panels cream, the coins gold and the block yellow.
- Flood the cap triangles red and drop in the white spots.
- Pipe the gills, the door planks and the question mark, glue the block, and leave everything overnight.
- Glue the cap together upside down in a lined bowl.
- Snow the board and stand the six stem panels, then wait 2 hours.
- Set the ceiling plate on the stem and wait 4 hours.
- Lift the cap onto the plate and pipe its edge and seam spots.
- Lay the coin path, set the block and pipe the bushes.
- Light the house with a battery tea light.
Notes: times are worked out from the set times on our icing page, not timed on a build. Ovens and doughs vary, so treat every bake time here as a starting point: check early, go by the matte surface and firm edge, and bake a test strip before you build. Not an official Mario product. Not approved by or associated with Nintendo. This is our own fan build.
Free Printable Mario Gingerbread House Template
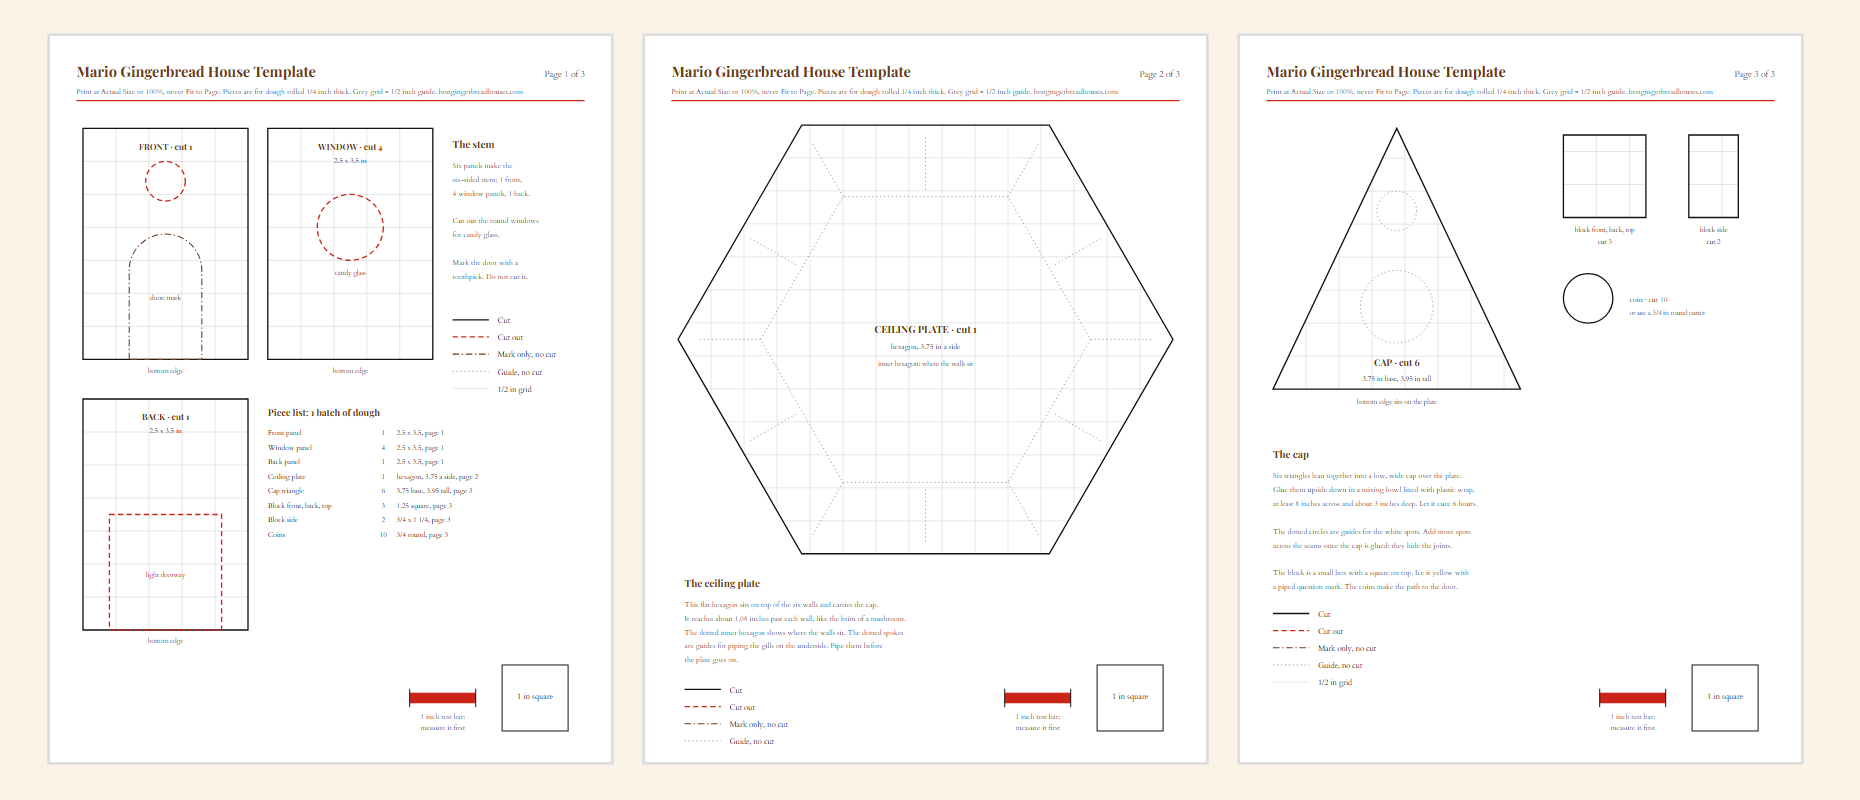
The template is three US Letter pages with eight shapes, drawn at true size over a faint 1/2 inch grid. Download the PDF, print it at Actual Size or 100 percent, and put a ruler on the red 1 inch bar before you cut anything. If the bar measures an inch, every piece is right.
| Piece | Cut | Size | What it does |
|---|---|---|---|
| Front panel | 1 | 2 1/2 x 3 1/2 in | A small round window, cut out for candy glass. The round-top door is marked, not cut. |
| Window panel | 4 | 2 1/2 x 3 1/2 in | One round window each, 1 inch across, for candy glass. |
| Back panel | 1 | 2 1/2 x 3 1/2 in | A light doorway at the bottom, so a tea light slides in from behind. |
| Ceiling plate | 1 | Hexagon, 3 3/4 in a side | Sits on the six walls and carries the cap. Its underside gets the piped gills. |
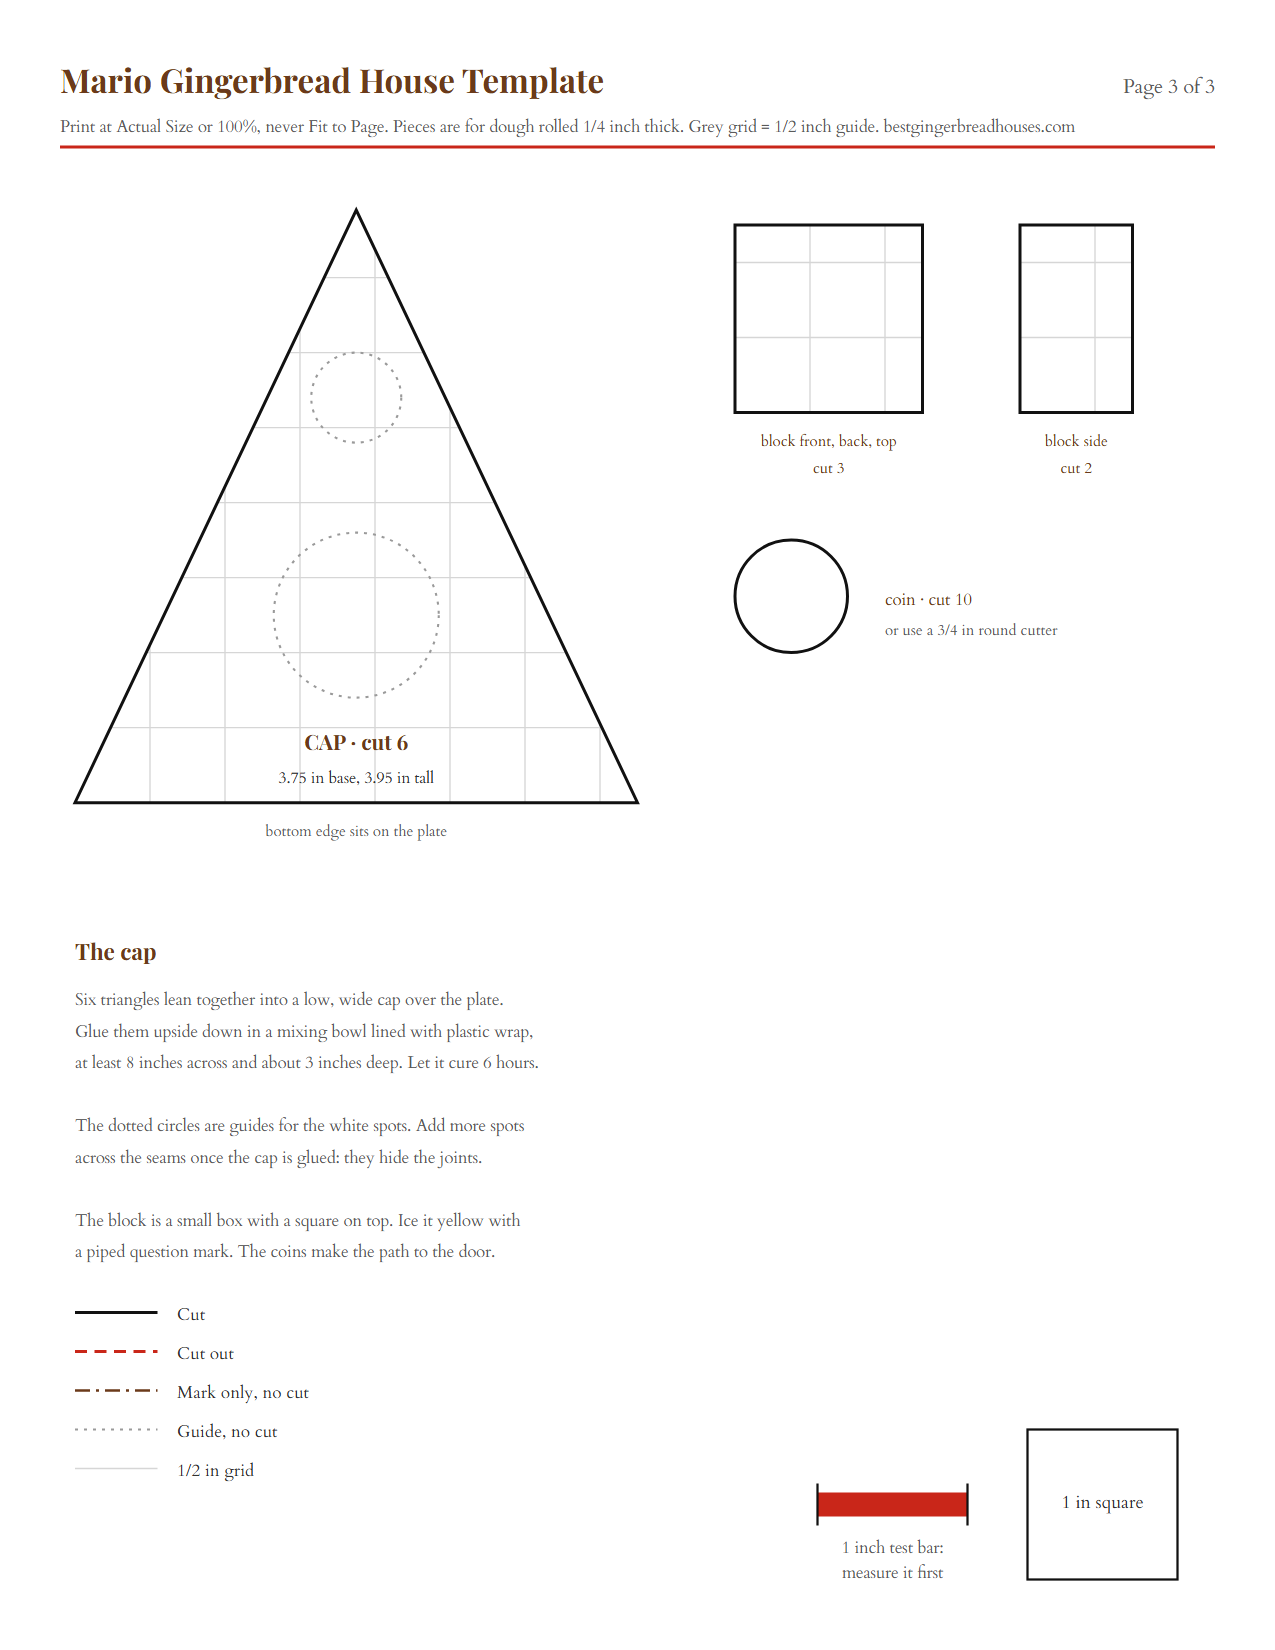
| Cap triangle | 6 | 3 3/4 in base, 3 15/16 in tall | Six of them lean together into the low, wide cap. |
| Block front, back and top | 3 | 1 1/4 in square | The question block. Front and back stand up, the third square is the lid. |
| Block side | 2 | 3/4 x 1 1/4 in | Tuck between the front and back so the block comes out square. |
| Coins | 10 | 3/4 in round | The path to the door. A 3/4 inch round cutter works too. |
The stem panels meet in a hexagon 4 1/3 inches across, and the 6 1/2 inch ceiling plate reaches about an inch past every wall like a mushroom brim. The cap rises a low 2 1/4 inches, so it reads as a mushroom, not a tent.

Black lines are cuts, red dashes are openings, the brown outline is the door you only mark, and dotted grey lines are guides. For a different shape next time, our other house templates that print true to size fit together the same way.
Why a Mushroom House
The games call it a Toad House, and the mushroom huts go back to Super Mario Bros. 3 in 1988. It suits gingerbread too: the stem is a ring of flat walls and the cap is six flat triangles, so nothing has to be bent or molded.

Three details carry the look: a red cap with big white spots, gills under a wide brim, and the coins and question block out front that tell anyone who has played the games whose world it is.
Is There a Super Mario Gingerbread House Kit?
Yes, but it is a castle, not a mushroom house. Wilton makes a Nintendo Super Mario Gingerbread Castle kit with pre-baked panels, a mushroom cookie, candy and decorations. It first came out at Walmart in 2017 and has returned in later seasons, and stock comes and goes. If you want the mushroom house, or the kit is gone by December, the template on this page builds it from one batch of dough.
The Cap, the Gills and the Coins: The Icing Work
The spotted cap. All three jobs happen with the pieces flat. Thin red icing to the 10 second mark, where a knife line through the bowl closes in about 10 seconds, flood each triangle and drop white spots into the wet red. Red deepens as it stands, so mix it ahead and check a dried dot.
The gills. Thick cream lines piped close together across the underside of the ceiling plate, like a real mushroom.
The coins and the block. Golden yellow coins, a brighter yellow block and a white question mark. Try other cap colors below.
Mushroom Cap Color Studio
The classic cap is red with white spots, but mushrooms in the games come in other colors too, like the green 1-Up. Try a cap, a spot style and a stem, and get the tinting tip for your pick.
Spots
Stem
A preview to plan colors, not a promise of the exact shade: gel brands and icing batches vary, so test a dot on parchment and let it dry before you flood the cap. Nothing you pick leaves your browser.
What You Need for the Mushroom House
For baking
- 1 batch of a dough that bakes flat and holds its edges. It covers about 225 square inches, and the pieces need about 138.
- About 8 yellow or orange hard candies, unwrapped, for the five round windows.
For the icing
- 2 batches of the royal icing recipe we tint for every color, made one at a time: the first thinned for flooding, the second kept thick for gluing, piping and snow.
- Gel food coloring in red, yellow, ivory or a touch of brown, and green.
- Two small round tips, one finer for the gills, plus a small star or grass tip for the bushes.
Tools
- Rolling pin with 1/4 inch guide strips, parchment and 2 half sheet pans
- Paring knife, scissors and a ruler with a clean straight edge
- 6 piping bags, the tips and toothpicks
- A mixing bowl at least 8 inches across and about 3 inches deep, and plastic wrap to line it
- A few small cups or cans for propping
- A 12 inch square cake board
- 1 battery LED tea light, 1.5 inches across
How Long It Takes, Day by Day
Plan on six sessions over two days, about 6 1/2 hours hands-on. Day 1 is baking, flooding and piping, and Day 2 is the cap, the stem, the plate and the coin path. The rest is waiting for royal icing to harden.
The waits are the ones our icing guide gives for any house: 2 hours before anything sits on new walls, 4 hours before decoration, and overnight, 8 to 12 hours, for a full cure. The cap gets about 6 hours in its bowl. The planner below works the schedule back from any date you choose.
Mario Gingerbread House Build Day Planner
Pick when you want the mushroom house finished. The planner counts back through every drying time and tells you when to start baking.
For planning only: icing sets faster or slower with the weather, so treat each wait as a minimum and check that joints feel firm before moving on. Not professional baking advice. Nothing you enter leaves your browser.
How to Make a Mario Gingerbread House Step by Step
Each step does one job, and the “why this matters” lines cover the steps that keep the stem square and the cap closed.
1. Print the template and measure the test bar
Print all three pages at Actual Size or 100 percent, never Fit to Page, and check that the red bar reads exactly 1 inch. Cut out the paper pieces, including the windows and the light doorway.
Why this matters: six triangles printed a little small will not close into a cap.

2. Make the dough and chill it
Make one batch of the house dough, split it, flatten each half into a disc about an inch thick, wrap and chill for at least an hour. A poked disc should dent and stay dented.
Why this matters: cold dough cuts clean and spreads less, so the panels stay template size.
3. Roll the dough and cut the six stem panels
Roll a disc on parchment to an even 1/4 inch between guide strips. Cut one front panel, four window panels and one back panel with a paring knife, using a ruler on the long edges. Cut out the round windows in short strokes and the light doorway in the back panel. Trace the door with a toothpick instead of cutting it. Slide the parchment onto a pan.
Why this matters: cutting on the parchment means you never lift a cut panel, so windows stay round.
4. Cut the ceiling plate
From the second disc, cut the big hexagon from page 2, keeping the edges straight with the ruler. Slide it onto its own pan.
Why this matters: straight, even edges let the cap sit level all the way around.

5. Cut the cap triangles, the block pieces and the coins
From the re-rolled scraps, cut six cap triangles from page 3, nesting them point up and point down. Cut three 1 1/4 inch squares and two narrow sides for the block, and ten coins. Put the small pieces on their own pan.
Why this matters: small pieces bake faster and come out early.
6. Bake the pieces, then melt yellow candy into the windows
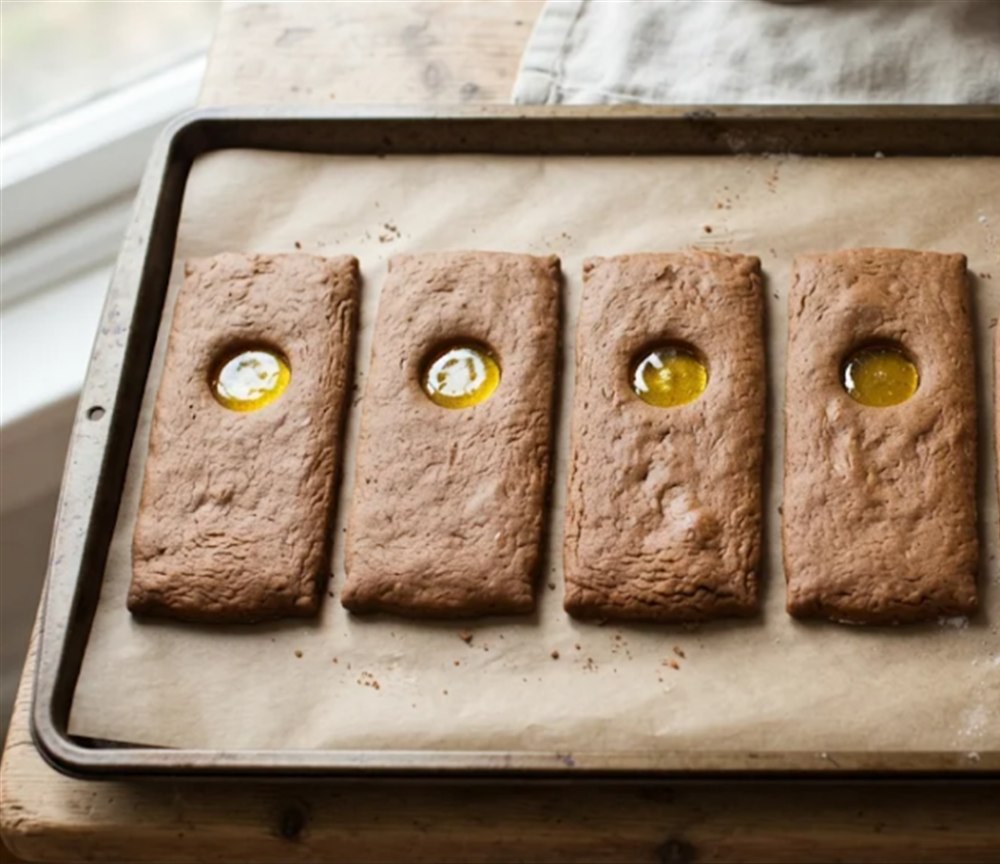
Bake at 300 degrees F. The stem panels and cap triangles take 22 to 30 minutes, until matte with a firm edge, and the plate a few minutes more. Check the coins and block pieces from about 12 minutes. Crush the yellow candies in a zip bag meanwhile. Pull the panels about 5 minutes early, fill each window two crushed candies deep right to the edges, and bake again until the candy is flat and glassy, checking after 5 minutes.
This is how you melt crushed candy into window glass on any house. Candy flows at hard crack, which Colorado State University Extension puts at 300 to 308 degrees F at sea level, so it melts slowly at this temperature. If it is still lumpy after about 10 minutes, raise the oven to 325 degrees F and watch closely. At high altitude the target drops about 2 degrees for every 1,000 feet, so check sooner.
Why this matters: filling right to the edges gives a full pane, not a blob.
7. Trim every piece while it is warm
Within two minutes of each pan coming out, lay the paper piece on top and trim any edge that spread, especially the top edges of the stem panels and the long sides of the triangles. Leave everything on the pan until cool and flat, and do not lift a window panel until the candy has hardened.
Why this matters: the plate only sits level if all six panels match in height, and the cap only closes if the triangle sides are straight.
8. Flood the stem panels, the coins and the block
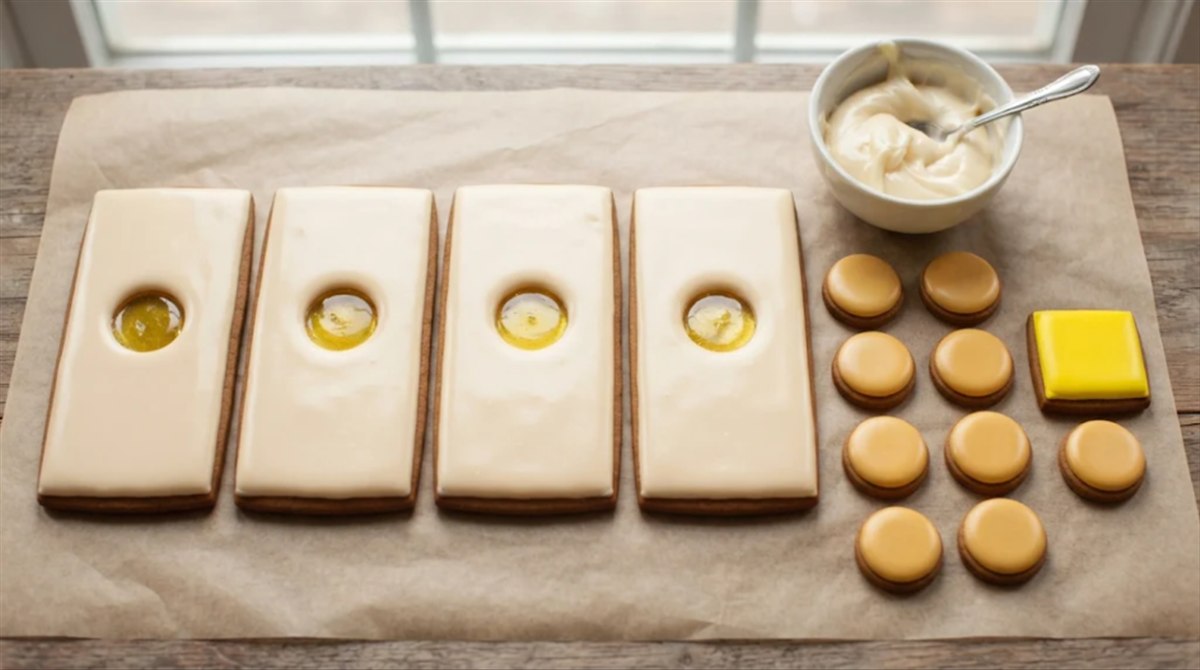
Make the first batch of icing and thin most of it to the 10 second mark. Tint a big share pale cream, a cup golden yellow and a small cup bright yellow. Flood the outside of each stem panel to the edges, leaving the candy windows clear, then flood the coins and the five block pieces.
Why this matters: the cream has to crust before the door is piped on, or the lines sink and blur.
9. Flood the cap triangles red and drop in the white spots
Thin the red to the same 10 second mark and flood each triangle. While it is wet, drop a big white spot in the lower middle and a small one near the point, using the template’s dotted circles, and give each triangle a gentle shake. Save some white for the seams later.
Why this matters: spots dropped into wet icing dry flat and glossy instead of sitting up as bumps.

10. Pipe the gills, the door planks and the question mark, then glue the block
Once the floods look matte, about an hour, turn the ceiling plate over and pipe the gills with thick cream icing and the finer tip, close together from the middle to the edge. Flood the marked door brown and pipe darker plank lines up it. Pipe a white question mark on the front block square. Stand the block front and back on parchment with the narrow sides tucked between, glue with thick icing and set the lid on. Leave everything flat overnight.
Why this matters: the red cap needs the whole night before it goes face down in a bowl.

11. Glue the cap together upside down in a lined bowl
Line the mixing bowl with plastic wrap. Pipe thick icing along both long sides of a triangle and set it red side down, point at the bottom. Add the rest around the bowl, pressing the edges together, until all six meet in a low six-sided cone. Pipe extra icing into every inside seam and fill the gap at the point. Leave it for at least 6 hours.
Why this matters: in a bowl the triangles lean on each other and cure as one shell you can lift in one piece.
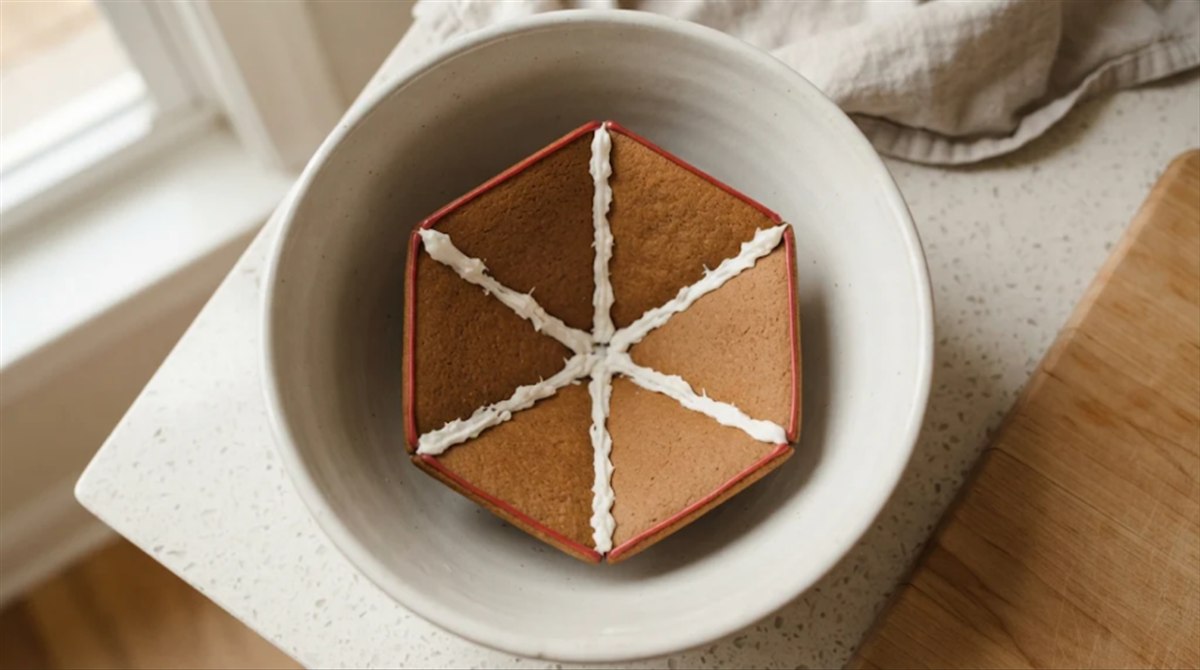
12. Snow the board and stand the six stem panels
Swirl thick white icing over the board for snow, leaving a bare patch about 5 inches across a little behind the middle. Glue the front panel on the patch, facing front, with icing along its bottom and one side. Add the panels around the ring, each touching the last at its outer edge, with the back panel opposite the front. Pipe icing into each inside corner, prop with cups and leave for 2 hours.
Why this matters: gluing at the outer edges keeps a true hexagon for the plate.
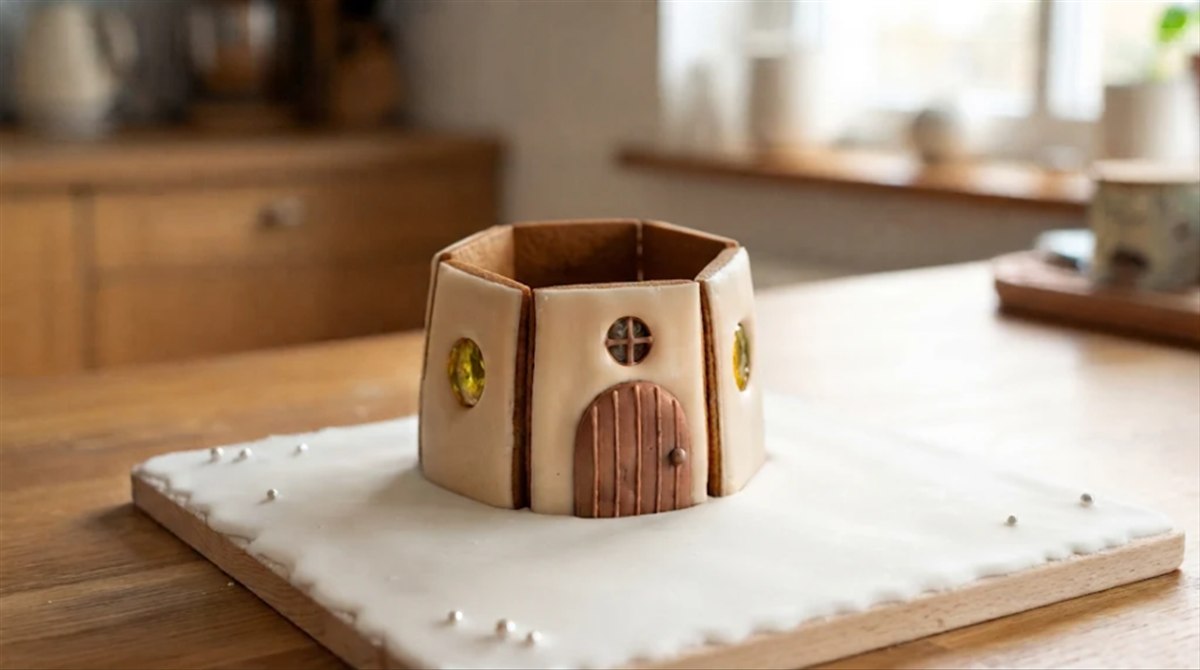
13. Set the ceiling plate on the stem
Pipe thick icing along the top edge of every panel. Lower the plate on, gills down, with each flat side over a wall so the brim reaches out evenly. Check it is level, hold it for a minute, and leave it for 4 hours.
Why this matters: the joints carry the brim like a shelf, so they need to firm up before the cap adds weight.

14. Lift the cap onto the plate and pipe its edge
Lift the cap out by the plastic wrap and peel it away. Pipe thick icing around the top of the plate just in from the edge, and set the cap on with its six corners over the plate’s corners. Hold it for a minute. Pipe a white bead around the bottom edge of the cap and add white spots over any seams that show.
Why this matters: the bead hides the cap joint and the spots hide the seams, so the cap reads as one piece.

15. Lay the coin path, set the block and pipe the bushes
Dab icing on each coin and press them into the snow in a curving path from the door to the front of the board. Set the question block beside the path on a dab of icing. With green icing and the star or grass tip, pipe small bushes along the path and around the base of the stem.
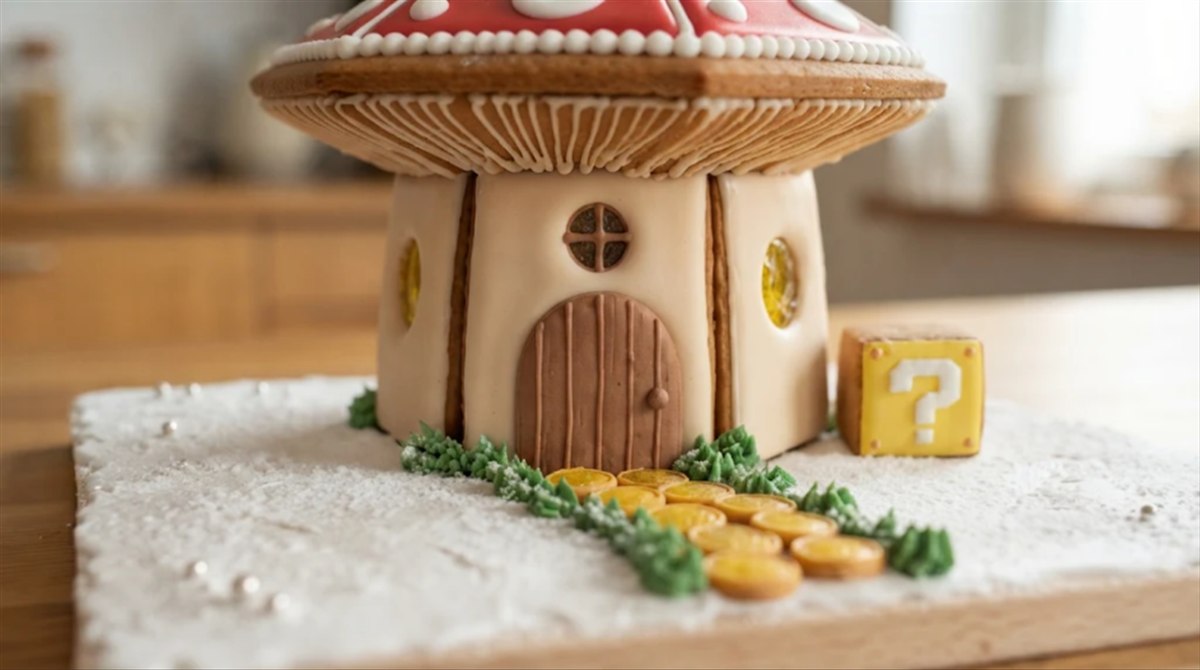
16. Light the house
Slide an LED tea light in through the back doorway toward the middle of the stem, and the round windows glow yellow. Use only battery lights, because a real candle can scorch sugar and butter walls, which is why our guide sticks to LED lights that make a house glow. Let the house stand overnight before you move it.
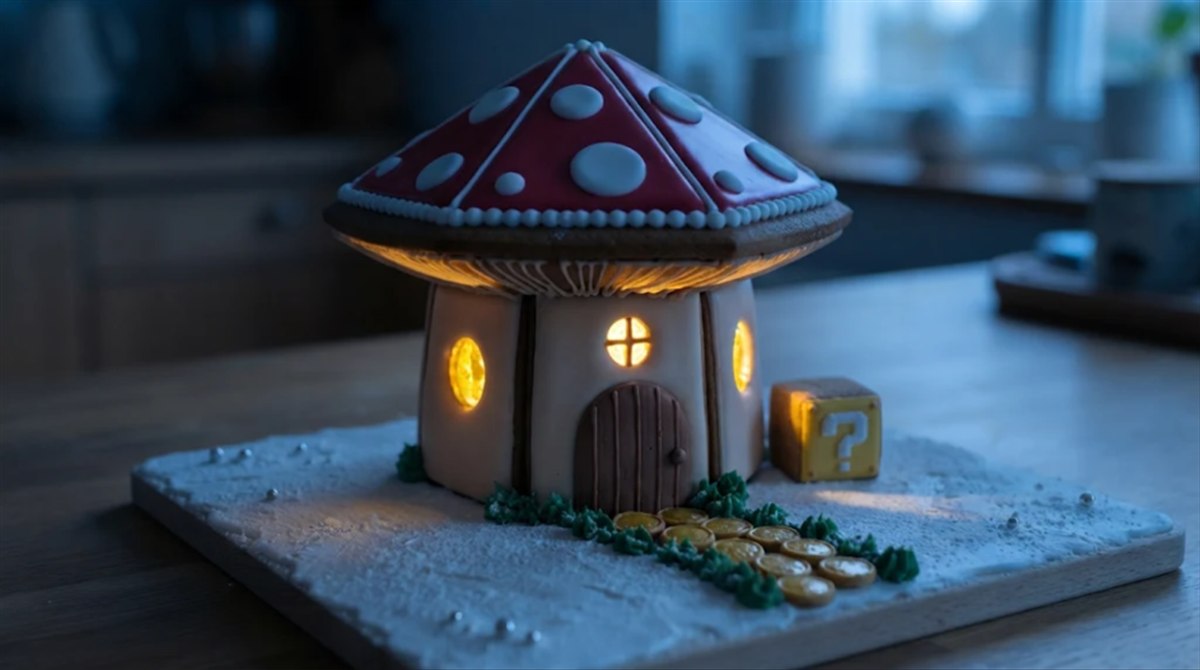
Troubleshooting
Most problems come from icing that has not set, pieces that spread in the oven, or heat and humidity.
| What you see | Why it happens | What to do |
|---|---|---|
| The cap will not close at the point | A triangle spread in the oven or printed small | Trim the long sides warm against the template. A small gap at the point fills with icing and a white spot. |
| The cap stuck to the bowl | The red was not fully dry, or the bowl was not lined | Line the bowl with plastic wrap and give the red a full night. Patch scuffs with a white spot. |
| The spots sit up as bumps | They went on after the red had crusted | Drop them in while the red is wet. Bumpy spots still look fine, just less glossy. |
| The red looks pink | Not enough color, or it was not given time to deepen | Mix it ahead, add more gel and test a dried dot before you flood. |
| The plate sits crooked | The stem panels are not the same height | Trim warm next time. Now, pipe thicker icing on the low side and hold the plate level. |
| The stem will not close into a ring | A panel spread wider than the others | Shave the long edge with a fine grater. The corner seams hide small gaps. |
| The brim cracked | The cap went on before the plate joints set | Pipe icing into the crack from below and prop the brim with a can for an hour. Wait the full 4 hours next time. |
| A round window came out lumpy | The candy did not reach the edges | Push the crushed candy all the way around before it melts. |
| The candy glass browned or bubbled | It stayed in too long, or you are at high altitude | Check from 5 minutes. Small bubbles at the edges hardly show once the house is lit. |
| The question mark ran | The icing was too thin or the block was still wet | Use thick icing and let the yellow dry first, or scrape it off and pipe it again. |
Want a Rounder Cap or a Castle?
For a smooth round dome, the quick mushroom house in our video game gingerbread houses roundup presses crisp rice cereal treat into a bowl for the cap, then ices it red with spots. For the castle instead, start from a four-tower castle template, flood the walls pale grey, and add red-topped towers, coins and a question block.
Easier Versions: No-Bake and Kit Shortcuts
A No-Bake Graham Cracker Mushroom House for Small Kids
Stand four graham cracker halves in a box, ice them cream, top with a large round cookie as the brim and a cereal treat cap iced red with white candy melt spots. A graham cracker house with no oven lives or dies on the glue, so use royal icing, not tub frosting.
The Kit Shortcut
Build any plain kit with the roof off, flood the walls cream, and top it with the cereal treat cap, a coin path of yellow candies and a candy question block. Our guide to where to buy kits covers the boxes that stay standing.
Storage Instructions
Keep the house in a cool, dry room away from steam and sunny windows. Treat it as a decoration after a few days out. If you plan to eat some, make the icing with meringue powder instead of raw egg whites.
FAQ
How do you make a mushroom cap out of gingerbread?
Cut six flat triangles, flood them red with white spots and dry them overnight, then glue them upside down in a bowl lined with plastic wrap and let the cap cure at least 6 hours.
Can I make it bigger?
Yes. Print at 125 percent for a house about 7 3/4 inches tall with a cap about 9 1/3 inches across. The pieces come to about 216 square inches, so make a batch and a half of dough, use a bowl at least 10 inches across and a 15 inch board.
More Gingerbread House Builds and Recipes
For another game build, our blocky Minecraft cottage and Poké Ball house both come with templates. Browse more gingerbread house ideas by theme, and when something sags, our fixes for leaning walls and sliding roofs work on any house.
Build Your Next House With Best Gingerbread Houses
A few strong details tell the whole story. When you want a head start next time, the kits we have tested and ranked sort the good boxes from the wobbly ones.