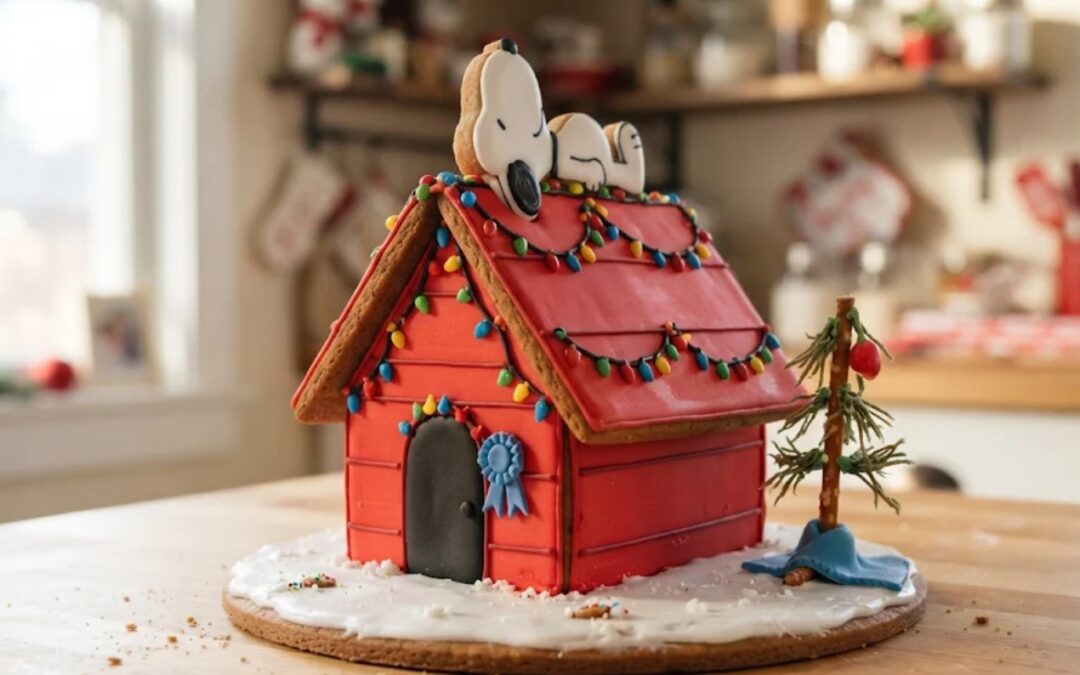
A Snoopy gingerbread house has one job: look like the red doghouse with Snoopy asleep on the roof. Everyone knows that shape, so a plain kit house with a dog cookie on top never quite gets there.
Our house dough and royal icing recipes set every bake temperature and wait, and the free template was checked by a script so the walls, the steep roof and the rooftop cookie all fit. Then we dressed it the way the doghouse looks in the 1965 Christmas special: strings of colored lights, a blue first prize ribbon, and a scraggly little tree with one ornament bending it over.
You will end up with a doghouse about 7 inches tall on a 10 inch board, from one batch of dough over two days. Start with the template, then the lights, the plan and 14 steps.
Snoopy Gingerbread House: At a Glance
- Difficulty: Easy to medium. Seven straight-edged shapes and one simple cookie, but the steep roof needs propping while it sets.
- Total time: about 1 1/2 days, in six sessions. Most of it is icing drying.
- Active time: about 6 hours, counting the dough chill and the bake.
- Makes: a doghouse 4 inches wide, 4 1/2 inches long and about 7 inches tall to the top of Snoopy, with a pretzel tree on a 10 inch board.
- Template: free 4-page PDF, US Letter, true size with a 1 inch test bar on every page.
Tools: printer, ruler, scissors, rolling pin with 1/4 inch guides, parchment, 2 half sheet pans, paring knife, toothpicks, 5 piping bags, two small round tips, cups or cans for propping, offset spatula, 10 inch cake board, optional battery fairy light string.
Materials
- 1 batch of a house dough that holds sharp corners
- 2 batches of royal icing that sets hard enough to pipe on
- Gel food coloring: red, a little brown, black and sky blue
- About 80 mini candy-coated chocolates or round sprinkles in red, green, blue and yellow for the light bulbs
- 1 pretzel stick about 3 1/2 inches long, 1 small red candy and a scrap of blue fruit leather or fondant for the tree
- Shredded coconut or coarse sugar for the snow, optional
Steps
- Print the template at Actual Size and measure the test bar.
- Make the dough and chill it for at least an hour.
- Roll the dough 1/4 inch thick and cut the floor plate and both gable walls.
- Cut the side walls, the roof panels, the Snoopy cookie and the ribbon.
- Bake at 300 degrees F and trim every piece while it is warm.
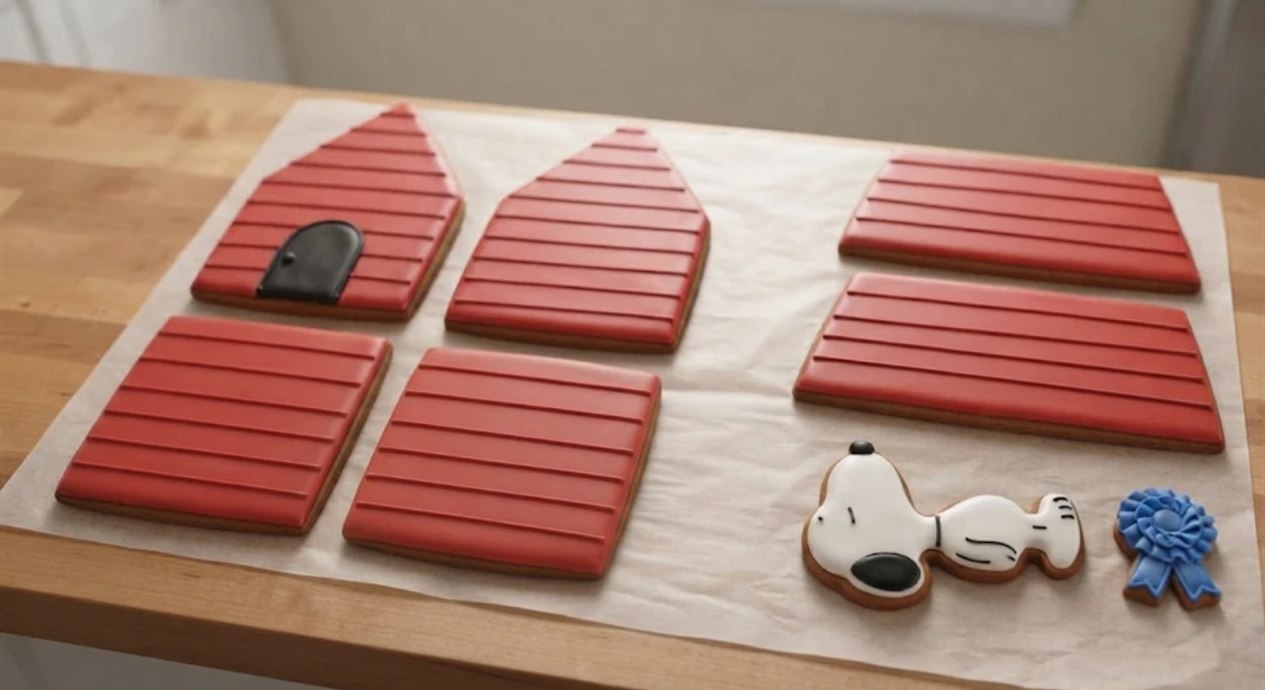
- Flood the walls and roof red, the door black, Snoopy white and the ribbon blue.
- Pipe the board lines and the ribbon rings.
- Decorate the Snoopy cookie in black, then leave everything overnight.
- Set the floor plate, stand the four walls and spread the snow, then wait 2 hours.
- Set both roof panels and fill the ridge, then wait 4 hours.
- Pipe the light strings and press on the candy bulbs.
- Stand Snoopy on the ridge and glue on the ribbon.
- Plant the scraggly pretzel tree.
- Add the fairy lights if you like, and let it stand overnight.
Notes: times are worked out from the set times on our icing page, not timed on a build. Ovens vary, so check every bake early and go by the matte surface and firm edge. Not an official Peanuts product. Not approved by or associated with Peanuts Worldwide or the Schulz family. This is our own fan build.
Free Printable Snoopy Gingerbread House Template
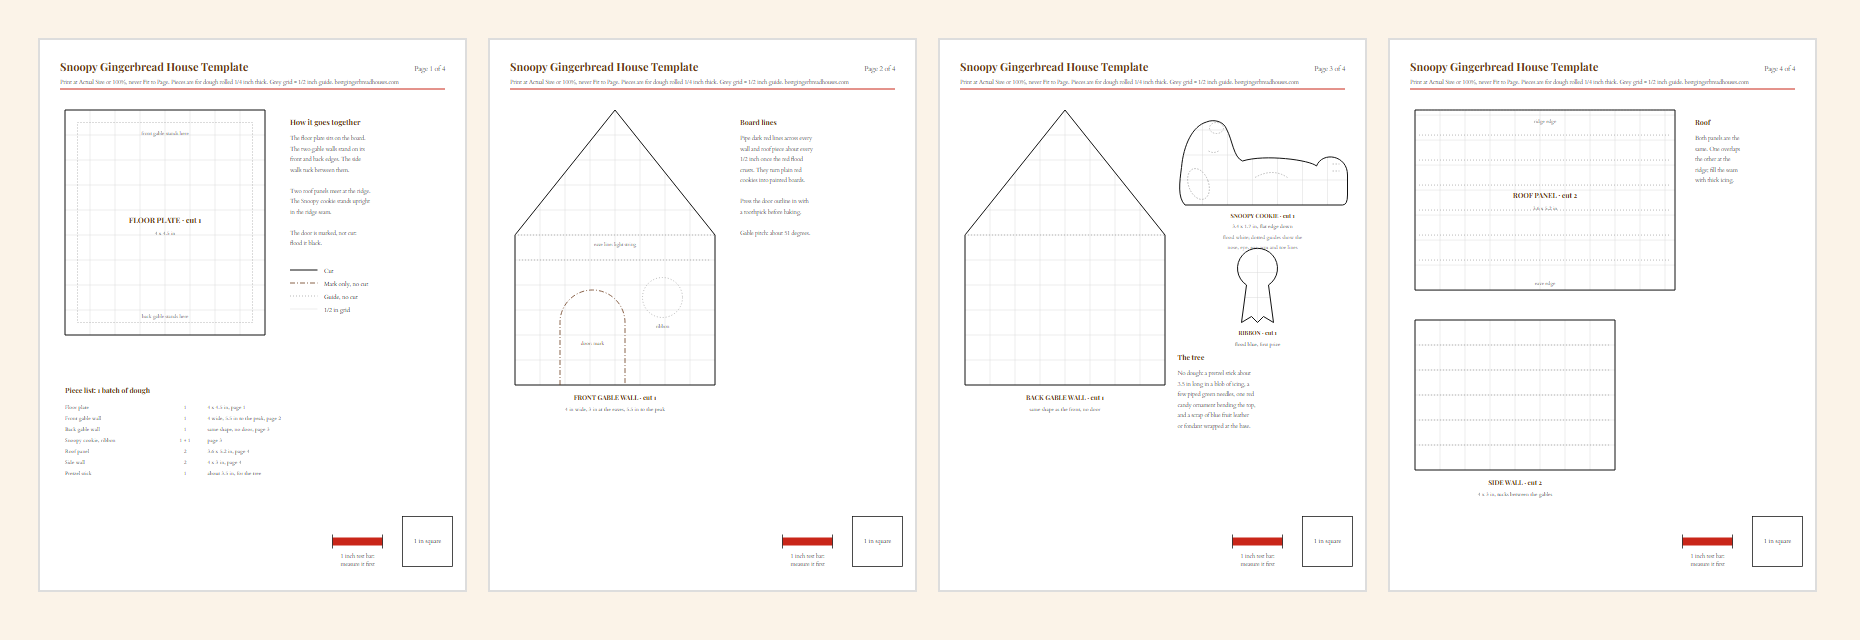
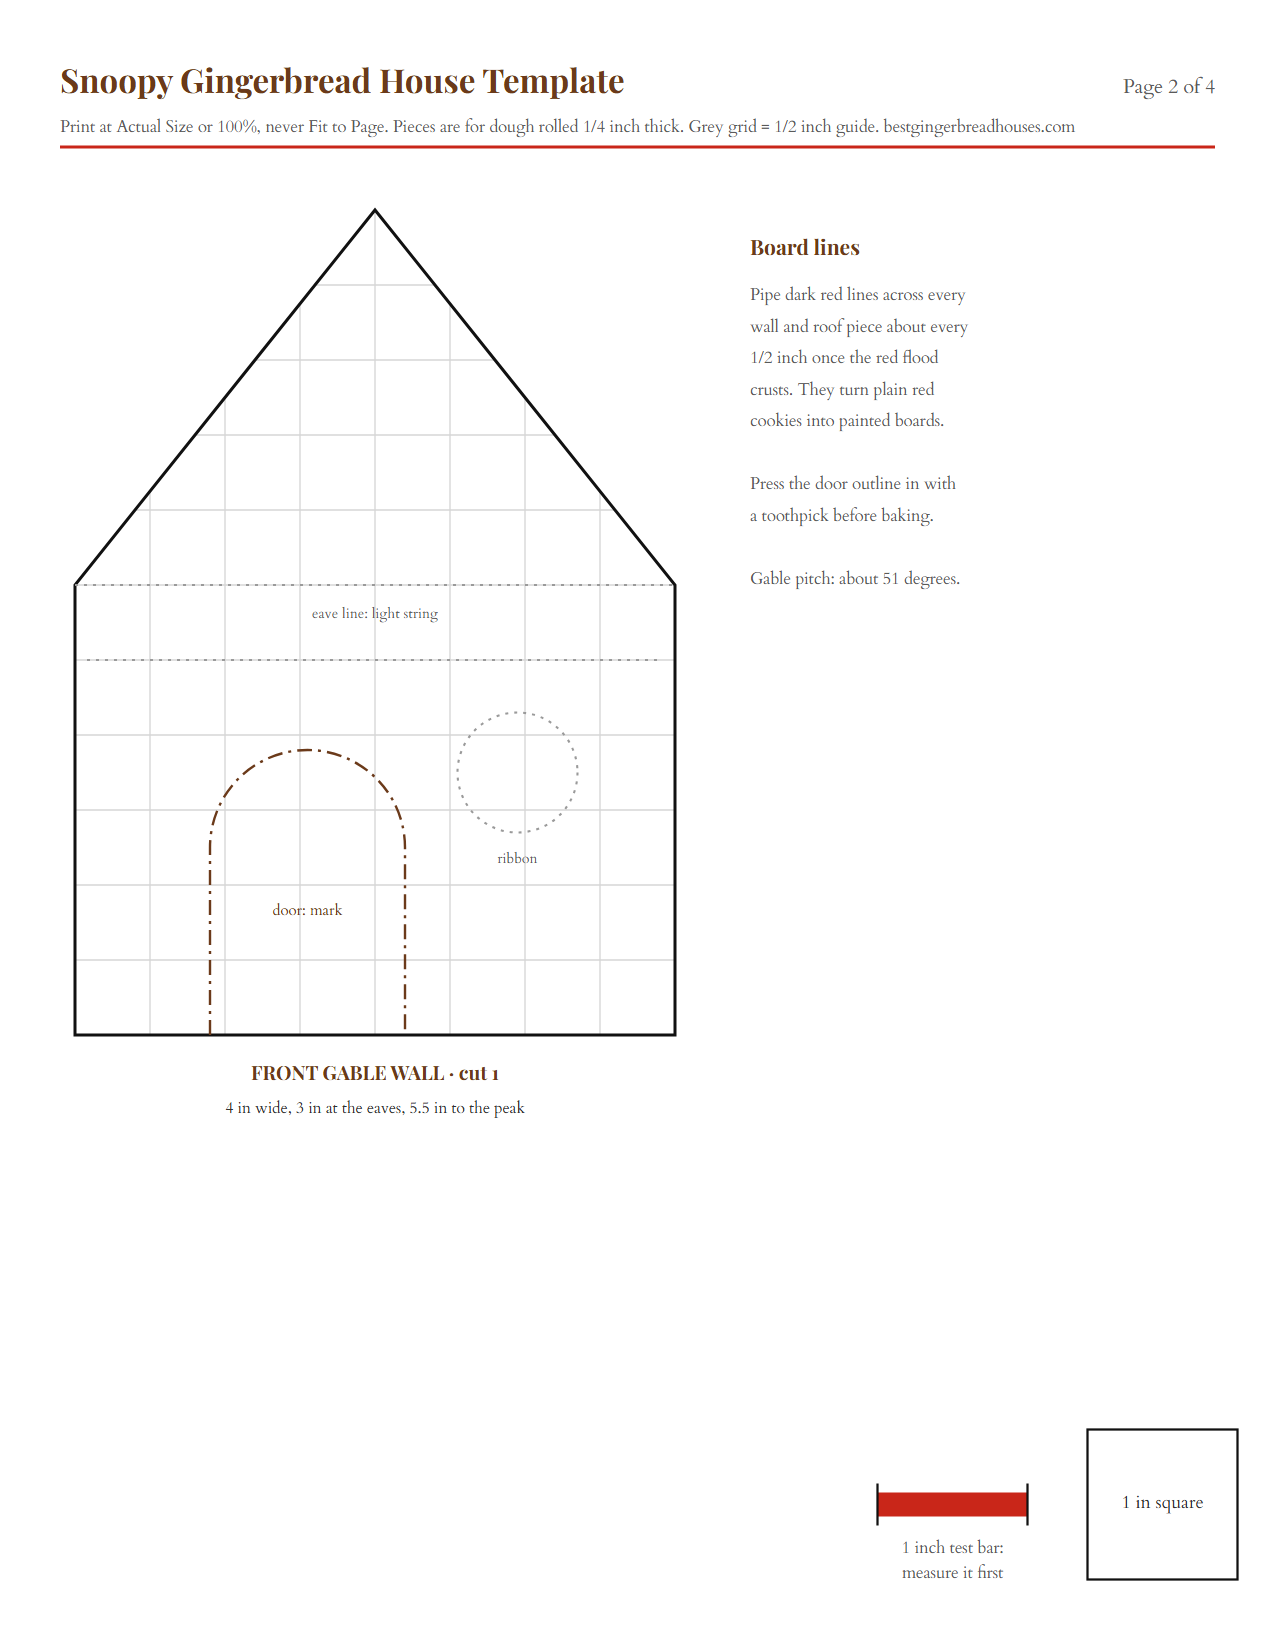
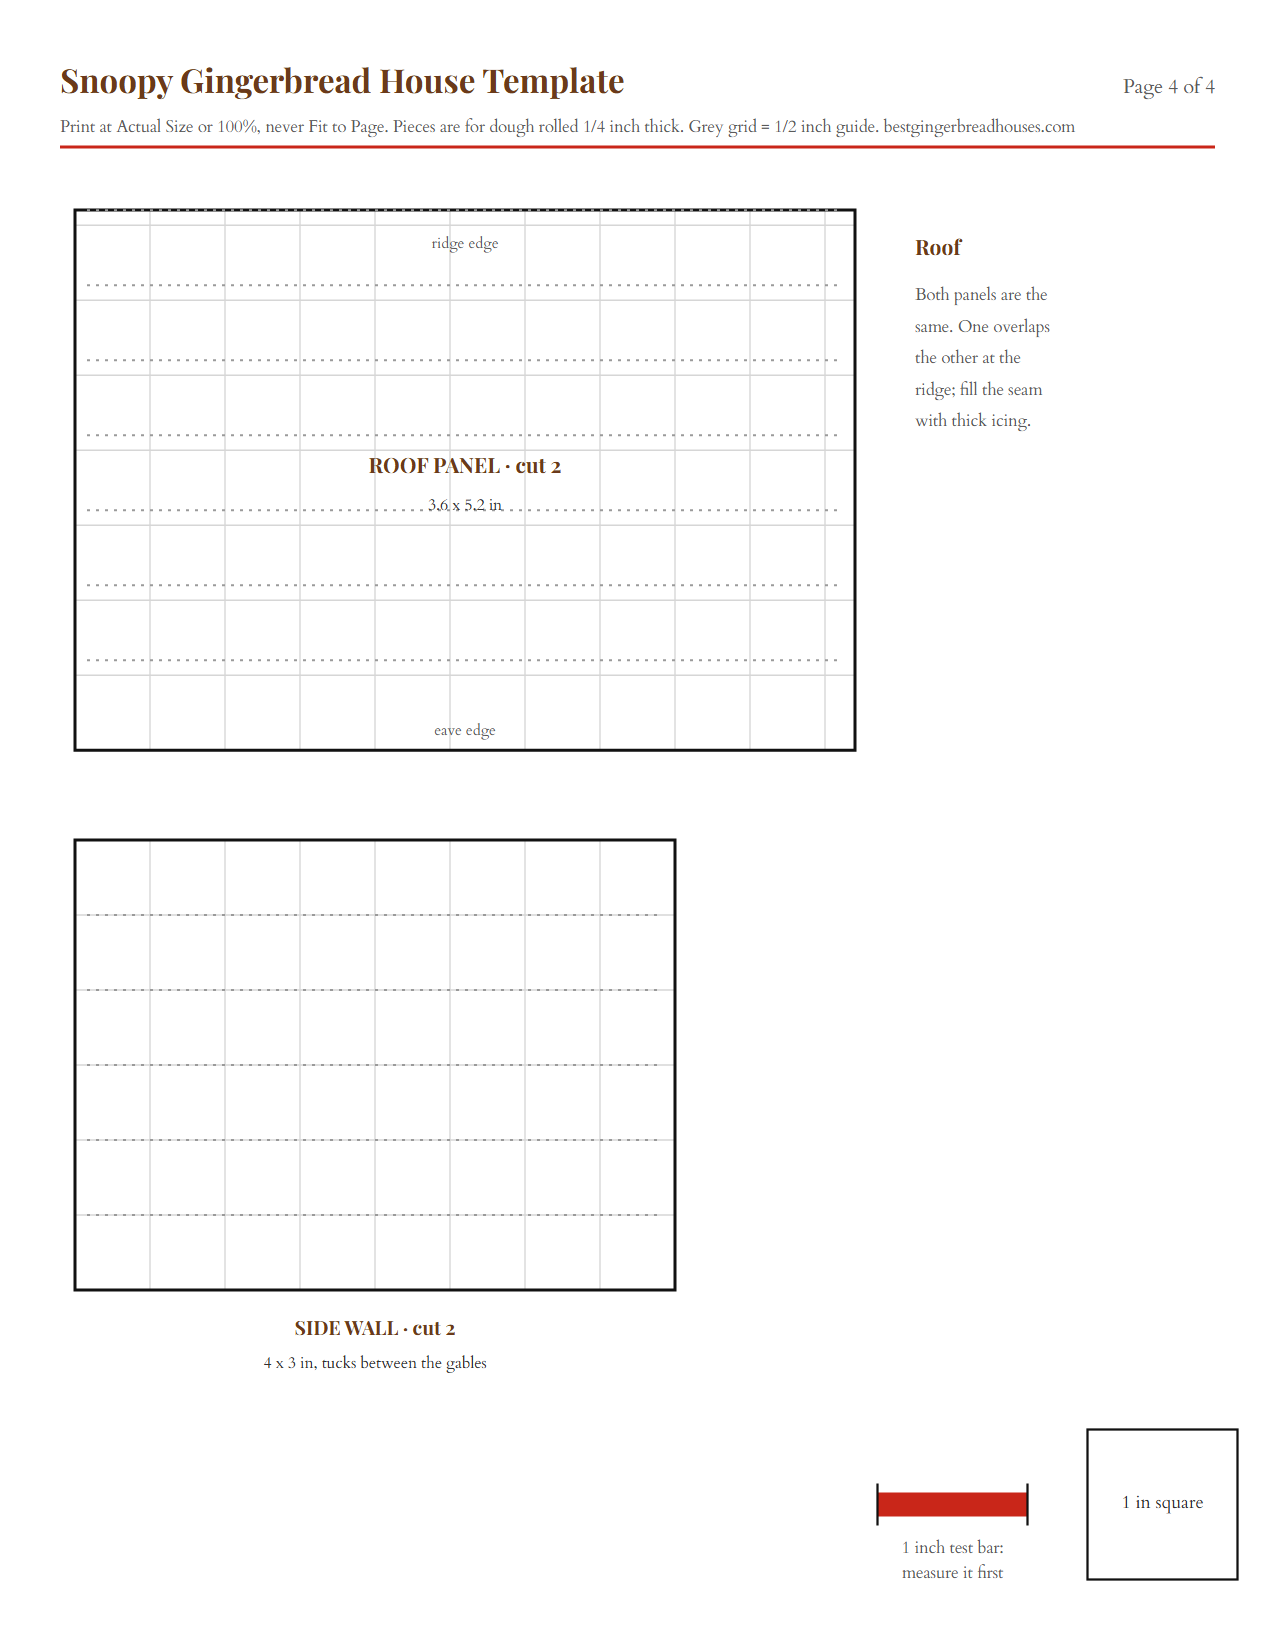
The template is four US Letter pages with seven shapes at true size over a faint 1/2 inch grid. Download the PDF, print it at Actual Size, and check that the red bar measures 1 inch before you cut anything.
| Piece | Cut | Size | What it does |
|---|---|---|---|
| Floor plate | 1 | 4 x 4 1/2 in | Carries all four walls and keeps the corners square. |
| Front gable wall | 1 | 4 in wide, 3 in at the eaves, 5 1/2 in to the peak | The pointed front with the arched door, marked and flooded black. |
| Back gable wall | 1 | same shape, no door | Holds the back end of the roof. |
| Side walls | 2 | 4 x 3 in | Tuck between the gable walls. |
| Roof panels | 2 | 3 3/5 x 5 1/5 in | The steep red roof, with a little overhang on every edge. |
| Snoopy cookie | 1 | 3 2/5 x 1 7/10 in | Stands upright in the ridge seam. |
| Ribbon | 1 | 4/5 in rosette with two tails | The first prize ribbon beside the door. |
The roof rises 2 1/2 inches over a 2 inch half width, about 51 degrees, which is what gives the doghouse its tall, narrow look. The pieces come to about 119 square inches, so one batch covers them with dough left for spare cookies.

Once you have built one, the printable patterns for other houses on our templates page go together the same way.
Why Snoopy’s Doghouse
Snoopy usually sleeps flat on top of his doghouse rather than inside it, and according to Wikipedia’s Snoopy article, the strip first showed him sleeping up there on December 12, 1958. From the outside the doghouse is simple: red boards, a steep red roof and a dark doorway.
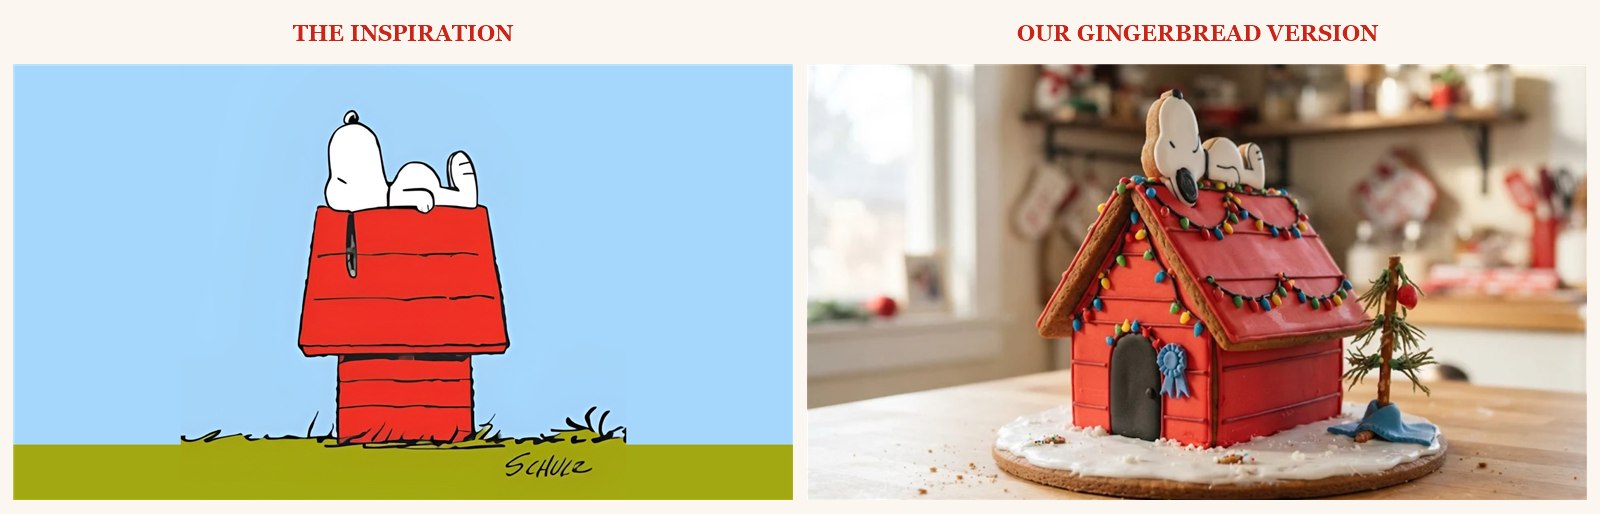
Here is what we copied: red walls with dark board lines, a steep overhanging red roof, the black arched door on the gable end, and Snoopy asleep on his back along the ridge, snout to the sky, ear hanging down and one paw in the air. The template turns those into seven shapes, and Snoopy stands upright in the ridge seam so you see him from the side, the way the strip draws him.
Snoopy’s Dog House at Christmas: The Prize-Winning Lights
In A Charlie Brown Christmas, which first aired on CBS on December 9, 1965, Snoopy decorates his doghouse for a neighborhood lights and display contest, and later in the special it has won, according to Wikipedia’s summary of the special. At the end, the gang takes decorations from the doghouse to fix up Charlie Brown’s little tree, and Linus wraps his blanket around its base.
That is the version we built. The lights are a thin black icing wire piped along the roof edges, with candy bulbs pressed on while it is wet. The ribbon is a small blue cookie. The tree is a pretzel stick with a few piped needles and one red candy that bends the top over, with a blue scrap for the blanket.
Mini candy-coated chocolates make the neatest bulbs; avoid jelly beans, which drag the wire down a steep roof. Our list of small candies that stay where you press them has more options. Plan your strings in the designer below before you tint the black icing.
Prize-Winning Lights Designer
Choose where the strings go, how close the bulbs sit and which colors to use. The doghouse lights up as you go, and you get the bulb count for each color.
Strings
Counts are for this template at true size. Mini candy-coated chocolates, round sprinkles or piped dots of tinted icing all work as bulbs; pipe a thin black icing line first and press the bulbs onto it while it is wet. For the glow in the photos, add a battery fairy light string as well, never candles. Nothing you choose leaves your browser.
Is There a Snoopy Gingerbread House Kit?
Yes, a licensed one. Kroger lists a Peanuts Holiday Gingerbread House Kit with pre-baked gingerbread, ready icing, candy and a gummy Snoopy. It is a house kit with a Snoopy on it, not the red doghouse, so the kit shortcut near the end shows how to turn any kit red.
If you are near Santa Rosa, California, the Charles M. Schulz Museum lists gingerbread doghouse workshops on December 12 and 13, 2026, where you assemble Snoopy's doghouse with a marshmallow Snoopy on top.
The Red Boards, the Black Door and Snoopy: The Icing Work
The red. Red gel darkens as it sits, so mix the red flood icing an hour ahead. A tiny touch of brown takes it from candy apple toward the barn red of the doghouse. Flood both gable walls, both side walls and both roof panels, and leave the floor plate bare.
The board lines. Once the red crusts, pipe thin lines of darker red, red with a little more brown, straight across every wall and roof piece about every 1/2 inch. The guides are on the template. They turn plain red cookies into painted boards.
The door and the ribbon. Flood the arched door black inside the pressed outline, and the ribbon sky blue with two rings piped on once it crusts. Snoopy gets his own step below, because the order of the white and the black is what makes him look right.
How Long It Takes, Day by Day
Plan on six sessions over two days, about 6 hours of hands-on work. The roof goes on only after the walls have set for 2 hours.
| When | What you do | Hands-on | Then wait |
|---|---|---|---|
| Day 1, morning | Print, make and chill the dough, cut, bake and trim. | About 2 1/2 hours | Until cool |
| Day 1, early afternoon | Flood the walls and roof red, the door black, Snoopy white and the ribbon blue. | 40 minutes | About 1 hour |
| Day 1, afternoon | Pipe the board lines and the ribbon rings, then decorate Snoopy. | About 1 hour | Overnight, pieces flat |
| Day 2, morning | Set the floor plate, stand the four walls and spread the snow. | 40 minutes | 2 hours |
| Day 2, midday | Set the roof panels and fill the ridge. | 30 minutes | 4 hours |
| Day 2, late afternoon | Pipe the lights, stand Snoopy, glue the ribbon and plant the tree. | About 50 minutes | Overnight before you move it |
Snoopy Gingerbread House Build Day Planner
Pick when you want the doghouse finished. The planner counts back through every drying time and tells you when to start baking.
For planning only: icing sets faster or slower with the weather, so treat each wait as a minimum and check that joints feel firm before moving on. Not professional baking advice. Nothing you enter leaves your browser.
How to Make a Snoopy Gingerbread House Step by Step
1. Print the template and measure the test bar
Print all four pages at Actual Size or 100 percent, never Fit to Page, and check that the red bar reads exactly 1 inch.
Why this matters: gable walls printed a little small leave the roof panels hanging too far past the eaves.

2. Make the dough and chill it
Make one batch of house dough, split it in two, flatten each half into an inch-thick disc, wrap and chill for at least an hour, until a poked disc dents and stays dented.
Why this matters: cold dough spreads less, so the peaks stay sharp and the roof panels stay square.
3. Roll the dough and cut the floor plate and both gable walls
Roll a disc on parchment to an even 1/4 inch between guide strips. Cut the floor plate and both gable walls. Lay the paper back on the front gable and press the door outline in with a toothpick, without cutting through.
Why this matters: a pressed outline gives the black flood a clean edge to stop at.
4. Cut the side walls, the roof panels, the Snoopy cookie and the ribbon
From the second disc, cut two side walls and two roof panels. From the scraps, cut the Snoopy cookie with its flat edge along the bottom, then the small ribbon rosette. Press the dotted decorating guides lightly into Snoopy with a toothpick.
Why this matters: Snoopy stands on his flat edge in the ridge seam, so a wavy bottom edge makes him lean.

5. Bake the pieces and trim them while they are warm
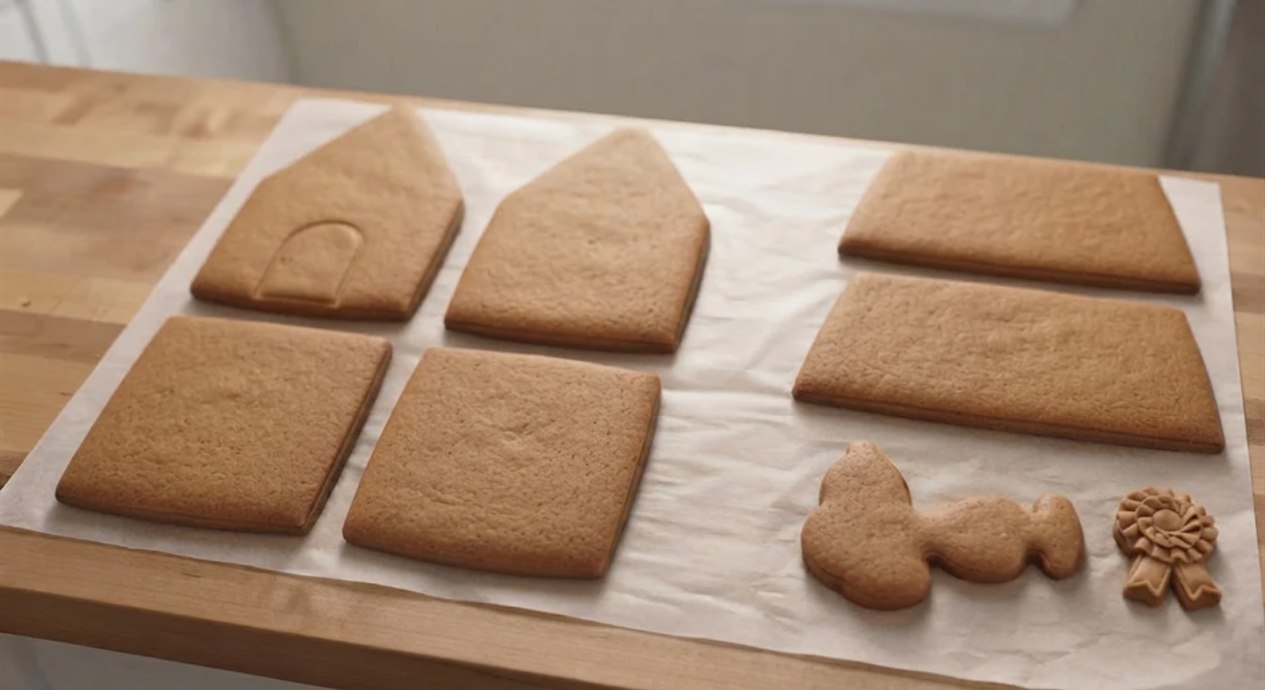
Bake at 300 degrees F. The walls, plate and roof panels take 22 to 30 minutes, until matte with a firm edge. Bake Snoopy and the ribbon on their own pan and start checking them at about 12 minutes. Within two minutes of each pan coming out, lay the paper pieces back on and trim any edge that spread.
Why this matters: the two gable peaks must match, or the roof panels rock on the higher one.
6. Flood the walls and roof red, the door black, Snoopy white and the ribbon blue
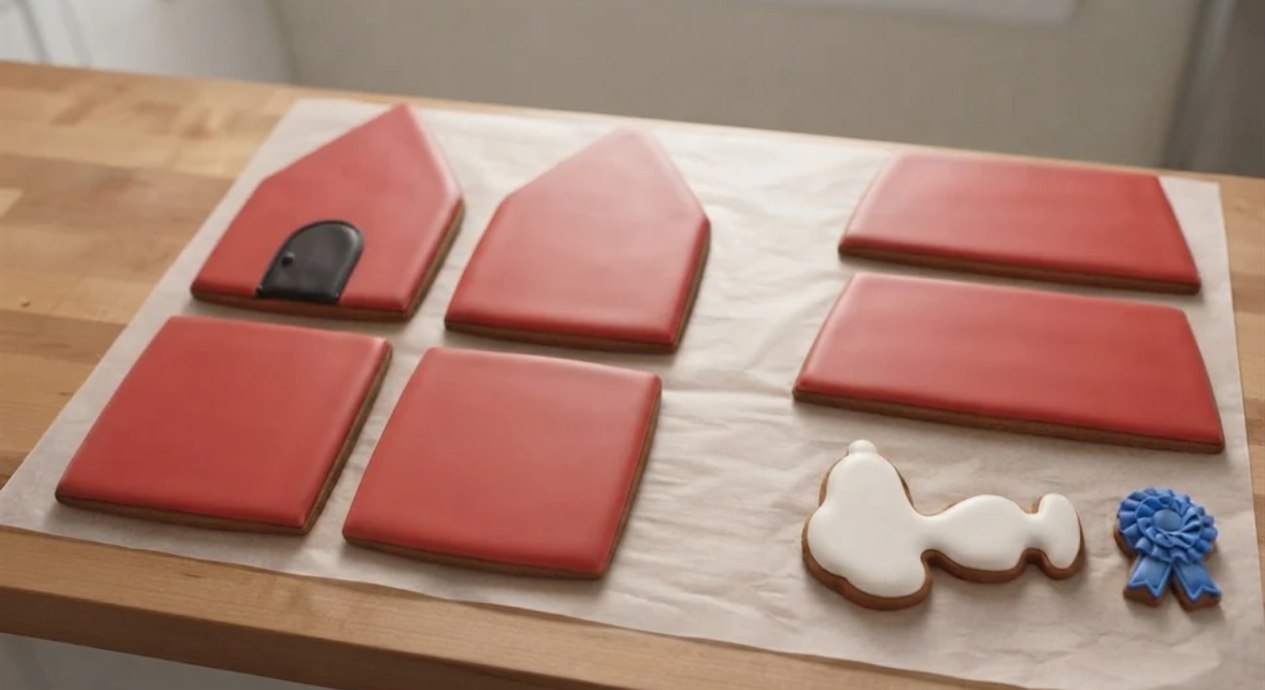
Thin most of the first batch of icing until a knife line closes in about 10 seconds. Flood the outside of every wall and both roof panels red, leaving a thin bare margin on the edges that will be glued. Flood the door black and the ribbon blue. Flood Snoopy white now too, following step 8.
Why this matters: icing on a glue edge stops the next layer of icing from gripping the cookie.
7. Pipe the board lines and the ribbon rings
Once the red floods look matte, about an hour, pipe the dark red board lines across every wall and roof piece along the guides, and the two rings on the ribbon. Leave the pieces flat.
Why this matters: a fully dry flood will not dent when you press the walls together tomorrow.
8. Decorate the Snoopy cookie
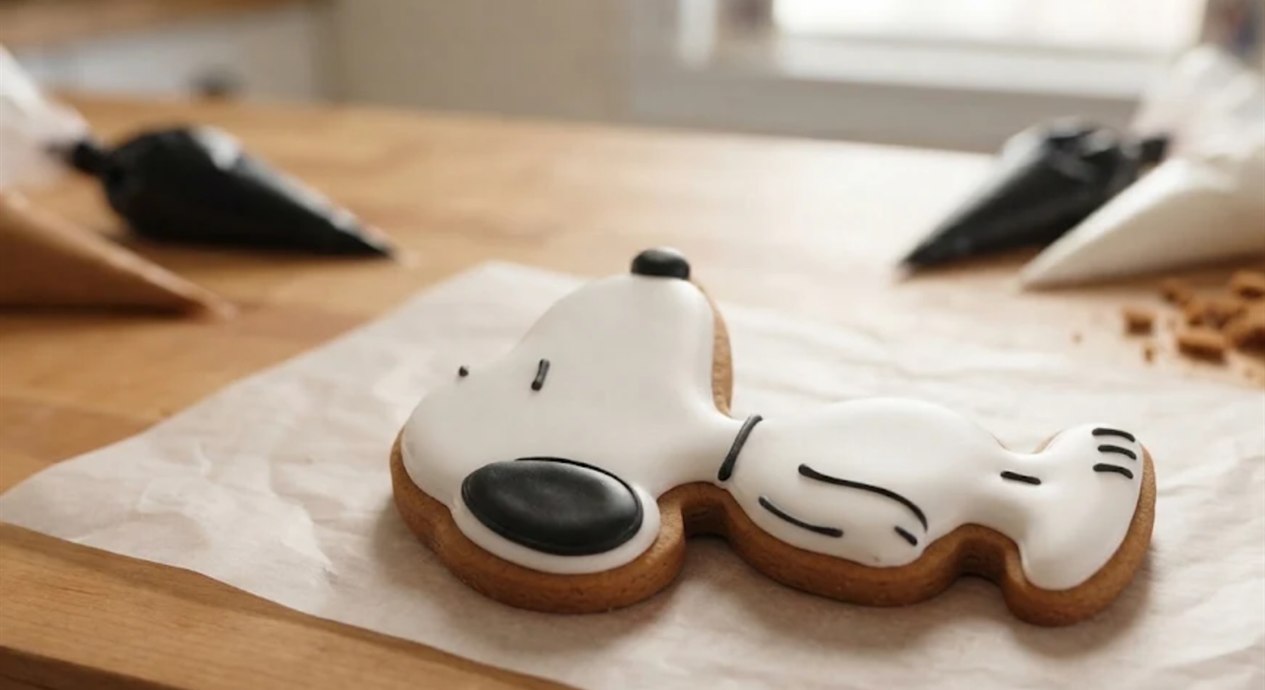
This is the piece people look at first, so give it its own time. The dotted guides on template page 3 show where every black line goes; keep the paper beside the cookie as you work.
Flood him white. Use white icing at the 10 second consistency in a bag with a #2 round tip. Outline just inside the edge, then fill the whole cookie, head, belly and paw, in one go, and pop any bubbles with a toothpick. Leave a thin bare gingerbread rim, as in the photos. Let it set until matte and dry to a light touch, about 1 hour, or the black will bleed into the white.
Pipe the black, in this order. Tint a little icing black and stiffen it to piping consistency, about like toothpaste, in a bag with a #1 round tip. First the nose: a round dot on the very top of the snout, built up until it stands proud. Then the closed eye: one short, slightly curved line partway down the face. Then the ear: outline a long oval hanging down the back of the head, and fill it with black thinned to about 15 seconds. Last, the thin outlines: the line where the head meets the body, the arm curving across the belly, and two short toe lines on the raised paw.
Let him dry overnight. Leave Snoopy flat for 8 to 12 hours, until the black ear is hard right through. He stands on edge tomorrow, and a soft ear can slide.
Why this matters: white first and black last keeps the lines crisp. Black piped onto wet white spreads into gray.
9. Set the floor plate, stand the four walls and spread the snow
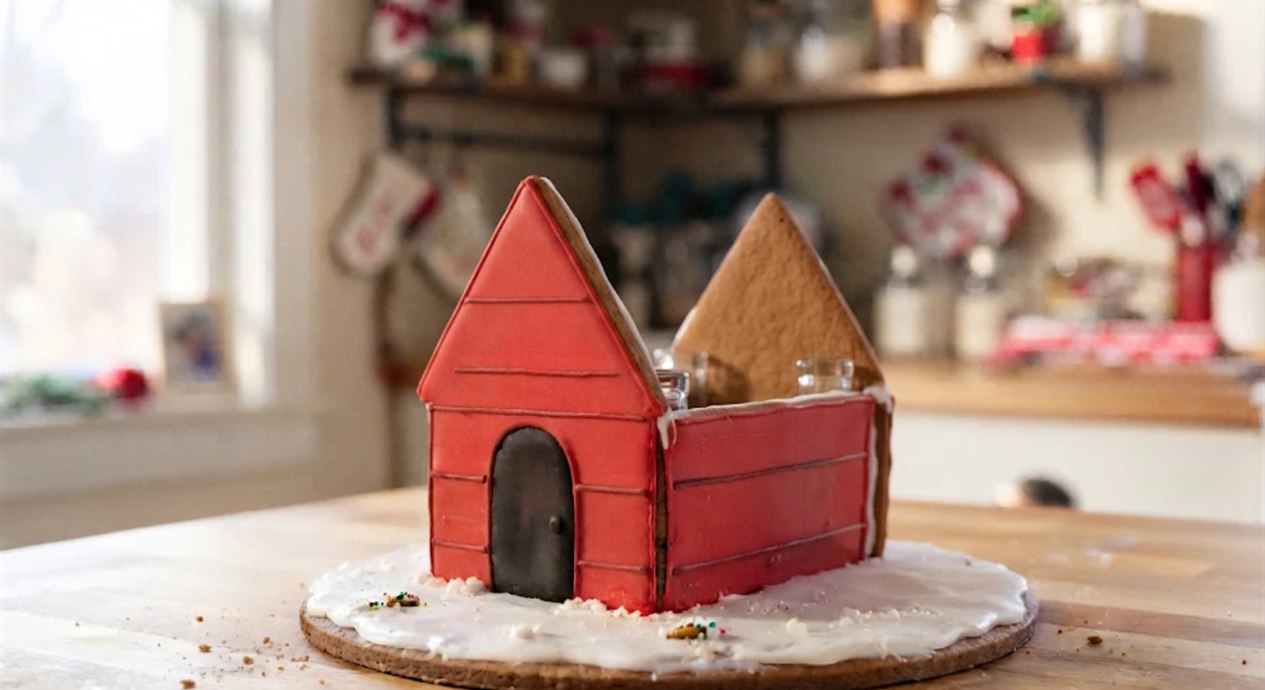
Glue the floor plate a little behind the middle of the board. Pipe a thick line along its front edge and stand the front gable on it, then the back gable on the back edge. Glue the two side walls between them, pipe every inside corner, and prop each wall with a cup. Spread white icing over the board around the house for snow and sprinkle on coconut or coarse sugar. Wait 2 hours.
Why this matters: the side walls tuck between the gables, so the gables carry the roof weight straight down.
10. Set both roof panels and fill the ridge
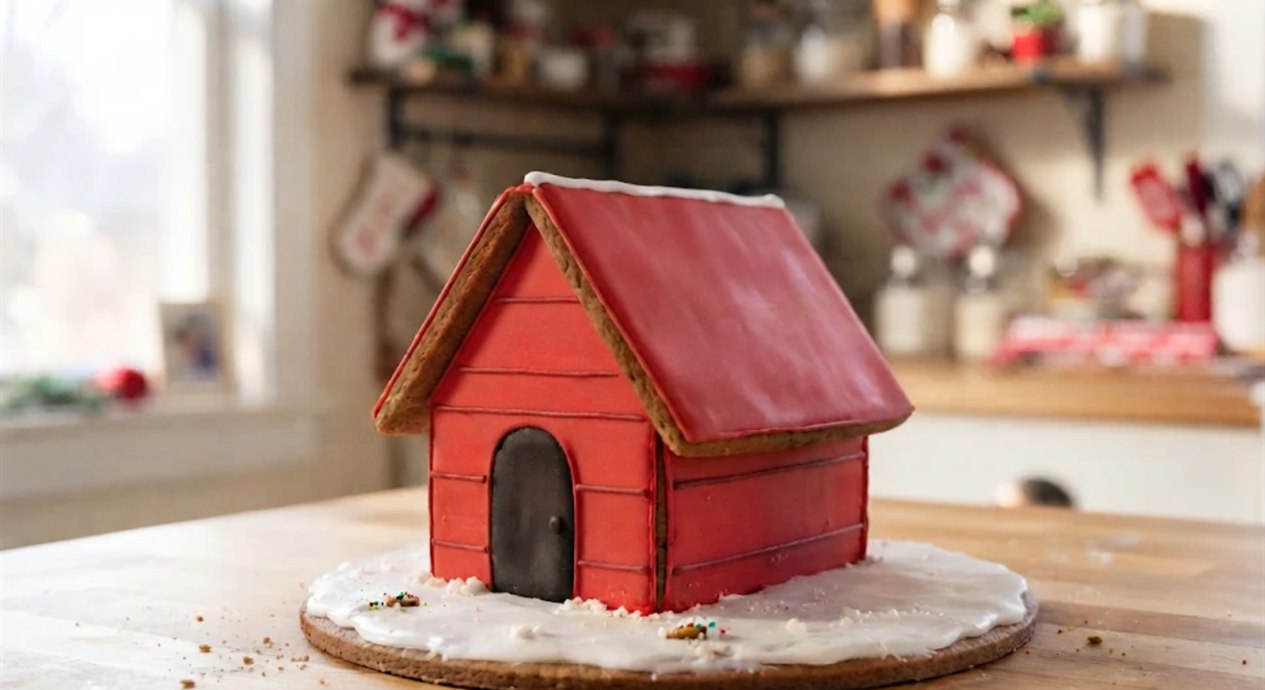
Pipe thick icing along the sloped tops of both gables and the tops of the side walls. Lay the first roof panel on so its top edge lines up with the peaks, and hold it for a minute. Lay the second panel against it so it overlaps at the ridge, then fill the ridge seam with a thick line of white icing. Prop the eave edges with cans and wait 4 hours.
Why this matters: at about 51 degrees the panels want to slide. The wait is what stops them.
11. Pipe the light strings and press on the candy bulbs
Tint a little icing black and pipe a thin wire along the roof edges, up the front gable and in loose swags across each roof face. Work one string at a time and press a candy bulb onto the wet line about every 1/2 inch, rotating the colors.
Why this matters: the wire skins over in a few minutes, and a bulb pressed onto a dry line falls off.
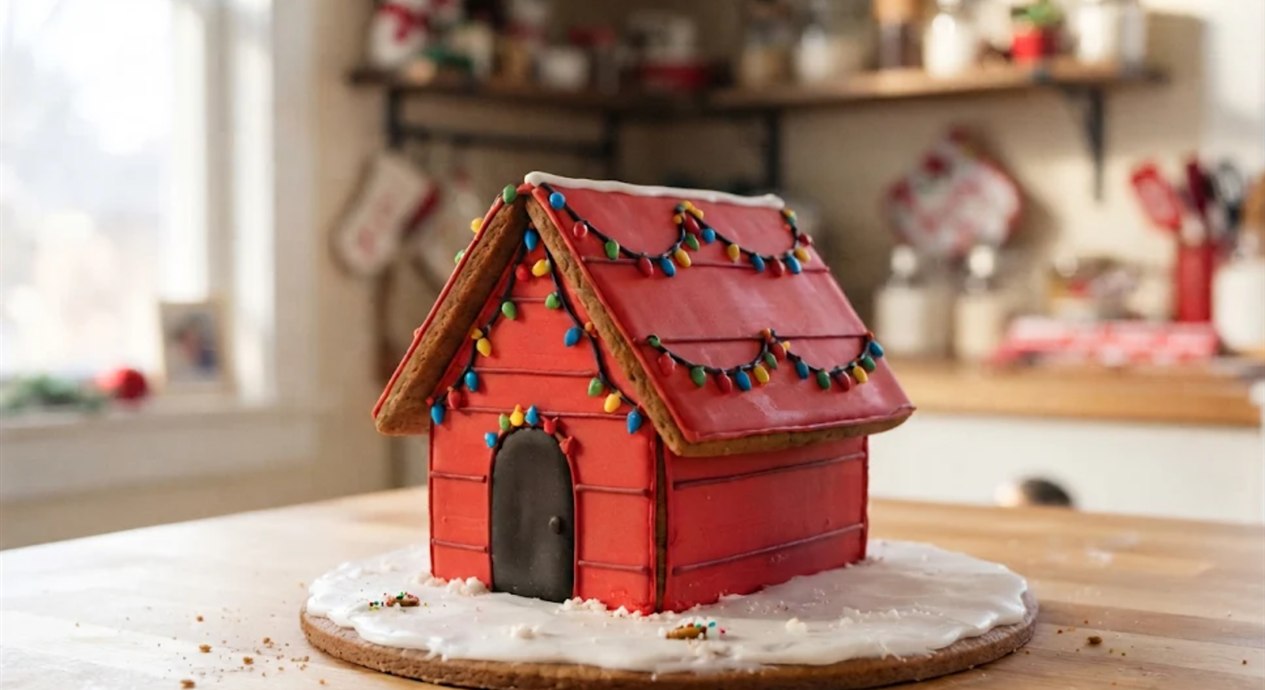
12. Stand Snoopy on the ridge and glue on the ribbon
Snoopy stands straight up along the ridge, head toward the front gable and snout pointing at the sky, the way he sits in the photos. Pipe a fat bead of stiff icing about 1/4 inch thick along the middle of the ridge, as long as his flat edge. Press him straight down so the icing squeezes out on both sides, check from the front that he is not leaning, and pipe a second bead along each side of his base. Push a toothpick into the roof against each side of his belly as props. Take the props out after 2 hours, and wait 4 before you move the house. Glue the ribbon to the front wall beside the door.
Why this matters: the ridge is a narrow peak, so the icing on both sides of his base holds him, not the point of the roof.
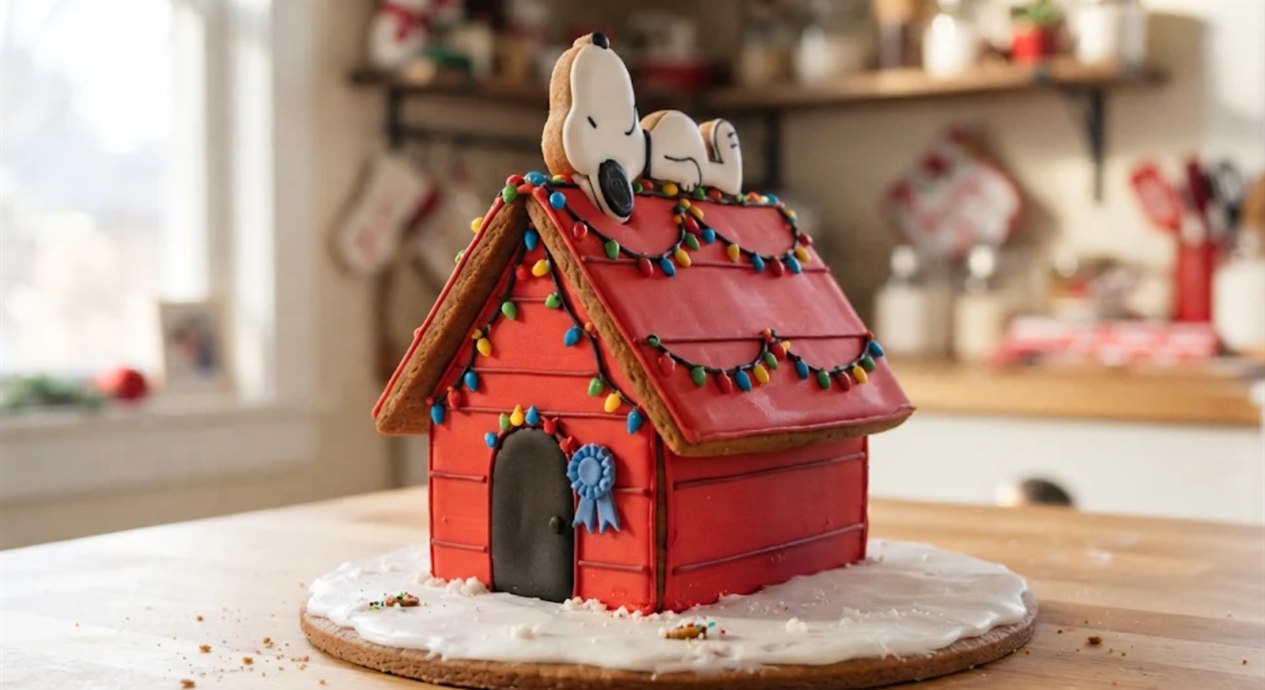
13. Plant the scraggly pretzel tree
Push the pretzel stick into a thick blob of icing on the board beside the house. Pipe a few short green needles on it in tiers, sparse on purpose. Glue one small red candy near the top so it leans the tip over, then wrap the blue scrap around the base.
Why this matters: a full, tidy tree is the wrong tree. This one is supposed to need a little love.
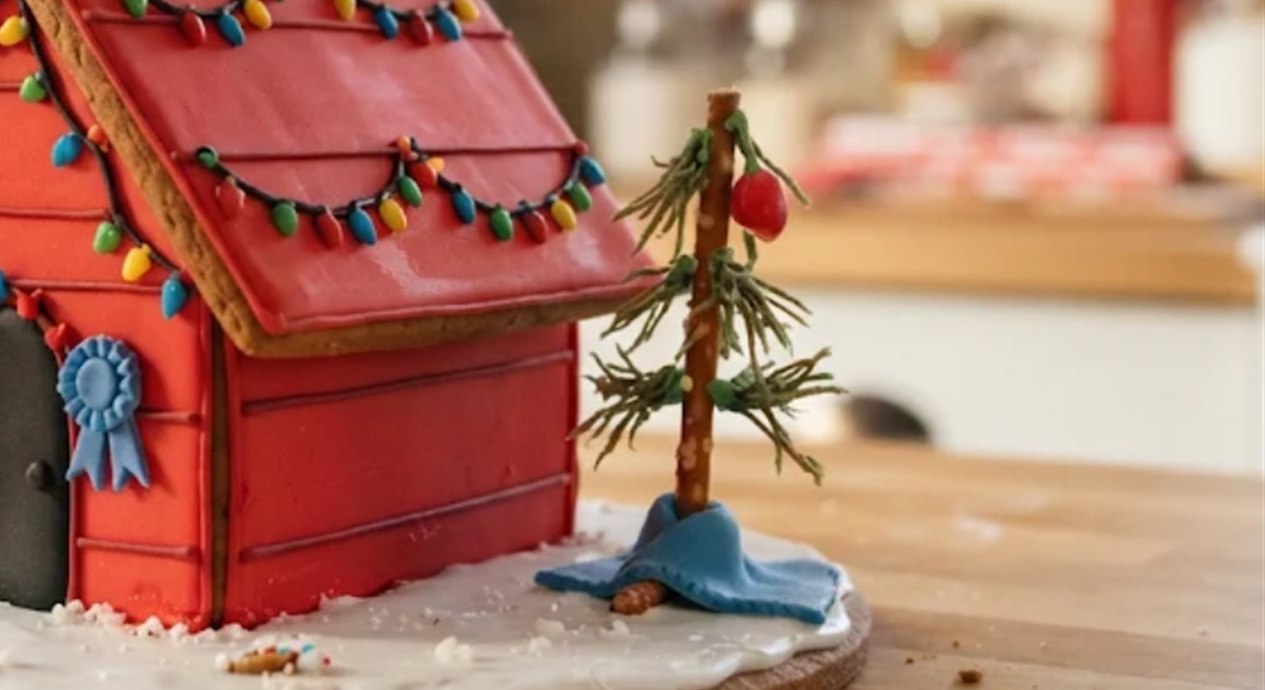
14. Add the fairy lights and let it stand overnight
For real glow, tuck a battery fairy light string along the roof edges behind the candy bulbs, with the battery box hidden behind the house. Use only battery lights, because a candle can scorch sugar, which is why our guide to keeping lights safe on a sugar house sticks to them. Let it stand overnight before you move it.

Troubleshooting
| What you see | Why it happens | What to do |
|---|---|---|
| A roof panel slides down | The walls were still soft, or the icing was thin | Lift it off, wait the full 2 hours, use stiff icing and prop the eave with a can. |
| A gap at the ridge | The gable peaks spread in the oven | Fill it with a thick ridge line. Snoopy covers the middle. |
| The roof rocks | One gable peak is taller than the other | Shave the taller peak with a fine grater. Trim both warm next time. |
| The red looks pink or orange | Not enough gel, or it was used straight away | Add more red and a touch of brown, then let it sit an hour to darken. |
| Red bleeds into the black door | The door was flooded before the red crusted | Let the red crust first, or flood the door first and the red around it later. |
| Bulbs fall off | The black wire dried before the candy went on | Pipe short lengths and press the bulbs on at once. Dab icing on a fallen one. |
| Snoopy tips over | Runny icing, or a wavy bottom edge | Shave the edge flat, use stiff icing on both sides and prop him with toothpicks for 2 hours. |
| Snoopy's black lines turned gray | The black went on before the white set | Let the white dry an hour first. Pipe a fresh line over a smudged one once dry. |
| The board lines wobble | Piping freehand across a wide piece | Press the lines in lightly with a ruler edge first and pipe over them. |
| A side wall bows in | It was pushed before the corners set | Prop it straight from inside with a cup until the corners harden. |
Want a Different Look?
The flying ace. Pipe a brown helmet, goggles and a red scarf onto the Snoopy cookie for his World War I flying ace persona, and point him toward the front like a pilot. Wikipedia dates his first flying ace strip to October 10, 1965, two months before the Christmas special aired.
For more builds from the screen, see our screen houses from the movies, the Bluey house on stilts, or the Grinch's crooked mountain house.
Easier Versions: No-Bake and Kit Shortcuts
A No-Bake Graham Cracker Doghouse for Small Kids
Stand four graham cracker halves in a box, cut two more into points for the gables with a serrated knife, and lean two whole crackers on top for the roof. Flood it red and add a dog cookie. Follow our steps for a doghouse from graham crackers, and use royal icing, not tub frosting, so it stands.
The Kit Shortcut
Build any plain kit, flood the walls and roof red, pipe board lines and a black door, and stand a dog cookie or a marshmallow figure on the ridge. Our notes on store kits that hold their shape point to the boxes with the steepest roofs.
Storage Instructions
Keep the doghouse in a cool, dry room, away from the stove, dishwasher and sunny windows, and take the fairy lights off before you store it. Make the icing with meringue powder if you plan to eat any.
FAQ
Is there an official Snoopy gingerbread house kit?
Kroger lists a Peanuts Holiday Gingerbread House Kit with a gummy Snoopy. It is a house rather than the red doghouse, so this template is the way to get the real shape.
Can I make it bigger?
Yes. Print at 125 percent for a doghouse about 9 inches tall. The pieces come to about 186 square inches, so one batch still covers them if you re-roll the scraps, and you need a 12 inch board.
More Gingerbread House Builds and Recipes
Browse our more themed gingerbread houses for the next build, and when something slips, our notes on what to do when a steep roof slides work on any house.
Build Your Next House With Best Gingerbread Houses
The doghouse proves the point we come back to on every build: a few strong details tell the whole story. Here it is red boards, a black door, Snoopy on the ridge and a string of prize-winning lights. When you want a head start, our tested list of gingerbread house kits sorts the good boxes from the wobbly ones.