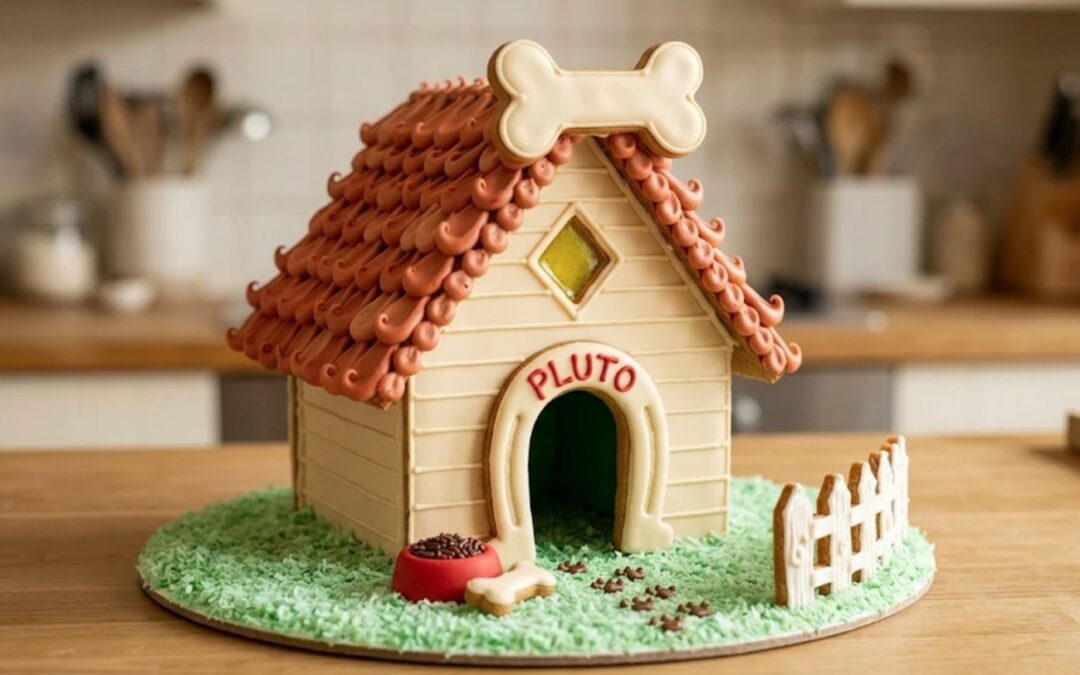
Most gingerbread dog houses are a plain box with a bone stuck over the door. This one copies a real doghouse: the one Pluto keeps in Mickey’s backyard at Disneyland, with its curling shingle roof, a giant bone on the peak and his name over the door.
Our house dough and royal icing recipes set every bake temperature and wait, and a script checked the free template so the doorway, the vent and the roof all fit. The roof shingles are big piped teardrops with their tips flicked up, the closest edible match for the cartoon curls on the real roof.
You will end up with a doghouse about 6 1/2 inches tall on a 12 inch board, from one batch of dough over two days. Start with the template, then the doghouse itself, the plan and 15 steps.
Pluto Gingerbread Dog House: At a Glance
- Difficulty: Easy to medium. The house is a simple box, and the steep roof and the bone on the peak add the challenge.
- Total time: about 1 1/2 days, in seven sessions. Most of it is icing drying.
- Active time: about 7 hours, counting the dough chill and the bake.
- Makes: a doghouse 4 1/2 by 5 inches and about 6 1/2 inches tall, with a fence, a dog bowl, a spare bone and paw prints on a 12 inch board.
- Template: free 3-page PDF, US Letter, true size with a 1 inch test bar on every page.
Tools: printer, ruler, scissors, rolling pin with 1/4 inch guides, parchment, 2 half sheet pans, paring knife, 6 piping bags, a large round tip and a small round tip, a toothpick, cans for propping, a bamboo skewer, offset spatula, 12 inch cake board, 1 battery LED tea light.
Materials
- 1 batch of our construction-grade house dough
- 2 batches of royal icing that sets hard enough to carry a roof
- Gel food coloring: orange, brown, red, ivory, leaf green and black
- About 3 lemon drops for the vent
- 1 red candy melt, 1 large red gumdrop and a spoon of chocolate sprinkles for the dog bowl
- 1 cup of shredded coconut
Steps
- Print the template at Actual Size and measure the test bar.
- Make the dough and chill it for at least an hour.
- Roll the dough 1/4 inch thick, cut the gables and the side walls, and press the plank lines.
- Cut the roof panels, the name arch, both bones and the fence.
- Bake at 300 degrees F, then melt lemon candy into the diamond vent.
- Trim every piece against the template while it is warm.
- Flood the walls cream, the roof terracotta, the arch and bones cream and the fence white.
- Pipe the curling shingles on both roof panels.
- Pipe the planks, the PLUTO letters and the bone shading, then leave everything overnight.
- Stand the four walls on the board, then wait 2 hours.
- Set both roof panels with props and pipe the ridge, then wait 4 hours.
- Glue on the name arch and pipe curls along the eaves.
- Stand the big bone on the peak.
- Green the board, pipe the paw prints and set the bowl and the spare bone.
- Stand the fence and light the doghouse with a battery tea light.
Notes: times are worked out from the set times on our icing page, not timed on a build. Ovens vary, so check every bake early and go by the matte surface and firm edge. This is a people treat: keep it out of reach of real dogs, because some candy and icing can make them sick. Not an official Disney product. Not approved by or associated with Disney. This is our own fan build for home baking.
Free Printable Gingerbread Dog House Template
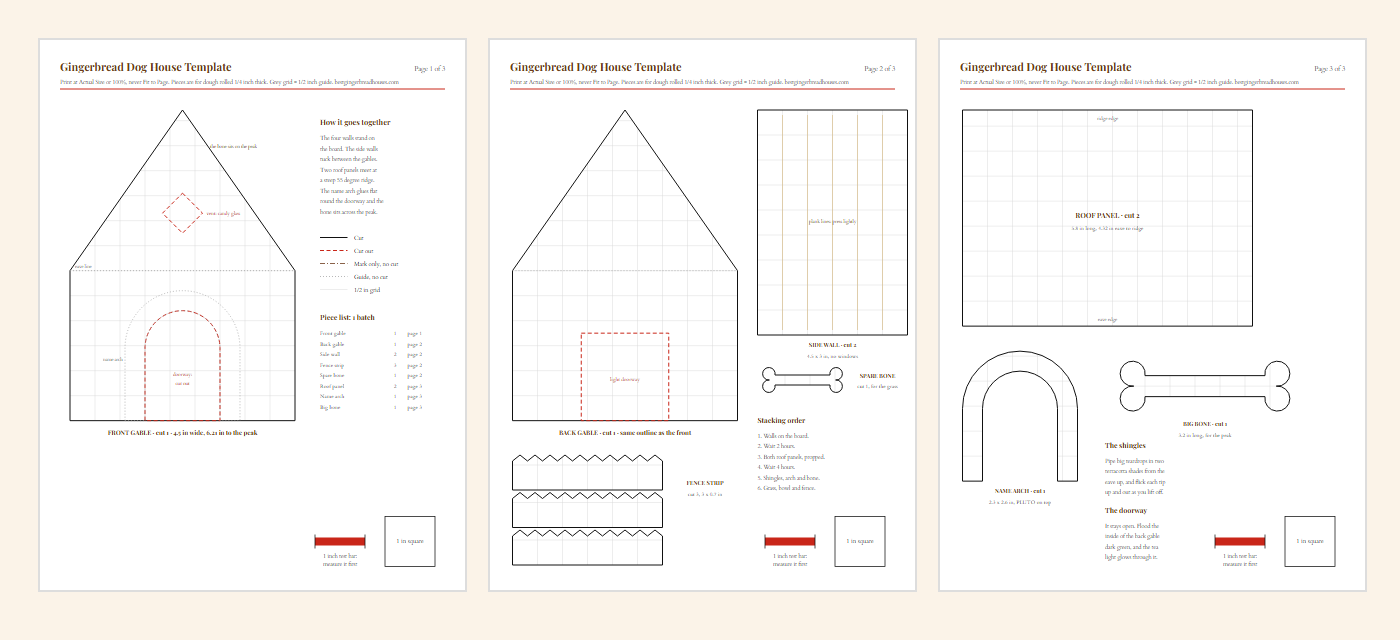
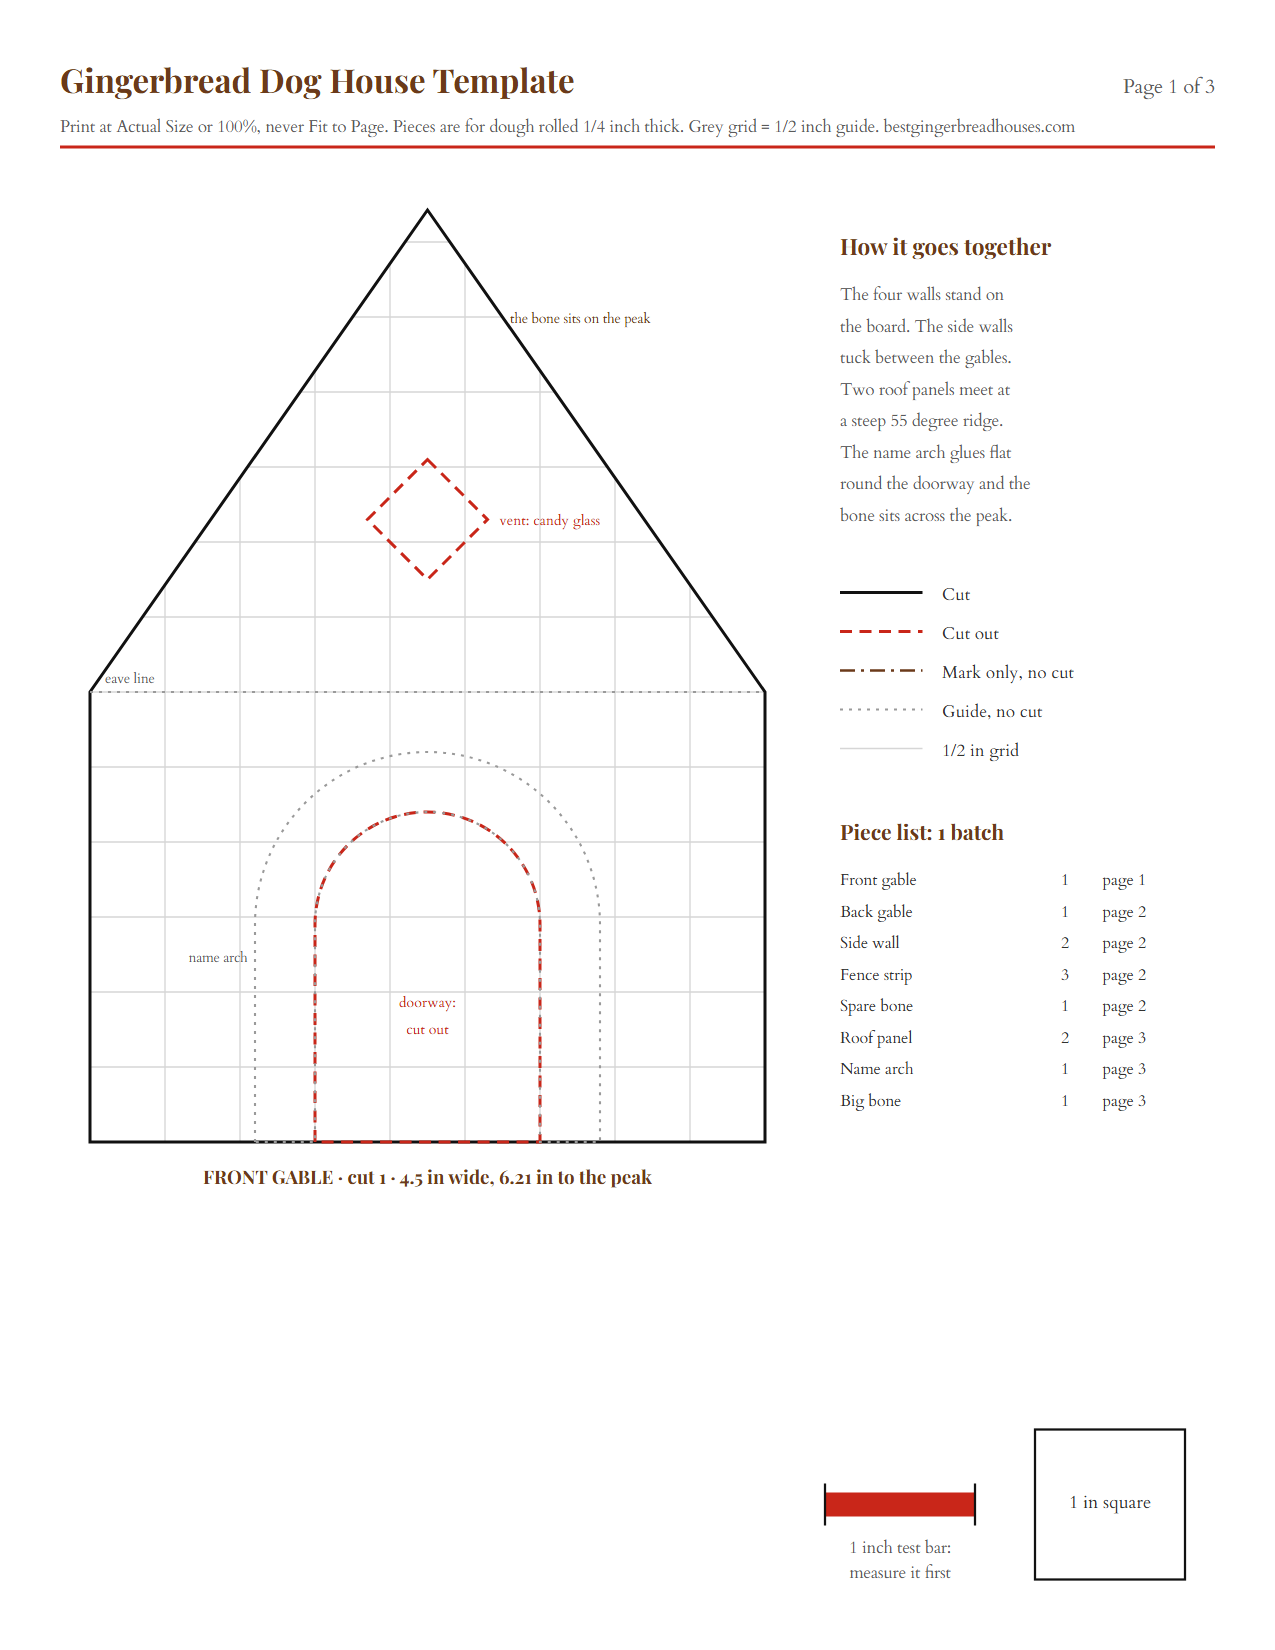
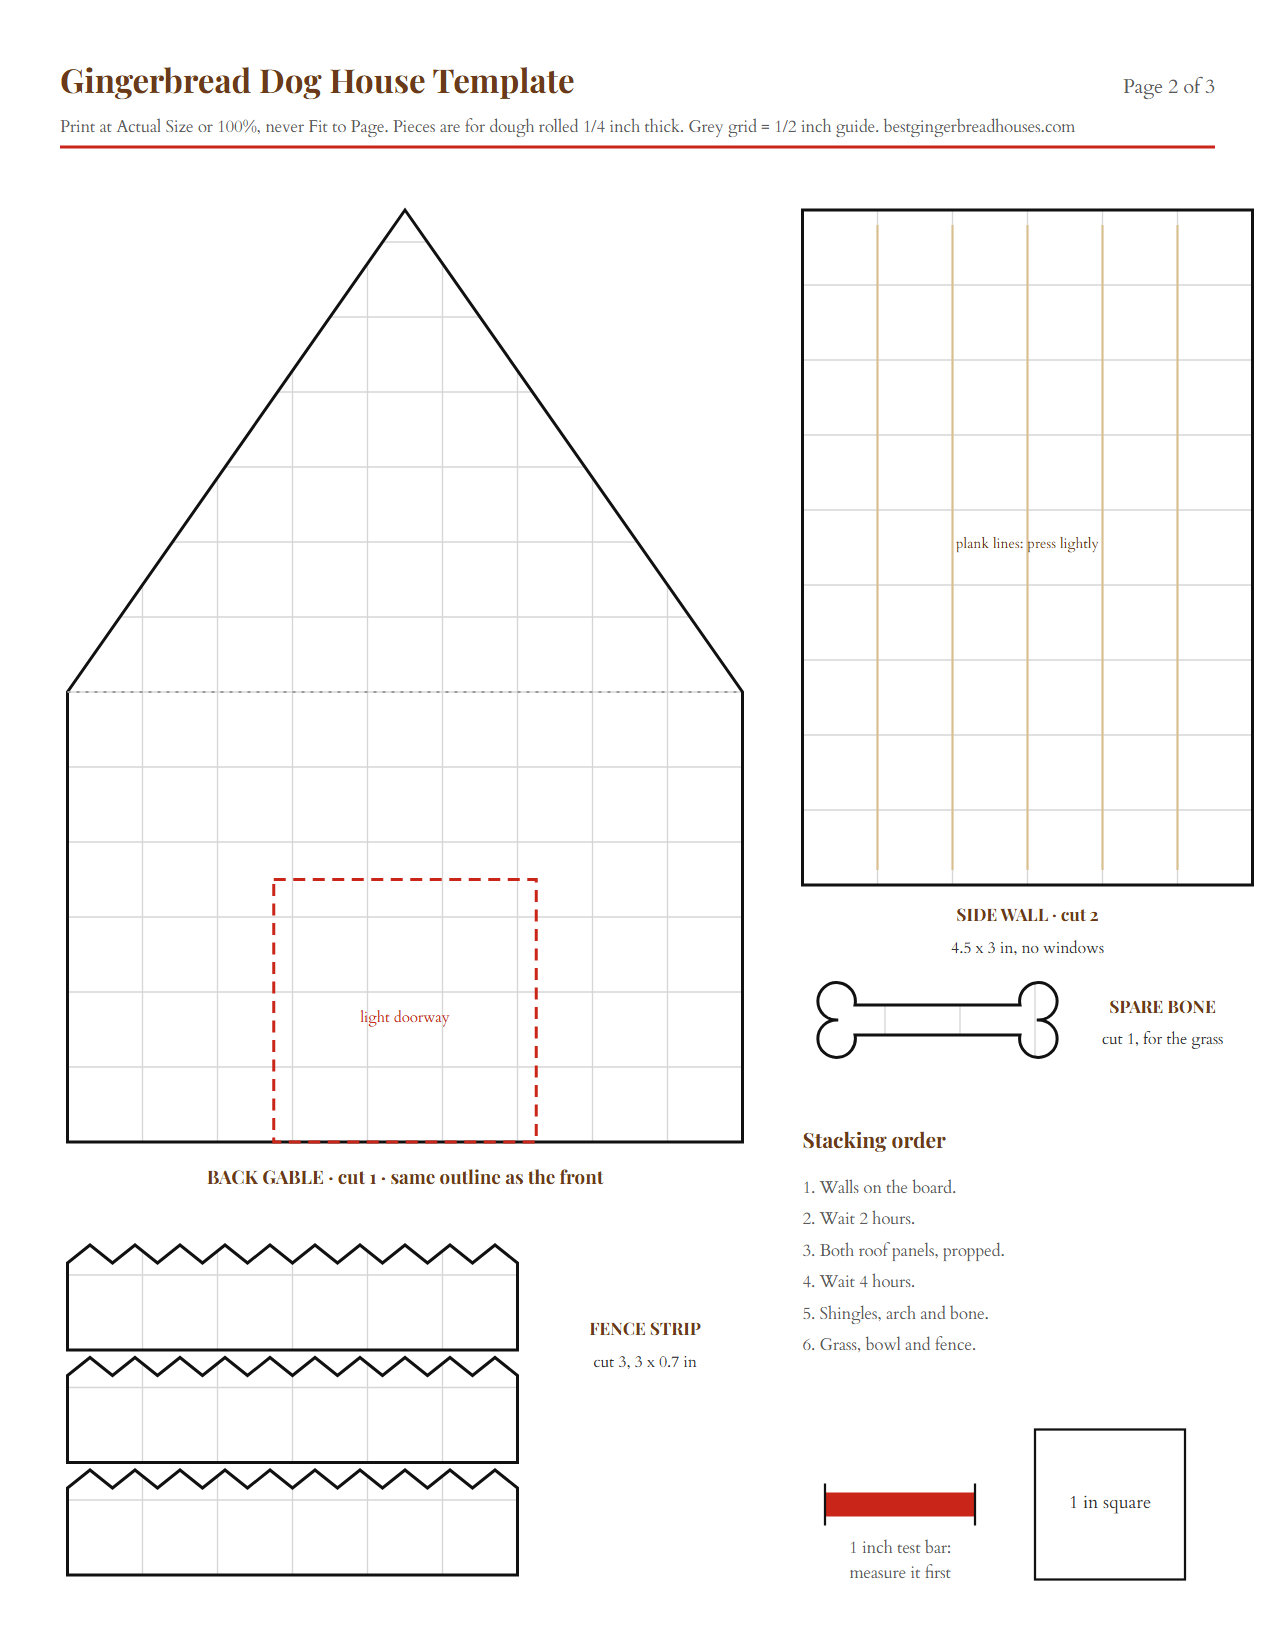
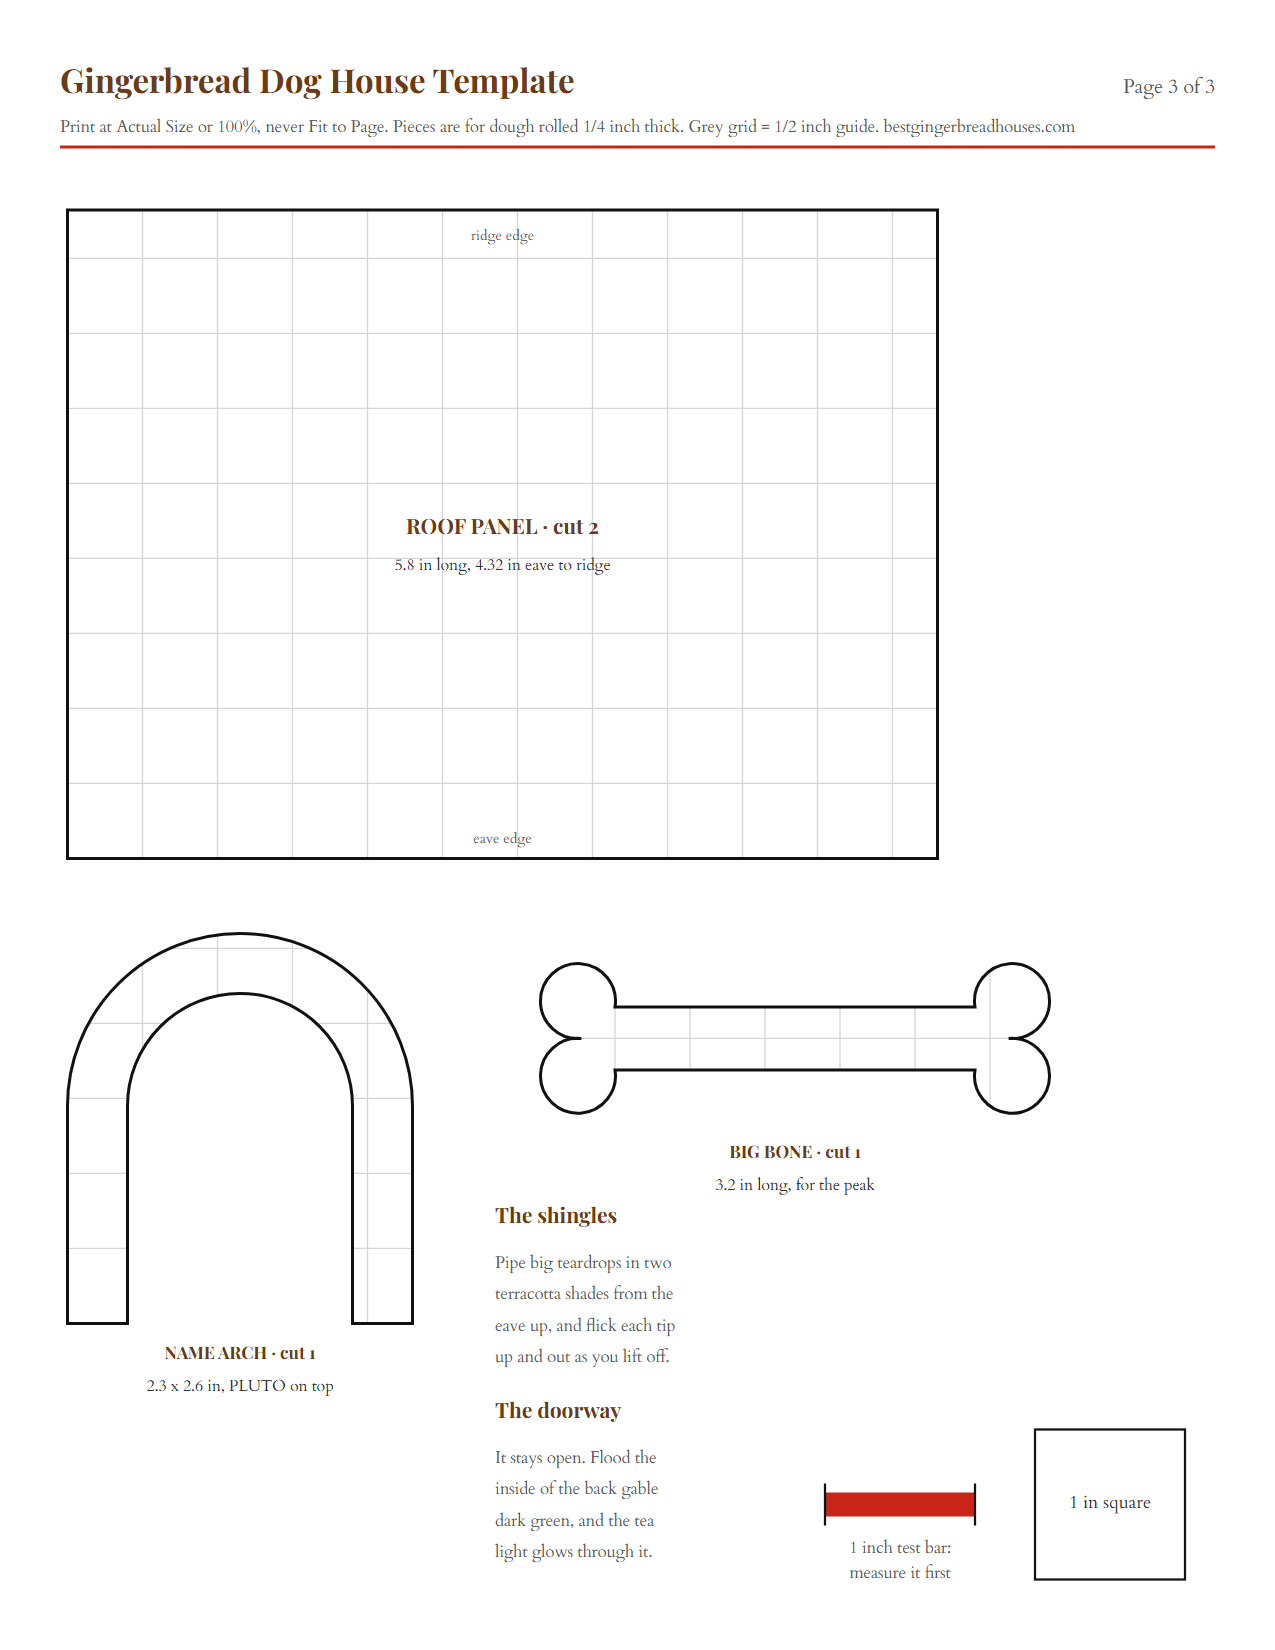
The template is three US Letter pages with eight shapes at true size over a faint 1/2 inch grid. Download the PDF, print it at Actual Size, and check that the red bar measures 1 inch before you cut anything.
| Piece | Cut | Size |
|---|---|---|
| Front gable | 1 | 4 1/2 in wide, 6.2 in to the peak, with an arched doorway and a diamond vent |
| Back gable | 1 | Same outline, with a light doorway |
| Side walls | 2 | 4 x 3 in, no windows |
| Roof panels | 2 | 5.8 x 4.3 in |
| Name arch | 1 | 2.3 x 2.6 in horseshoe |
| Big bone and spare bone | 1 + 1 | 3.2 in and 1 1/2 in long |
| Fence strips | 3 | 3 x 0.7 in |
The walls stand 3 inches to the eave and the steep 55 degree gable rises another 3.2 inches, which leaves room for the diamond vent and the bone above the doorway. The roof panels overhang 0.4 inch all round, more than on most of our houses, so the curling shingles have an edge to hang over. The pieces come to about 125 square inches, so one batch covers them with dough left over.
Why Pluto’s Doghouse in Mickey’s Toontown
Pluto has a real doghouse. It sits behind Mickey’s House in Mickey’s Toontown at Disneyland Park, and Disneyland’s page for Mickey’s House lists Pluto’s doghouse among the things you pass on the walk through. Toontown reopened after a reimagining on March 19, 2023, per the Disney Parks Blog, and WDW News Today’s reopening tour found the doghouse still in the backyard, next to a garden. Building from a doghouse people have stood next to beats inventing one, and it gives every detail a reason.
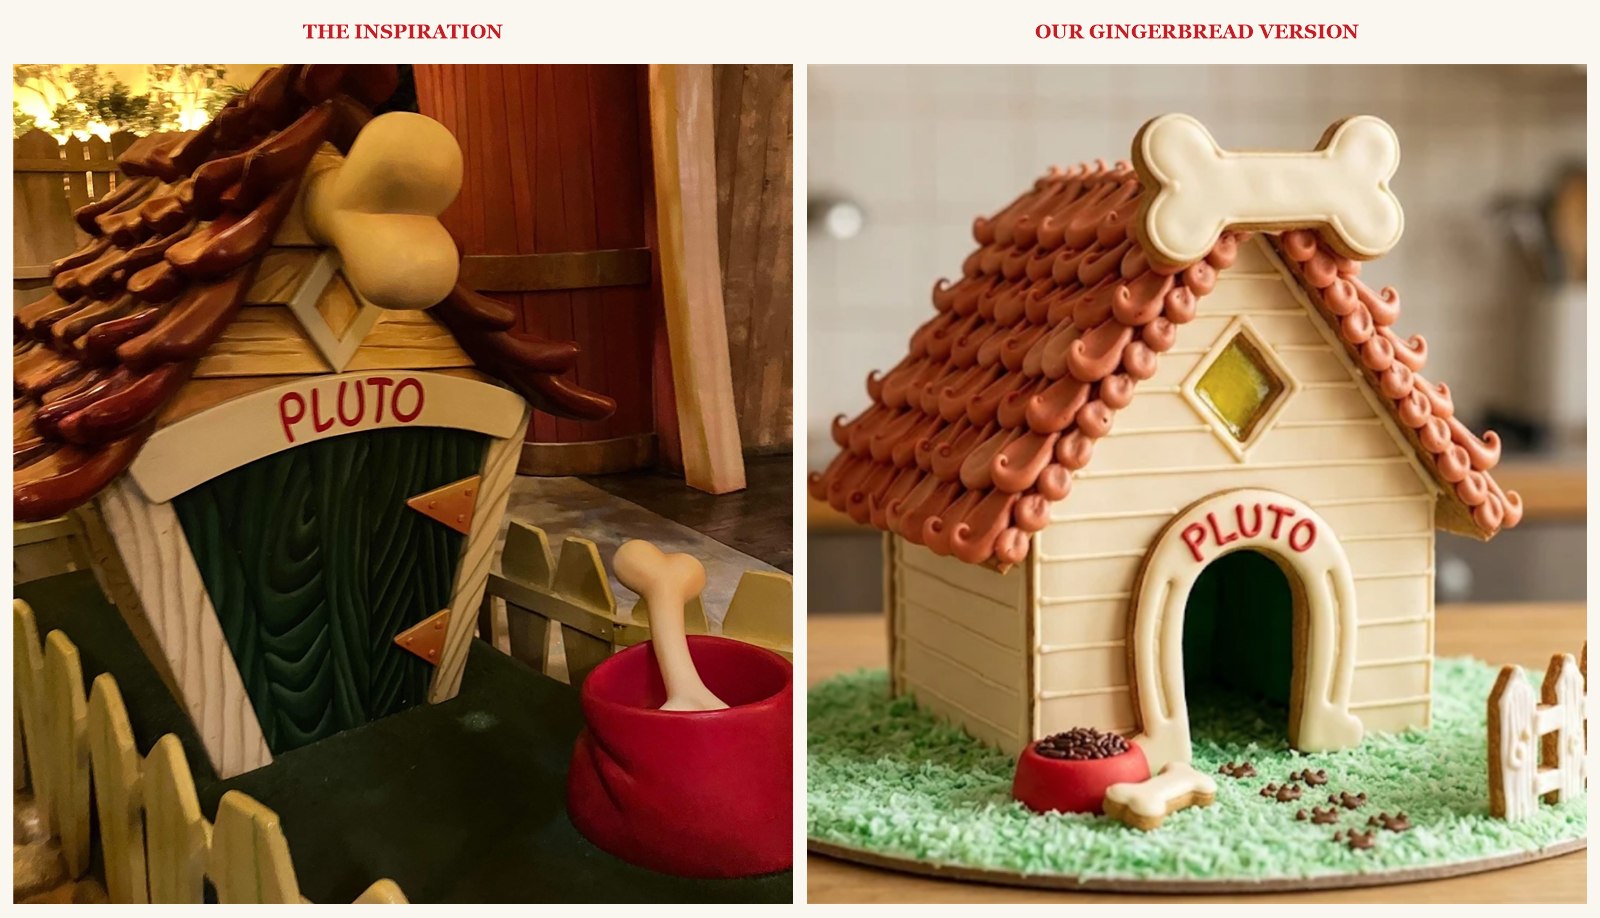
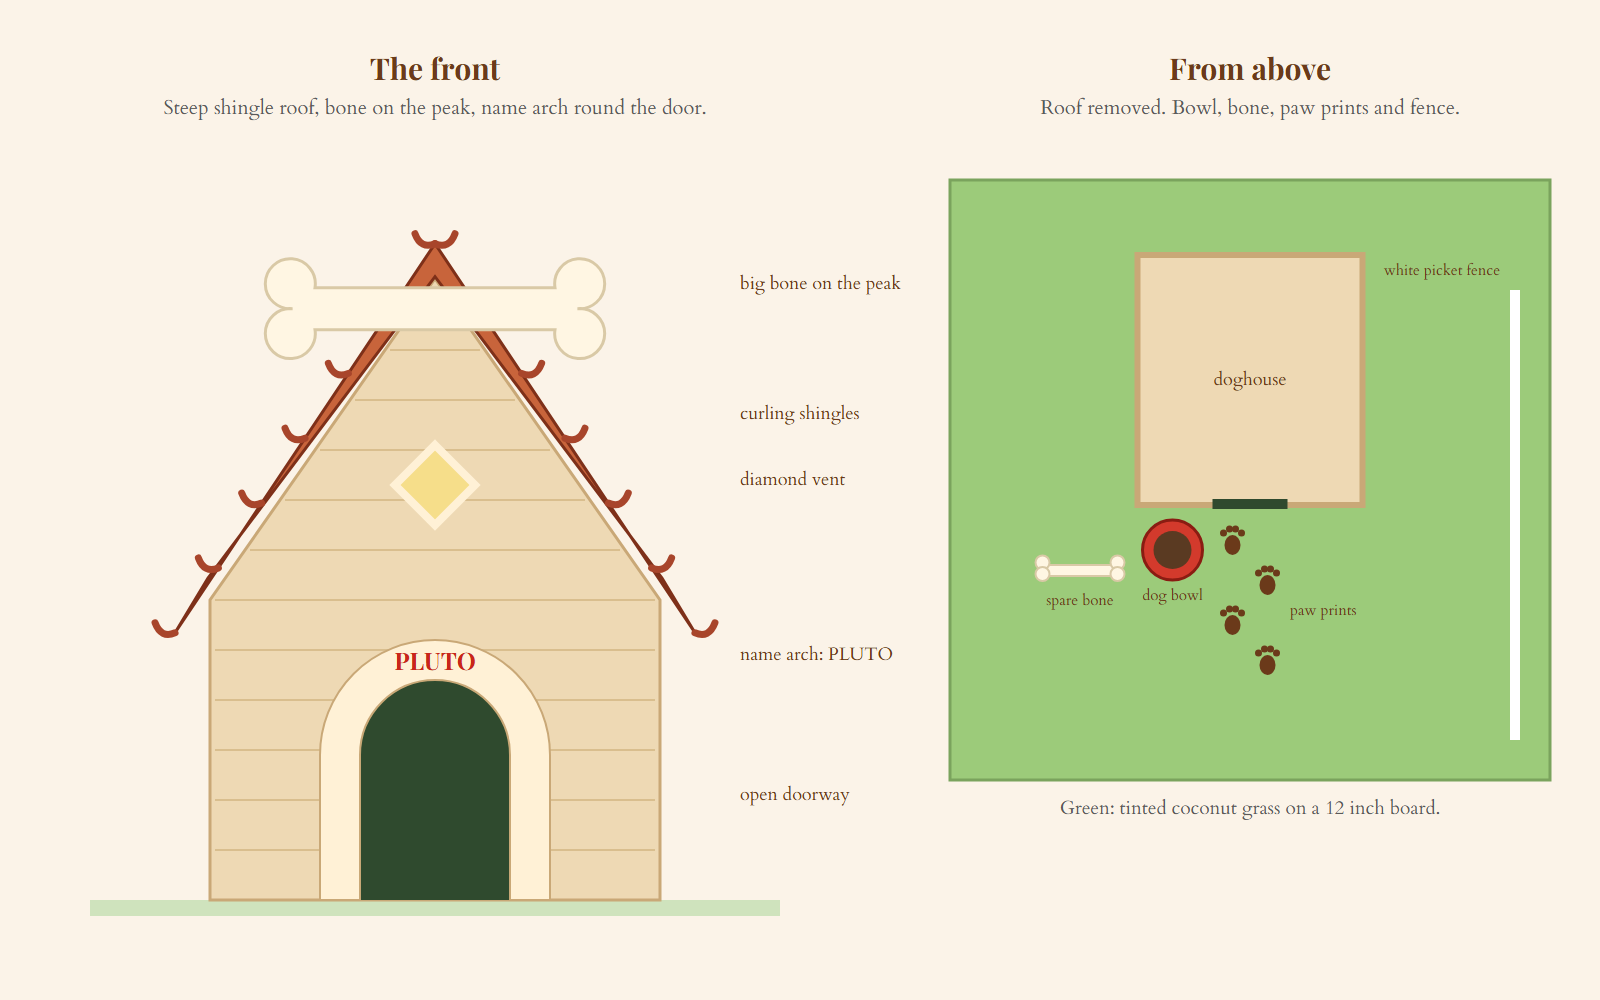
Here is what we copied from the photo. The walls are pale cream planks with the grain showing. The roof is steep and covered in fat terracotta shingles that curl up at the tips like a cartoon. A giant cream bone pokes out from the front of the peak, and a diamond outline sits in the gable below it. Ours stands upright on the ridge instead, where it reads from across the room. A cream arch frames the doorway with PLUTO in red letters across the top, and the doorway itself is dark green, with no door at all. A white picket fence runs along the side. The bone on the peak is the detail people remember, so it gets its own step here.
Is There a Gingerbread Dog House Kit?
Sometimes, but not a Pluto one. Target’s Wondershop line sold a Dog House kit in 2019, which we tracked on our Target gingerbread house kit history, and small doghouse kits turn up in stores most seasons. None we found copies the Toontown doghouse, and a kit doghouse is usually too small for a bone on the peak. Use a kit for the shortcut near the end, or bake this one from the template.
The Shingles, the Bone and the Name Arch: The Icing Work
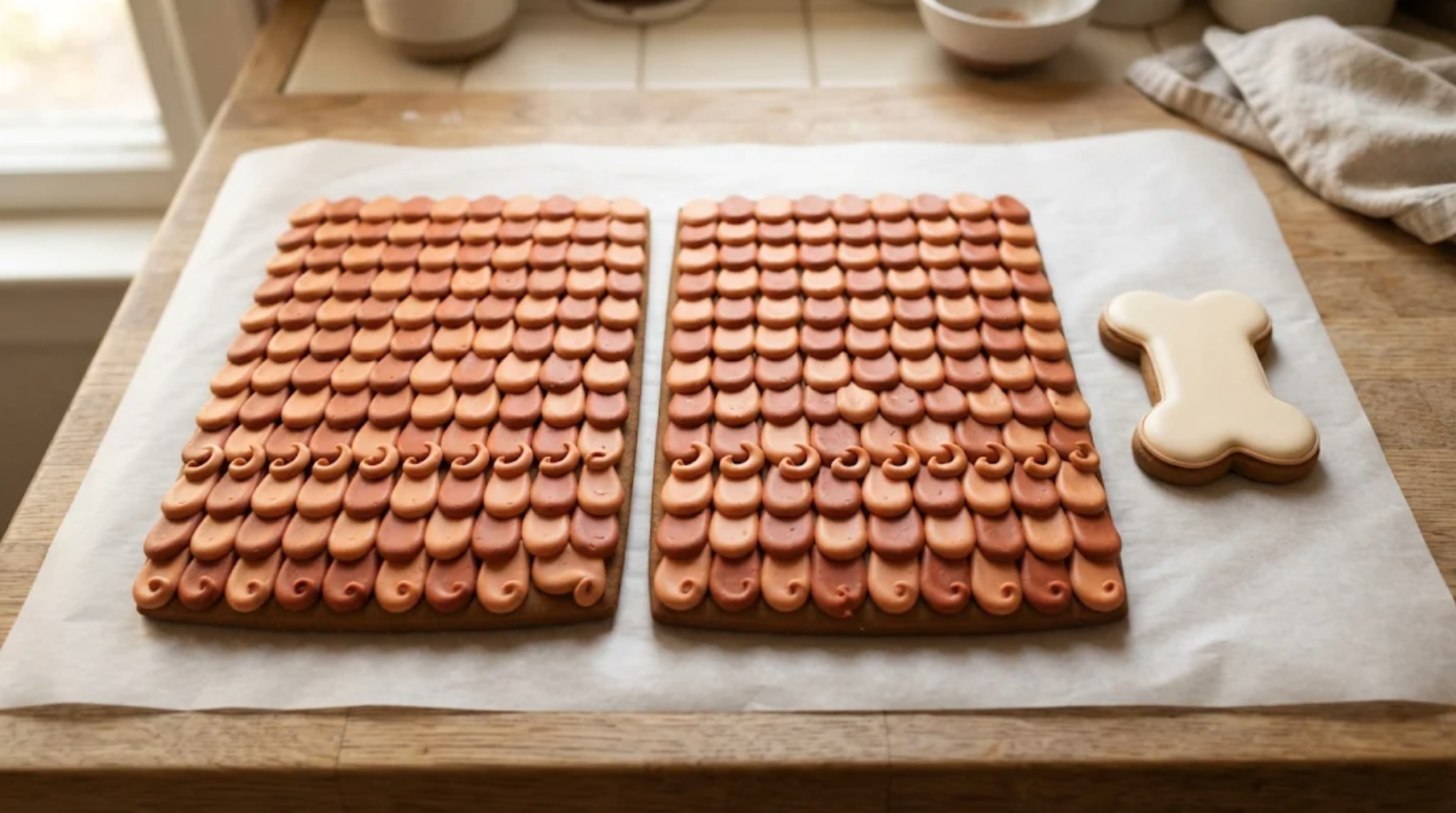
The shingles. Flood both roof panels terracotta first. Once they crust, pipe big teardrops with a large round tip, starting each one at the eave edge and pulling it up toward the ridge. As you lift off, flick the tip up and out so it curls. Work in rows from the eave up, each row overlapping the one below, and switch between a light and a dark terracotta inside every row so no two neighbors match. Pipe five test shingles on parchment first. If the tips droop flat, the icing is too soft; if they crack as you flick, it is too stiff, so stir in a few drops of water.
The bone. Flood both bones cream, then pipe a thin pale tan line along the bottom edge of each knob and down one side of the shaft. That one shadow line makes a flat cookie read as round from across the room.
The name arch. Flood the arch cream. Once it is matte, pipe PLUTO across the top in red with a small round tip. Start with the middle letter, T, and work out to both ends so the word sits centered on the curve. Try other colors, or your own dog’s name, in the studio below before you tint a bowl.
Doghouse Color Studio
Start from the Toontown colors, or paint the doghouse your own way. The preview updates, and you get the icing mix for each part.
Colors on screen are approximate, and gel colors vary by brand, so tint a spoonful and let a dot dry before you mix the whole bowl. Nothing you choose leaves your browser.
How Long It Takes, Day by Day
Plan on seven sessions over two days, about 7 hours of hands-on work. The walls must wait 2 hours before the roof goes on, the roof 4 hours before the arch and the bone go on, and the finished doghouse a night before you move it. All the shingle and letter piping happens while the pieces lie flat on day 1. Pick your finish time and the planner counts back for you.
| When | What you do | Hands-on | Then wait |
|---|---|---|---|
| Day 1, morning | Print, make and chill the dough, cut, press the planks, bake, melt the candy vent and trim. | About 2 3/4 hours | Until cool |
| Day 1, early afternoon | Flood the walls, the roof panels, the arch, both bones and the fence. | 40 minutes | About 1 hour |
| Day 1, afternoon | Pipe the curling shingles, the plank lines, PLUTO and the bone shading. | About 80 minutes | Overnight, pieces flat |
| Day 2, early morning | Stand the four walls. | 25 minutes | 2 hours |
| Day 2, mid morning | Set the roof panels with props and pipe the ridge curls. | 30 minutes | 4 hours |
| Day 2, afternoon | Glue on the name arch, stand the bone on the peak and pipe the eave curls. | 40 minutes | About 1 hour |
| Day 2, late afternoon | Green the board, pipe paw prints, set the bowl and the spare bone, stand the fence and light it. | 40 minutes | Overnight before you move it |
Gingerbread Dog House Build Day Planner
Pick when you want the house finished. The planner counts back through every drying time and tells you when to start baking.
For planning only: icing sets faster or slower with the weather, so treat each wait as a minimum and check that joints feel firm before moving on. Not professional baking advice. Nothing you enter leaves your browser.
How to Make a Gingerbread Dog House Step by Step
1. Print the template and measure the test bar
Print all three pages at Actual Size or 100 percent, never Fit to Page, and check that the red bar reads exactly 1 inch.
Why this matters: a gable printed small leaves no room for the vent between the arch and the bone.
2. Make the dough and chill it
Make one batch of house dough, split it in two, flatten each half into an inch-thick disc, wrap and chill for at least an hour.
Why this matters: cold dough holds the points of the diamond and the round top of the doorway.
3. Roll the dough, cut the gables and the side walls, and press the planks
Roll a disc on parchment to an even 1/4 inch between guide strips. Cut the front gable, the back gable and the two side walls. Cut out the arched doorway and the diamond vent in the front gable and the square light doorway in the back gable. Then lay a ruler across each wall every 1/2 inch and press it in lightly to mark the planks.
Why this matters: pressed lines stay crisp through the bake and show through a thin flood, so the walls look like painted boards.
4. Cut the roof panels, the name arch, both bones and the fence
From the second disc, cut the two roof panels. From the scraps, cut the name arch, the big bone, the spare bone and three fence strips.
Why this matters: the roof panels are the biggest pieces. Cut them from fresh dough, not scraps, so they bake flat.
5. Bake the pieces, then melt candy into the vent
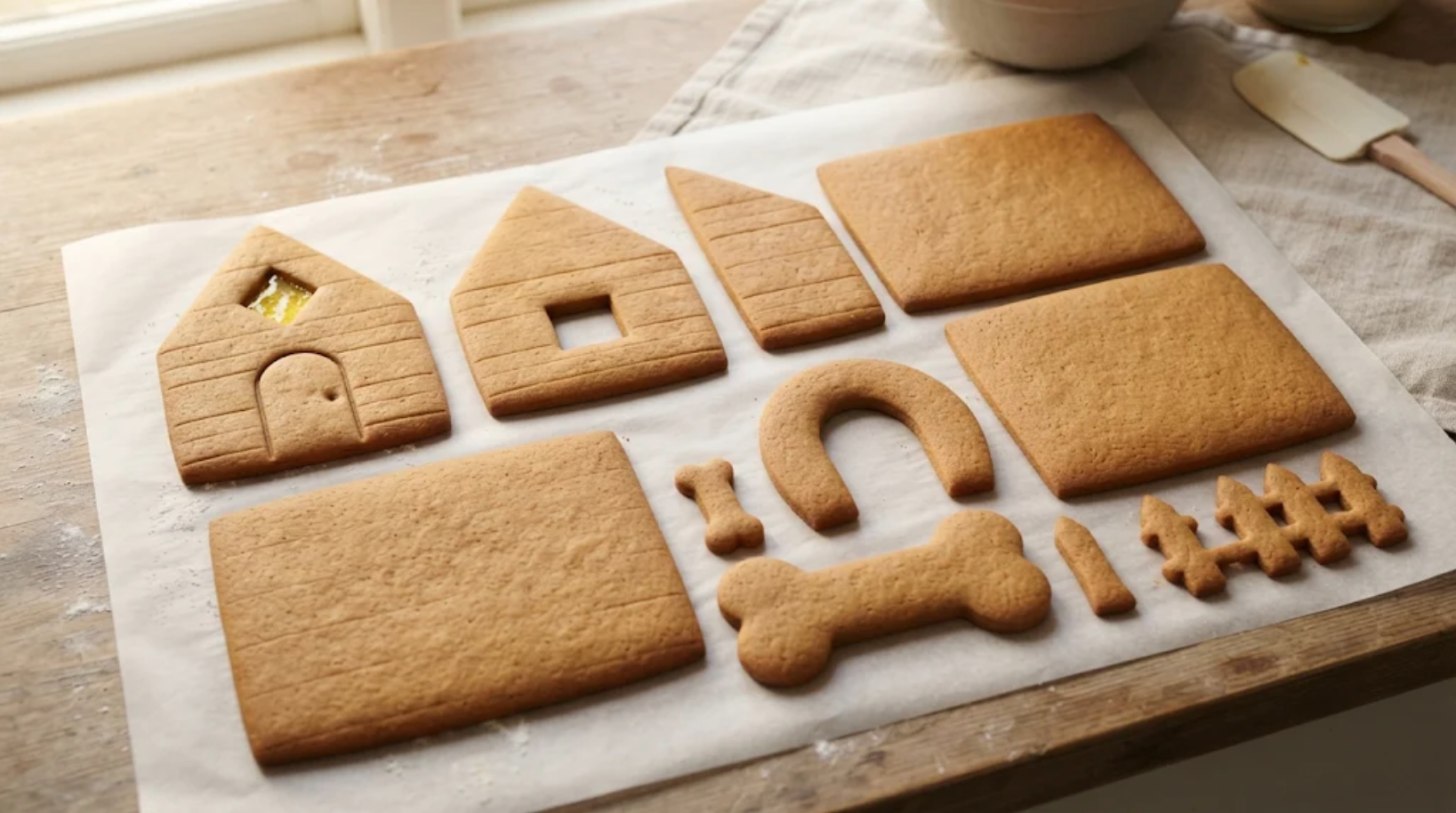
Bake at 300 degrees F. The walls and roof panels take 22 to 30 minutes, until matte with a firm edge. Bake the arch, the bones and the fence on their own pan and start checking them at about 12 minutes. Pull the front gable about 5 minutes early, fill the diamond with crushed lemon drops, two pieces deep, and bake again until the candy melts flat.
This is how you turn crushed hard candy into stained glass. Hard crack, where candy flows, is 300 to 308 degrees F at sea level per Colorado State University Extension, so it melts slowly at 300. If it is still lumpy after about 10 minutes, raise the oven to 325 degrees F and watch closely.
6. Trim every piece while it is warm
Within two minutes of each pan coming out, trim any edge that spread past the paper piece, most carefully the two sloped edges of each gable. Leave everything on the pan until cool.
Why this matters: on a roof this steep, a gable that spread holds the panels apart at the ridge.
7. Flood the walls, the roof, the arch, the bones and the fence
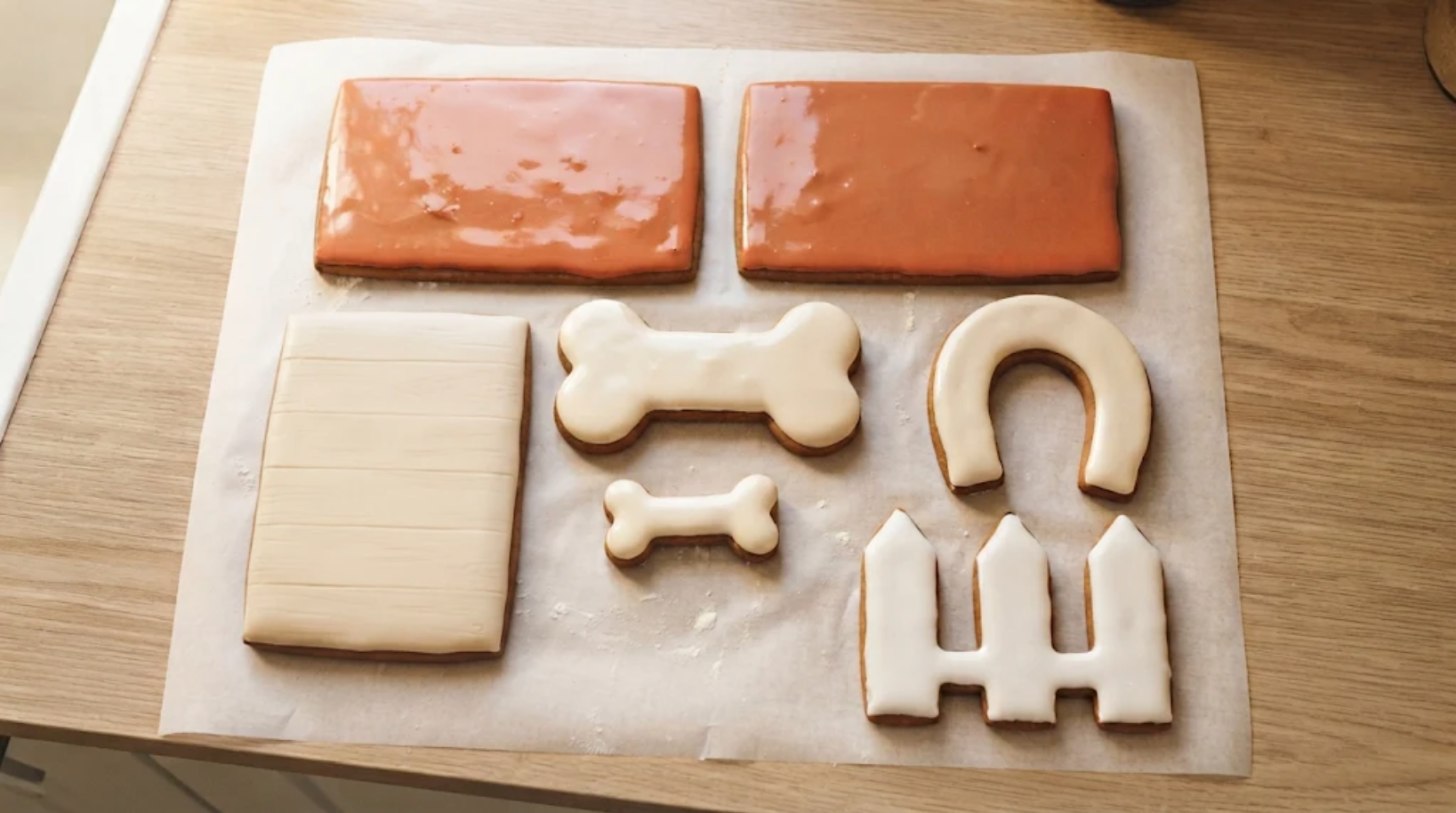
Thin most of the first batch of icing until a knife line closes in about 10 seconds. Flood the outside of every wall cream, both roof panels terracotta, the name arch and both bones cream and the fence strips white. Flood the inside face of the back gable dark green around the light doorway.
Why this matters: the dark green inside is what you see through the open doorway, the same shade as the real one. The shingles and letters only stay crisp on a flood that has crusted.
8. Pipe the curling shingles
Once the floods look matte, about an hour, pipe rows of big teardrop shingles on both roof panels from the eave up, mixing light and dark terracotta in every row and flicking each tip up as you lift off. Let the bottom row hang a little past the eave edge.
Why this matters: working flat lets each row overlap the last evenly. On a 55 degree roof, wet shingles slide.
9. Pipe the planks, the letters and the bone shading, then leave it overnight
Pipe a thin pale tan line along each pressed plank on the walls. Pipe PLUTO in red across the top of the name arch, and a pale tan shadow line on each bone. Leave everything flat overnight.
Why this matters: red letters need a full night before they go upright, or they run.
10. Stand the four walls on the board
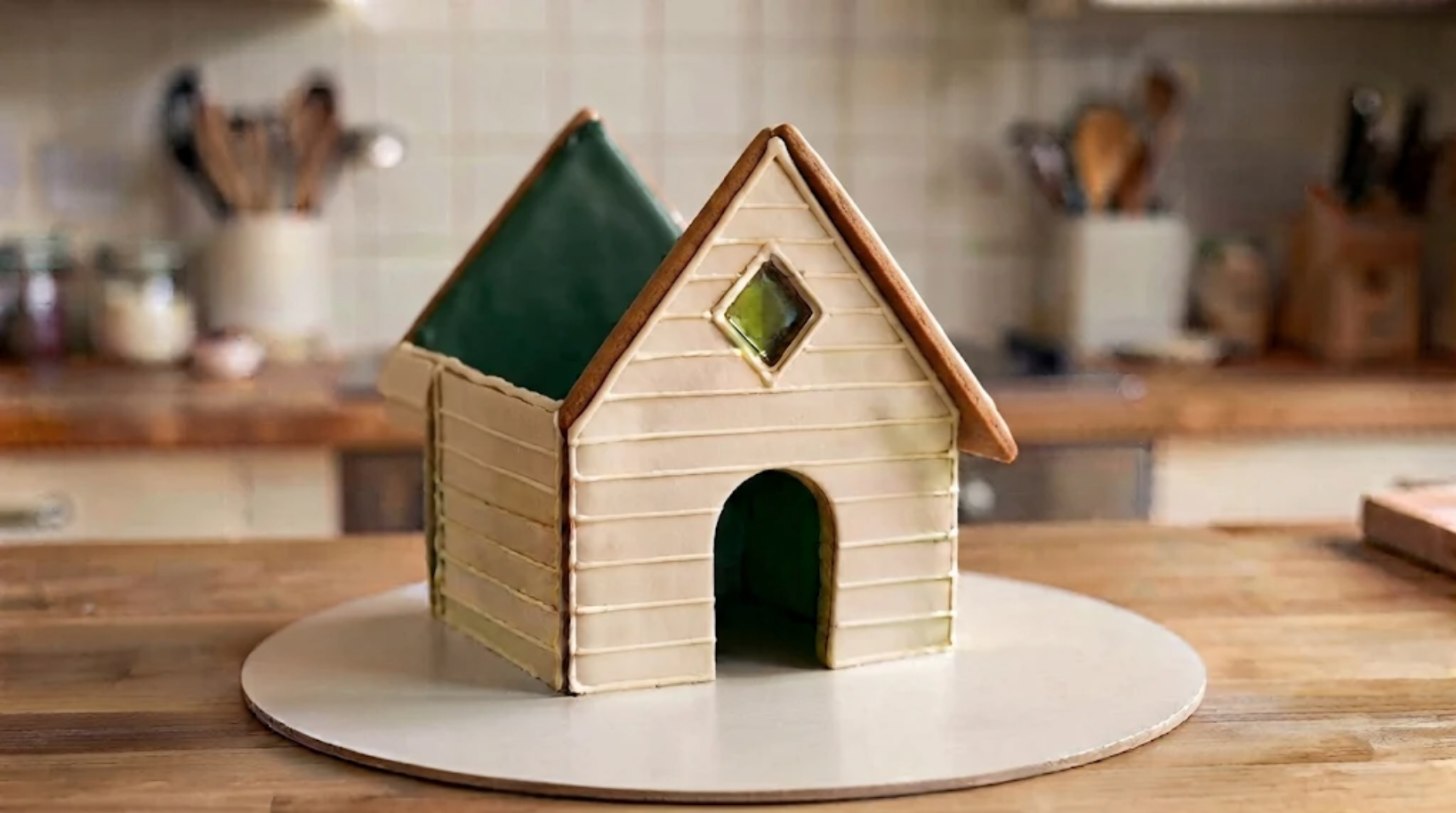
Spread thick icing where the doghouse will go, about 1 1/2 inches from the back of the board. Stand the back gable, then the two side walls against it, then the front gable, so the side walls tuck between the gables. Check every corner is square, prop with cans and wait 2 hours.
Why this matters: walls that are not set lean the moment the steep roof goes on.
11. Set both roof panels with props and pipe the ridge
Pipe thick icing along both sloped edges of each gable. Lay the first panel on, flush with the eave, hold it for a minute and prop its lower edge with a can. Set the second panel the same way. Pipe a row of dark terracotta curls along the ridge to hide the seam. Wait 4 hours.
Why this matters: a steep roof pulls downhill harder than a shallow one, so the props stay on for the full 4 hours.
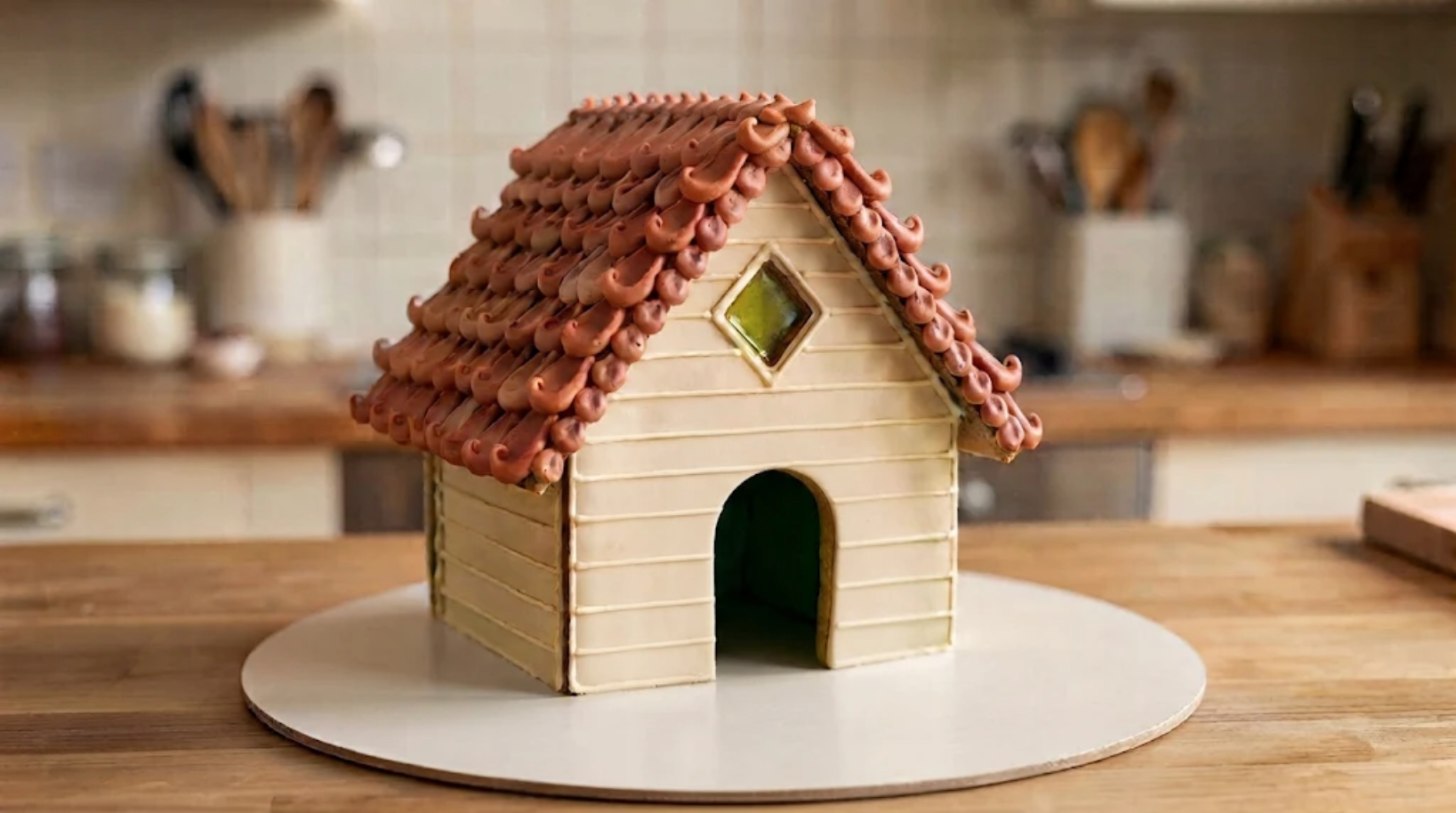
12. Glue on the name arch and pipe the eave curls
Pipe icing on the back of the name arch and press it flat against the front gable so its inner edge lines up with the doorway. Then pipe a row of extra curls along both eaves and up both front roof edges, flicking each one outward.
Why this matters: the extra curls along the edges are what give the real roof its cartoon outline from the front.

13. Stand the big bone on the peak
Pipe a thick line of icing along one long edge of the big bone. Stand it on that edge on the ridge, right at the front of the roof, facing out, with its middle over the peak and a knob on each side. Hold it for two minutes, then lean a bamboo skewer against the back of it for an hour.
Why this matters: the bone is light, but it stands on a narrow ridge. The skewer keeps it upright while the icing grabs.
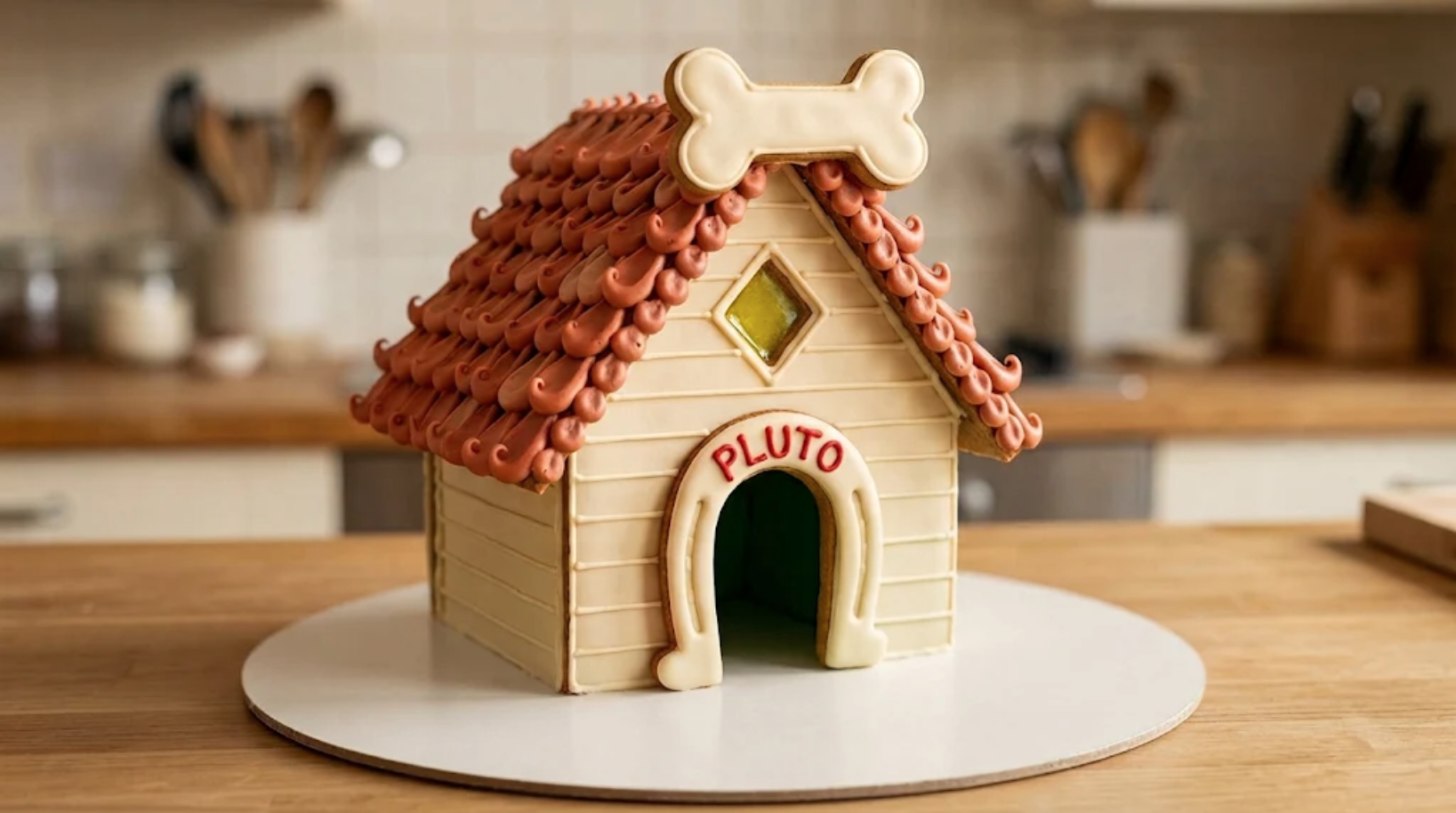
14. Green the board, pipe the paw prints and set the bowl and the spare bone
Tint the coconut green in a zip bag with a drop of leaf green. Spread thin icing over the bare board and scatter the coconut. Pipe a trail of brown paw prints from the doorway toward the front, each one a small oval with four dots. For the bowl, glue a red candy melt flat side up on the board beside the doorway, top it with a ring of red icing and fill the middle with chocolate sprinkles for kibble. Lay the spare bone on the grass.
Why this matters: Toontown is a California backyard, not a snowfield, and the cream bone and red bowl read brighter against green.
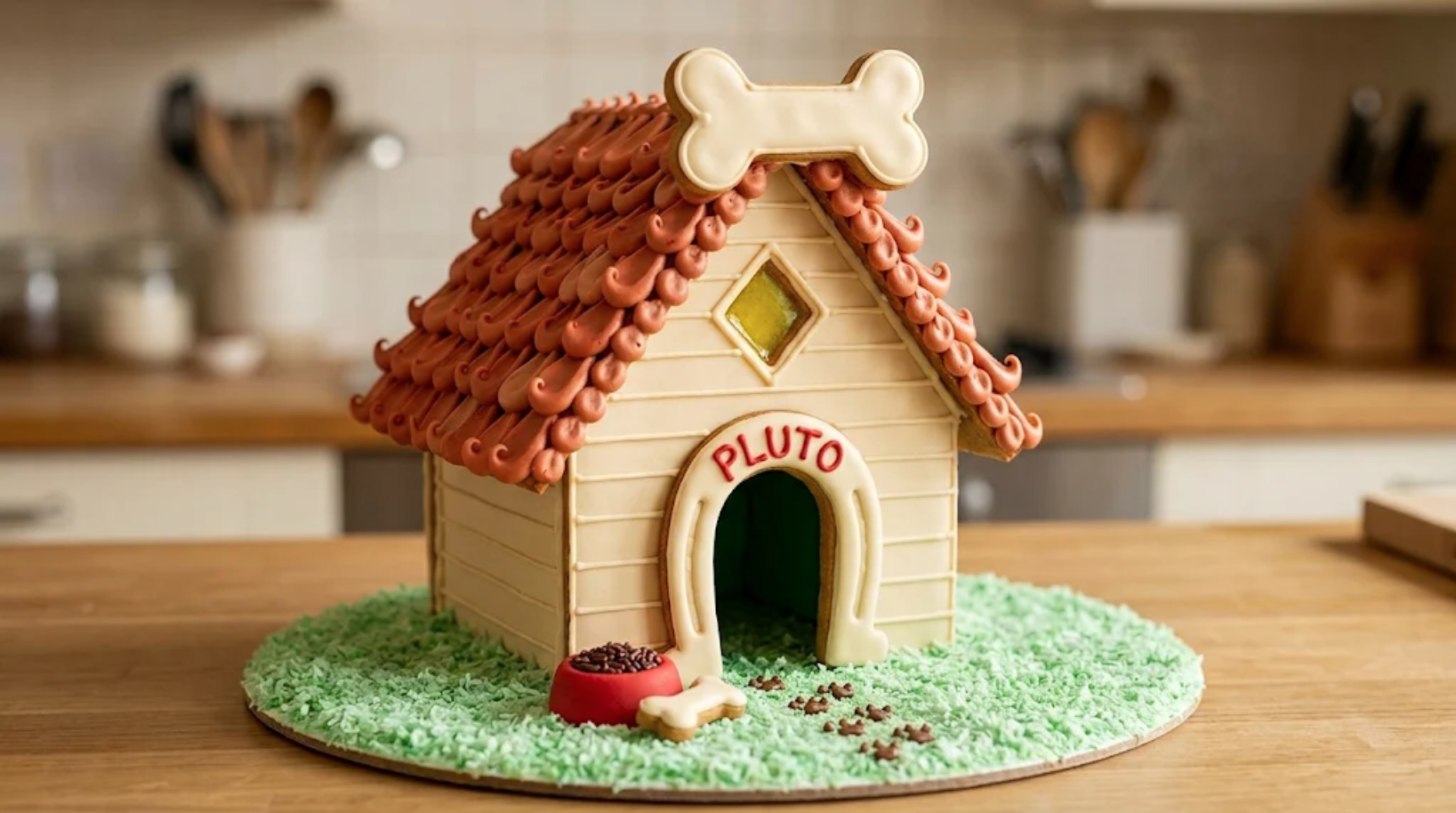
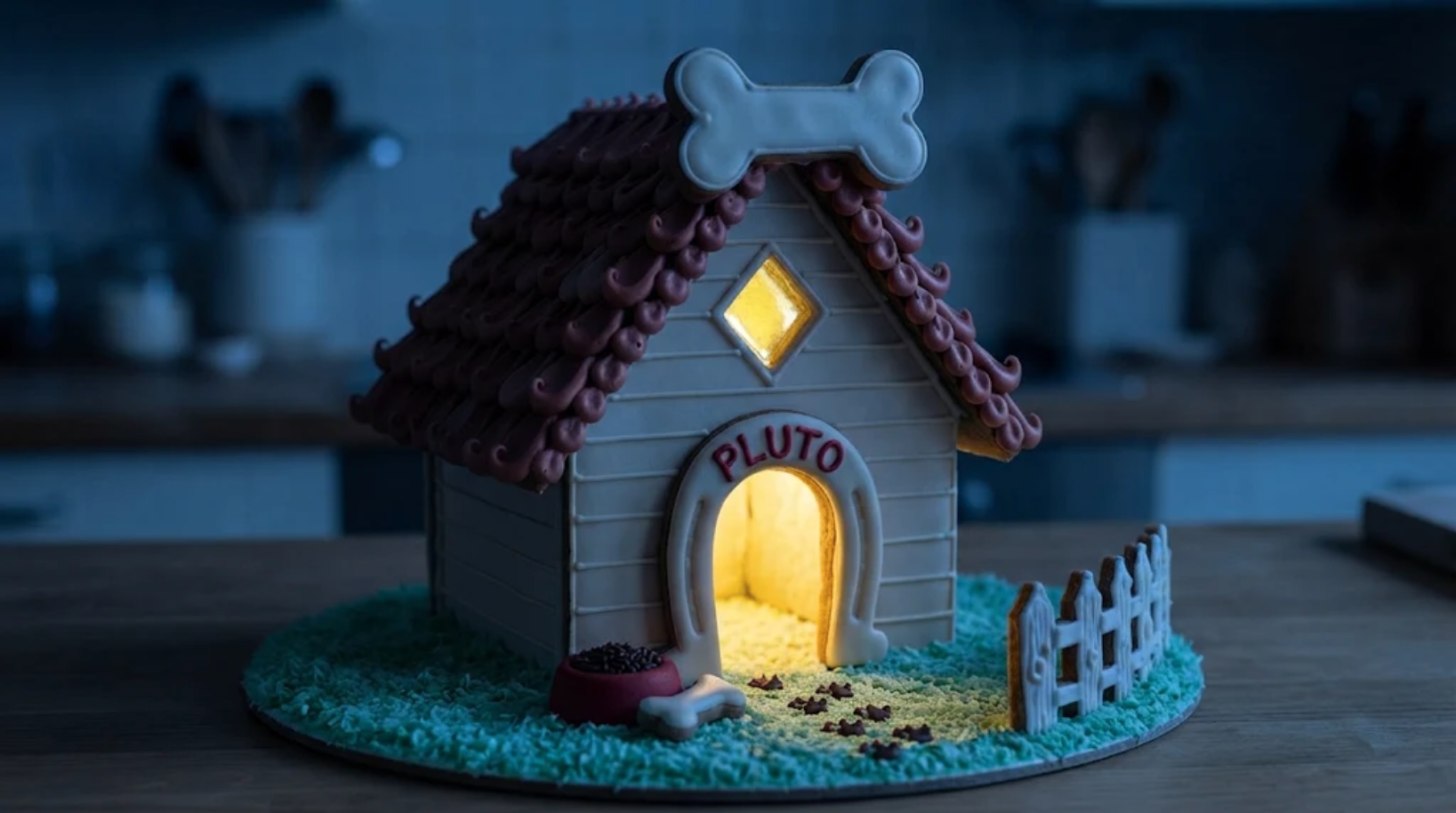
15. Stand the fence and light the doghouse
Stand the three fence strips end to end on a line of icing, in a short run along the right side of the board from the front corner back. Then slide an LED tea light in through the back doorway, and the open doorway and the diamond vent glow. Use only battery lights, because a candle can scorch sugar walls, which is why our guide to lighting a gingerbread house from inside sticks to them. Let it stand overnight before you move it.
Troubleshooting
| What you see | Why it happens | What to do |
|---|---|---|
| The shingles are flat blobs, not curls | The icing was too soft | Beat in more sugar until a peak stands straight, then pipe again. |
| The roof looks striped | Each row used one shade | Switch between light and dark terracotta inside every row. |
| A roof panel slides | Thin icing, or the props came off early | Lift it off, pipe thicker icing and prop the eave for the full 4 hours. |
| A gap at the ridge | The gables spread in the oven | Fill it with the ridge curls. Trim warm next time. |
| The bone keeps rolling off | Not enough icing at the peak | Pipe a thick blob on each roof tip, press the bone in and prop it with a skewer. |
| The red letters ran | The arch went upright too soon | Scrape them off, pipe again and let the arch dry flat overnight. |
| The plank lines vanished | The flood was too thick | Pipe thin tan lines over them, or press deeper next time. |
| The vent is cloudy | The candy was not fully melted | Bake a few minutes more at 325 degrees F, watching closely. |
Make It Your Own Dog’s House
The arch takes about six letters, so pipe your own dog’s name instead of PLUTO. Printed at 125 percent, it fits about eight letters, enough for two short names. The studio above shows a red barn version, sky blue walls and a snow-topped roof. For a dog with spots, dot the cream walls with brown icing. Keep the finished house up high, though: our page on what to do if your dog eats gingerbread explains why sugar free candy is the real emergency. For a second famous doghouse, our red Snoopy doghouse with Christmas lights uses the same open doorway.
Easier Versions: No-Bake and Kit Shortcuts
A No-Bake Graham Cracker Version for Small Kids
Glue four graham cracker halves into a box, lean two whole crackers on top for a steep roof and pipe orange teardrops on it. Cut the doorway with a serrated knife before you build, and glue a bone shaped cookie across the peak. A no-bake graham cracker house needs royal icing, not tub frosting, to stand.
The Kit Shortcut
Ice any plain kit cream, pipe curling terracotta shingles on the roof and glue a cookie bone across the peak. Pipe a cream arch and a name over the door. Our notes on which store kits are worth buying point to the boxes that stay standing.
Storage Instructions
Keep the doghouse in a cool, dry room, away from the stove and sunny windows, which fade terracotta icing. Above all, keep it where pets cannot reach it. Kept dry, it holds its shape through the season, though the icing colors slowly fade.
FAQ
Is this the Pluto’s Dog House restaurant?
No. Pluto’s Dog House was also a hot dog counter in Toontown, open from 1993 until the land closed in March 2022, per Duchess of Disneyland’s history of it. After the 2023 reopening, WDW News Today reported that its window now serves mobile orders for Café Daisy. This build copies the doghouse in Mickey’s backyard instead.
Can I build Mickey’s House next to it?
Yes. The real doghouse stands in Mickey’s backyard, so set it beside his yellow cottage on a long board. Minnie’s cottage with the heart window lives next door, and all three share one green yard.
Can I make it bigger?
Yes. Print at 125 percent for a doghouse about 8 inches tall. The pieces come to about 190 square inches, so one batch still covers them if you re-roll the scraps, and you need a 15 inch board.
More Gingerbread House Builds and Recipes
Our Disney gingerbread houses roundup and the Grand Floridian’s walk-in gingerbread house cover more Disney builds. When something sags, our fixes for a roof that slides work on any house.
Build Your Next House With Best Gingerbread Houses
This doghouse proves the point we come back to on every build: a few strong details tell the whole story. Here it is a curling roof, a bone on the peak and a name over the door. When you want a head start, our ranked list of gingerbread house kits sorts the good boxes from the wobbly ones.