

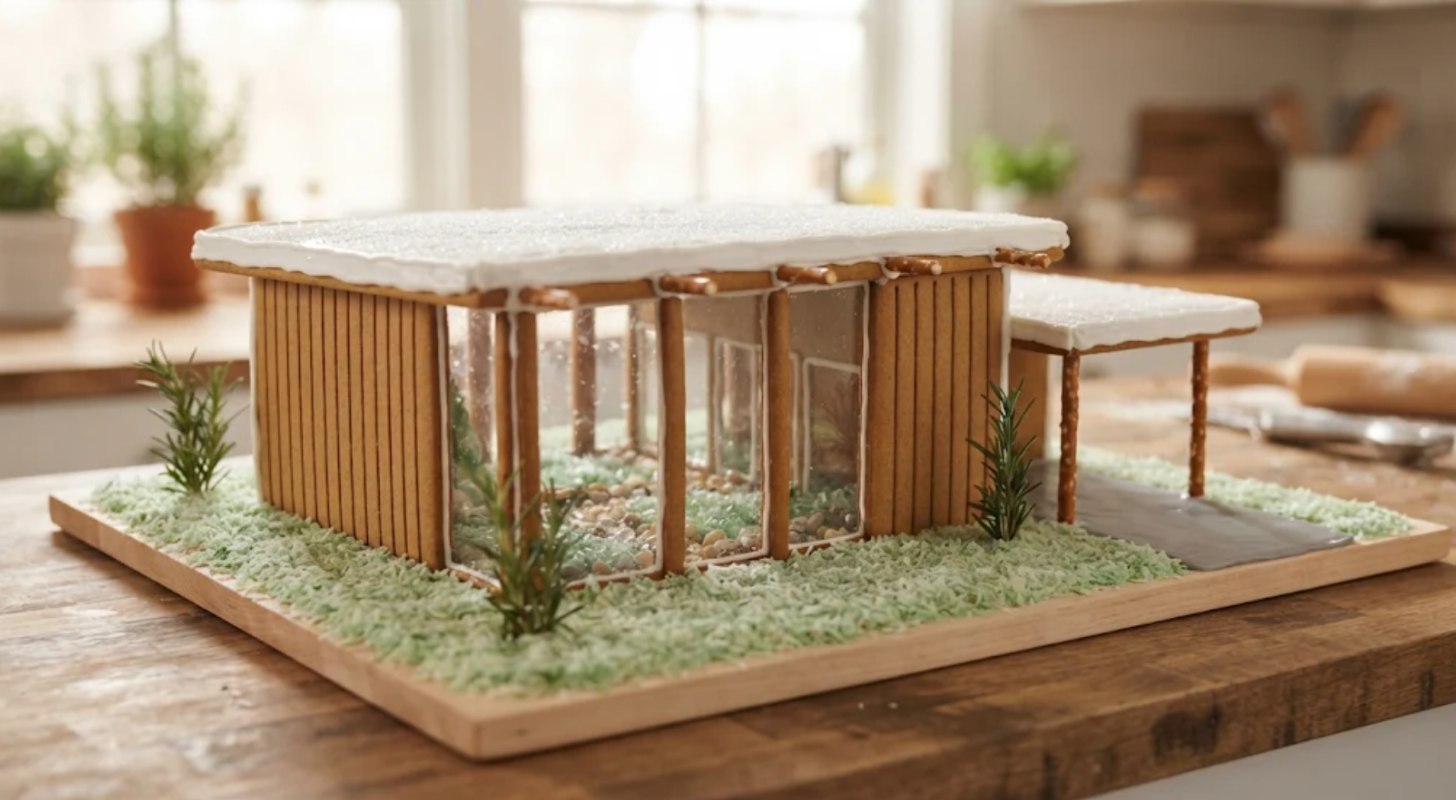
Most mid century modern gingerbread houses are an A-frame or a plain box with a flat lid. The house people picture when they say mid century is lower and stranger: a blank wall to the street, a strip of glass under the roof, one bright door, and a wall of glass at the back round an open courtyard.
That house is an Eichler, the California tract home of the 1950s and 1960s. We read architecture sources for what makes one, our house dough and royal icing recipes set every bake temperature and wait, and a script checked the free template.
You get a house 8 inches wide with an open atrium, candy glass walls and a carport, from one batch of dough over two days. Start with the template, then the features, the plan and 16 steps.
Mid Century Modern Gingerbread House: At a Glance
- Difficulty: Medium. Every piece is a flat rectangle, so nothing meets at an angle. The glass takes patience, not skill.
- Total time: about 2 days, in eight sessions. Most of it is icing drying.
- Active time: about 7 hours, counting the dough chill and the bake.
- Makes: a house 8 inches wide, 7 1/2 inches deep and 2 3/4 inches tall, about 11 inches wide with the carport, on a 14 inch board. 15 baked pieces.
- Template: free 4-page PDF, US Letter, true size with a 1 inch test bar and square on every page.
Tools: printer, ruler, scissors, rolling pin with 1/4 inch guides, parchment, 2 half sheet pans, paring knife or pizza wheel, 6 piping bags, a small round tip, cans for propping, a 14 inch square cake board, a small offset spatula, tweezers, a box or book with a square corner, 1 battery LED tea light.
Materials
- 1 batch of our construction dough that bakes flat and hard
- 2 batches of royal icing stiff enough to hold up a roof
- Gel food coloring: brown, black, orange, leaf green and sky blue
- About 25 clear hard candies, roughly 4 ounces, for the glass
- 2 pretzel rods for the carport posts, and a few pretzel sticks for beam ends
- 2 tablespoons of white sanding sugar for the roof and the atrium gravel
- 1 blue hard candy or a few blue candy melts for the atrium pond, and 3 small rosemary sprigs
- 1 cup of shredded coconut for the lawn
Steps
- Print the template at Actual Size and measure the test bar.
- Make the dough and chill it for at least an hour.
- Roll the dough 1/4 inch thick and cut the four outside walls and their openings.
- Cut the four atrium walls and the ledger strip.
- Cut the four roof strips and the carport roof.
- Bake at 300 degrees F, then melt candy into the glass openings.
- Trim every piece warm and let it cool on the pan.
- Flood the roof tops, the front door and any painted walls.
- Pipe the grooves, the fascia and the posts, then leave it overnight.
- Stand the four outside walls on the board.
- Stand the four atrium walls in the middle, then wait 2 hours.
- Plant the atrium garden.
- Set the roof strips, then wait 2 hours.
- Build the carport, then wait 2 hours.
- Spread the lawn and the driveway.
- Light the house from inside.
Notes: times are worked out from the set times on our icing page, not timed on a build. Ovens and doughs vary, so treat every bake time here as a starting point: check early, go by the matte surface and firm edge, and bake a test strip before you build. The board and the tea light are not food. This is our own design inspired by Eichler homes, not a copy of any one house.
Free Printable Mid Century Modern Gingerbread House Template
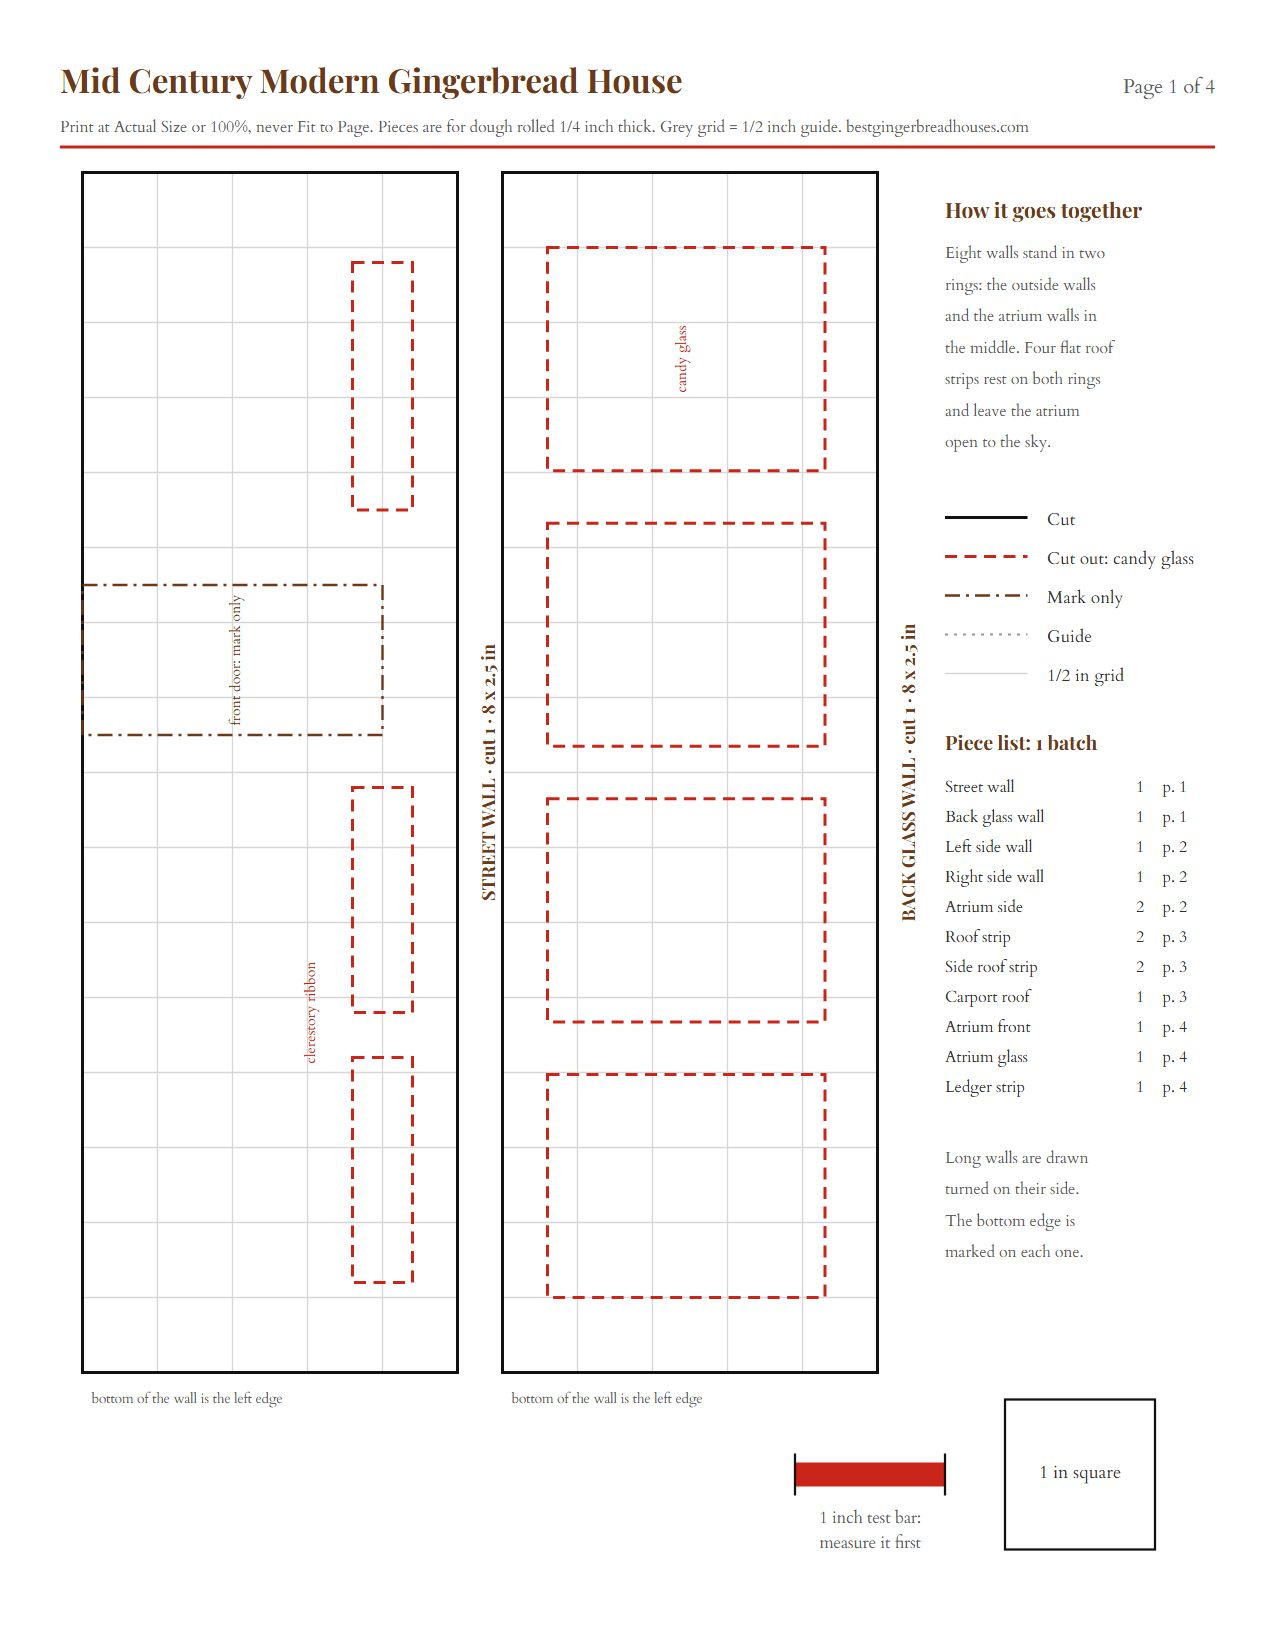
The template is four US Letter pages with ten shapes at true size over a faint 1/2 inch grid. Download the PDF, print it at Actual Size, and check that the red bar and the square both measure 1 inch before you cut anything.

| Piece | Cut | Size |
|---|---|---|
| Street wall | 1 | 8 x 2 1/2 in, with three clerestory windows and a door mark |
| Back glass wall | 1 | 8 x 2 1/2 in, with four tall glass panes |
| Side walls | 2 | 7 x 2 1/2 in, the left one with a doorway for the light |
| Atrium front and glass walls | 1 + 1 | 3 x 2 1/2 in, the glass wall with two panes |
| Atrium side walls | 2 | 2 x 2 1/2 in, one pane each |
| Roof strips | 2 + 2 | 8.8 x 3.15 in front and back, 3.15 x 2 in at the sides |
| Carport roof and ledger | 1 + 1 | 2 3/4 x 4 1/2 in and 4 1/4 x 0.4 in |
The pieces come to about 159 square inches, so one batch covers them.

What Makes a House Read as Mid Century Modern
Per Wikipedia’s article on Eichler Homes, his company built more than 11,000 houses in California between 1949 and 1966, designed by architects including Robert Anshen, Claude Oakland and the firm of A. Quincy Jones and Frederick Emmons. The hallmarks are glass walls, post-and-beam framing and plain exteriors.
The Los Angeles Conservancy’s page on Balboa Highlands, an Eichler tract built from 1962 to 1964, puts the look in one line: simple front facades with clerestory windows, and inside each house an open atrium and floor-to-ceiling glass walls.
| Feature | How we build it |
|---|---|
| Blank street wall | A solid street wall with grooved siding piped on |
| Clerestory ribbon | Three slim candy glass windows near the top edge |
| Bold front door | A door flooded in tangerine, or your pick below |
| Flat or low roof | Flat roof strips with a piped white fascia |
| Post and beam | Gingerbread posts between the panes, pretzel beam ends under the eaves |
| Glass walls | A back wall that is mostly candy glass |
| Atrium | A ring of four walls in the middle, open to the sky |
| Carport | A gingerbread slab on a ledger and two pretzel posts |
Old California summed up the street view in “The Secret Lives of Eichler Homes”: grooved wood siding, a carport, perhaps “a narrow ribbon of clerestory windows under a flat roof and a tasteful pop of color on the front door.”
How to Build the Glass, the Atrium and a Roof That Stays Flat
Glass Walls That Hold Up a Roof
Candy glass cannot carry a roof: it softens in damp air and cracks as it cools. So the back wall is a frame: a sill along the bottom, a beam along the top and gingerbread posts 0.35 inch wide between four panes about 1 1/2 by 1 7/8 inches. The roof rests on the frame, never on the glass, just as posts and beams carry the roof on the real houses.
Keep each pane under about 2 inches each way. Bigger panes melt unevenly and crack when you lift the wall.

An Atrium You Can See Into
Per Dave Weinstein at the Eichler Network, it was Bob Anshen, Eichler’s architect, who proposed the atrium. Ours is a ring of four short walls standing in the middle of the house, 2 1/2 inches back from the street wall and 2 1/2 inches in from each side. The roof stops at the inside faces of those walls, which leaves an opening 2 1/2 by 2 inches open to the sky.
Three of the atrium walls carry glass, so the tea light behind them makes the courtyard glow.

A Flat Roof That Does Not Sag
Flat gingerbread roofs sag over long gaps and under wet icing. Here the atrium walls hold up the inside edge of every roof strip, so no strip bridges more than 2 1/4 inches between walls. Our rule for 1/4 inch dough is no flat span longer than about 2 1/2 inches.
Also bake the strips firm all the way across, ice them flat and dry them overnight before they go on, and keep the overhang to 0.4 inch.
A Carport on Two Posts
The carport slab rests on a ledger strip glued to the right wall and on two pretzel rod posts, and tucks under the main roof’s edge so the two roofs read as one long line.
The Colors: Wood, Glass and One Bold Door
The siding. Bare gingerbread already looks like stained wood. Thin vertical brown lines turn it into grooved siding.
The glass. Clear candy is the point here, so skip the colored ones. Crush the candies in a zip bag until no piece is bigger than a pea. Our guide to which hard candies melt into the clearest glass covers the brands.
The door. One strong color, on the door only. No shutters, no trim, no candy on the walls.
Mid Century Palette Picker
Pick the walls, the door and the roof. The street view updates, and you get the icing mix for each part.
Colors on screen are approximate, and gel colors vary by brand, so tint a spoonful and let it dry before you mix a full bowl. Royal icing dries a shade darker than it looks wet. Nothing you choose leaves your browser.
How Long It Takes, Day by Day
Plan on eight sessions over two days, about 7 hours hands-on.
| When | What you do | Hands-on | Then wait |
|---|---|---|---|
| Day 1, morning | Print, make and chill the dough, cut, bake, melt the candy glass and trim. | About 3 hours | Until cool |
| Day 1, early afternoon | Flood the roof tops, the door and any painted walls. | 40 minutes | About 1 hour |
| Day 1, afternoon | Pipe the siding grooves, the fascia, the posts and the door knob. | 1 hour | Overnight, pieces flat |
| Day 2, early morning | Stand the outside walls, then the atrium walls. | 35 minutes | 2 hours |
| Day 2, mid morning | Plant the atrium garden. | 20 minutes | None |
| Day 2, late morning | Set the four roof strips. | 30 minutes | 2 hours |
| Day 2, early afternoon | Build the carport. | 30 minutes | 2 hours |
| Day 2, late afternoon | Spread the lawn and driveway and light the house. | 30 minutes | Overnight before you move it |
Mid Century Modern Gingerbread House Build Day Planner
Pick when you want the house finished. The planner counts back through every drying time and tells you when to start baking.
For planning only: icing sets faster or slower with the weather, so treat each wait as a minimum and check that joints feel firm before moving on. Not professional baking advice. Nothing you enter leaves your browser.
How to Make a Mid Century Modern Gingerbread House Step by Step
1.Print the template and measure the test bar
Print all four pages at Actual Size or 100 percent, never Fit to Page, and check that the red bar and the square both read exactly 1 inch.
Why this matters: the roof strips have to land on both rings of walls. A template printed small leaves them short of the atrium walls.
2.Make the dough and chill it
Make one batch of house dough, split it in two, flatten each half into an inch-thick disc, wrap and chill for at least an hour.
Why this matters: cold dough keeps the thin posts between the glass panes straight when you lift the cutouts.
3.Roll the dough and cut the four outside walls
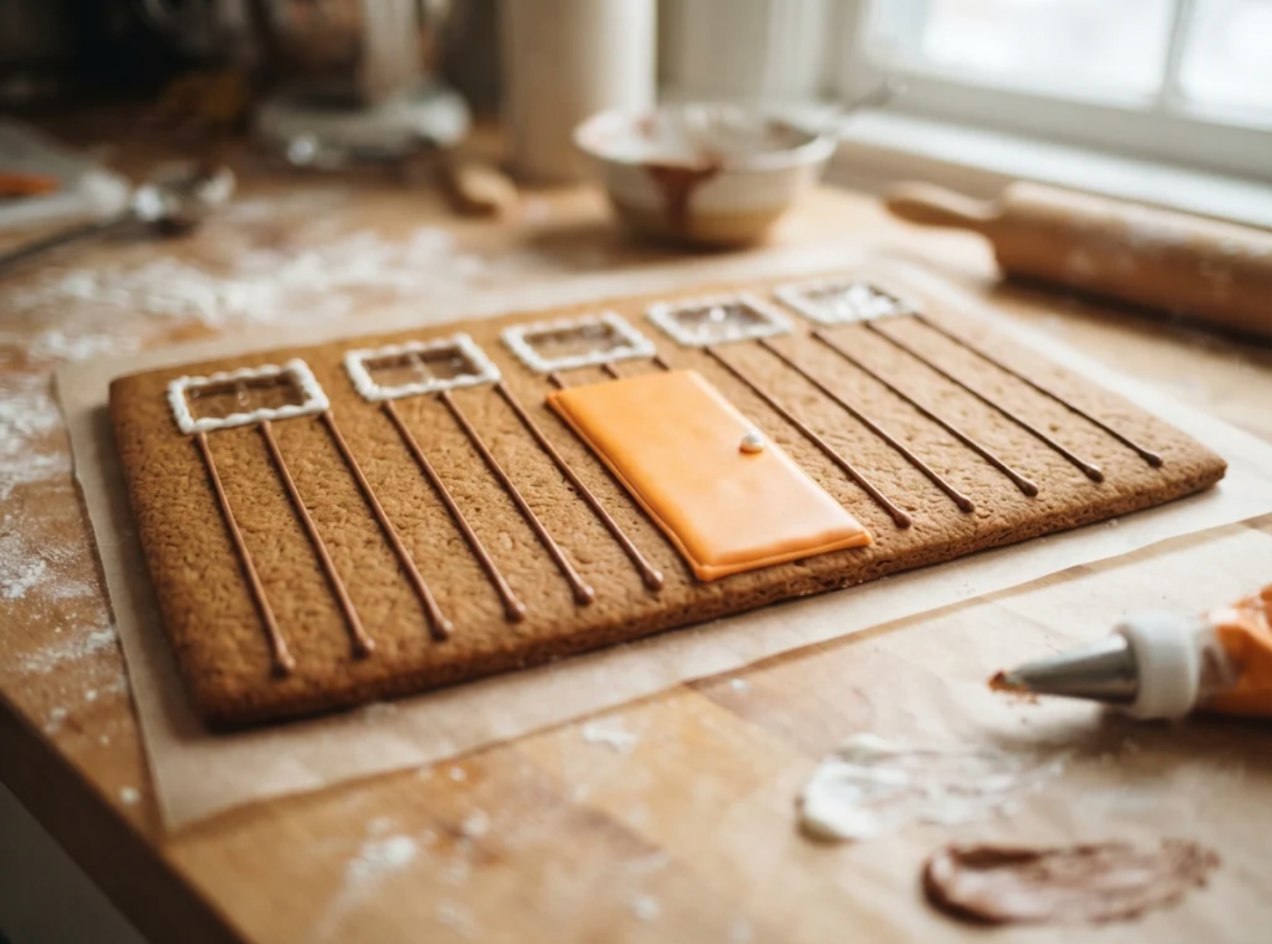
Roll a disc on parchment to an even 1/4 inch between guide strips. Cut the street wall, the back glass wall and the two side walls right on the parchment. Cut out the three clerestory windows, the four tall panes in the back wall and the light doorway in the left side wall, and lift the scraps out with the knife tip. Press the door outline into the street wall with a toothpick.
Why this matters: a wall with big openings stretches if you move it raw. Cutting on the parchment means it goes onto the pan untouched.

4.Cut the atrium walls and the ledger
From the scraps, cut the atrium front wall, the atrium glass wall with its two panes, the two atrium side walls with one pane each, and the thin ledger strip. Press a door outline into the atrium front wall, on the side that will face the courtyard.
Why this matters: the atrium walls hold up the roof as much as the outside walls do, so cut them to the line, not by eye.

5.Cut the roof strips and the carport roof
From the second disc, cut two long roof strips, two short side roof strips and the carport roof.
Why this matters: four strips are far easier to bake flat and lift than one big roof with a hole in it.

6.Bake the pieces, then melt candy into the glass
Bake at 300 degrees F. The walls and the long roof strips take 22 to 30 minutes, until matte with a firm edge. Bake the small pieces on their own pan and start checking at about 12 minutes. Pull the glass walls and the street wall about 5 minutes early, fill each opening with crushed candy two pieces deep, and bake again until the candy melts flat.
Check as you go: hard crack, where candy flows, is 300 to 308 degrees F at sea level per Colorado State University Extension, so it melts slowly at 300. If it is still lumpy after about 10 minutes, raise the oven to 325 degrees F and watch closely.

7.Trim every piece warm and let it cool on the pan
Within two minutes of each pan coming out, lay the paper pieces back on and trim any edge that spread. Square the corners. Leave everything on the pan until fully cool.
Why this matters: walls that meet at square corners stand without propping, and roof strips with straight edges close neatly round the atrium.
8.Flood the roof tops, the door and any painted walls
Thin part of the first batch of icing until a knife line closes in about 10 seconds. Flood the tops of the roof strips and the carport roof white and sprinkle on a little sanding sugar for a gravel roof. Flood the door in its color. If you picked painted walls, flood the outsides of the four outer walls now.
Why this matters: the roof strips take their moisture now, lying flat, instead of on the house where wet icing could make them droop.

9.Pipe the grooves, the fascia and the posts, then leave it overnight
With stiff brown icing and a small round tip, pipe vertical groove lines 1/4 inch apart on the outside walls. Pipe a crisp white line along every roof edge for the fascia. Pipe over the posts between the panes so they read as painted wood, and add a white dot for the door knob. Leave everything flat overnight.
Why this matters: the grooves are what make the walls read as mid century siding, and doing them flat keeps them dead straight.
10.Stand the four outside walls
Pipe thick icing in an 8 by 7 1/2 inch rectangle on the board, set a little left of center and toward the back so the carport and the driveway fit on the right. Stand the back glass wall, then the two side walls against it, then the street wall, so the side walls tuck between the front and back. The light doorway goes at the back of the left wall. Check every corner against the square corner of a box.
Why this matters: the long roof strips span the full width, so the outside walls have to sit square and level.
11.Stand the four atrium walls, then wait 2 hours
Measure 2 1/2 inches in from the outside face of the street wall and of each side wall, and pipe a 3 by 2 1/2 inch rectangle there. Stand the atrium front wall facing the street, the glass wall behind it, and the two side walls between them. Hold a long roof strip across the house to check that it rests on the street wall and the atrium front wall at the same time. Prop with cans and wait 2 hours.
Why this matters: if the atrium walls sit low, the roof strips span the whole room with nothing under them.

12.Plant the atrium garden
Spread a thin layer of icing on the board inside the atrium ring and spoon on sanding sugar for gravel. Melt a blue hard candy or a few blue candy melts into a small puddle on parchment, let it set, and press it in as a pond. Stand two or three short rosemary sprigs in a dab of icing for trees, using tweezers.
Why this matters: once the roof is on, the opening is only 2 1/2 by 2 inches. Now you can reach every corner.

13.Set the roof strips, then wait 2 hours
Pipe icing along the tops of every wall, outside and atrium. Lower a long roof strip onto the front half so its edge lines up with the inside face of the atrium front wall, then the back strip the same way. Set the two side strips between them over the atrium side walls. For beam ends, push short pretzel stick pieces into the icing under the front and back eaves about 1 inch apart. Wait 2 hours.
Why this matters: lowering each strip straight down, not sliding it, keeps the icing on the wall tops where it holds.

14.Build the carport, then wait 2 hours
Pipe icing on the back of the ledger strip and press it to the right wall along its marked line, front end flush with the street wall. Cut two pretzel rods to 2 1/4 inches and stand them on the board 2 3/4 inches out from the wall, one at the front and one at the back of the carport. Pipe icing on the ledger and the post tops and lay the carport roof across so it tucks under the main roof’s edge. Prop the outside edge for an hour and wait 2 hours in all.
Why this matters: the ledger carries half the carport, so nothing hangs off the main roof.

15.Spread the lawn and the driveway
Tint the coconut green in a zip bag with a drop of leaf green. Smooth grey icing under the carport and out to the board’s front edge for a concrete driveway. Spread thin icing over the rest of the board, scatter the coconut, and plant a rosemary sprig or two by the street wall.
Why this matters: a plain grey driveway and a flat green lawn keep the yard as spare as the house.
16.Light the house from inside
Switch on an LED tea light and slide it through the doorway at the back of the left wall, into the room behind the atrium. The back glass wall, the atrium panes and the clerestory all glow. Use only battery lights, because a candle can scorch sugar walls, which is why we explain why we only light gingerbread with LEDs. Let it stand overnight before you move it.

Troubleshooting
| What you see | Why it happens | What to do |
|---|---|---|
| A post between the panes broke | The wall was moved before the candy set | Pipe a thick icing post over the break, let it dry flat, and leave the wall on its pan until cool next time. |
| A candy pane cracked | The pane cooled unevenly or the wall flexed | Set a few crushed candies on the crack and return it to a 300 degree F oven for a few minutes, flat. |
| The candy glass is cloudy or lumpy | The candy did not fully melt | Bake a few minutes more at 325 degrees F, watching closely. |
| A roof strip does not reach the atrium wall | The template printed small, or the atrium ring sits off its marks | Pipe a thick bead on the atrium wall top to close the gap, and check the test bar next print. |
| The roof dips in the middle | The strip was underbaked or set while still damp | Slide a short gingerbread scrap under it as a hidden post inside the house. |
| The carport roof tilts down | The posts are uneven or the ledger slid | Trim the longer post and prop the roof edge for an hour. |
| The siding grooves wander | They were piped on a standing wall, or the icing was too soft | Pipe flat, with icing stiff enough to hold a ridge. |
| The glass turns sticky | Damp air softens candy | Keep the house away from the stove and the dishwasher, and build on a dry day. |
Make It Your Own
A butterfly roof. The Eichler Network’s round-up of modern gingerbread houses shows a butterfly roof one blogger made by cutting and staggering the panels of a store-bought mid century kit.
Want the opposite look? Try a Victorian house dripping with icing trim, a pink house covered in sweets or a castle with towers that really stand.
Easier Versions: A Kit, a Simple Box and No-Bake
The Mid Century Kit
Our kit rankings include the Woodland Mid-Century Modern kit, sold at World Market, with pre-baked panels and connector clips. It skips the baking, but there is no atrium.
The Five-Piece Flat Roof Box
Our layouts page has a five-piece modern flat roof box with one big candy window and a slab roof. It takes an afternoon.
No-Bake Graham Cracker Version
Glue graham crackers into a long, low box with a flat graham roof, pipe vertical grooves and an orange door, and use a clear hard candy laid flat in icing as a window. A graham cracker house that needs no oven still needs royal icing, not tub frosting, to stand.

Storage Instructions
Keep the house in a cool, dry room, away from the stove and sunny windows. Damp air makes candy glass sticky. Move it only by the board.
FAQ
Can I make it bigger?
Print at 125 percent for a house 10 inches wide, and plan on two batches of dough and an 18 inch board. The longest roof span grows to about 2 3/4 inches, so roll the dough a little thicker, closer to 5/16 inch, and bake the roof strips until fully firm.
More Gingerbread House Builds and Recipes
For another big build, try the Up balloon house, a cozy video game cottage or a cartoon lookout tower. Browse other free house templates to print and other gingerbread house ideas, plus our fixes for a wall that leans or a roof that slides.
Build Your Next House With Best Gingerbread Houses
A few strong details tell the whole story on every build. Here it is a blank wall, a ribbon of glass, one bright door and a courtyard open to the sky. When you want a head start, our ranked list of gingerbread house kits sorts the good boxes from the wobbly ones.