

In the game, a gingerbread house is something you cook, not something you build. Toss five ingredients into the pot and out comes a tiny frosted cottage you can eat, sell or set on a shelf.
The game facts below come from a long-running fan wiki, a 2022 recipe guide and Disney’s own patch notes, each dated. The real house is built on our house dough and royal icing recipes, with a free template checked by a script.
First you get the in-game recipe and where each ingredient grows. Then you get a cozy storybook cottage you can bake for real, about 7 1/4 inches tall, with a front garden planted with candy versions of those same five ingredients.
How to Make the Gingerbread House in Dreamlight Valley
The Gingerbread House is a five-star dessert meal that you cook at any cooking station. It is not furniture you craft, and it is not a building. Per the fan-run Dreamlight Valley Wiki’s Gingerbread House page (read November 9, 2026), the recipe takes exactly five ingredients:
| Ingredient | Where to get it |
|---|---|
| Wheat | Buy it, or its seeds, at Goofy’s Stall in Peaceful Meadow |
| Ginger | A wild plant in the Forgotten Lands |
| Sugarcane | Grown from seeds, like wheat, but in Dazzle Beach |
| Vanilla | A wild plant in the Sunlit Plateau |
| Egg | The pantry at Chez Remy |
The ingredient sources come from the GosuNoob Gingerbread House guide, last updated December 9, 2022. Shop stock has shifted over the years, so treat the stalls as a starting point. Put all five in the pot together.
What It Is Worth
The wiki lists 1,460 energy when you eat it and a sell price of 545 Star Coins. Older guides say 641. Both were right in their day: the wiki’s history notes that version 1.8 dropped the sell price from 641 to 545. If a guide quotes 641, it was written before that change.
When It Arrived
The wiki lists the recipe as added in version 1.2. That lines up with Disney’s Missions in Uncharted Space patch notes, dated December 5, 2022, which brought a Festive Star Path for the holidays and the Toy Story Realm. Those official notes do not name the Gingerbread House, though. The GosuNoob guide from four days later lists it among that winter’s new holiday foods.
Is It a Star Path or Shop Reward?
Not that we could find. Every source we checked treats it as a cooked meal, not a reward.
Can You Display It?
Yes. The wiki explains that any meal can be dropped from your inventory and then moved with furniture placement mode, and it lists this one as a 2×2 item that sits on surfaces. Its in-game description reads: “Looks almost too warm and cozy to eat… but too delicious not to!”
A real one is just as cozy. Here is how to bake it.
Cozy Valley Gingerbread Cottage: At a Glance
- Difficulty: Easy to medium. Four walls and two roof panels, like a classic house. The steep roof and the chimney add the challenge.
- Total time: about 2 days, in seven sessions. Most of it is icing drying.
- Active time: just under 7 hours, counting the dough chill and the bake.
- Makes: a cottage 5 inches wide, 4 1/2 inches deep and about 7 1/4 inches tall to the chimney top, with a front garden on a 14 inch board. 11 baked pieces.
- Template: free 4-page PDF, US Letter, true size with a 1 inch test bar and a 1 inch square on every page.
Tools: printer, ruler, scissors, rolling pin with 1/4 inch guides, parchment, 2 half sheet pans, paring knife, 6 piping bags, a small round tip, a toothpick, cans for propping, an offset spatula, 14 inch cake board, 1 battery LED tea light.
Materials
- 1 batch of our construction gingerbread that bakes flat and hard
- 2 batches of stiff royal icing that glues and pipes
- Gel food coloring: teal or sky blue, ivory or yellow, brown, pink, black and leaf green
- About 12 yellow or orange hard candies for the window glass
- Garden: about 20 thin pretzel sticks and 1 pretzel rod, 8 green candy sticks or green licorice twists, 1/4 cup crystallized ginger, about 12 vanilla wafers, 3 white candy eggs or white jelly beans, 4 chocolate sandwich cookies and 1 round yellow candy
- 1 1/2 cups of shredded coconut: 1/4 cup toasted for the nest, the rest tinted green for grass
Steps
- Print the template at Actual Size and measure the test bar.
- Make the dough and chill it for at least an hour.
- Roll the dough 1/4 inch thick and cut the front and back walls.
- Cut the side walls, the roof panels, the chimney pieces and the door step.
- Bake at 300 degrees F, then melt golden candy into every window.
- Trim every piece against the template while it is warm.
- Flood the walls, the roof panels, the door, the chimney and the step.
- Pipe the scallop shingles, the trim and the chimney stones, then leave it overnight.
- Stand the four walls on the board, then wait 2 hours.
- Set both roof panels, prop them, then wait 4 hours.
- Build the chimney on the right roof panel, then wait 2 hours.
- Glue the step and lay the vanilla wafer path.
- Plant the wheat and sugarcane beds.
- Plant the ginger bed and fill the egg nest.
- Stand the lamp post and spread the grass.
- Light the cottage with a battery tea light.
Notes: times are worked out from the set times on our icing page, not timed on a build. Ovens and doughs vary, so treat every bake time here as a starting point: check early, go by the matte surface and firm edge, and bake a test strip before you build. Not an official Disney Dreamlight Valley product. Not approved by or associated with Disney or Gameloft. This is our own fan build, inspired by the game’s cozy village feel, with no characters or game art on it.
Free Printable Dreamlight Valley Gingerbread House Template
The template is four US Letter pages with eight shapes at true size over a faint 1/2 inch grid. Download the PDF, print it at Actual Size, and check that the red bar and the square both measure 1 inch before you cut anything.

| Piece | Cut | Size |
|---|---|---|
| Front wall | 1 | 5 in wide, 3 1/2 in to the eave, about 6 1/2 in to the peak, with two windows, a round attic window and a door mark |
| Back wall | 1 | Same outline, with a light doorway |
| Side walls | 2 | 4 x 3 1/2 in, one window each |
| Roof panels | 2 | 5 1/2 x 4.4 in |
| Chimney sides | 2 | 1 in wide, 2.2 in tall on one edge and 1 in on the other |
| Chimney front and back | 1 + 1 | 1/2 x 2.2 in and 1/2 x 1 in |
| Door step | 1 | 1.6 x 0.6 in |
The 50 degree roof gives the cottage its storybook shape, and the chimney top clears the ridge by about 0.4 inch so it shows from the front. The door is piped on, not cut out, so only the windows glow. The pieces come to about 124 square inches, well inside one batch.

What We Borrowed From the Valley
The game itself sells a cozy, build-your-own village. The official Disney Dreamlight Valley site invites you to “build the perfect neighborhood” with “thousands of decorative items,” and to cook with Remy or garden with WALL-E. So we built a house that fits that feeling instead of copying any one building from the game.
Here is the look, part by part. A cream cottage with a steep, soft teal roof of scallop shingles. A rose pink arched door. Two square windows and a round attic window of golden candy glass that glow at night. A grey stone chimney. And in front, a garden, because cooking in the valley starts with what you grow and gather.
There are no characters, logos or game screens on it. Want a favorite character? Add a small toy figure.
The Five Ingredient Garden and the Icing Work
Each of the five in-game ingredients gets a candy stand-in in the front garden.
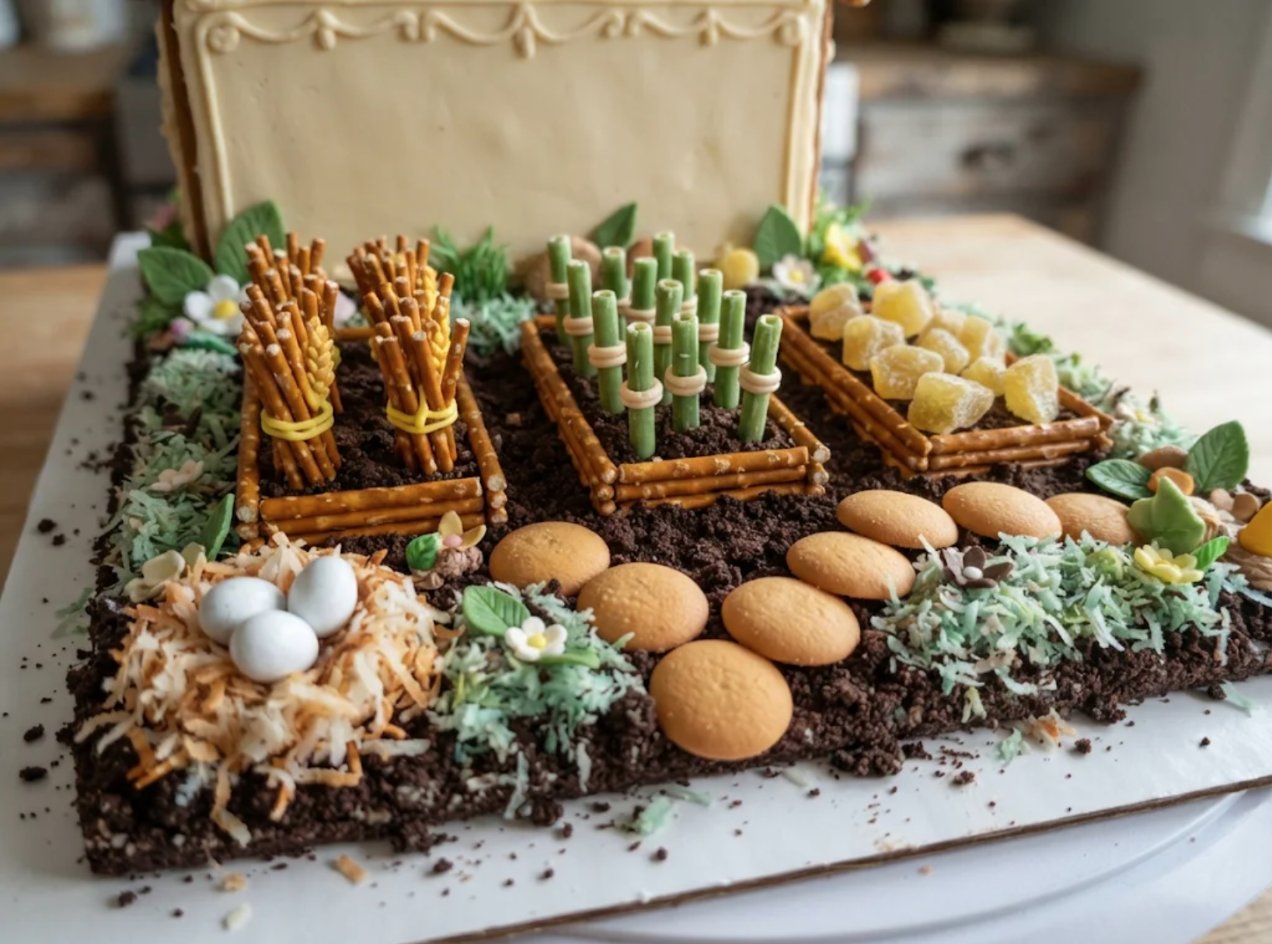
- Wheat: bundles of thin pretzel sticks, tied in the middle with a line of yellow icing, standing in the back left bed.
- Sugarcane: short green candy sticks or green licorice twists, standing upright in the front left bed. Pipe a few thin pale rings on each one so they look jointed.
- Ginger: real crystallized ginger, chopped into knobby chunks and set in rows in the right bed.
- Vanilla: a path of vanilla wafers running from the door step to the edge of the board.
- Egg: three white candy eggs in a little nest of toasted coconut.
The candy glass. Crush the yellow or orange candies in a zip bag with a rolling pin until no piece is bigger than a pea. Golden glass gives the windows that warm, lamp-lit look. Our guide to candy that melts into stained glass windows covers other colors.
The scallop shingles. Pipe a row of round dots along the eave edge of a flooded roof panel, then drag each dot up with a toothpick into a little teardrop. Start the next row a little higher, so its dots sit between the ones below. Do it while the panels lie flat. On a 50 degree slope, wet icing runs.
Not sold on teal? Try other colors in the studio below first.
Cozy Cottage Color Studio
Pick the walls, the roof and the door. The preview updates, and you get the icing mix for each part.
Colors on screen are approximate, and gel colors vary by brand, so tint a spoonful and let a dot dry before you mix the whole bowl. Nothing you choose leaves your browser.
How Long It Takes, Day by Day
Plan on seven sessions over two days, just under 7 hours of hands-on work, with all the piping done flat on day 1. Pick your finish time and the planner counts back for you.
| When | What you do | Hands-on | Then wait |
|---|---|---|---|
| Day 1, morning | Print, make and chill the dough, cut, bake, melt the candy glass and trim. | About 3 hours | Until cool |
| Day 1, early afternoon | Flood the walls, the roof panels, the door, the chimney pieces and the step. | 40 minutes | About 1 hour |
| Day 1, afternoon | Pipe the scallop shingles, the window trim, the door details and the chimney stones. | About 1 hour | Overnight, pieces flat |
| Day 2, early morning | Stand the four walls. | 25 minutes | 2 hours |
| Day 2, mid morning | Set both roof panels and prop them. | 25 minutes | 4 hours |
| Day 2, early afternoon | Build the chimney. | 20 minutes | 2 hours |
| Day 2, late afternoon | Step, path, garden beds, egg nest, lamp post, grass and light. | 50 minutes | Overnight before you move it |
Dreamlight Valley Gingerbread House Build Day Planner
Pick when you want the house finished. The planner counts back through every drying time and tells you when to start baking.
For planning only: icing sets faster or slower with the weather, so treat each wait as a minimum and check that joints feel firm before moving on. Not professional baking advice. Nothing you enter leaves your browser.
How to Make a Dreamlight Valley Gingerbread House Step by Step
1.Print the template and measure the test bar
Print all four pages at Actual Size or 100 percent, never Fit to Page, and check that the red bar and the square read exactly 1 inch.
Why this matters: a cottage printed small leaves the roof panels too short to meet at the ridge.

2.Make the dough and chill it
Make one batch of house dough, split it in two, flatten each half into an inch-thick disc, wrap and chill for at least an hour.
Why this matters: cold dough holds the sharp gable point and the round attic window.
3.Roll the dough and cut the front and back walls
Roll a disc on parchment to an even 1/4 inch between guide strips. Cut the front wall and the back wall. Cut out the two square windows and the round attic window in the front wall and the square light doorway in the back wall. Press the arched door outline into the front wall with a toothpick, but do not cut it.
Why this matters: the gable walls carry the roof, so cut them from fresh dough, not re-rolled scraps.

4.Cut the side walls, roof panels, chimney pieces and step
From the second disc, cut the two roof panels and the two side walls with their windows. From the scraps, cut the two slanted chimney sides, the chimney front and back and the door step. On one roof panel only, press the chimney outline into the dough with a toothpick.
Why this matters: the marked outline puts the chimney over the house, not out on the overhang where it would tip.


5.Bake the pieces, then melt candy into the windows
Bake at 300 degrees F. The walls and roof panels take 22 to 30 minutes, until matte with a firm edge. Bake the chimney pieces and the step on their own pan and start checking them at about 12 minutes. Pull the front wall and the side walls about 5 minutes early, fill every window with crushed candy two pieces deep, and bake again until the candy melts flat.
Check as you go: hard crack, where candy flows, is 300 to 308 degrees F at sea level per Colorado State University Extension, so it melts slowly at 300. If it is still lumpy after about 10 minutes, raise the oven to 325 degrees F and watch closely.

6.Trim every piece while it is warm
Within two minutes of each pan coming out, trim any edge that spread past the paper piece, most carefully the two sloped edges of each gable wall. Leave everything on the pan until cool.
Why this matters: the roof panels rest on those sloped edges. A bump on either one rocks the whole roof.
7.Flood the walls, the roof, the door, the chimney and the step
Thin most of the first batch of icing until a knife line closes in about 10 seconds. Flood the outside of all four walls cream, both roof panels soft teal and the chimney pieces and step grey. Flood the door outline rose pink.
Why this matters: shingles, trim and stones only stay crisp on a flood that has crusted.

8.Pipe the shingles, the trim and the stones, then leave it overnight
Pipe rows of teal scallop shingles up both roof panels, from the eave edge to the ridge. Pipe brown trim round every window and a cross bar in the square ones, brown plank lines and a gold knob on the door, and small grey and white stones on the chimney pieces. Leave everything flat overnight.
Why this matters: shingles piped on a standing roof slide off. Piped flat, they dry in place.

9.Stand the four walls on the board
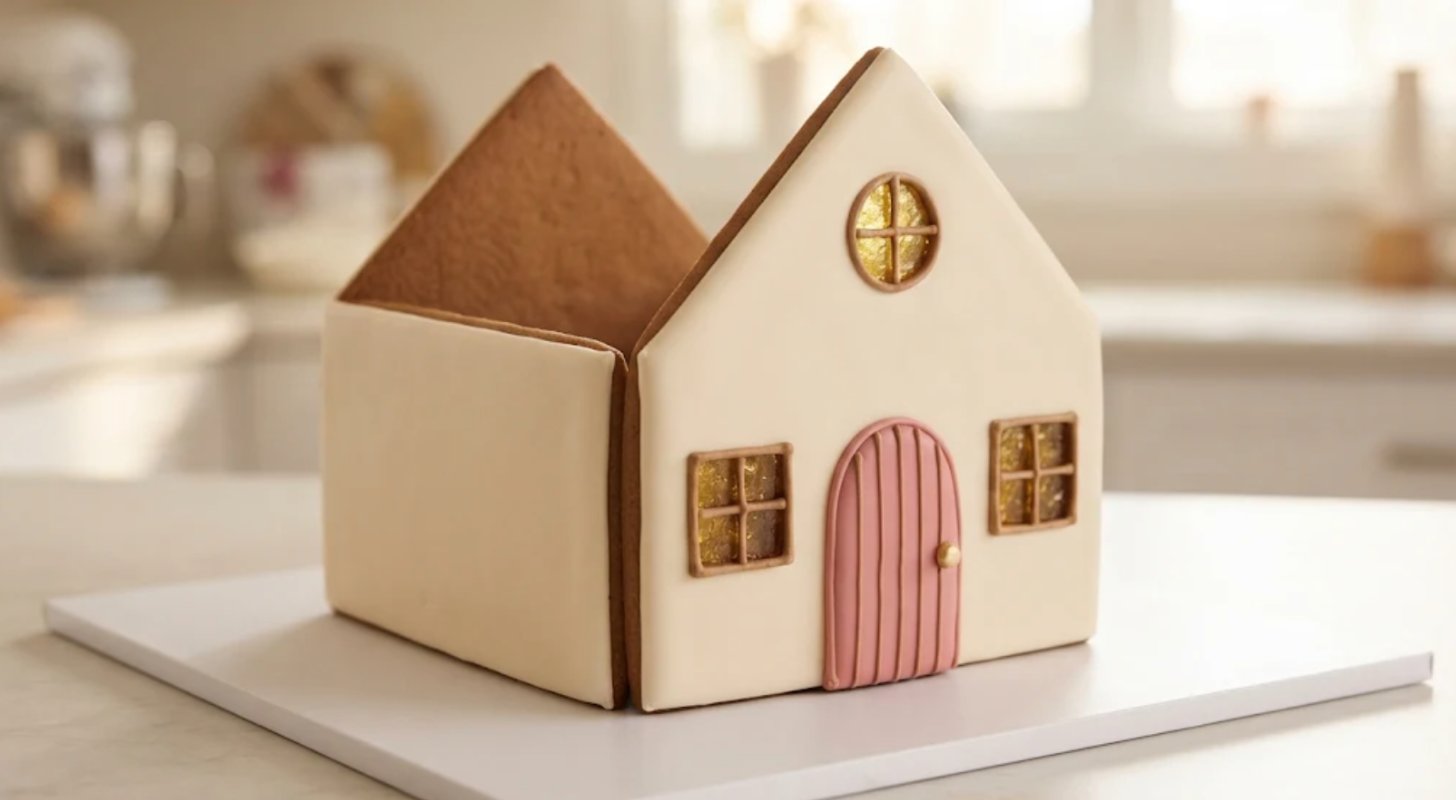
Mark a 5 by 4 1/2 inch rectangle with its back edge about 2 1/4 inches from the back of the board, and pipe thick icing along it. Stand the back wall, then the two side walls against it, then the front wall, so the side walls tuck between the front and back. Check that the corners are square, prop with cans and wait 2 hours.
Why this matters: the garden needs the front of the board, and square corners keep the roof true.
10.Set both roof panels and prop them
Pipe thick icing along the sloped edges of both gables and the tops of the side walls. Set the left roof panel with its ridge edge at the peak, then the right one, with the chimney mark toward the back, so its ridge edge laps the left panel. Pipe a line of icing along the ridge. Prop each panel with a can and wait 4 hours.
Why this matters: a steep roof wants to slide. The cans hold it until the joints harden.

11.Build the chimney on the right roof panel
Pipe thick icing round the chimney mark. Stand the two slanted sides on it, tall edge downhill, then set the tall front and short back pieces between them. Pipe a thick bead into the small gap under each piece, where it meets the slope. Hold it for a minute and wait 2 hours.
Why this matters: the slanted sides match the roof, so the chimney stands straight up instead of leaning with the slope.

12.Glue the step and lay the vanilla wafer path
Glue the grey step against the front wall under the door. Lay vanilla wafers in a line from the step to the front edge of the board, each on a dot of icing, about 1 1/4 inches wide.
13.Plant the wheat and sugarcane beds
On the left of the path, spread two beds of thick brown icing, each about 4 by 1 1/2 inches, and press the cookie crumbs on top. Stand pretzel bundles in rows in the back bed, tied with yellow icing. Stand the green candy sticks upright in the front bed and pipe a few pale rings on each one.
Why this matters: thick icing under the crumbs grips each stalk so the rows stand straight.
14.Plant the ginger bed and fill the egg nest
On the right of the path, spread one more bed and set the crystallized ginger chunks in rows. In front of it, pipe a small ring of icing, pile the toasted coconut on top and press three white candy eggs into the middle.
Why this matters: real ginger and a nest of eggs make the recipe easy to spot, even for kids who have never played.
15.Stand the lamp post and spread the grass
Push a pretzel rod into a thick blob of icing just right of the path, near the door, and glue the round yellow candy on top as the lantern. Hold it for a minute. Tint the rest of the coconut green in a zip bag with a drop of leaf green, spread thin icing over the bare board and scatter the coconut.
Why this matters: the grass hides every icing smear around the beds and the path.
16.Light the cottage
Slide an LED tea light in through the back doorway, and the golden windows glow. Use only battery lights, because a candle can scorch sugar walls, which is why our guide to lighting a gingerbread house from the inside sticks to them. Let it stand overnight before you move it.

Troubleshooting
| What you see | Why it happens | What to do |
|---|---|---|
| The candy glass is cloudy or lumpy | The candy did not fully melt | Bake a few minutes more at 325 degrees F, watching closely. |
| A roof panel slides down | The steep pitch, with thin icing or no prop | Lift it off, pipe thicker icing and prop it with a can for the full 4 hours. |
| There is a gap at the ridge | The gable edges spread in the oven | Fill it with a thick line of teal icing and pipe a row of shingles over it. |
| The chimney leans downhill | The tall edge went on the uphill side | Take it off while soft and turn the sides so the tall edge faces the eave. |
| The sugarcane falls over | The soil icing was too thin to grip | Pipe a thick blob at the base of each stick and hold it for a few seconds. |
| The ginger looks wet and sticky | Crystallized ginger weeps sugar in damp air | Plant it last, pat it dry and keep the house in a dry room. |
Make It Your Own
For winter, drip white icing along the ridge and swap the garden for snow. For a village, build two or three cottages in different roof colors with our tips for setting up a whole gingerbread village. Our candy-covered Hansel and Gretel cottage is another fairy tale house, and our gingerbread castle with towers is a bigger project.
Easier Versions: No-Bake and Kit Shortcuts
A No-Bake Graham Cracker Cottage for Small Kids
Glue four graham cracker quarters into a box and lean two halves on top for a steep roof. Pipe teal dots on the roof, pipe a pink door and press a few candies into a garden bed out front. Building a graham cracker house with no oven still needs royal icing, not tub frosting, to stand. Our small gingerbread house ideas have more quick builds.

The Kit Shortcut
Build any plain kit house, ice it cream, pipe teal scallop shingles on the roof and plant the five ingredient garden in front. Our picks of the sturdiest store kits point to the boxes that stay standing.

Storage Instructions
Keep the cottage in a cool, dry room, away from the stove and sunny windows, which fade teal and pink icing. Damp air makes candy glass and ginger sticky. Kept dry, it lasts the season.
FAQ
Is the gingerbread house a permanent recipe in the game?
We found no source that lists it as limited-time. It has been in the game since December 2022. If it will not cook, check that you have all five ingredients, including ginger from the Forgotten Lands.
Can I make the real one bigger?
Yes. Print at 125 percent for a cottage about 9 inches tall. The pieces come to about 194 square inches, so one batch only just covers them. Roll the scraps carefully and use an 18 inch board.
More Gingerbread House Builds and Recipes
For more movie and park houses, browse our Disney gingerbread house builds. For more game builds, see our video game gingerbread house ideas, or try another cozy island life with our Animal Crossing gingerbread cottage. When a wall leans, our tips for a gingerbread house that stays standing work on any build, and our printable gingerbread house templates have more shapes to try.
Build Your Next House With Best Gingerbread Houses
The in-game recipe takes five ingredients. The real one takes two days, and it lasts all season. When you want a head start, our ranked list of gingerbread house kits sorts the good boxes from the wobbly ones.