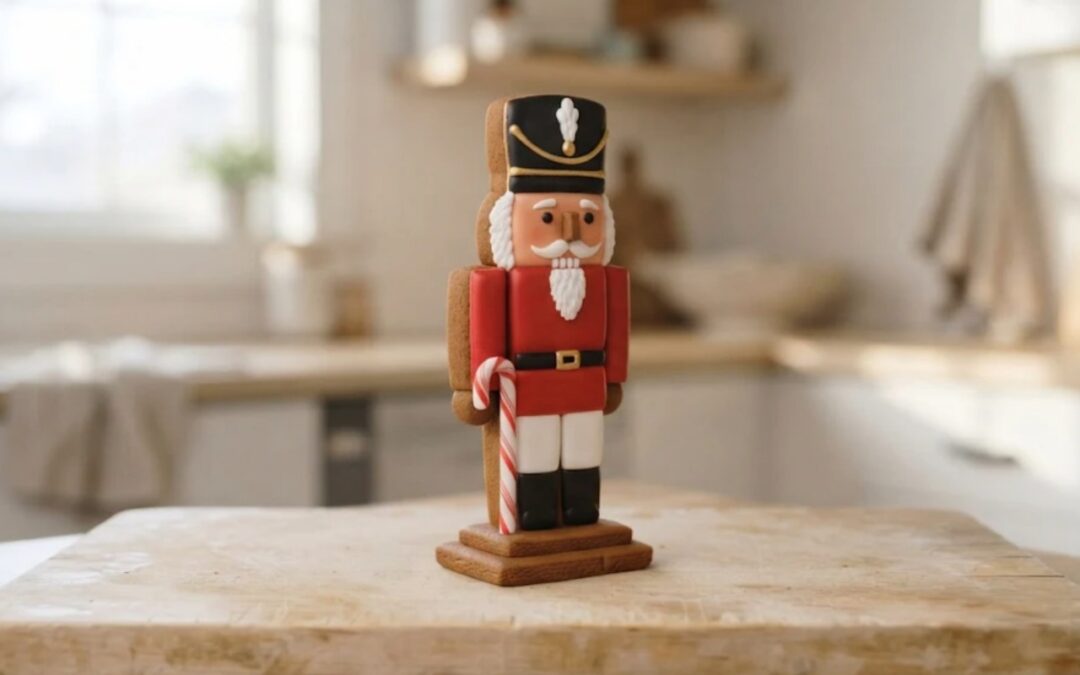
A gingerbread nutcracker is the wooden toy from the mantel, made from cookie dough and icing instead of turned wood. It stands about 10 inches tall on a stepped base, with a red coat, a tall hat and a white beard.
The bake times and icing waits come from our house dough and royal icing recipes. The free template was drawn by a script that checks every piece fits before you cut it. It is written for families who want a centerpiece, for people who collect nutcrackers, and for anyone with leftover dough and a free weekend.
You get a printable template, three looks from one set of pieces, a paint planner and a build clock. Start with the template.
Gingerbread Nutcracker: At a Glance
- Difficulty: Moderate. Four flat panels make a tall box, and the icing does the rest.
- Total time: about 2 days in two sessions, most of it icing drying.
- Active time: about 4 hours.
- Makes: one standing nutcracker about 10 inches tall: a column 2 1/2 inches wide, 2 inches deep and 8 1/2 inches tall on a two-step base. 11 baked pieces.
- Template: free 3-page PDF, US Letter, true size, with a 1 inch test bar on every page.
Tools: printer, ruler, scissors, rolling pin with 1/4 inch guides, parchment, 2 sheet pans, a small sharp knife, piping bags with small round tips, a toothpick, cans for propping, and a board at least 6 by 5 inches.
Materials
- 1 batch of sturdy gingerbread house dough
- 2 batches of royal icing, split into stiff, piping and flood
- Gel food coloring in red, black and gold, or the colors for your look
- 1 small candy cane
- Edible gold luster dust labeled with an ingredient list, for the King look
- White nonpareils or sanding sugar for the base, optional
Steps
- Print the template at Actual Size and measure the test bar.
- Roll the dough 1/4 inch thick and cut the 11 pieces.
- Score the paint zone lines on the front and back panels.
- Bake at 300 degrees F and trim each piece while it is warm.
- Flood the front and back panels flat, zone by zone.
- Ice the sides, arms, nose and topper flat.
- Leave every piece flat overnight.
- Glue the two base slabs to the board.
- Stand the column on the base and wait 2 hours.
- Set the lid and the hat topper, then wait 2 hours.
- Glue the arms to the sides and the nose to the face.
- Pipe the beard, the mustache and the eyes.
- Add the buttons, the belt buckle and, 4 hours later, the candy cane.
- Leave the nutcracker overnight before moving it.
Notes: times are worked out from the set times on our icing page, not timed on a build. Ovens and doughs vary, so treat every bake time here as a starting point: check early, go by the matte surface and firm edge, and bake a test strip before you build.
Free Printable Gingerbread Nutcracker Template
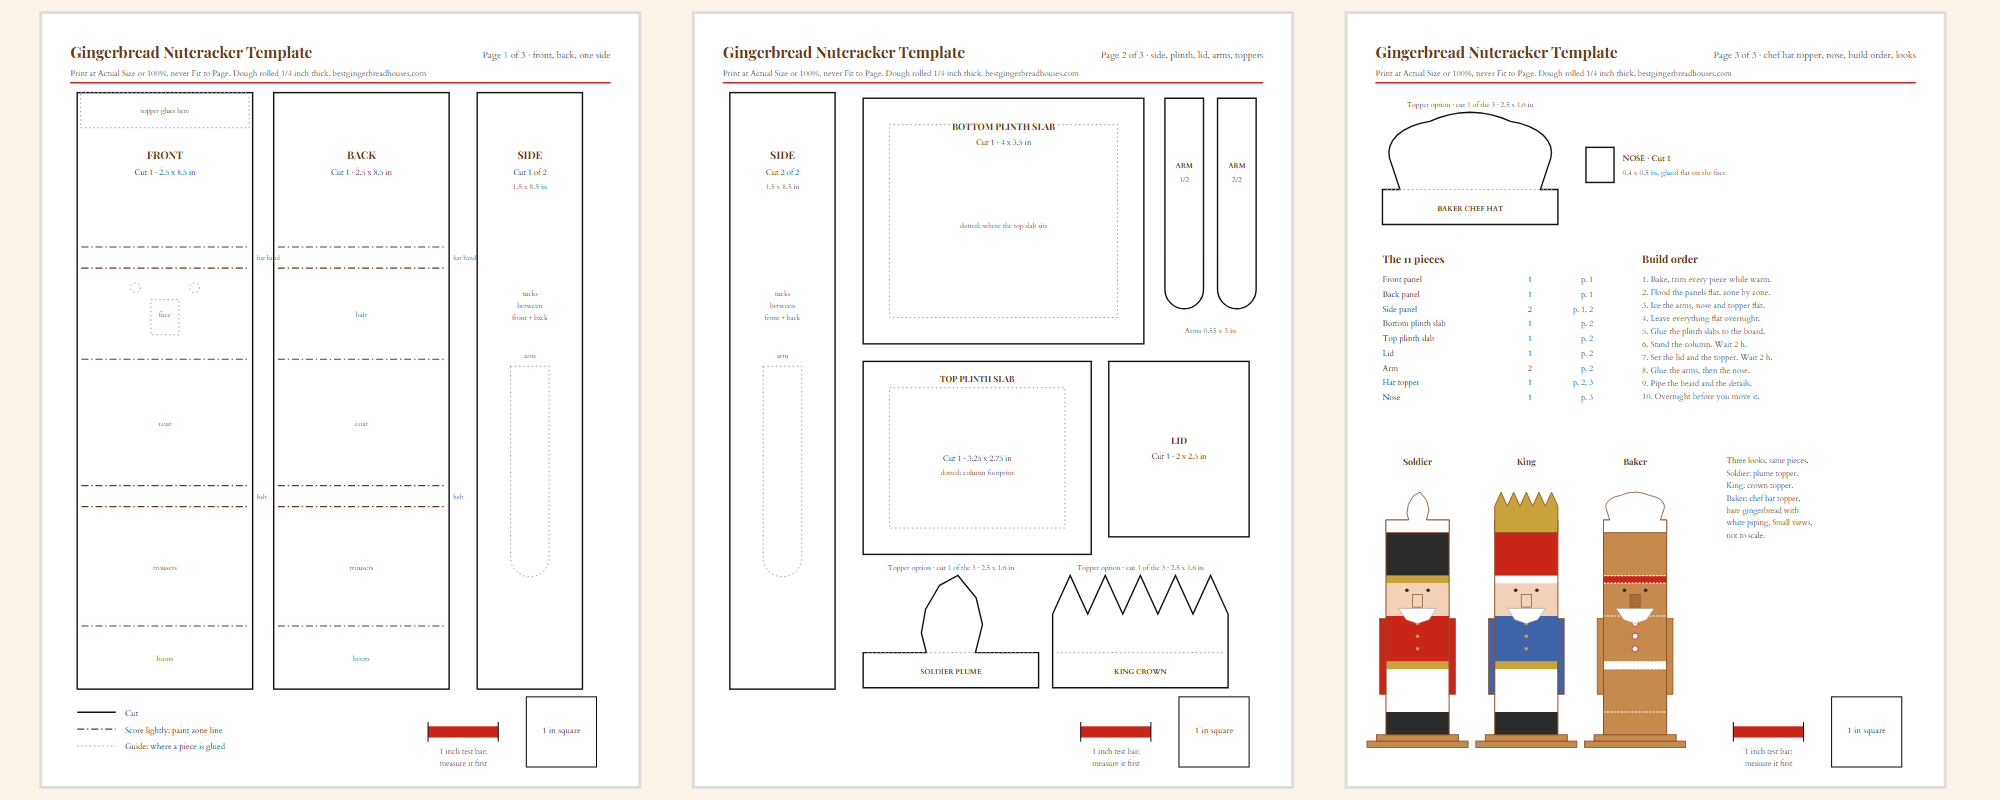
The template is three US Letter pages. Download the PDF, print it at Actual Size or 100 percent, never Fit to Page, and put a ruler on the red 1 inch bar before you cut. If the bar measures an inch, every piece is the size printed on it.
| Piece | Cut | Size | What it does |
|---|---|---|---|
| Front panel | 1 | 2 1/2 by 8 1/2 in | Carries the face, coat and boots. Six scored lines mark the paint zones. |
| Back panel | 1 | 2 1/2 by 8 1/2 in | Same zones, with hair where the face would be. |
| Side panel | 2 | 1 1/2 by 8 1/2 in | Tucks between the front and back. A dotted outline shows where the arm goes. |
| Bottom base slab | 1 | 4 by 3 1/2 in | Glues to the board. |
| Top base slab | 1 | 3 1/4 by 2 3/4 in | Steps in on top of the bottom slab, like the turned base of the wooden toy. |
| Lid | 1 | 2 1/2 by 2 in | Closes the top of the hat. |
| Arm | 2 | About 1/2 by 3 in, round hand | Glues flat to each side, top at the shoulder. |
| Nose | 1 | 0.4 by 0.5 in | Glues flat to the face. |
| Hat topper | 1 of 3 | 2 1/2 by 1.6 in | Plume, crown or chef hat. It sets the look. |
The 11 pieces use about 103 square inches of dough. One batch of our no-leavening house dough covers roughly 225, so more than half the batch is left. That is enough for a tray of nutcracker gingerbread cookies to stand around the base, which is the best use of it.
Why a Gingerbread Nutcracker Is a Column
The nutcracker on your mantel comes from the Ore Mountains of eastern Germany, where toymakers turned the figures on a lathe and painted them in flat, bright colors. Friedrich Wilhelm Füchtner of Seiffen is credited with the first mass production, in 1872. A lathe makes columns, so the classic nutcracker is a stack of round sections, and all of its character is paint.
The Column Rule: a gingerbread nutcracker is a tall box with tucked sides, built exactly like a chimney. Gingerbread cannot be turned, but a square column reads as the same toy from across the room. The front and back panels run the full 2 1/2 inch width, and the two 1 1/2 inch sides tuck between them, so the box is 2 inches deep outside and closes square without trimming. The 1 1/2 inch square towers on our castle with four corner towers go together the same way.

The Flat Paint Rule: every color goes on while the panels lie flat, never on the standing figure. Flood icing on a wall slides, but on a flat panel it settles into a smooth, glossy block. The template marks six zone lines on the front: boots, trousers, belt, coat, face, hat band and hat. Score them lightly into the raw dough and the flood stops at each line. Paint the panels like seven narrow cookies, let them dry overnight, and the build day is only glue.
The stepped base matters too. The column stands about 3/8 inch inside the top slab on every side, which leaves room for a bead of icing, and the arms stop inside the base edge. The whole figure sits on a 4 by 3 1/2 inch footprint, so it stays put on a crowded table.
Three Gingerbread Nutcracker Looks From One Template
The same 11 pieces make three different nutcrackers. Only the topper and the colors change. Pick the look before you bake, because the topper is the one piece you choose from three.

| Look | Topper | Coat and hat | Details |
|---|---|---|---|
| Soldier | Plume | Red coat, black hat with a gold band | White trousers, black boots, gold belt and buttons |
| King | Crown | Royal blue coat, red hat with a white band | Crown brushed with edible gold, black belt |
| Baker | Chef hat | Bare gingerbread with white piped lines | Peppermint buttons, red hat band, white chef hat |
Choose by who is decorating. Building with young kids, pick the baker: there is no flooding, and a wobbly white line still looks like piping. For a mantel next to a wooden collection, the soldier matches what is already there. For a big table with a village or a tree, the king’s gold crown catches the light from across the room. If you are making more than one, a soldier and a king side by side look like a matched pair, and the paint planner below sizes the dough for up to six.
The Soldier
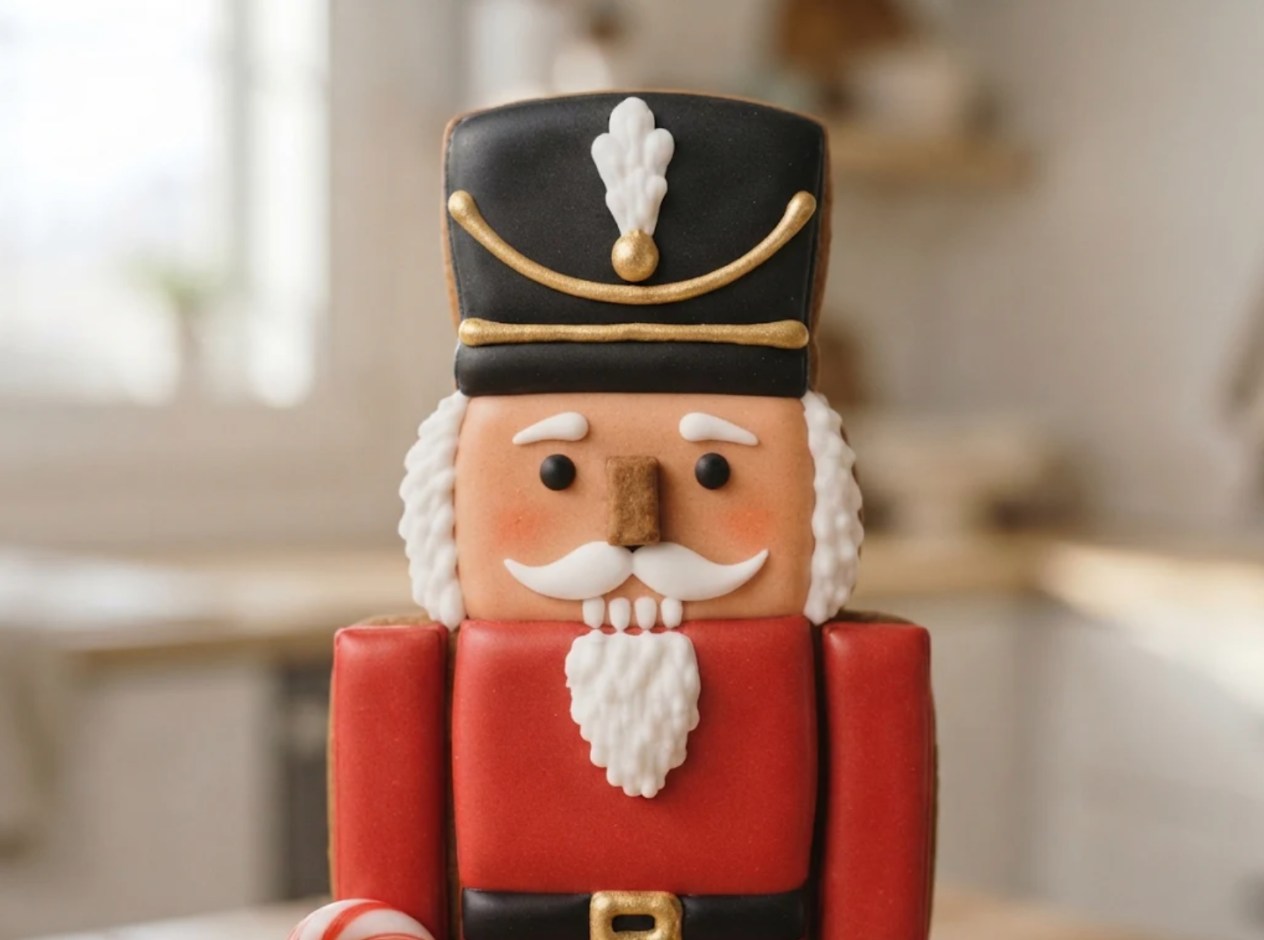
This is the nutcracker most people picture. Flood the coat red, the hat and boots black, the trousers white and the face a pale peach, then add a gold belt and hat band. The plume topper is iced white. Red and black take a lot of gel to get deep, so mix them first, keep them covered, and judge the color after an hour, once it has had time to develop.
The King

Swap the plume for the crown topper, ice it yellow, and brush it with gold once it has set hard. Use only gold sold as edible. The FDA advises against glitters and dusts labeled only “nontoxic” or “for decorative purposes only,” because those words do not mean edible; edible products list their ingredients on the label. A royal blue coat and a red hat finish the look, with a white band between the hat and the crown and a black belt at the waist.
The Gingerbread Baker

The gingerbread nutcrackers sold in stores are often dressed as bakers and chefs, and this is the edible version. It is also the easiest of the three. Leave the gingerbread bare, pipe a white line along every zone line, add white cuffs at the boots and a red band at the hat, and ice the chef hat topper white. Three small peppermints make the buttons. There is no flooding at all, so it suits kids and anyone short on time.
Want your own colors? Pick a look below, then change any zone. The preview updates, and it lists the icing bowls to mix and warns you when two touching zones share a color.
Nutcracker Paint Shop
Start from a look, then change any color. The preview updates, and you get the icing bowls to mix and the dough to make.
Sizes come from our free template: 11 pieces, about 103 square inches of dough per nutcracker, and one batch of our house dough covers about 225. The scrap allowance is an estimate. Gel colors vary by brand, so tint a spoonful and test it on a scrap first. Nothing you enter leaves this page.
How Long It Takes
Plan two sessions. Bake, flood and ice every piece on day one, and let it all dry flat overnight. Build on day two. After that, the icing page sets every wait: two hours before a joint takes weight, four before candy, and overnight before you move the figure.
The clock below asks when the nutcracker needs to be on display and tells you if it will be set in time.
Gingerbread Nutcracker Build Clock
Enter when you start baking and when the nutcracker needs to be on display. You get a time for every stage and a check that it is set before then.
Cure times are the royal icing guidance from our gingerbread house icing page: two hours before a joint takes weight, four before candy, overnight before the piece is moved. Bake times come from our house dough recipe. The other stage lengths are estimates, not timed on a build, and humid kitchens run longer, so check each joint by hand. Nothing you enter leaves this page.
How to Make a Gingerbread Nutcracker Step by Step
The dough and icing recipes have their own pages. Use our house dough for the pieces and the royal icing that thins from glue to flood in one batch. This walkthrough is only the nutcracker’s build order.
1.Print the template and measure the test bar
Print all three pages at Actual Size and measure the 1 inch bar on each. If it reads anything else, change the print setting and print again.

Why this matters: the sides tuck between the front and back, so all four panels must print at one scale or the column will not close.
2.Roll the dough and cut the 11 pieces
Roll the dough to an even 1/4 inch on parchment, lay the paper pieces on it a finger’s width apart, and cut around them with a sharp knife. Put the four tall panels on one tray and the small pieces on another.

Why this matters: the small pieces bake faster, so a tray of their own can come out early without pulling the panels.
3.Score the zone lines
Lay the paper front panel back on the dough and press a toothpick through each zone line, then join the dots with a light knife line. Do the same on the back panel. Score, do not cut: the line should be about as deep as a fingernail.

Why this matters: a scored line gives the flood an edge to stop at, so each color stays a crisp block.
4.Bake and trim the pieces while warm
Bake at 300 degrees for 22 to 30 minutes, depending on panel size, as our house recipe says. As soon as a tray comes out, lay each paper piece back on its panel and trim the edges straight.

Check as you go: the arms, the nose and the topper are small and bake faster than the panels, and the crown points brown first. Pull them when the surface turns matte and the edges feel firm. Ovens vary, so watch the first tray rather than the clock.
Why this matters: the panels are long and narrow. Trimmed square while warm, the four of them close into a true 2 by 2 1/2 inch box.
5.Flood the front and back panels flat
Outline each zone in piping icing, then flood every other zone: boots, belt, face and hat. Let those crust for about half an hour, then flood the trousers, coat and hat band.
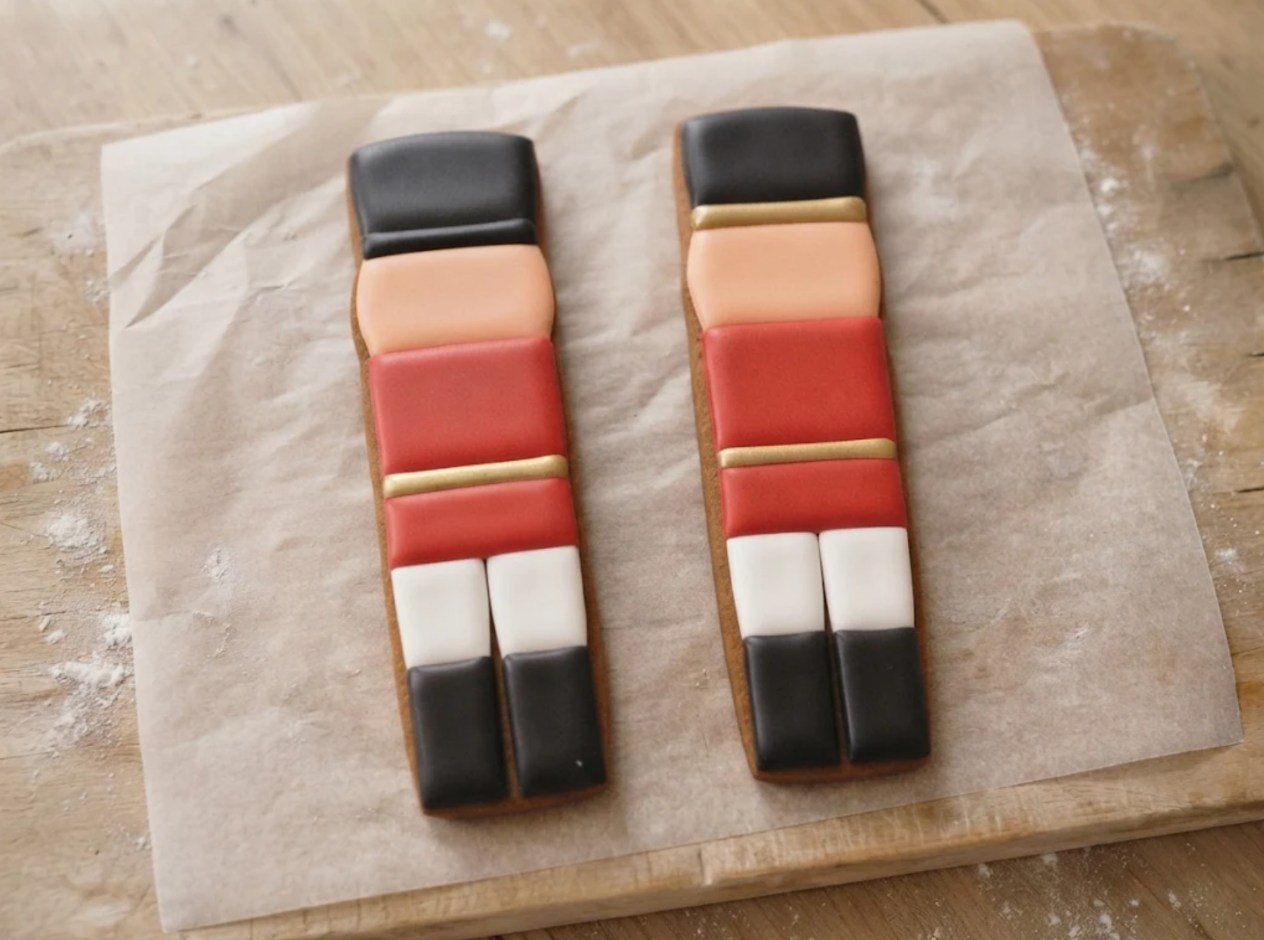
Why this matters: two wet colors side by side bleed into each other. Every other zone first keeps the bands sharp.
6.Ice the sides, arms, nose and topper flat
Flood the side panels in the coat color above the belt line and in the trouser and boot colors below it, so the bands wrap around the figure. Ice the arms in the coat color with a pale hand, the nose in the face color, and the topper for your look.
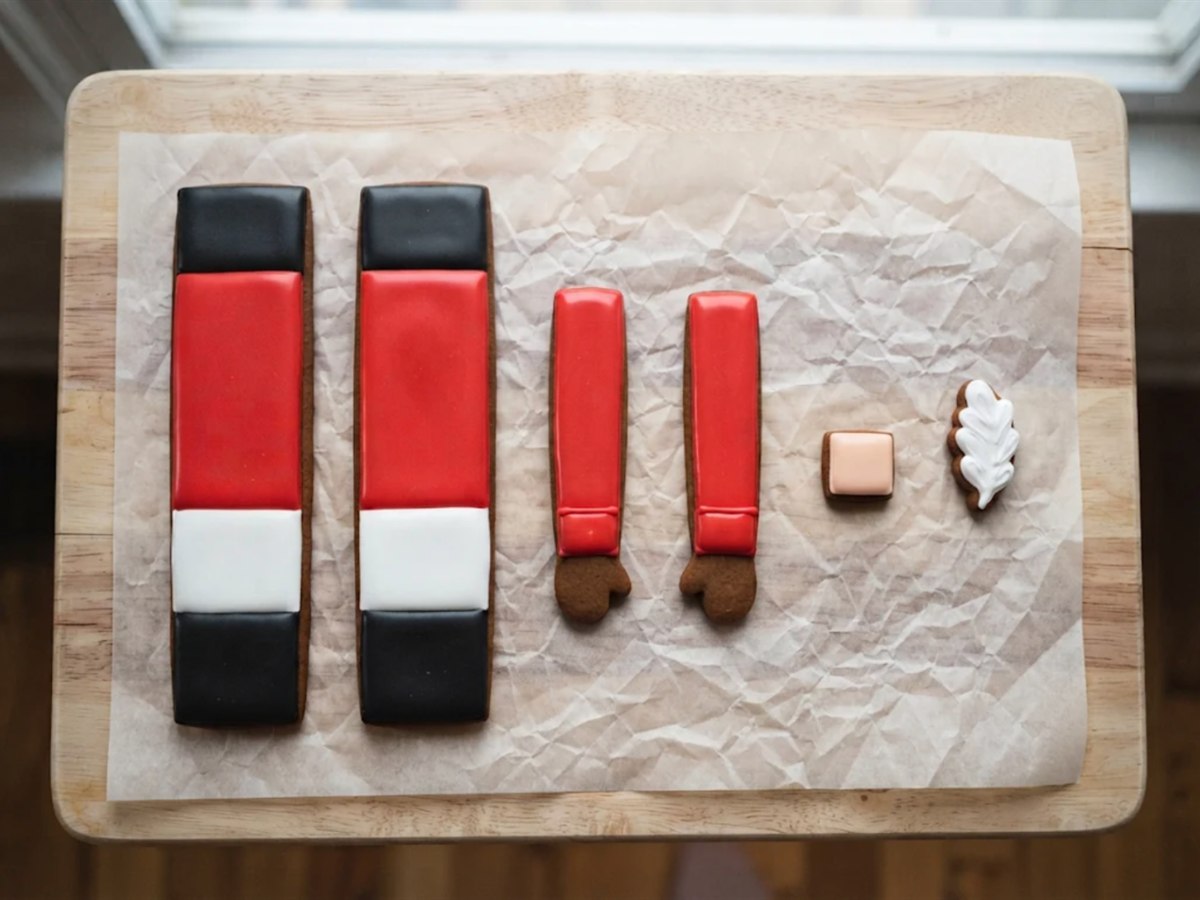
Why this matters: bands that wrap all four sides make the column read as a round toy, not a flat sign.
7.Leave every piece flat overnight
Leave everything on its parchment, uncovered, in a dry room. Nothing is glued yet.

Why this matters: fresh flood dents when a can props against it. Overnight, it has a hard shell that takes a fingertip.
8.Glue the base slabs to the board
Pipe a line on the board and press the bottom slab onto it. Pipe a rectangle on the bottom slab and center the top slab on it, so the step is even all round.

Why this matters: the base is the foundation. Glued first, it has set by the time the column goes on.
9.Stand the column on the base
Pipe stiff icing along the bottom edges and the side edges of the front and back panels. Stand the front and back on the top slab, then tuck the two sides between them. Check the corners with a ruler, prop all four faces with cans, and wait two hours.
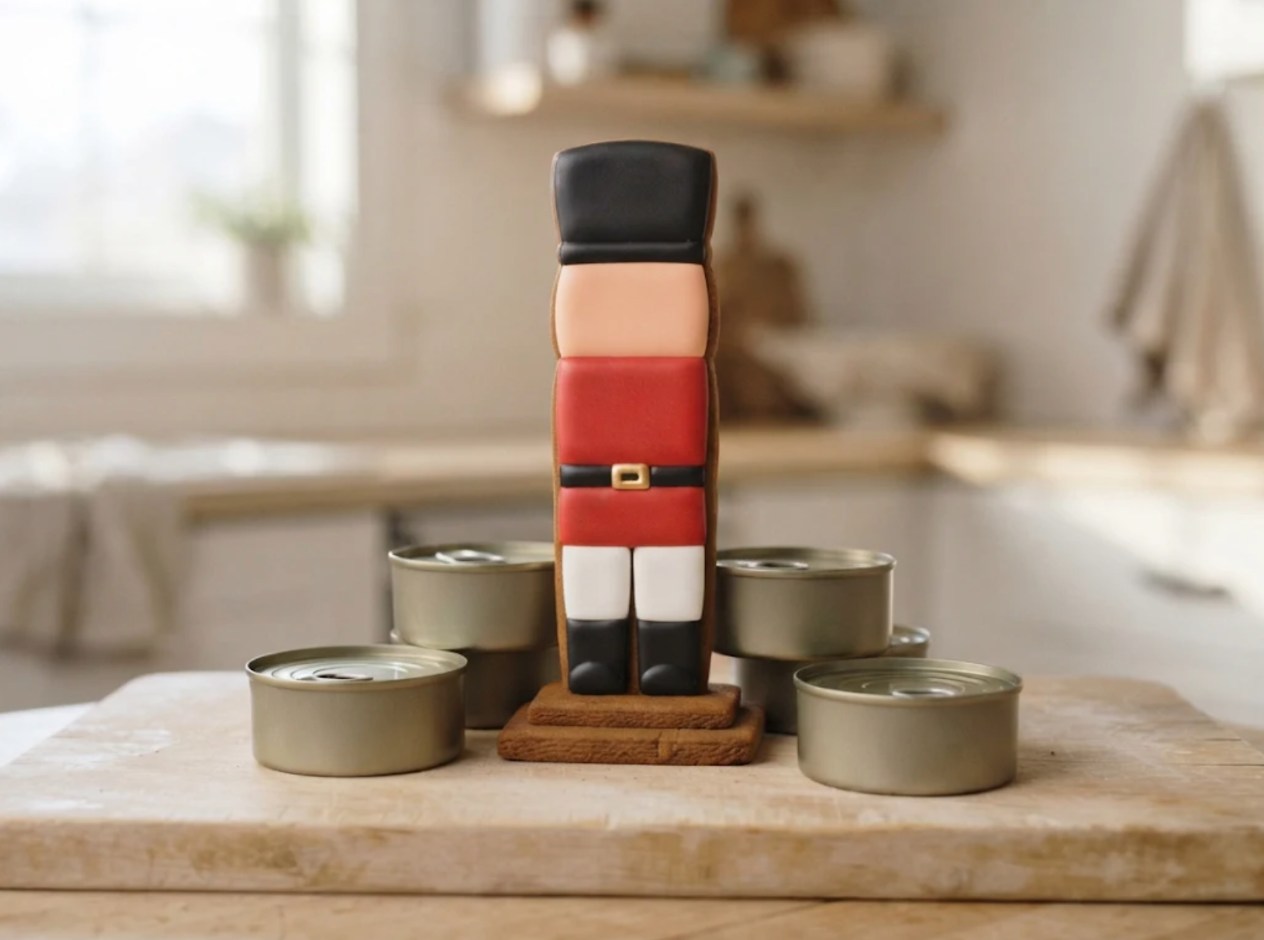
Why this matters: the column is tall and narrow, so it needs its full two hours before the lid and topper put weight on top.
10.Set the lid and the topper
Pipe the top edges of all four panels and set the lid. Pipe a band of icing on the back of the topper’s bottom half inch, press it onto the front of the hat so its back rests against the lid edge, and prop it with a can. Wait two hours.

Why this matters: The Topper Swap works because the topper glues on two faces: the half inch on the hat and the lid edge behind it. That is what lets one template wear three hats.
11.Glue the arms and the nose
Pipe a thin line down the back of each arm and press it onto the dotted outline on each side, shoulder at the top. Hold each for a minute. Glue the nose to the middle of the face the same way.

Why this matters: on a standing wall, a thin layer of icing grips better than a thick one that slides.
12.Pipe the beard, the mustache and the eyes
With stiff white icing and a small round tip, pipe a mustache under the nose and a beard of short downward strokes from cheek to cheek. Pipe two black dots for eyes and white hair on the back panel.

Why this matters: the white beard is the detail that says nutcracker. Two dots and a beard read as the toy from across the room.
13.Add the buttons, the belt buckle and the candy cane
Pipe three gold dots down the coat and a small gold square on the belt. Four hours after the arms went on, pipe a dab of icing on one hand and press a small candy cane against it and the base.
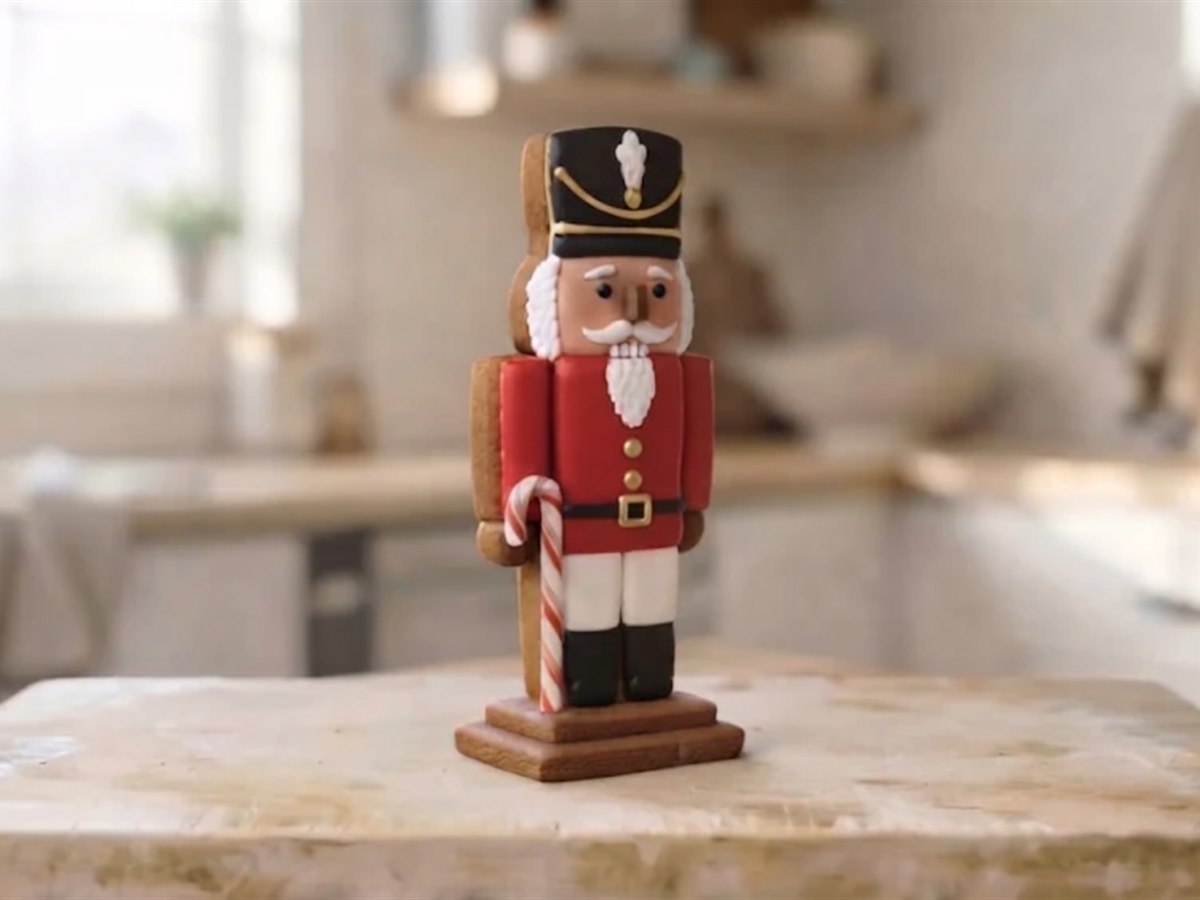
Why this matters: the candy cane is the heaviest add-on, so it waits the four hours our icing page gives any joint before candy.
14.Leave it overnight before moving it
Snow the board with sanding sugar or nonpareils if you like. Leave the nutcracker overnight, then lift it by the board, never by the hat.
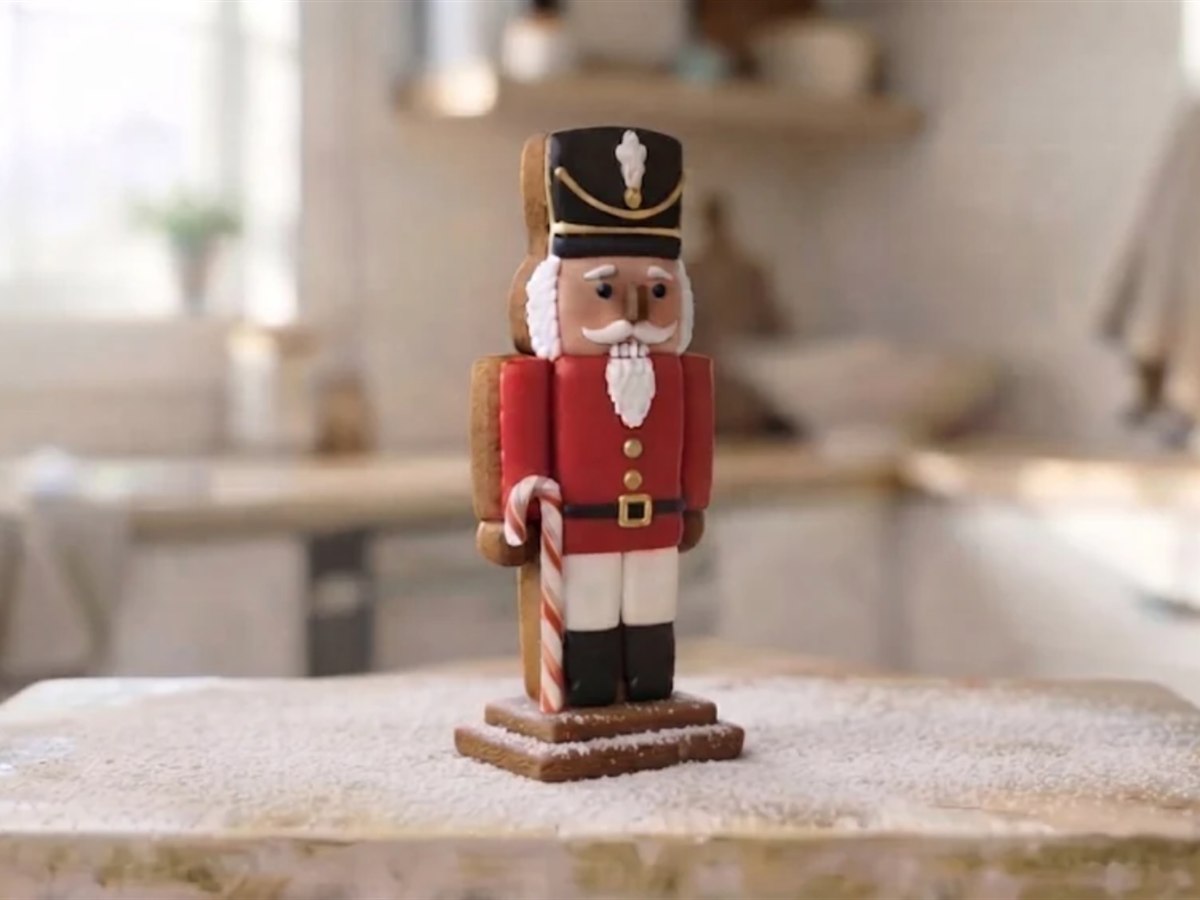
Why this matters: the topper is the last joint and the highest one. Overnight, it is hard enough to travel.
Nutcracker Gingerbread Cookies From the Leftover Dough
More than half the batch is still in the fridge, and the best use for it is cookies. Our nutcracker cookie designs include a soldier, a crown, a drum and a peppermint round, with a palette that matches the soldier look here. Set a few around the base and the standing figure becomes the center of a little scene.
For the wider table, our stacked star gingerbread tree makes a good partner, and the pair works well beside a gingerbread village. Check every guest’s allergies before you share any of it.
Troubleshooting
| What you see | Why | What to do |
|---|---|---|
| The column will not close square | The panels spread in the oven, or one page printed at a different scale | Trim each panel against its paper pattern while warm; measure the test bar on every page |
| The column leans | It was not propped on all four faces, or the base was still soft | Glue the base first, then prop all four faces of the column for the full two hours |
| Two colors bled together | Neighboring zones were flooded at the same time | Flood every other zone, wait half an hour, then fill the rest |
| The flood dented where a can touched it | The panels were built before the icing dried | Fill the dent with a dab of the same color; next time leave the panels flat overnight |
| The topper tips forward | It is glued only on the hat, not on the lid edge | Pipe a bead where its back meets the lid edge and prop it for two hours |
| An arm slid down the side | Too much icing on a standing wall | Scrape it off, pipe a thinner line and hold the arm for a minute |
| The crown points broke | The thin tips bake and break first | Glue them back with icing and pipe over the crack; pull the topper early next time |
| The whole sheet printed small | Fit to Page was on | Measure the bar, switch to Actual Size, and reprint |
A No-Bake Graham Cracker Nutcracker
For small kids, skip the oven. Stand two whole graham crackers upright as the front and back, and make each side from two graham quarters stacked on end. Glue it all with royal icing, or with one of the quicker glues in our no-bake graham cracker house guide, on a graham square that sits on a paper plate.

Spread the top third black for a hat, the middle red for a coat, and leave the bottom bare. A marshmallow makes a chef hat and a gumdrop makes a plume. Pipe a white beard and two dots for eyes. It is shorter than the baked one and done in an afternoon.
Storage Instructions
Baked pieces keep flat in a dry, airtight tin for a few days before you decorate. Store the finished nutcracker uncovered in a dry room, away from steam, sunny windows and the fireplace, where heat softens icing. For how long it stays edible versus how long it stays standing, see how long gingerbread lasts on display.
FAQ
Can I print it smaller?
Yes, but trim the sides. The dough stays 1/4 inch thick at any size, so the sides of a smaller print come out too wide. At 75 percent the column is 1 1/2 inches deep and the sides need to be 1 inch, but they print at 1 1/8. Trim each side by 1/8 inch and it closes square.
Can the jaw open?
Not in gingerbread. A wooden nutcracker’s jaw is worked by the lever at its back, and a baked panel cannot hinge. Pipe a straight mouth line under the mustache and the face still reads.
Is it safe to eat?
The gingerbread and candy are. Traditional royal icing uses raw egg white, so use the meringue powder version on our icing page, and only edible gold, if the nutcracker will be eaten.
More Gingerbread Builds and Recipes
Every other printable shape is on the free gingerbread templates page. Before your first build, read our tips for building with gingerbread, and for more themes, browse the gingerbread house ideas. Our candy guide sorts the peppermints and canes that hold up on a build.
Build Your Gingerbread Nutcracker With Best Gingerbread Houses
A gingerbread nutcracker is a tall box with three tricks: tucked sides, colors flooded flat and a topper that leans on the lid. Print the sheet, give the icing its overnight, and pick your hat. If you would rather start a house from a box this year, our guide to the best gingerbread house kits grades every kit on the icing it ships with, which decides whether the walls stay up.