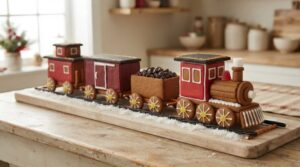
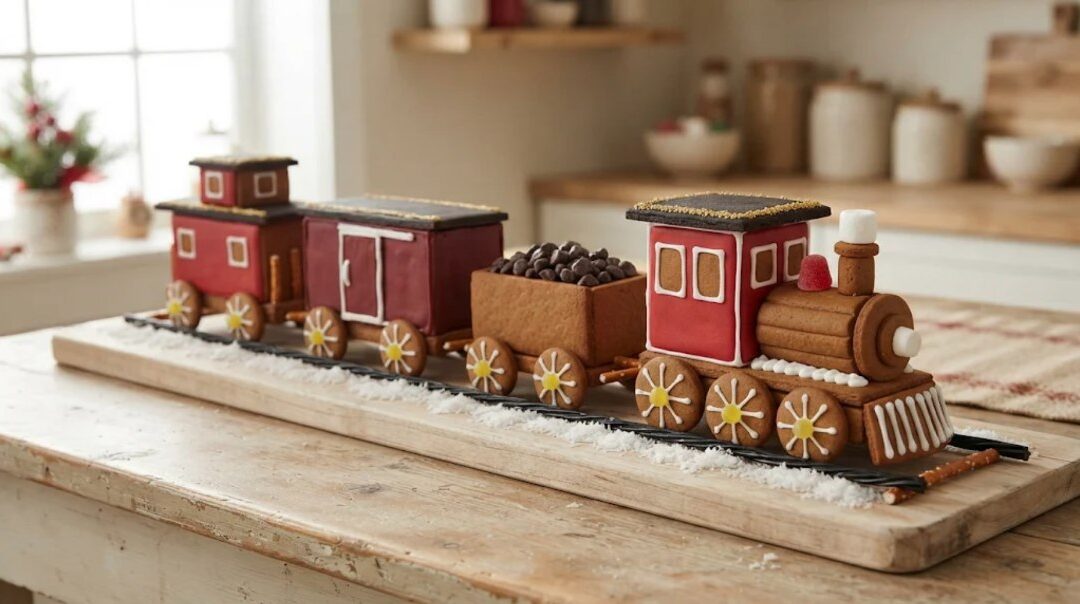
A gingerbread train looks harder than a house, mostly because of that round boiler. Most home bakers try to bend a warm sheet of dough into a tube, and that is the moment the engine cracks.
Our house dough and royal icing recipes set every bake time and wait here, and a home builder’s account of a snapped boiler shaped the design. The template was checked by a script, so the decks, walls, roofs and wheels line up the first time. It is written for families building over a weekend, with jobs a child can own.
You get a free four-page template for an engine, a coal car, a boxcar and a caboose, cut from one batch of dough with no bent pieces at all.
Here is how the flat-pack train goes together.
Gingerbread Train: At a Glance
- Difficulty: Medium. Every piece is a flat rectangle or a circle. The patience goes into waiting for the icing.
- Total time: about 1 1/2 days, in six sessions. Most of it is icing drying.
- Active time: about 6 3/4 hours, counting the dough chill and the bake.
- Makes: a train about 15 1/4 inches long, with an engine 3 1/2 inches tall at the cab roof, on a 20 x 7 inch board.
- Template: free 4-page PDF, US Letter, true size with a 1 inch test bar on every page.
Steps
- Print the template at Actual Size and measure the test bar.
- Make the dough and chill it for at least an hour.
- Roll the dough 1/4 inch thick and cut the engine pieces and windows.
- Cut the car pieces and every wheel.
- Bake the big pieces and the small rounds on separate pans.
- Trim every piece against the template while it is warm.
- Stack the boiler discs and the smokestack discs, and leave them overnight.
- Decorate the flat pieces: floods, window frames, wheel spokes and the door.
- Build the four chassis and wait 2 hours.
- Ice the wheels to the rails.
- Stand the cab and car walls.
- Lay the boiler in its cradle and add the smokestack, then wait 2 hours.
- Set the roofs and the front plate, and wait 2 hours.
- Build the cupola on the caboose roof.
- Load the coal car and couple the cars.
- Lay the track and the snow.
Notes: times are worked out from the set times on our icing page, not timed on a build. Ovens vary, so check early and bake a test piece before you build. This is our own simplified train, not a model of any real locomotive.
Free Printable Gingerbread Train Template
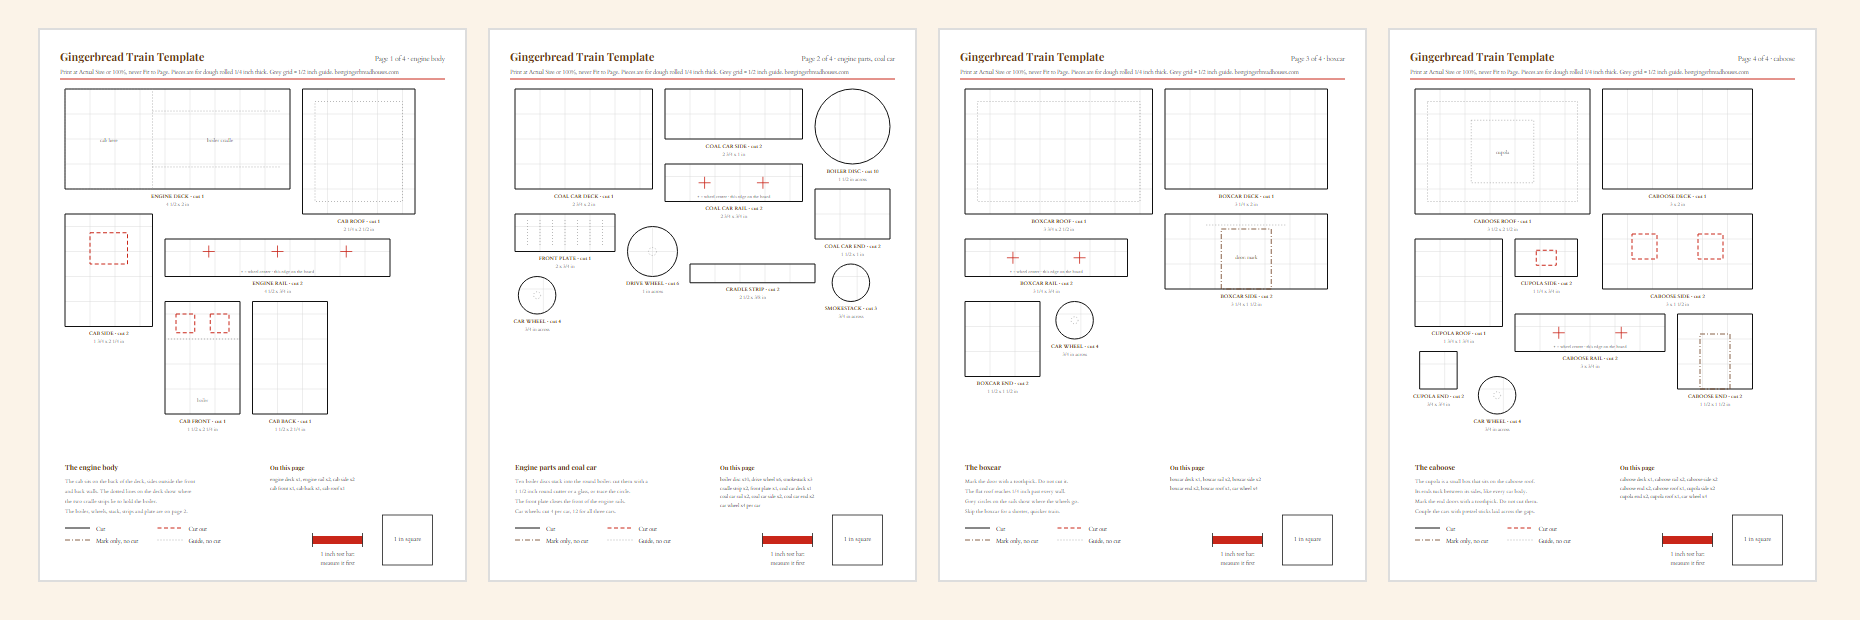
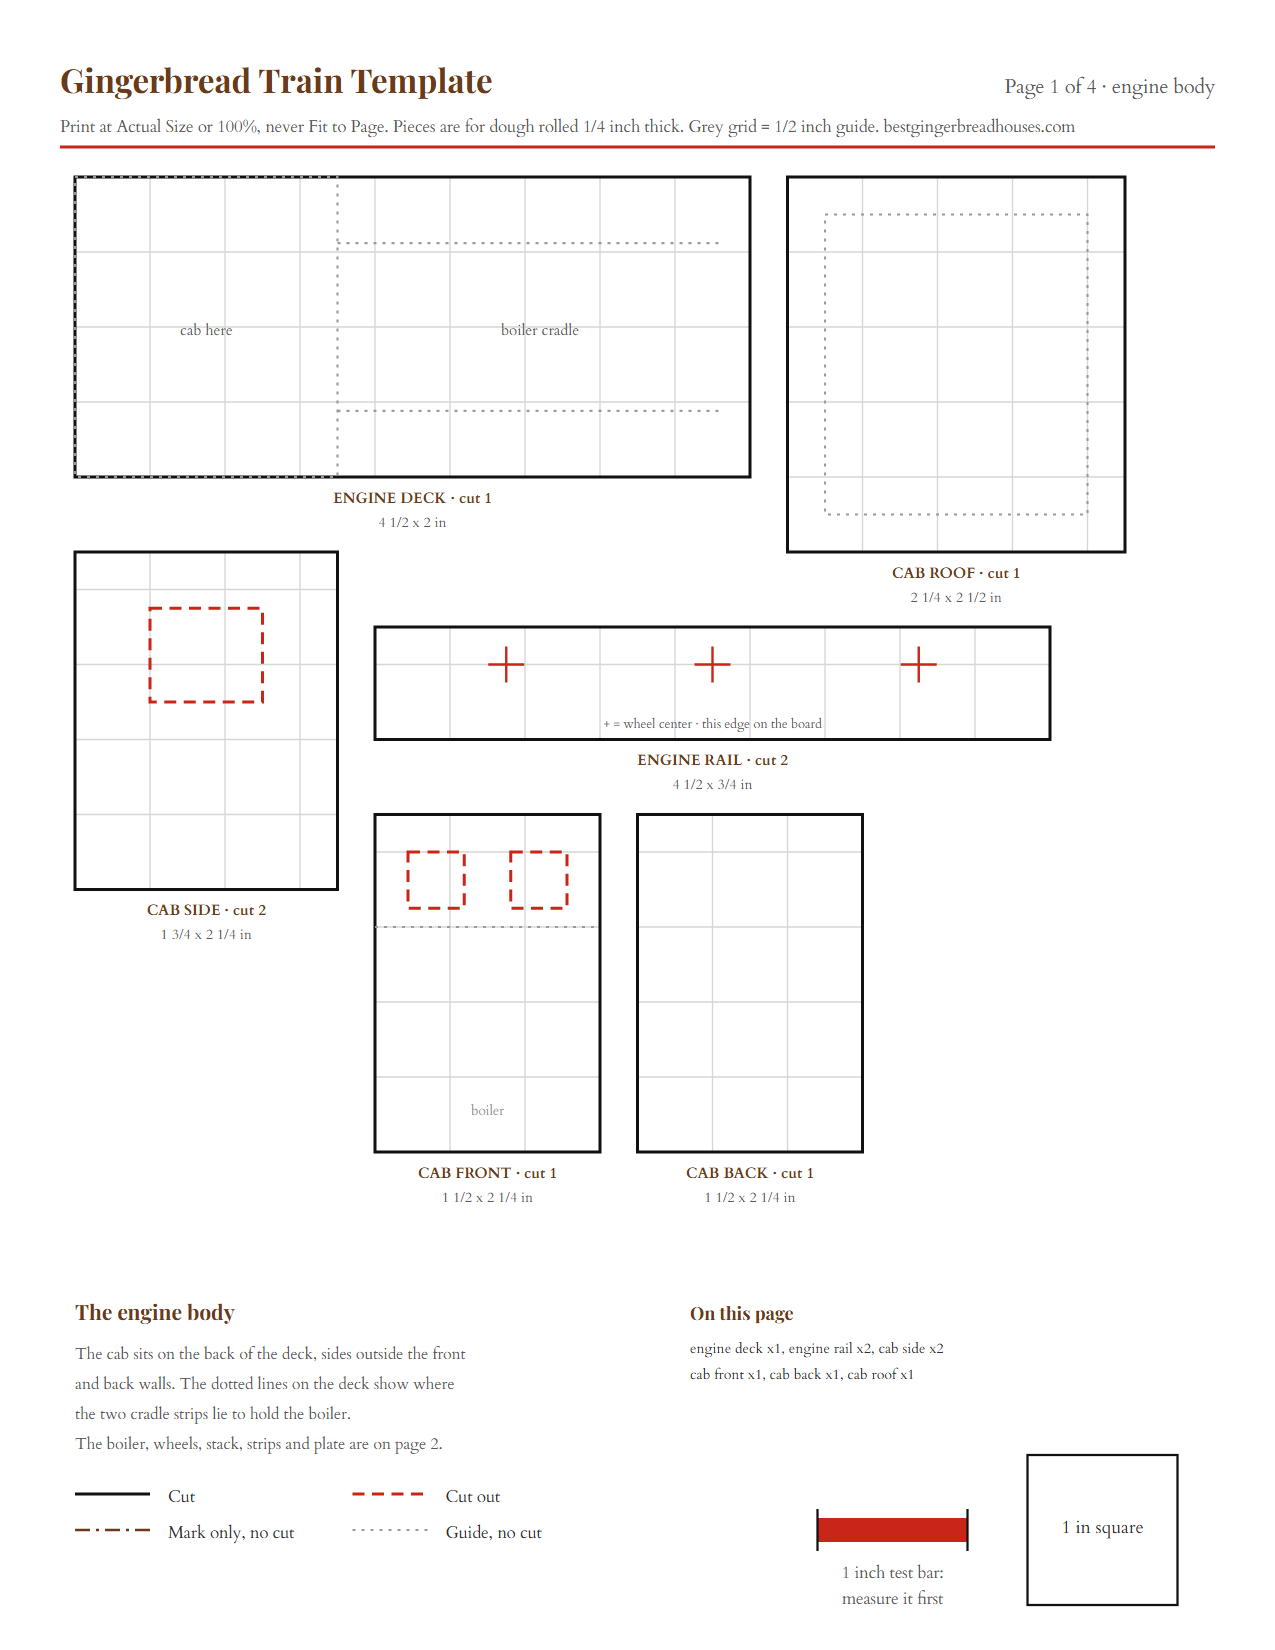
The template is four US Letter pages with 29 shapes at true size. Download the PDF, print it at Actual Size, and check that the red bar measures 1 inch before you cut anything.
| Page | What is on it | Pieces |
|---|---|---|
| 1. Engine body | The engine deck and rails, the cab walls and the cab roof | 8 |
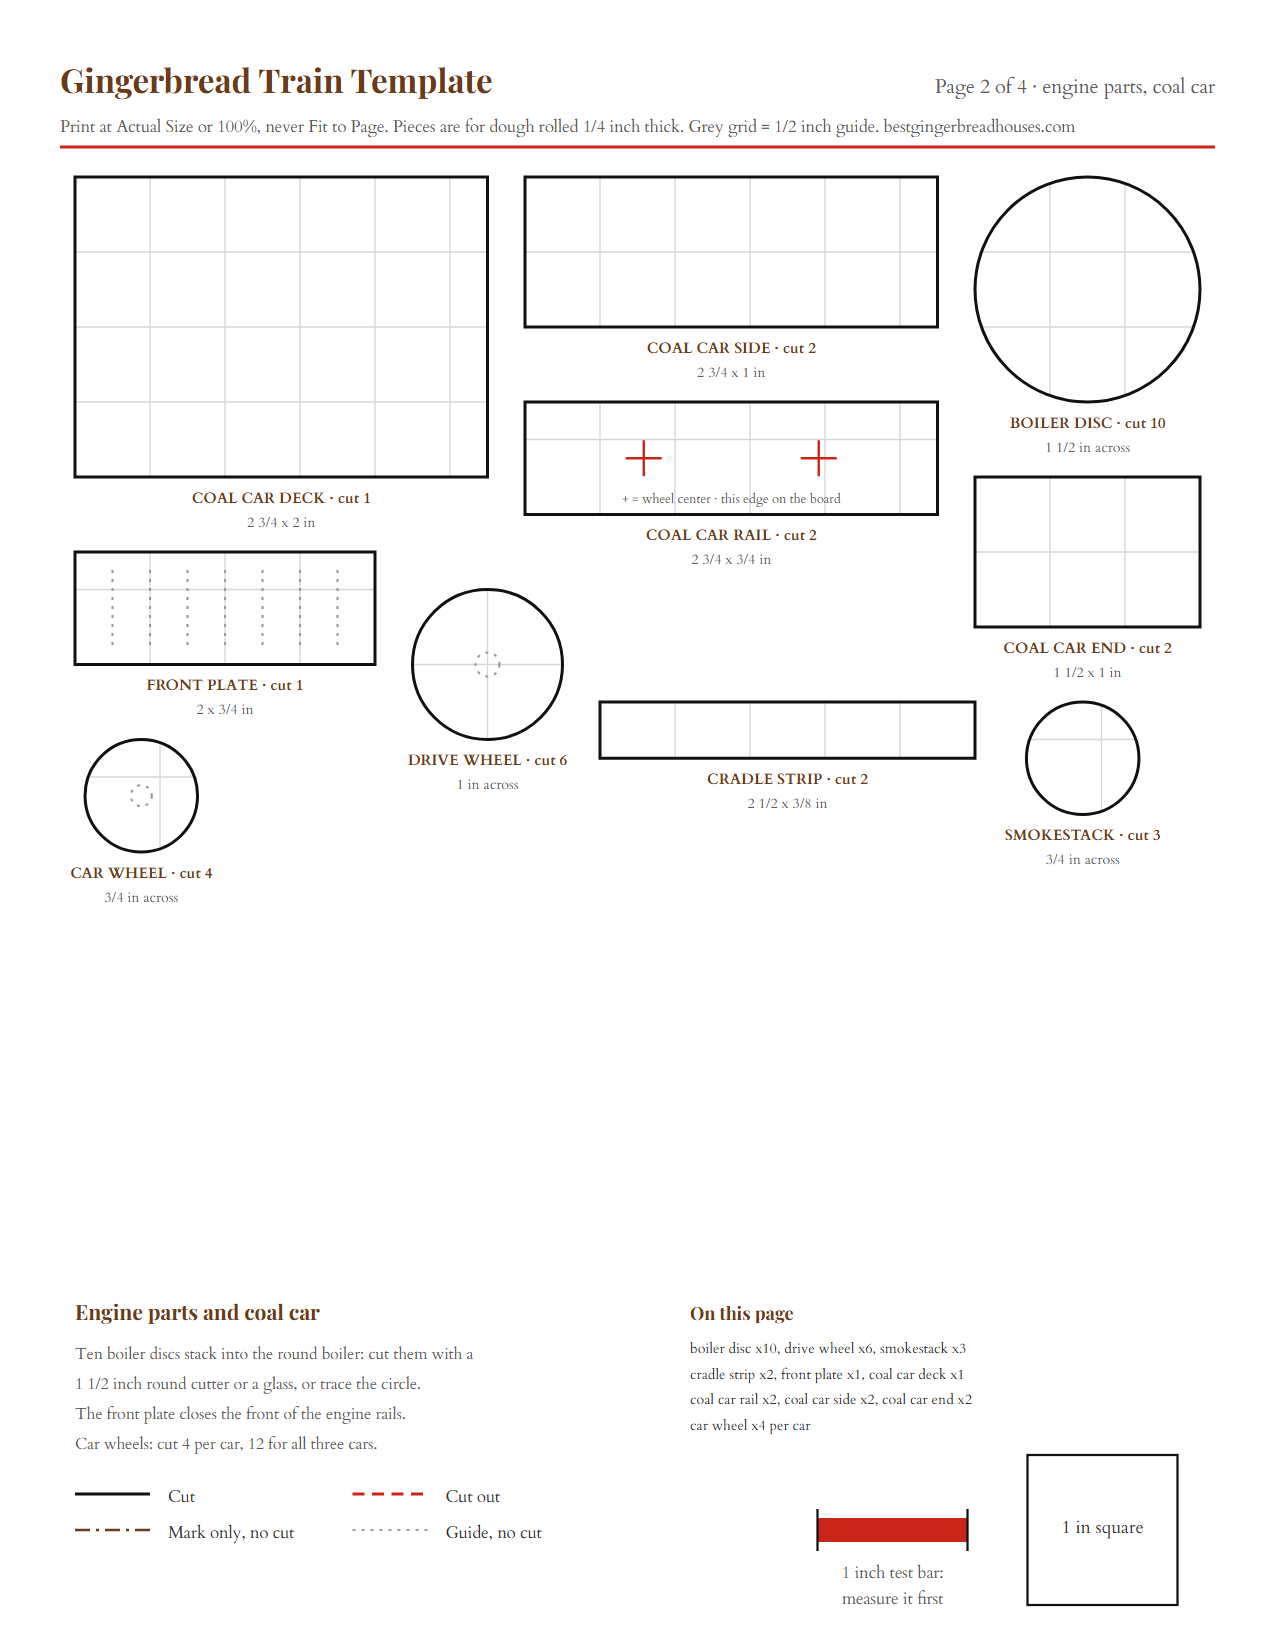
| 2. Engine parts and coal car | The boiler discs, drive wheels, smokestack, cradle strips and front plate, plus the whole coal car and the car wheel | 29 plus 12 car wheels |
| 3. Boxcar | Deck, rails, sides with a marked door, ends and a flat roof | 8 |
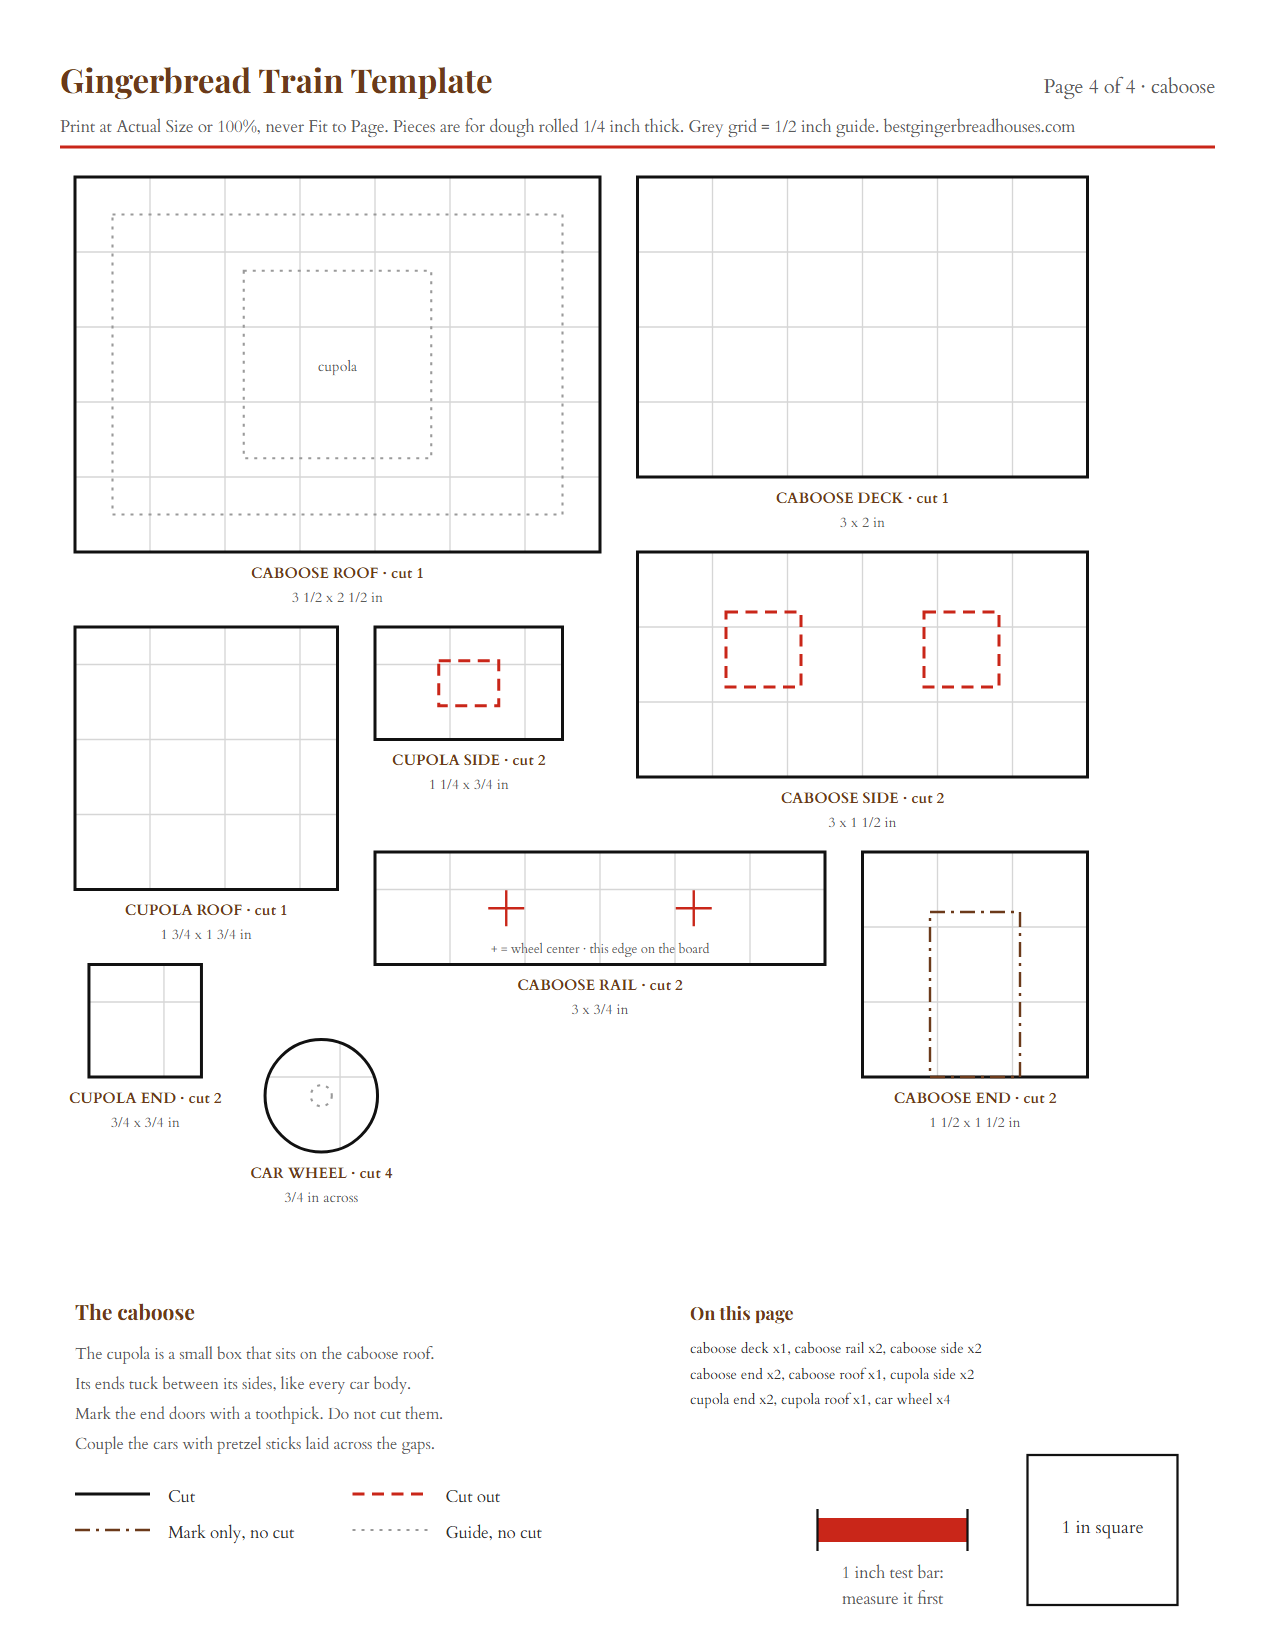
| 4. Caboose | Deck, rails, windowed sides, ends, roof and the little cupola box | 13 |
That adds up to 70 dough pieces, wheels included. It sounds like a lot, but 31 of them are circles you can cut with round cutters or a small glass, and every piece comes to about 160 square inches, so one batch of dough covers the whole train with scraps left over. The engine alone is about 30 pieces if you want to start small.
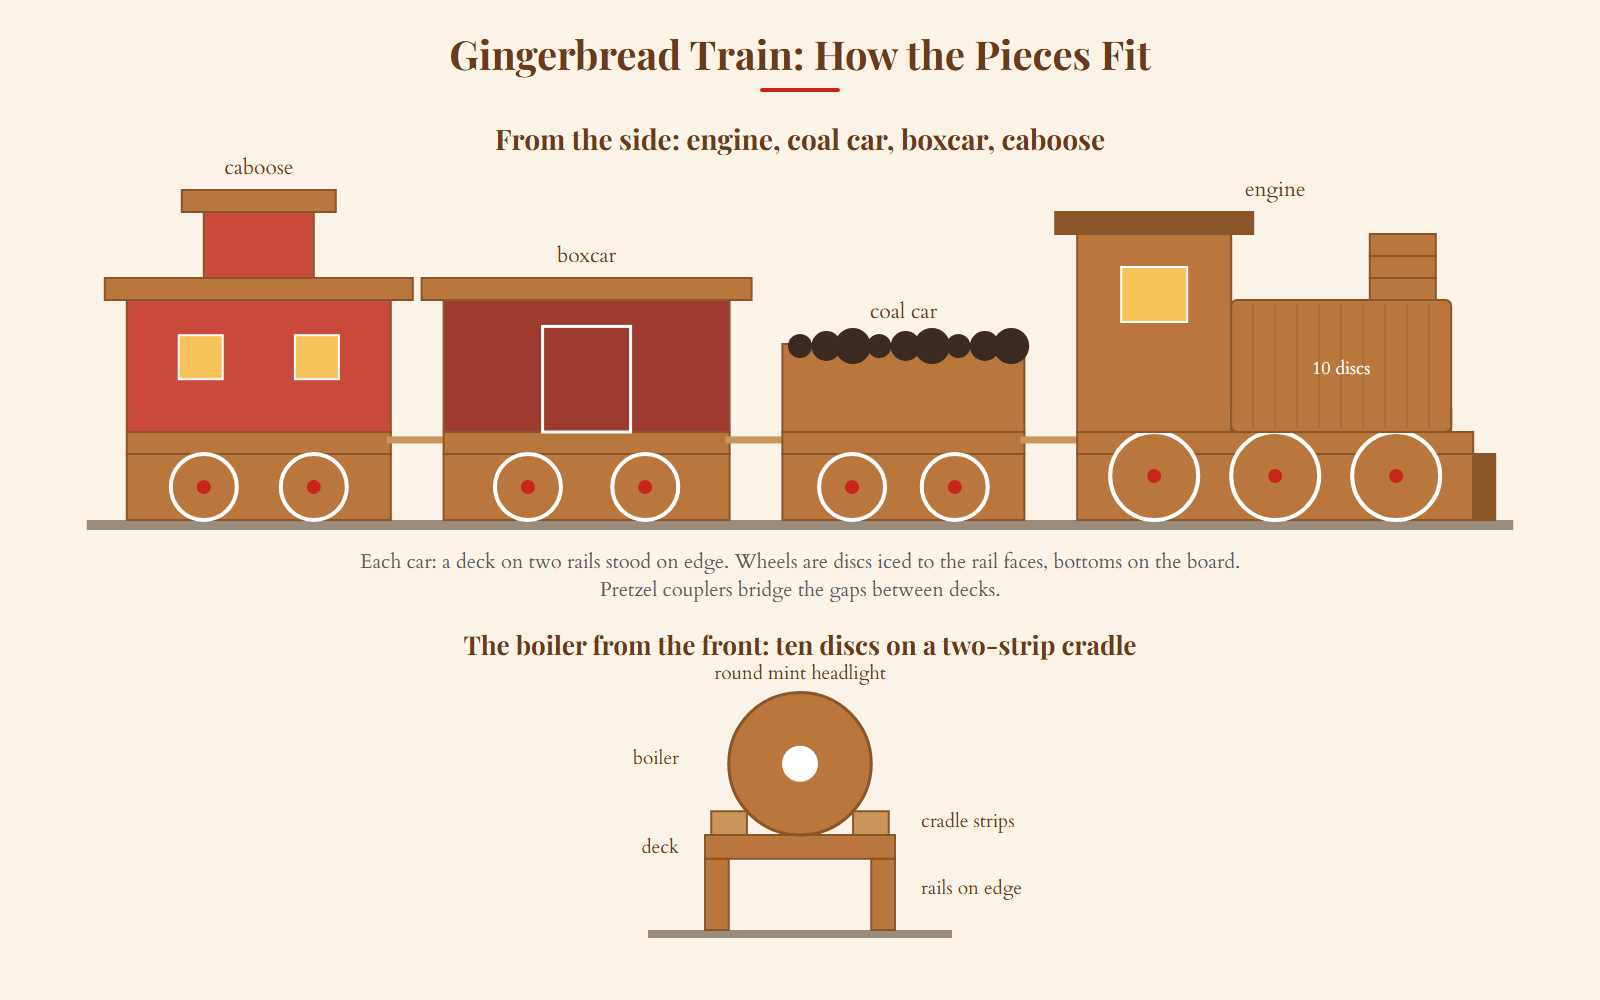
Every car is built the same way, so the template reads quickly once you know the pattern:
- Deck: a flat 2 inch wide plank that every body sits on.
- Rails: two 3/4 inch strips that stand on edge under the deck, like the legs of a bench. The red crosses mark where the wheels go.
- Sides and ends: the sides run the full length of the deck, and the 1 1/2 inch ends tuck between them.
- Wheels: dough circles iced flat to the rail faces, 1 inch for the engine and 3/4 inch for the cars.
Solid lines are cuts, red dashes are windows to cut out, the brown dash-dot outline is a door you only mark, and dotted grey lines are guides. If you want a tiny train to set beside a house instead, the smaller one-carriage train on our templates page is a quick afternoon build.
Why a Flat-Pack Train Stands Up
The hard part of any gingerbread train is the round boiler on the front of the engine. A home baker who built a snow train for her blog's 2009 gingerbread contest wrote that bending a rectangle of hot gingerbread for the engine body broke it in half, and that baking it over a foil-wrapped can still left the sides fallen off. Warm gingerbread bends a little, then snaps.
This train never asks the dough to bend. Three choices make that work:
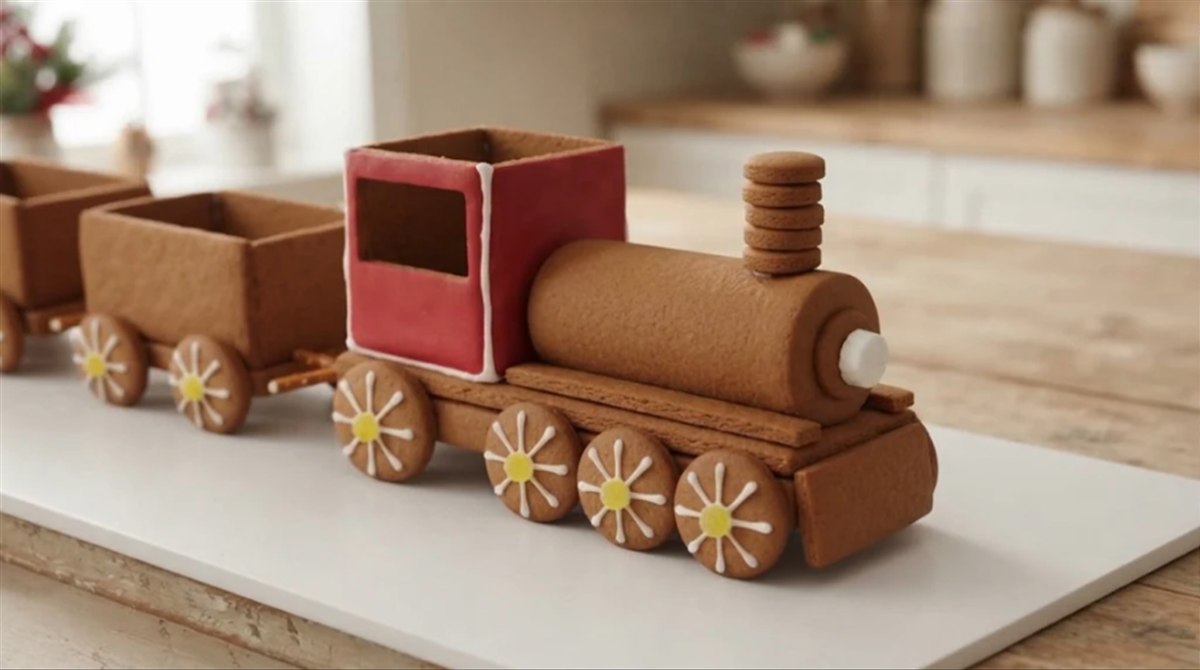
The boiler is a roll of coins. Ten 1 1/2 inch discs glued face to face make a solid round boiler 2 1/2 inches long. You stack them flat, like coins, let the stack set overnight, then lay it on its side. It is heavier than a hollow tube, and it cannot crack along a fold, because there is no fold.
The boiler sits in a cradle. Two narrow strips lie flat on the engine deck about 1 1/8 inches apart. The round boiler drops between them until its bottom touches the deck, so it cannot roll. The template script checked that spacing, which is why it is printed as guide lines on the deck.
The wheels carry nothing. Each car stands on its two rails, which sit right on the board. The wheels are iced to the outside of the rails with their bottoms on the board too, so they look like they carry the train, but a wheel that slips does not drop a car. That is also why the coal car and caboose stay level if a child glues a wheel a little high.
The bodies are plain boxes on top, the same build as a small house, with flat roofs instead of pitched ones. Flat roofs are the easy kind: they rest straight down on the walls and do not slide.
Decorating Looks for Your Gingerbread Train
A train gives you four small canvases instead of one big one, so it suits a theme. Five looks work well with this template:
- Classic red: a red cab and caboose, a deep red boxcar, a bare gingerbread boiler, black roofs and gold sprinkle trim.
- Candy cane: every car flooded white, then red stripes piped on the slant, with round peppermints on the drive wheels.
- Snowy night: navy cars, thick white icing dripping off every roof, silver sugar pearls and coconut drifts.
- Chocolate express: mostly bare gingerbread with melted chocolate piping and chocolate coins on the drive wheels.
- Rainbow sweets: each car its own pastel color, white roofs, and gumdrops on top.
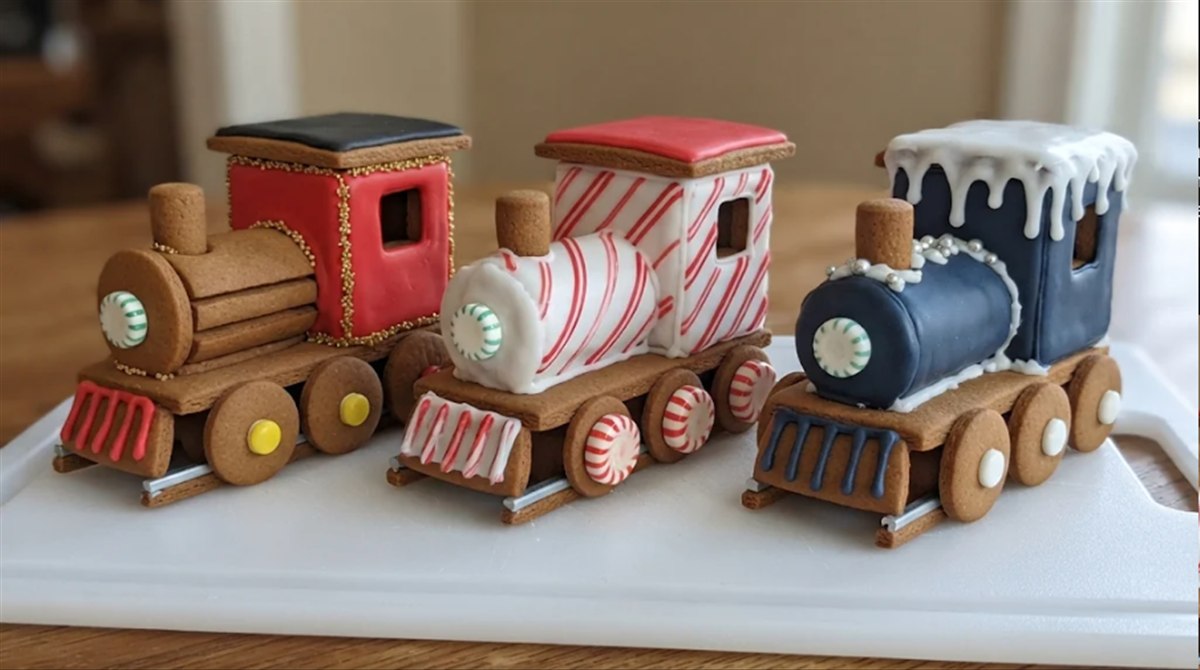
Whichever look you pick, keep the roofs one color across the whole train. It ties four separate boxes into one train at a glance. Try your look and your cars below before you shop.
Gingerbread Train Paint Shop
Choose your cars and a look. The preview repaints, and the list below tells you what to buy and how much dough the train takes.
Cars behind the engine
Look
Candy amounts are estimates for planning. Pieces, lengths and dough come from the template on this page. Nothing you choose leaves your browser.
What You Need for the Train
Materials
- 1 batch of our sturdy house dough recipe, which covers the train with room for re-rolled scraps.
- 2 batches of the royal icing recipe we use for every build, made one at a time: part of the first thinned for flooding, the rest and the second kept thick for gluing and piping.
- Gel food coloring for your look, plus small round candies for the wheel centers. The candies that hold up on a gingerbread build are the safe picks.
- About 1/2 cup of chocolate rocks or crushed chocolate cookies for the coal.
- 1 round mint for the headlight, 1 gumdrop for the dome, and a mini marshmallow for a puff of steam.
- A few pretzel sticks for the couplers, 2 long licorice laces for the track, and coconut or powdered sugar for snow.
- Tools: rolling pin with 1/4 inch guides, parchment, 2 or 3 half sheet pans, a paring knife, round cutters of 1 1/2 inches, 1 inch and 3/4 inch or small glasses that size, a ruler, 4 piping bags with small round tips, toothpicks, and a 20 x 7 inch board such as a long cutting board or foil-covered cardboard.
How Long It Takes, Day by Day
Plan on six sessions over two days. Most of the time is waiting, because royal icing has to harden before it can carry weight.
| When | What you do | Hands-on | Then wait |
|---|---|---|---|
| Day 1, morning | Print, make and chill the dough, cut every piece, bake and trim. | About 3 1/2 hours with chilling and baking | Until the pieces are cool |
| Day 1, afternoon | Stack the boiler and smokestack, flood the car sides, pipe the windows, spokes and door. | 1 hour | Overnight |
| Day 2, early morning | Build the four chassis and lay the cradle strips. | 30 minutes | 2 hours |
| Day 2, late morning | Ice on the wheels, stand the cab and car walls, lay the boiler and smokestack. | 45 minutes | 2 hours |
| Day 2, early afternoon | Set the roofs and front plate, stand the cupola walls. | 30 minutes | 2 hours |
| Day 2, late afternoon | Cupola roof, coal, couplers, track and snow. | 30 minutes | Overnight before you move it |
In a damp kitchen, add time to every wait. The clock below works out the schedule backward from the moment you want the train on the table.
Gingerbread Train Build Clock
Pick when the train should be on the table. The clock counts back through every drying time and tells you when to start baking.
For planning only: icing sets faster or slower with the weather, so treat each wait as a minimum and check that joints feel firm before moving on. Hands-on times are estimates. Nothing you enter leaves your browser.
How to Make a Gingerbread Train Step by Step
1.Print the template and measure the test bar
Print all four pages at Actual Size, never Fit to Page, and check that the red bar reads exactly 1 inch. Cut out the paper pieces, including the cab and caboose windows, with scissors or a craft knife.
Why this matters: a deck printed a little small will not match the walls, and the roofs will fall short.
2.Make the dough and chill it
Make one batch of house dough, split it into three discs about an inch thick, wrap them and chill for at least an hour.
Why this matters: cold dough cuts clean circles and spreads less in the oven, which keeps 70 small pieces close to their paper shapes.
3.Roll the dough and cut the engine
Roll a disc on parchment to an even 1/4 inch. Cut the deck, both rails, the cab walls and the cab roof, using a ruler on the long edges, and cut out the cab windows. Then cut the 10 boiler discs, 6 drive wheels and 3 smokestack discs with round cutters, plus the two cradle strips and the front plate. Pull away the scraps and slide the parchment onto a pan.
Why this matters: cutting on the parchment means you never lift a piece with a window in it.
4.Cut the cars and every wheel
From the other discs and the re-rolled scraps, cut the coal car, boxcar and caboose: a deck, two rails, two sides and two ends each, plus the boxcar and caboose roofs and the five cupola pieces. Cut the caboose and cupola windows, and only mark the boxcar door and caboose end doors with a toothpick. Finish with 12 car wheels.
Why this matters: a marked door gets piped later, while a cut door would weaken a short wall.
5.Bake the big pieces and the small rounds on separate pans
Bake at 300 degrees F. Put the decks, walls and roofs on one or two pans, and every disc, wheel and strip on a pan of their own. Start checking the big pieces at about 15 minutes and the small rounds at about 10. They are done when the surface looks matte and the edges feel firm.
Check as you go: these pieces are all much smaller than house walls, so they finish well before the 22 to 30 minutes on our dough recipe. Pull any piece that starts to darken at the edges.
6.Trim every piece while it is warm
Within two minutes of each pan coming out, lay the paper piece back on top and trim any edge that spread. Check the rails and the wall heights most carefully. Leave everything on the pan until it is cool.
Why this matters: warm gingerbread trims cleanly, and a rail that is taller than its partner tips the whole car.
7.Stack the boiler and the smokestack
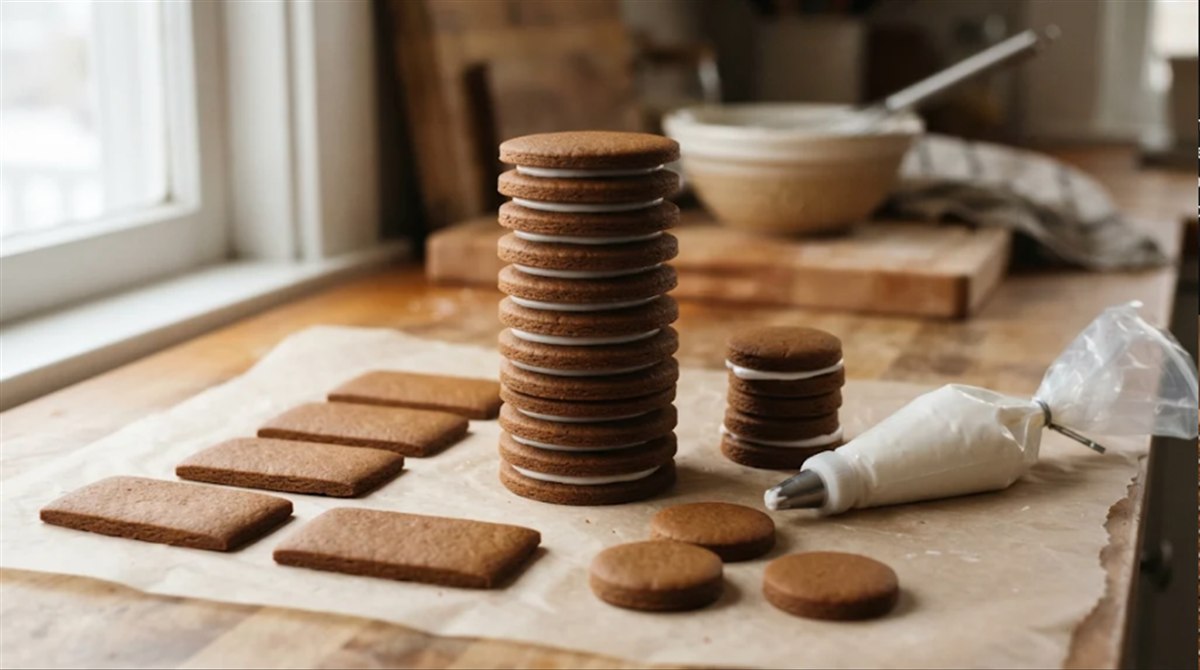
Smear a thin layer of thick icing on a boiler disc, press the next one on top, and keep going until the stack measures 2 1/2 inches. Depending on how much your discs rose, that may take 9 discs instead of 10, which is why the template gives you a spare. Stack the three smokestack discs the same way. Leave both standing on parchment overnight.
Why this matters: a boiler longer than 2 1/2 inches pokes past the front of the deck, and the overnight set turns ten loose discs into one solid log.
8.Decorate the flat pieces
Thin part of the first batch of icing until a knife line through it closes in about 10 seconds. Flood the car sides and ends in your colors, leaving the bottom 1/4 inch bare where they meet the deck. Once the floods look matte, about an hour, pipe the window frames, the boxcar door and the caboose doors with thick icing. Pipe spokes on every wheel and bars on the front plate, and press a candy into each wheel center. Leave everything flat overnight.
Why this matters: piped details stay sharp on a flat piece. Wheels are a perfect job for a child: they are small, they are all the same, and a wobbly spoke still looks like a wheel.
9.Build the four chassis
For each car, pipe thick icing along the bottom edge of both rails and stand them on the board, about 1 1/2 inches apart inside. Pipe icing along their top edges and lay the deck across, so its long edges line up with the outside of the rails. Line the chassis up in a row with about 5/8 inch between decks, the engine at the front. On the engine deck, lay the paper deck on top, prick the cradle lines through it with a toothpick, and ice the two cradle strips along them, starting at the cab guide. Wait 2 hours.
Why this matters: the chassis carries everything above it. Setting all four in place now means nothing has to be moved once the bodies are on.
10.Ice the wheels to the rails
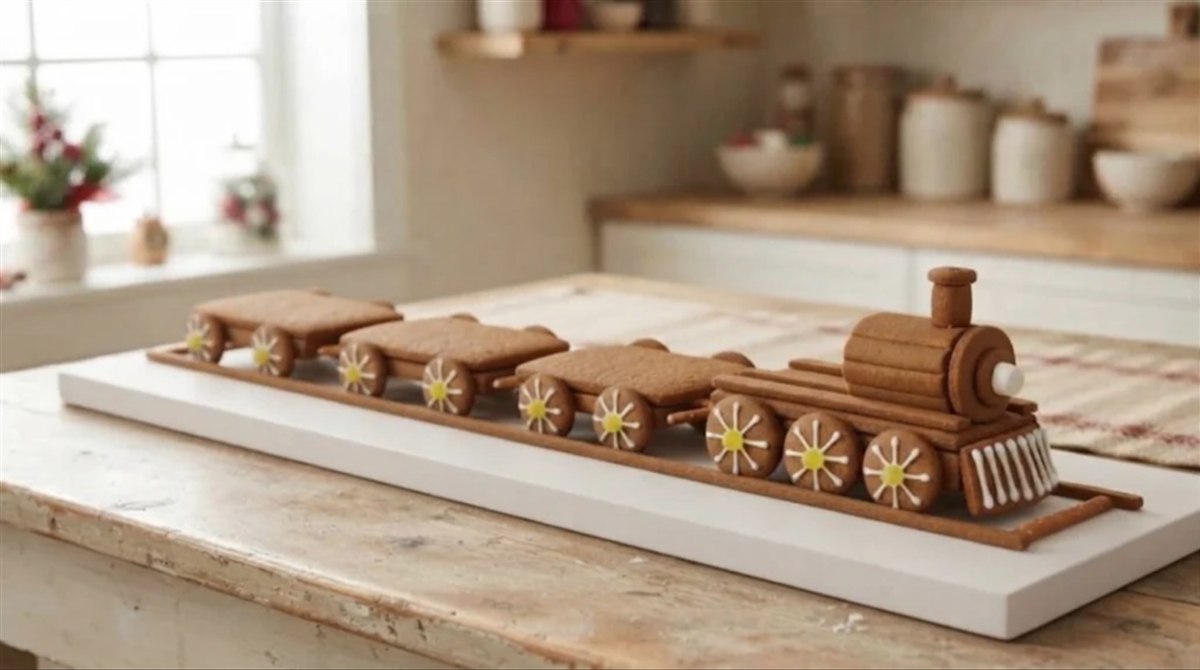
Dab thick icing on the back of each wheel and press it flat to the outside of a rail, centered on the red cross, with its bottom edge just touching the board. Hold each for a few seconds. The engine takes three drive wheels a side, and each car takes two wheels a side.
Why this matters: the wheels only need to stick, not to carry weight, so a light dab is enough and a crooked wheel is easy to pull off and reset.
11.Stand the cab and car walls
On the back of the engine deck, stand the two cab sides along the deck edges and tuck the front and back walls between them, with the front wall’s windows at the top. On each car, stand the two sides along the deck edges and tuck the ends between them. Pipe icing into every inside corner and prop with small cups if anything leans.
Why this matters: tucking the ends between the sides means every body is exactly 2 inches wide, which is the size the roofs were cut for.
12.Lay the boiler in its cradle and add the smokestack
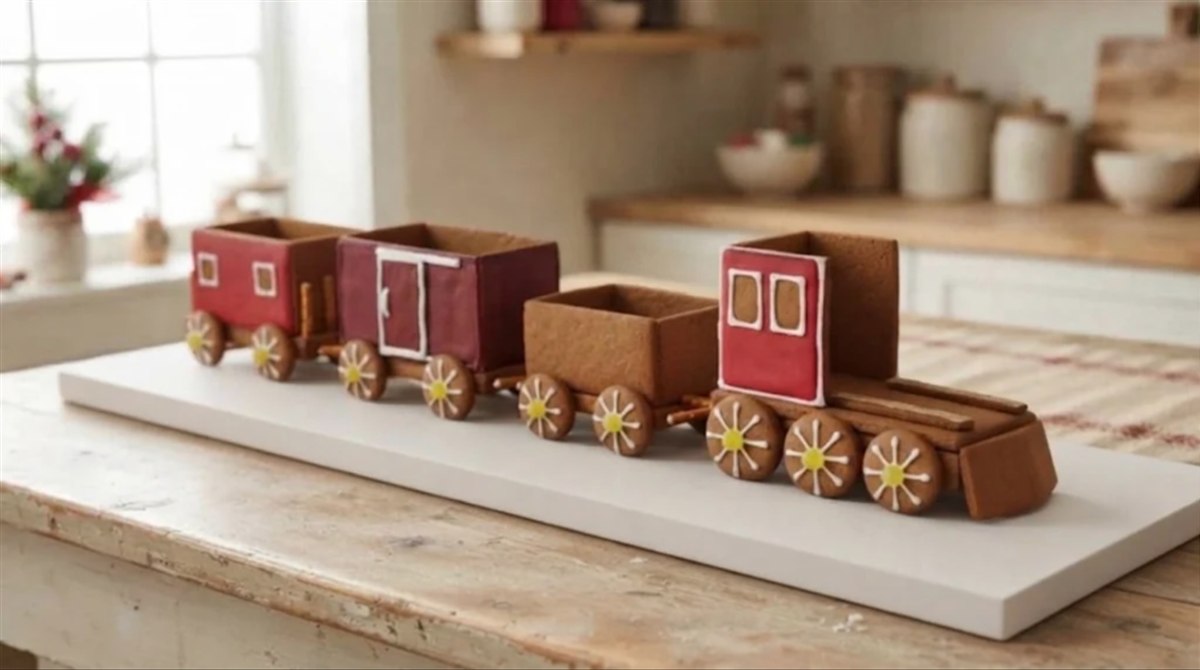
Pipe icing along the cradle strips and the front of the cab. Lay the boiler log on its side in the groove, pushed back against the cab front, so it rests on the strips and the deck. Ice the smokestack on top of the boiler near its front, and press the round mint onto the front face as a headlight. Wait 2 hours.
Why this matters: the boiler is the heaviest piece on the train. Resting it against the cab and in the groove gives it three surfaces to grab, so it cannot roll off.
13.Set the roofs and the front plate
Pipe icing along the top edges of the cab, boxcar and caboose walls and lower each flat roof straight down, so it reaches about 1/4 inch past every wall. The coal car stays open. Ice the front plate across the front ends of the engine rails, under the deck lip. Wait 2 hours.
Why this matters: a flat roof locks four walls square, and the full wait lets the caboose roof carry the cupola.
14.Build the cupola on the caboose roof
Stand the two cupola sides on the guide square in the middle of the caboose roof and tuck the two ends between them. Once they hold, ice the cupola roof on top. Pipe a frame around its little windows to match the caboose.
Why this matters: the cupola is the one detail that says caboose at a glance, and building it on the roof means you never handle a tiny box.
15.Load the coal car and couple the cars
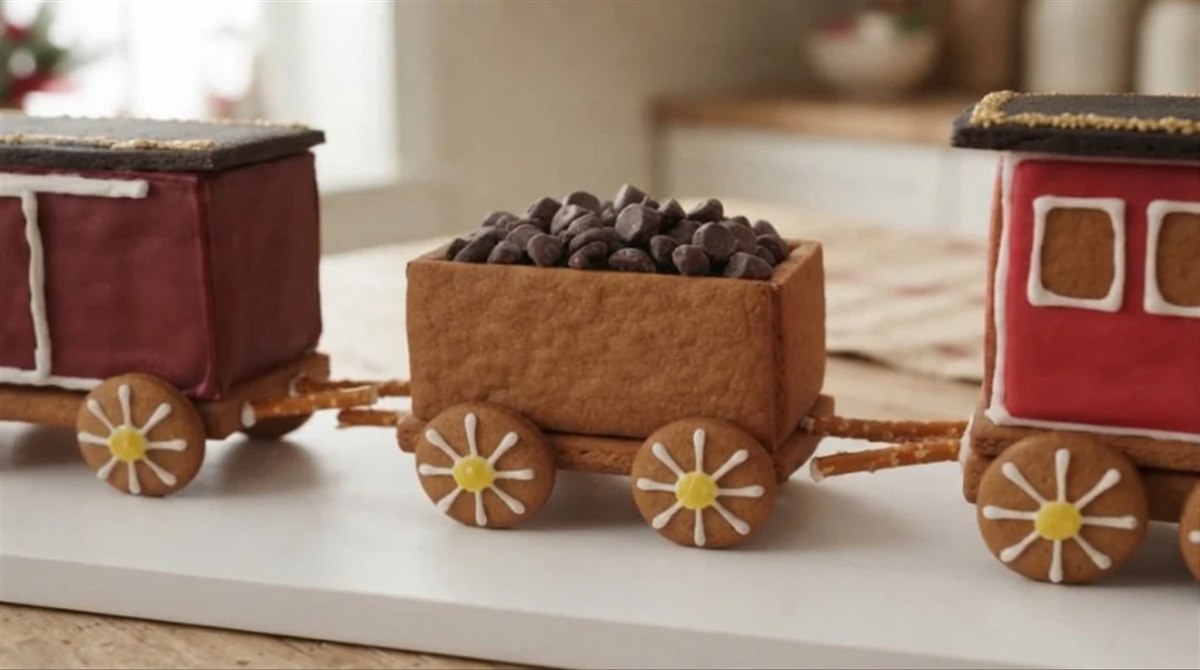
Pipe a little icing into the bottom of the coal car and pile in the chocolate coal until it mounds over the top. Break pretzel sticks to about 1 1/2 inches and ice one across each gap from deck to deck. Add the gumdrop dome behind the smokestack and a mini marshmallow puff on top of the stack.
Why this matters: the couplers make four boxes read as one train. Loading coal is the other job children love, and the icing underneath keeps it from rolling off the board.
16.Lay the track and the snow
Run two licorice laces along the board just outside the wheels, so the train looks like it sits on its track. In front of the engine and behind the caboose, lay pretzel-stick ties across the open board between the laces, where the track runs on. Spread a little thin icing over the rest of the board and press on coconut, or sift powdered sugar over the roofs at the very end.
Why this matters: the track gives the train a reason to be there. Keeping the ties out from under the cars means nothing lifts a rail off the board.
Troubleshooting
| Problem | Why it happens | Fix |
|---|---|---|
| The boiler is too long for the deck | The discs rose, or the icing between them was thick | Leave a disc off the stack. A boiler that sits a little short of the front lip looks right. |
| The boiler rolls | The cradle strips are too far apart, or it went on before they set | Prop it with toothpicks pushed into the deck for an hour, then pull them out. |
| A car leans to one side | One rail came out taller than the other | Trim warm next time. Now, add thicker icing under the short rail and press the deck level. |
| The roof will not reach both walls | The ends were glued outside the sides instead of between them | Pipe a thick line on the short side. Next time, tuck every end between its sides. |
| A wheel slid down | Too much icing, or the wheel was not pressed flat | Pull it off, scrape the icing thin and hold it for 10 seconds. |
| The cupola tips over | It went on before the caboose roof set | Wait the full 2 hours after the roof, and stand the cupola walls before its roof. |
| The circles came out oval | The dough was warm, or the pieces were moved before baking | Chill the cut rounds on the pan for 10 minutes before baking. |
| The coal keeps rolling off | No icing under it | Pipe a bed of icing in the car first, then pile the coal on top. |
Easier Versions: No-Bake and Kit Shortcuts
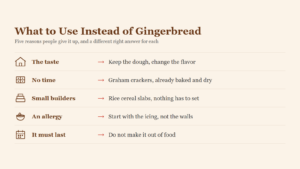
No-bake. Use graham cracker quarters for the car sides and halves for the decks and roofs, glued with royal icing. Stack round cookies, such as vanilla wafers, for the boiler, and use chocolate sandwich cookies for wheels. A no-oven graham cracker house walks through the same icing rules.
Kit shortcut. Several stores sell a small gingerbread train kit each winter, and our look at the cheapest train and house kits lists one we priced. Build the kit as the engine and add one or two cars from this template behind it.
Storage Instructions
Humidity softens gingerbread and makes candy sticky, so keep the train in a cool, dry room away from the stove and sunny windows. Treat it as a decoration once it has stood out for a few days, and if you plan to eat some, make the icing with meringue powder instead of raw egg whites.
FAQ
How do you make a round gingerbread boiler without it cracking?
Do not bend the dough. Stack flat round discs face to face with icing between them, let the stack set overnight, then lay it on its side.
How many cars can I add?
As many as your board allows. Each car is its own chassis, so print an extra copy of a car page and add it behind the others. Each extra coal car adds about 3 3/8 inches with its coupler gap.
Can a child build a gingerbread train?
Yes, with an adult on the cutting and the boiler. Wheels, coal, couplers and snow are all good jobs for children, and none of them can topple the train.
Can I make it bigger?
Yes. Print at 125 percent for a train about 19 inches long, and the test bar will read 1 1/4 inches. You will need a batch and a half of dough to be safe, a board about 24 inches long, and round cutters about 1 7/8 inches for the boiler.
More Gingerbread Builds
A train looks best with somewhere to go. Line it up beside a gingerbread village laid out like one town, or build a few mini houses to set along the track. Browse more gingerbread house ideas sorted by theme, and when something sags, our gingerbread house troubleshooting tips work on any build. For a head start next time, our ranked list of tested kits sorts the good boxes from the wobbly ones.