

A Grinch gingerbread man is a plain gingerbread man in disguise: a green face, a sly grin, a floppy red hat and a red coat with white trim. Most people make one of two versions, a paper craft for the school disguise project or a real cookie iced to match. This guide covers both, from one free template.
The bake times come from our gingerbread man recipe, the icing drying windows from published royal icing guidance, and the safety notes from the FDA and the American Academy of Pediatrics. It is written for parents with a project due tomorrow, teachers running it with a whole class, and anyone baking a tray for a holiday party.
You get four printable sheets, a planner that counts supplies and a clock that tells you when the red can go on. Start with what the finished character has to show at a glance.
What Makes a Gingerbread Man Read as the Grinch
Four cues do almost all the work: a green face, angry eyebrows over a sly grin, a red Santa hat with a white brim, and a red coat with white trim. Get those four right and anyone recognizes the character, whether it is cut from paper or iced on a cookie. Everything else, the belt, the cuffs, the heart, is a bonus.
The grin matters more than people expect. A plain gingerbread man smiles with a gentle curve. This character smirks, so the mouth runs wide and lifts higher on one side, and the eyebrows slant down toward the nose. Leave those two lines out and you have a gingerbread man in a Santa suit, which is a different character entirely.
| Cue | Paper version | Cookie version |
|---|---|---|
| Green face | Green crayon, or the face piece cut from green cardstock | The whole cookie flooded in green icing |
| Eyebrows and grin | Black marker lines, printed on the face piece to trace | Stiff black or dark icing, piped on dry green |
| Red hat with white brim | Hat, brim and pompom pieces | Piped red icing, or a fondant hat cut with the stencil |
| Red coat, white trim | Coat, trim, hem and cuffs | Piped red coat, white trim piped last |
| The heart | Three paper hearts in growing sizes | Red candy hearts or three piped hearts |
Paper or Cookie: Pick the Version That Fits Your Evening
Pick paper if it is due tomorrow or you are making more than a handful, and pick the cookie if you have two days and an oven. The cookie needs an overnight dry between the green and the red, and that wait is the part people do not plan for.
| Version | Time | Best for | What you need |
|---|---|---|---|
| Paper: color, cut and done | 10 to 25 minutes | Ages 3 to 5, a class with one short session | One printed sheet, crayons, scissors |
| Paper: cut and glue costume | 20 to 50 minutes | Ages 6 and up, the school disguise project | Two printed sheets, glue stick, markers |
| Cookie: decorated gingerbread | Two days, about 2 hours hands on | Parties, gifts, older kids with an adult | Dough, icing, gel color, a 5 inch cutter |
If your deadline is tonight, go straight to the one-page coloring sheet. If the letter from school says the disguise has to be glued on and brought back by Friday, use the cut and glue sheets. And if the cookies are for a party on Saturday, start them on Thursday. The planner below does the counting for you.
Grinch Gingerbread Man Planner
Pick the version and how many you are making. The planner tells you which template sheets to print, how many copies, what to gather and how long it takes.
Cookie amounts are estimates from our gingerbread man recipe, which makes about 20 cookies with a 3.5 inch cutter, and our cookie icing, which covers about 24 standard cookies. A 5 inch man has about twice the surface. For planning only; amounts and times vary with your kitchen and your helpers. Nothing you enter leaves this browser, and your last choices are saved only in this browser’s local storage.
The Free Grinch Gingerbread Man Template, No Email Needed
The template is four printable sheets, each in US Letter and A4, and every link below opens the PDF directly. There is no sign-up form. That matters on this topic: the most popular template for this craft sits behind an email form, and its comment section is full of people asking for the file to be sent to them.
All four sheets are original artwork drawn for this page, in the spirit of the character rather than copied from any book or film. Print at Actual Size or 100%, not Fit to Page, then measure the 1 inch bar at the bottom before you cut anything.
Picture a kindergarten teacher at the copier at 7:40 in the morning with 24 children arriving at 8. Printing the coloring sheet at Fit to Page shrinks every man by a few percent, which does not matter for coloring. But if the costume sheet shrinks and the gingerbread man sheet does not, every coat comes out too small for its man. The 1 inch bar catches it on the first copy instead of the twenty-fourth.
1. Color, Cut and Done
One page with the costume already drawn on a 7 inch gingerbread man. Color, cut around the outside and you are finished. No glue, no small pieces. Download: US Letter PDF · A4 PDF

2. The Gingerbread Man
A blank 8 inch gingerbread man with wide arms, because the arms are the part that tears. Print it on tan or brown cardstock, or color it brown. If you need a different size, there are 15 more gingerbread man templates to print. Download: US Letter PDF · A4 PDF
3. Costume Pieces
Thirteen pieces sized to fit the 8 inch man exactly: face, hat, brim, pompom, coat, coat trim, hem, belt, two cuffs and three hearts. Each piece is labeled with its color. Download: US Letter PDF · A4 PDF

4. Cookie Stencils
The same hat, face, coat and hearts, scaled for a 5 inch cookie, plus a dashed 5 inch outline to check against your cutter. Cut the paper pieces out and use them to cut fondant or modeling chocolate. Download: US Letter PDF · A4 PDF
That last sheet is the reason the template comes as one set. The costume you glue onto paper is the same costume you lay on a cookie, so a family can make the paper version while the cookies cool and end up with a matching pair.
How to Make the Paper Grinch Gingerbread Man
Print the gingerbread man and the costume pieces, color everything before you cut, then glue the costume on from the bottom layer up. The whole job takes 30 to 40 minutes for a six to eight year old, and the order below keeps every piece where it belongs.
1. Print Both Sheets at Actual Size
Print the gingerbread man and the costume pieces, then hold a ruler to the 1 inch bar. Why this matters: if one sheet prints smaller than the other, the costume will not fit the man and nothing lines up.
2. Color Before You Cut
Face green, hat and coat red, belt black, trim and brim left white. Why this matters: coloring a big sheet is easy, coloring a pompom the size of a coin is not, and small hands push crayons off the edge.
3. Cut the Big Pieces First
Cut the man, then the coat, hat and face, and leave the cuffs, pompom and hearts until last. Why this matters: the small pieces are the ones that go missing, so cut them right before they get glued.
4. Glue From the Bottom Layer Up
Coat first, then belt, hem, trim and the two cuffs. Use a glue stick, not liquid glue. Why this matters: each piece overlaps the one before it, and liquid glue soaks thin paper until it wrinkles, where a glue stick wrinkles it far less.

5. Add the Face and Hat
Glue the face over the head, then the hat, brim and pompom on top. Why this matters: the brim covers the seam where the hat meets the face, which hides any wobbly cutting.
6. Draw the Grin
Trace the eyebrows and grin printed on the face piece with a black marker. Press harder on the inner ends of the eyebrows so they look angry. Why this matters: the grin and eyebrows carry the character, and a light line disappears against green.
Picture a parent at the kitchen table at 8 on a Wednesday night, letter from school in one hand, a seven year old who wants to do it all alone. Printing both sheets on plain paper, the child colors while the parent cuts the cuffs and pompom, and the glue order keeps the pieces from turning into a pile. By 8:40 he is done and drying on the fridge.
The Three-Sizes Heart
In the story, the character’s heart grows three sizes in one day, and that is the finishing touch most versions of this craft leave out. The template includes three red hearts in growing sizes. Glue the smallest on the chest first, then the medium one over it, then the largest, so the heart looks like it is growing.

On a cookie, do the same thing with candy or icing. Press three red candy hearts of different sizes into the wet green, or pipe three hearts in a row from small to large once the green is dry. It turns the decoration into the ending of the story, which is the part kids remember.
If a toddler sibling will be eating these, use piped hearts instead of candy. The American Academy of Pediatrics’ choking guidance lists hard candy among the foods to keep from children until 4 years of age or older, depending on the child.
How to Decorate a Grinch Gingerbread Man Cookie
Bake 5 inch gingerbread men, flood them green, let the green dry overnight, then pipe the red hat and coat on day two. The overnight wait is not optional. Red icing bleeds into wet green and leaves a pink halo, and it shows up after you have gone to bed.
1. Bake Sturdy 5 Inch Men
Use our gingerbread man recipe and roll the dough to 5/16 inch, because a 5 inch man has legs long enough to break under their own weight. Bake 13 to 15 minutes at 350F and let them rest on the pan 7 minutes before moving them. One batch makes about 20 cookies with a 3.5 inch cutter, so expect roughly 8 at 5 inches. Why this matters: a thin 5 inch cookie snaps at the neck the moment you pick it up to ice it.
2. Mix the Green the Day Before
Use gel color, not liquid, and mix a shade lighter than you want. Royal icing color deepens as it rests, so the bowl you mix tonight will be darker by morning. Why this matters: a perfect green at 9pm can look almost bottle green by breakfast. Our Grinch gingerbread house guide walks through the three greens and what goes wrong with each.
A deep green takes a lot of color, and many green food colors combine Yellow No. 5 with a blue. The FDA’s color additive guidance says most children have no adverse effects from approved colors but some may be sensitive to them. If you are baking for a class, a lighter grass green uses far less.
3. Flood the Whole Cookie Green
Outline the edge, then flood the inside with icing thinned until a ribbon sinks back into the surface in about 10 to 15 seconds, the consistency decorators call 10-second icing. The icing for gingerbread cookies page has both consistencies and how to reach them. If you are using candy hearts, press them in now, within about 15 minutes, because the surface starts to crust within 15 to 30 minutes. Why this matters: candy cannot bleed, so it is the one red that can go on wet green.
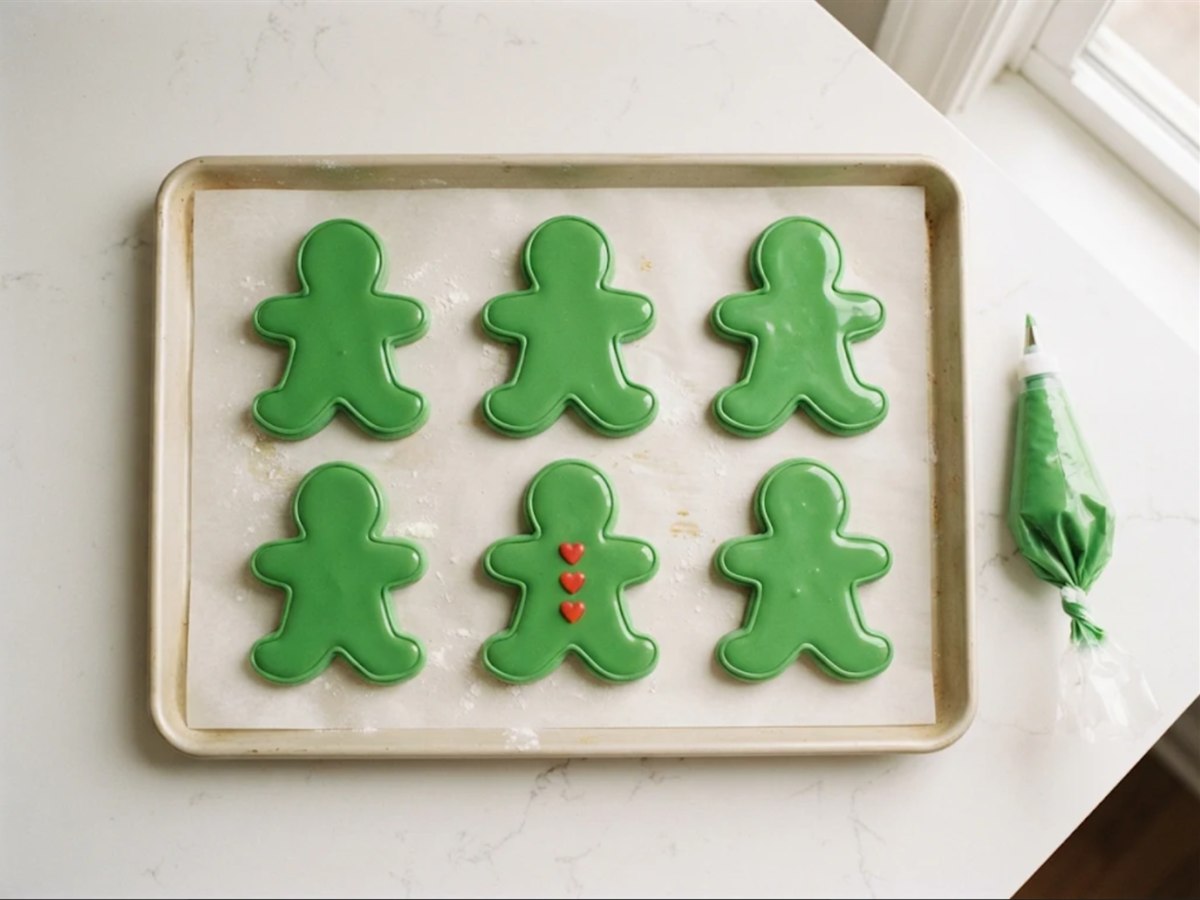
4. Let It Dry Overnight
A flooded layer needs 8 to 12 hours, and longer in damp weather. Leave the cookies uncovered on a flat tray. Why this matters: this is the step that stops the red from bleeding, and there is no shortcut that works as well.

5. Pipe the Hat, Coat and Face
On day two, pipe the red hat and coat with stiff icing, then the white brim, trim and pompom, then the eyebrows and grin. Keep the eyes halfway down the head so the face reads correctly. Why this matters: dark lines on dry green stay sharp, and white piped last sits on top of the red instead of turning pink.
6. Or Cut a Fondant Hat With the Stencil
Roll red fondant or modeling chocolate thin, lay the paper hat stencil on it and trace around it with a small sharp knife. Stick it on with a dab of icing. Why this matters: a fondant hat skips the most fiddly piping on the cookie and stands slightly proud of the icing.

7. Wait Before You Stack
Thin piped details set in an hour or two but stay soft underneath for longer, so give them at least 2 hours, or up to 8 in humid weather, before stacking or bagging. Why this matters: a thin layer that feels dry on top can still smear when another cookie sits on it.
The clock below works out the earliest time for each layer from the moment you flood the green.
Grinch Cookie Layer Clock
Red bleeds into wet green. Enter the time you flood the green faces and this works out the earliest clock time for every layer after it. Tick each one off as you go; it remembers where you got to.
Times use the drying windows from our cookie icing guide: a flooded layer overnight, 8 to 12 hours, and a thin piped layer about 2 hours, longer in damp weather. A guide, not a guarantee: thick floods and humid kitchens take longer, so touch-test before piping. Nothing you enter leaves this browser; your ticks are saved only in this browser’s local storage.
Say you are making two dozen for a class party on Friday afternoon. You bake on Wednesday evening and flood the green by 9pm. The clock puts the red details at 5am Thursday at the earliest, so you pipe them Thursday after dinner, they are safe to stack by bedtime, and they travel to school Friday morning without a single pink halo.
Grinch Gingerbread Man for a Classroom or a Preschooler
The craft works for anyone who can hold a crayon, but a full class and a three year old need different setups. Before you pick, decide how much cutting the children will do and how much time you have.
For teachers running it with a whole class
On the most popular Grinch gingerbread man craft online, one of the commenters asking for the template wanted it to use with their classroom, and printable versions of this craft are sold for classroom use. For a class, print the one-page coloring sheet for everyone and keep the cut and glue version as an early-finisher extension. One sheet per child means no small pieces to sort, and the planner above counts glue sticks at one per four children.
For preschoolers still learning to cut
A popular pin presents this exact craft as Christmas scissor skills practice, and that is the right way to think about it for ages 3 to 5. Let them cut the big, gentle curves of the coat and the man, and cut the cuffs, pompom and hearts for them ahead of time. The pieces that tear are the small ones, and a torn cuff ends the fun faster than anything.
When a Grinch Gingerbread Man Goes Wrong
| Problem | Why it happens | Fix |
|---|---|---|
| The costume does not fit the man | The sheet printed at Fit to Page | Reprint at Actual Size and check the 1 inch bar |
| Paper arms tear when cutting | Scissors turned into the narrow neck or armpit | Cut toward the body from the hand, and leave a little extra paper |
| Paper wrinkles under the glue | Liquid glue soaks thin paper | Use a glue stick, or print on cardstock |
| Pink halo around the red icing | Red piped onto wet green | Dry the green overnight first, or switch to red candy |
| The green came out darker than planned | Icing color deepens as it rests | Mix a shade lighter the day before, then judge it after it rests |
| Green hands and green mouths | Deep green takes a lot of gel color | Use a lighter grass green for young children |
| Cookie snapped at the neck | Dough rolled too thin for a 5 inch cutter | Roll to 5/16 inch and rest 7 minutes on the pan |
Grinch Gingerbread Man Questions
Is there a free Grinch gingerbread man template?
Yes. The four sheets on this page are free to print for personal, classroom and library use, with no email sign-up, in US Letter and A4.
Can you disguise a gingerbread man as the Grinch for school?
Yes, and it is one of the most popular choices for the school disguise project. Use the cut and glue sheets so the disguise sits on top of the gingerbread man, which is what most project letters ask for.
What colors do you need?
Green for the face, red for the hat and coat, white for the trim, brim and pompom, and black for the belt, eyebrows and grin.
How long do Grinch gingerbread cookies take?
Plan on two days. Bake and flood the green on day one, let it dry overnight, then pipe the red and white details on day two and allow about 2 more hours before stacking.
How do you keep red icing from bleeding into green?
Let the green dry completely, 8 to 12 hours, before any red touches it. If you cannot wait, use red candy for the hearts and hat details, because candy cannot bleed.
Give Him a House With Best Gingerbread Houses
A Grinch gingerbread man looks best standing next to something to steal from, and a house to go with him is a weekend project, not a week. Whether you build from scratch or start from a box, our guide to kits that actually stay standing rates each kit on how well it holds together, so you can spend the time on the decorating.