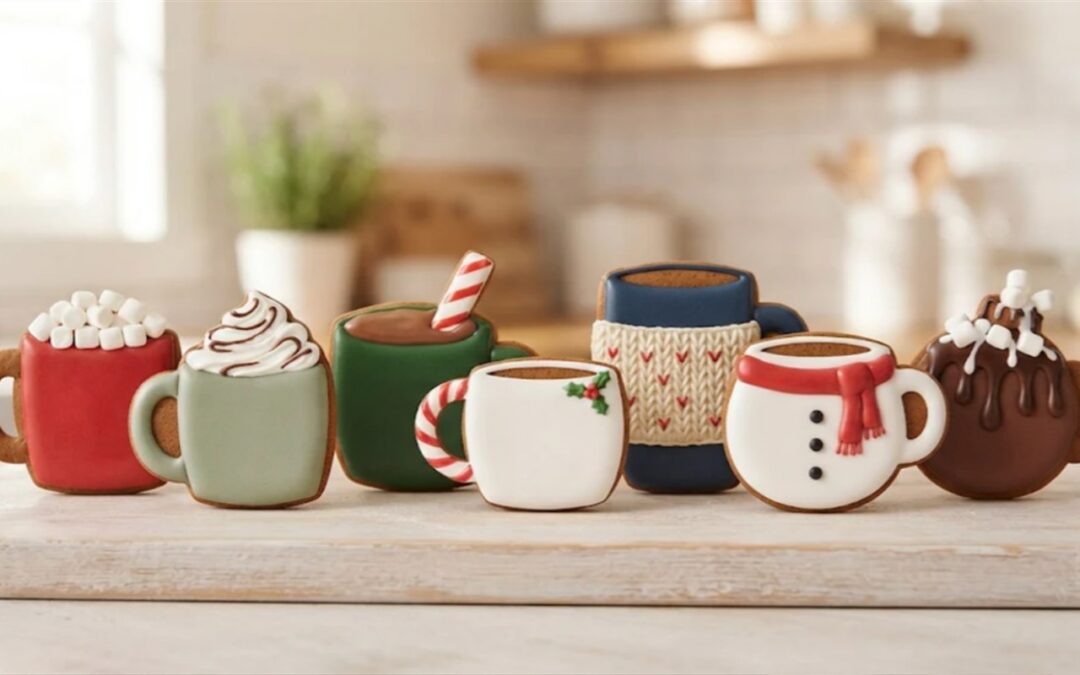
Hot chocolate mug cookies look like the best part of a snow day: a mug piled so high with marshmallows that you can barely see the cocoa. Set one on a plate and people reach for it as if it were warm.
This set uses one free printable template with six shapes, a cut-out dough that bakes flat enough to keep a handle in one piece and the royal icing cure times from our icing pages. It is written for anyone hosting a cocoa bar, baking for a cookie exchange, or filling a tin for a teacher who lives on hot chocolate.
You get an icing palette, three steps for each design, a picker and a party batch planner. Start with the recipe card, then the shapes.
Hot Chocolate Mug Gingerbread Cookies
Makes about 35 cookies, 2 1/4 to 2 3/4 inch mugs and cocoa bombs · Prep 30 minutes · Bake 11 minutes · Chill and freeze 2 hours 30 minutes · Icing cure overnight, 8 hours
Total time about 11 hours, most of it hands off. The overnight cure is what lets you stack them in a tin.
Equipment: Stand or hand mixer, Rolling pin with 1/4 inch guides, The free template and a small paring knife, Two light-colored half sheet pans, Parchment paper, Piping bags with small round tips.
Template: free 1-page PDF, US Letter, a topped mug, a peppermint stick mug, a wide mug, a tall mug, a round mug and a melting cocoa bomb, with piping guides and a 1 inch test bar.
Ingredients
Dough
- 3 cups all-purpose flour, 360 g, spooned and levelled
- 1 teaspoon baking soda
- 1/2 teaspoon salt
- 1 tablespoon ground ginger
- 1 1/2 teaspoons ground cinnamon
- 1/2 teaspoon ground cloves
- 1/4 teaspoon ground nutmeg
- 3/4 cup unsalted butter, 170 g, softened but still cool
- 3/4 cup dark brown sugar, packed, 150 g
- 1/2 cup unsulphured molasses, 170 g
- 1 large egg
- 1 teaspoon vanilla extract
Royal icing, a double batch
- 1/4 cup meringue powder
- 1/2 cup cold water, plus a few drops more for flooding
- 1/2 teaspoon cream of tartar
- 4 cups confectioners sugar, unsifted, 454 g
- Gel food coloring in the shades from the palette chart
- For the no-bake mugs: graham cracker squares, red frosting, mini pretzel twists and mini marshmallows, optional
Method
- Make the dough: whisk the flour, soda, salt and spices, cream the butter and brown sugar until lighter in color, beat in the molasses, egg and vanilla, then mix in the dry ingredients on low and stop the moment no dry flour remains.
- Chill the dough as two flat wrapped discs about an inch thick for 2 hours, until a pressed thumb leaves a clean dent rather than a smear.
- Roll each disc to 1/4 inch between two sheets of parchment, so the dough never picks up extra flour.
- Cut the six mug and cocoa bomb shapes round the template with a paring knife held upright, cutting the handles and the peppermint stick last.
- Freeze the cut shapes on the parchment-lined pan for 30 minutes, until the handles and the peppermint stick feel hard and lift without bending.
- Bake at 350F for 9 to 11 minutes straight from the freezer, until the surface looks matte and the edges are set, then cool completely on the pan.
- Mix the icing to stiff peaks, keep a generous bowl of white, and tint the rest into the colors your designs need from the palette chart.
- Flood the base colors, leave the cookies flat overnight until the flood does not dent under a fingertip, then pipe the stripes, stitches, drizzles and buttons and give them about 2 hours before stacking.
Notes: times are worked out from the set times on our icing pages, not timed on a build, and ovens vary, so judge by the surface rather than the clock. The yield is an estimate: the dough weighs about 900 g, which rolls to roughly 180 square inches at 1/4 inch, about 160 after re-rolled scraps, and the six shapes average 4.3 square inches. Bake one test tray before you shop for a big party. Dough adapted from King Arthur Baking gingerbread cut-outs.
What Makes a Cookie Read as a Cocoa Mug
A mug on its own is just a mug. The toppings and trimmings say hot chocolate, so each shape leaves room for one of them.
| Detail | Why it says hot chocolate | What the template does with it |
|---|---|---|
| A heap above the rim | Marshmallows and whipped cream are the toppings everyone pictures | A bumpy heap baked onto the topped mug, with a rim line under it |
| A peppermint stick | A stirring stick turns plain cocoa into a Christmas drink | A stick that stands up out of the mug, wide enough to bake without snapping |
| A striped handle | Red and white stripes read as candy cane from across a room | A wide mug with a big handle and five short stripe guides |
| A knitted sleeve | Cocoa is a cold weather drink, and a sweater says cold weather | A tall mug with two guides for a sleeve band |
| A scarf and buttons | A snowman, told without a face | A round belly mug with a scarf band, a scarf tail and three button circles |
| Melting chocolate | Cocoa bombs are the newest way to make a mug | A ball with three drips, a crack line and two drizzle guides |
A few real facts make good talking points at a cocoa bar. Hot cocoa is made from cocoa powder, while hot chocolate is made from bar chocolate. Whipped cream and marshmallows are frequently added on top. So the mugs in this set are technically hot cocoa mugs, and nobody will mind.
The word marshmallow comes from the marsh mallow plant, which grows in wet, marshy ground, and by the early 1900s marshmallows had become a popular garnish for hot chocolate.
The candy cane is younger than its legend. A popular story says a choirmaster handed out the first canes in 1670, but that story is likely made up, and the earliest written mention of a candy cane comes from 1866. A cocoa bomb is newer still: a hollow chocolate ball filled with cocoa mix and marshmallows that opens up when hot milk is poured over it. The cookie version just melts on purpose.
One Template, 6 Mug Shapes
Every baked design starts as one of six cookies on a single page. The mugs are about 2 to 2 3/4 inches tall and the cocoa bomb about 2 1/4 inches across, a good size for a favor bag or a cookie tin.
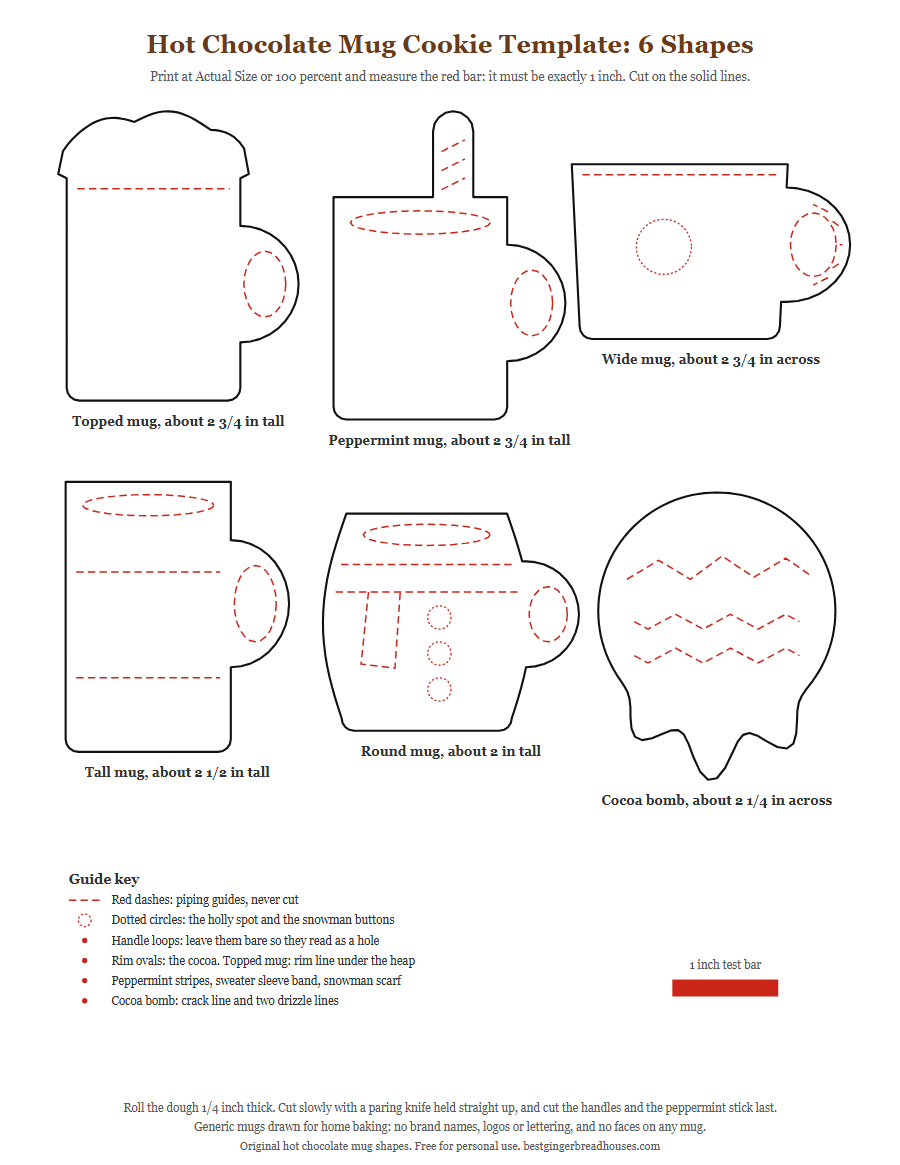
The free template prints on one US Letter page at 100 percent. Measure the red bar first: if it is not exactly 1 inch, your printer scaled the page.
The red dashed lines are piping guides, not cut lines: rim ovals for the cocoa, stripes, the sleeve band, the scarf and the cocoa bomb drizzle. Dotted circles mark the holly spot and the snowman buttons.
Every handle is solid, not a ring. A ring of dough that thin breaks in the oven or in a favor bag, so the template draws a loop guide inside each handle instead. Leave that loop bare when you flood and it reads as a hole.
A script checked the parts most likely to snap. Every handle is close to an inch tall or more where it meets the loop, the peppermint stick is 0.38 inches wide, the middle drip on the cocoa bomb is 0.31 inches across near its tip, and every guide sits inside its cut line.
Icing Palette for All 8 Designs
Each row lists the colors one design needs and what each covers, so you can pick the mugs you want and mix only those bowls. Gel brands vary, so tint a spoonful and test it on a scrap cookie first.
| Design | Shape | Colors and what they cover | Difficulty |
|---|---|---|---|
| The Marshmallow Pile Mug | Topped mug template | cranberry red for the mug; marshmallow white for the marshmallow heap; soft shadow gray for the marshmallow edges | Medium |
| The Whipped Cream Mug with a Drizzle | Topped mug template | sage green for the mug; cream white for the whipped cream; chocolate brown for the drizzle | Medium |
| The Peppermint Stick Mug | Peppermint mug template | forest green for the mug; cocoa brown for the cocoa in the rim oval; snow white for the peppermint stick; candy red for the stick stripes | Hard |
| The Candy Cane Handle Mug | Wide mug template | snow white for the mug and handle; candy red for the handle stripes, rim and berries; holly green for the leaves | Easy |
| The Cozy Sweater Mug | Tall mug template | navy blue for the mug; oatmeal cream for the knitted sleeve; cranberry red for the knit stitches; cocoa brown for the cocoa in the rim oval | Hard |
| The Snowman Mug | Round mug template | snow white for the mug; cocoa brown for the cocoa in the rim oval; cranberry red for the scarf; coal black for the buttons | Medium |
| The Melting Cocoa Bomb | Cocoa bomb template | dark chocolate for the ball and drips; milk chocolate for the drizzle and crack; marshmallow white for the marshmallows spilling out | Easy |
| No-Bake Cocoa Mug Cookies for Little Kids | Store-bought graham crackers | red for the frosting; white for the mini marshmallows; pretzel brown for the handle | Easy |
Cranberry red, cocoa brown and snow white each cover three designs, so mix those first. All seven baked designs need 16 bowls, but a candy cane, cocoa bomb and marshmallow plate needs only 8. The picker shows each design’s swatches, steps and difficulty, or picks one from how your cocoa lover takes their mug.
Which Hot Chocolate Mug Cookie Should You Make?
Pick a design to see its icing colors, its three steps and how hard it is. Or say how your cocoa lover takes their mug, filter by skill, or let the button choose.
For ideas only: these palettes are original color choices and gel brands vary in shade, so tint a little and test on a scrap cookie. Nothing you pick leaves your browser.
Difficulty follows one rule. Easy means one flood color and simple piped details on top. Medium means a two-stage flood, where one color has to crust before the next goes on beside it or over it. Hard means three or more flood areas plus fine lines on one cookie.
Ingredient Notes
The dough is a cut-out dough on purpose. It holds a sharp edge and bakes flat. A soft cookie dough puffs, the handle loop closes up and the mug turns into a blob.
Meringue powder, not raw egg whites. Royal icing is never cooked and a cocoa bar sits out for hours, so use meringue powder, dried egg white sold as a pasteurized product. For flood consistency and the full cure table, see how thin flood icing for cookies should be.
Three whites, not one. Snow white for the mugs, a warm marshmallow white for the heap and a cream white for whipped cream. A pinpoint of ivory or yellow gel is all it takes to warm the last two, so a white heap still shows on a white mug.
Cocoa brown needs a little red. Brown gel alone can look flat or green. A drop of red warms it to the color of a real mug of cocoa. Mix the dark chocolate for the cocoa bomb a few hours ahead, the way dark icing deepens as it sits on our Halloween cookies.
How to Make Hot Chocolate Mug Cookies Step by Step
1.Make the dough
Whisk the flour, soda, salt and spices, cream the butter and brown sugar until lighter in color, then beat in the molasses, egg and vanilla. Mix in the dry ingredients on low and stop the moment no dry flour remains, so the dough stays tender.
2.Chill the dough
Chill the dough as two flat wrapped discs about an inch thick for 2 hours. It is ready when a pressed thumb leaves a clean dent rather than a smear.
3.Roll the dough
Roll each disc to 1/4 inch between two sheets of parchment. Keep it even: a thin spot under a handle or the peppermint stick is where a mug breaks.
4.Cut the shapes
Lay the paper shapes on the dough and cut round them with a paring knife held straight up. Cut the handles and the peppermint stick last, then peel the scraps away rather than lifting the cookies.

5.Freeze the shapes
Slide the parchment onto a pan and freeze the cut shapes for 30 minutes. They are ready when the handles and the stick feel hard, which stops the edges rounding off in the oven.
6.Bake at 350F
Bake for 9 to 11 minutes straight from the freezer. The wide mug is the smallest shape and the topped mug the largest, so the wide mugs are often ready a minute sooner; bake similar sizes together, and judge by the surface rather than the clock: matte all over, with edges that are set. Let everything cool completely on the pan.
7.Mix and color the icing
Beat the icing to stiff peaks, set aside a big bowl for the whites, and tint the rest from the palette chart. Thin a spoonful of each base color to flood consistency and keep the rest stiff for details. Mix the browns first so they have time to darken.
8.Flood and pipe the details
Outline and flood the base colors, then leave the cookies flat overnight until the flood does not dent under a fingertip. Pipe the stripes, stitches, drizzles and buttons the next day, and give the details about 2 hours before anything touches them.

Say you are decorating with a seven-year-old who wants marshmallows on everything. Flood the red mugs and the white heaps the night before, then hand over a bag of soft gray for the marshmallow squares and a bag of milk chocolate for the cocoa bomb drizzle. A wobbly square still looks like a marshmallow, because real ones are never quite square.
7 Hot Chocolate Mug Cookie Designs
Each design lists its colors, difficulty and three short steps, plus a no-bake mug for the youngest helpers. The marshmallow pile and the whipped cream mug share the topped mug shape. None of the mugs has a face, the snowman included.
1.The Marshmallow Pile Mug

Colors: cranberry red, marshmallow white, soft shadow gray. Difficulty: Medium.
The cookie everyone reaches for first. The gray squares are what turn a white cloud into marshmallows, so tip a few onto their corners like a real heap.
- Flood the mug cranberry red below the dashed rim line, leaving the handle loop bare, and let it crust for an hour.
- Flood the heap above the rim marshmallow white right down to the red and leave the cookie flat overnight.
- Pipe little squares in soft shadow gray over the white so the heap reads as stacked cubes, with two or three tipped onto a corner.
2.The Whipped Cream Mug with a Drizzle

Colors: sage green, cream white, chocolate brown. Difficulty: Medium.
Same shape, different topping. The toothpick swirl does the work of a piping tip, and the two drips over the rim make it look freshly poured.
- Flood the mug sage green below the dashed rim line, leaving the handle loop bare, and let it crust for an hour.
- Flood the heap cream white, then drag a toothpick through the wet icing in a loose spiral from the edge to the peak, and leave it flat overnight.
- Pipe a thin chocolate brown zigzag across the cream and let two lines run a little way down over the rim like real drips.
3.The Peppermint Stick Mug

Colors: forest green, cocoa brown, snow white, candy red. Difficulty: Hard.
The most Christmas of the set. Lean every stripe the same way and the flat stick reads as a twist.
- Flood the mug forest green below the rim oval and the stick snow white above the rim, keeping a hairline of bare cookie between them, and let both crust for an hour.
- Flood the rim oval cocoa brown right up to the stick and leave the cookie flat overnight.
- Pipe candy red stripes on the slanted guides across the stick, all leaning the same way so they read as a twist.
4.The Candy Cane Handle Mug

Colors: snow white, candy red, holly green. Difficulty: Easy.
The easiest mug and the best first cookie for a new decorator. One flood, then a bag of red does nearly everything.
- Flood the whole mug and handle snow white, leaving the handle loop bare, and leave it flat overnight.
- Pipe candy red stripes on the five short guides across the handle and one red line along the rim.
- Pipe two holly green leaves inside the dotted circle on the front and three candy red dots between them for berries.
5.The Cozy Sweater Mug

Colors: navy blue, oatmeal cream, cranberry red, cocoa brown. Difficulty: Hard.
The slowest to finish and the one people keep. Rows of tiny Vs look like knitting even when every V is a little different.
- Flood the mug navy blue above and below the sleeve band, leaving the band and the handle loop bare, and let it crust for an hour.
- Flood the band between the two guides oatmeal cream and the rim oval cocoa brown, then leave the cookie flat overnight.
- Pipe rows of small cranberry red Vs across the sleeve, like knit stitches, and one cream dot for a button where the sleeve meets the handle.
6.The Snowman Mug

Colors: snow white, cocoa brown, cranberry red, coal black. Difficulty: Medium.
A snowman with no face at all, and nobody misses it. The scarf tail hanging down the side is the detail that sells it.
- Flood the round mug snow white below the rim oval, leaving the handle loop bare, and let it crust for an hour.
- Flood the rim oval cocoa brown, then flood the scarf band and its tail cranberry red right over the white, and leave the cookie flat overnight.
- Pipe a coal black button in each of the three dotted circles and thin snow white stripes across the scarf tail.
7.The Melting Cocoa Bomb

Colors: dark chocolate, milk chocolate, marshmallow white. Difficulty: Easy.
The only cookie in the set that is not a mug, and the one older kids ask for. One dark flood, then everything else is piping.
- Flood the whole ball and its three drips dark chocolate and leave it flat overnight.
- Pipe milk chocolate back and forth along the two wavy guides for the drizzle, and along the jagged guide for the crack.
- Pipe four or five fat marshmallow white dots right on the crack line, so they look like they are tumbling out.
No-Bake Cocoa Mug Cookies for Little Kids

Colors: red, white, pretzel brown. Difficulty: Easy, no oven.
For a table of four-year-olds, or a day the oven is busy. Pressing on the marshmallows is the part every small child wants to do twice.
- Spread a graham cracker square with red frosting right to the edges using the back of a spoon.
- Press half a mini pretzel twist onto one side, so half of it sticks out, for the handle.
- Line the top edge with mini marshmallows, pressing each one into the frosting so it stays put.
Hot Chocolate Mug Cookies for a Party
These cookies land best right next to real cocoa. How to serve them depends on the crowd.
- If it is a cocoa bar, stand a few mugs among the toppings and hand them out with the drinks. Lean on the marshmallow pile and the whipped cream mug, which echo what is in the cups.
- If it is a cookie exchange, pick three designs and bag them in sets, one of each, so every tin gets a mug, a snowman and a cocoa bomb.
- If it is a gift, tie one cookie to a packet of cocoa mix with ribbon. A teacher or a neighbor gets the drink and the joke in one bag.
The planner below does the math for cookies, shapes, batches, colors and days. It works the dough out from the size of each shape, because a topped mug uses over a quarter more dough than a wide mug.
Cocoa Party Cookie Planner
Enter the guests, the cookies each and the party date, then tick the designs. It works out the dough batches from how big each shape is, how many of each to cut, the icing colors and which day each job falls on.
For planning only: the dough per batch figure is an estimate and dough rolls out differently in every kitchen, so bake one test tray before you shop for a big party. The no-bake version is not counted because it uses store-bought cookies. Nothing you enter leaves your browser.
Picture a party for 12 on a Saturday, with the marshmallow pile, the peppermint stick, the candy cane handle and the cocoa bomb ticked. The planner calls for 14 cookies, one batch of dough and one double batch of icing in 10 colors, with 4 marshmallow mugs, 4 peppermint mugs, 3 candy cane mugs and 3 cocoa bombs. Bake and flood on Wednesday, pipe on Thursday, and Friday stays free in case a handle snaps.
Troubleshooting
| Symptom | Cause | Fix |
|---|---|---|
| A handle or the peppermint stick snaps off | Dough rolled thin there, or the cookie lifted by the handle | Roll an even 1/4 inch, freeze before baking, and lift every mug by its body |
| The handle loop fills in with icing | The flood ran into the loop | Outline the loop first with stiff icing, or flood the body and stop a hair short |
| Red bleeds into the white heap | The heap went on before the red crusted | Give the mug an hour to crust, or leave a hairline of bare cookie between the two |
| The white heap disappears on a white mug | Two identical whites side by side | Warm the heap with a pinpoint of ivory, and pipe the gray marshmallow lines |
| Cocoa brown looks green or gray | Brown gel on its own | Add a drop of red and let it sit for a few hours |
| The scarf sinks into the snowman | Flooded onto white that was still soft | Wait for the white to crust for a full hour, or overnight for a crisp edge |
Make-Ahead and Timeline
Plan on three days: bake and flood on day one, pipe details on day two, bag or plate on day three. For a big party, freeze the plain cookies flat in an airtight container and thaw them in it so condensation forms on the outside. For how long decorated cookies stay good to eat, see how long decorated gingerbread keeps once it is iced.
Storage Instructions
Once the icing has cured, store the cookies in a single layer or with parchment between layers, in an airtight tin at room temperature and away from sunlight, which fades cranberry red and navy fast. Keep them away from soft cookies, which pass their moisture to crisp ones.
Keep them away from steam too: a tin left next to a pot of hot cocoa softens the icing in an afternoon. The overnight cure time for royal icing on gingerbread is the schedule to hold to before anything gets stacked.
Frequently Asked Questions
Do hot chocolate mug cookies taste like chocolate?
No, not on their own. They are spiced gingerbread under sweet royal icing, and only the look comes from cocoa.
Can I use sugar cookie dough instead?
Yes. Any cut-out dough that bakes flat works with the template. A plain sugar cookie gives a paler base, which some decorators like under the snow white mugs.
Can I dunk them in real hot chocolate?
You can, though the icing softens fast in a hot drink. Dunk the plain bottom edge and keep the decorated face dry.
How far ahead can I make hot chocolate mug cookies?
Baked, undecorated shapes freeze for up to about 3 months. Decorated cookies keep about two weeks in an airtight tin once cured, so decorating three days ahead leaves plenty of margin.
More Gingerbread Cookie Recipes
- sushi cookies that fool people for two seconds, another look-alike set with its own template
- a nutcracker cookie set for the Christmas tray, built the same way
- gingerbread you can hang on the tree, for mugs that end up on a branch
Pair the Cookies with a Best Gingerbread Houses Kit Pick
When the cocoa party wants something to build too, skip baking walls and start from a gingerbread house kit the whole family can build, then set the mugs out beside it.