
A gingerbread windmill asks two things of you that a cottage never does. The tower has to lean in as it rises, and four long sails have to hang off the front of it without pulling it over. Search for one and you find ornaments, a village figurine and a single gallery photo, but no template and no method.
This build fills that gap. Our house dough and royal icing recipes set every bake temperature and every wait, and a script checked the free template so the six tower faces close and the sails reach the board.
You will end up with a windmill about 11 inches tall from one batch of dough over two days. Start with the template, then why it stands, three looks, a day by day plan and 16 steps.
Gingerbread Windmill: At a Glance
- Difficulty: Intermediate. The tower is a six-sided ring, the cap is a tiny house roof, and the sails go on as one piece.
- Total time: about 2 days, in seven sessions. Most of it is icing drying.
- Active time: about 6 1/2 hours, counting the dough chill and the bake.
- Makes: one windmill with a 6 inch tower, about 11 inches to the top sail tip and about 11 inches across the sails. 20 baked pieces, 6 candy glass windows.
- Template: free 5-page PDF, US Letter, true size with a 1 inch test bar on every page.
Tools: printer, 2 sheets of cardstock, tape, ruler, scissors, a small sharp knife, rolling pin with 1/4 inch guides, parchment, 2 half sheet pans, a zip bag for crushing candy, piping bags with a small round tip, a few cans for propping, a board at least 14 by 12 inches.
Materials
- 1 batch of house dough that bakes flat for tall tower faces
- 2 batches of stiff royal icing that holds a leaning wall
- About 10 clear hard candies such as Jolly Ranchers, in yellow or amber, plus a few spare
- Gel food coloring: red or green for the door, plus your tulip colors for the spring look
- For the spring look, gumdrops or candy-coated chocolates for tulips
- For the night look, a battery micro LED string with a small battery box
Steps
- Print the template at Actual Size and measure the test bar.
- Make the dough and chill it for at least an hour.
- Roll the dough 1/4 inch thick and cut the six tower faces.
- Cut out the six windows before baking.
- Cut the sails, the stage ring, the cap and the small pieces.
- Bake at 300 degrees F, then melt crushed candy into the windows.
- Trim every piece against the template while it is warm.
- Pipe the sail lattice, the door and the window frames flat.
- Build the sails on the hub discs, then leave everything overnight.
- Tape the cardstock faces into the inside former.
- Stand the six tower faces around the former, then wait 2 hours.
- Slide the stage ring down the tower.
- Add the light and set the top plate, then wait 2 hours.
- Build the cap on the top plate, then wait 2 hours.
- Set the sails with the bottom tip on the board, then wait 4 hours.
- Finish the yard and let it stand overnight.
Notes: times are worked out from the set times on our icing page, not timed on a build. Ovens and doughs vary, so treat every bake time here as a starting point: check early, go by the matte surface and firm edge, and bake a test strip with one candy window before you build. Nobody has baked this exact sheet yet, so read the troubleshooting table before you start.
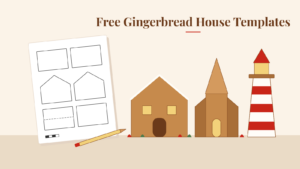
Free Printable Gingerbread Windmill Template
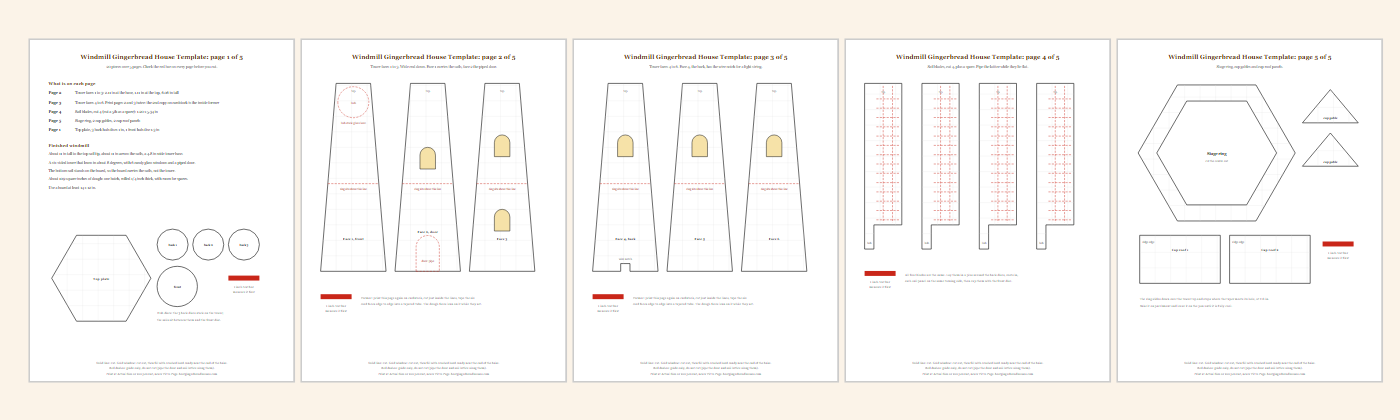
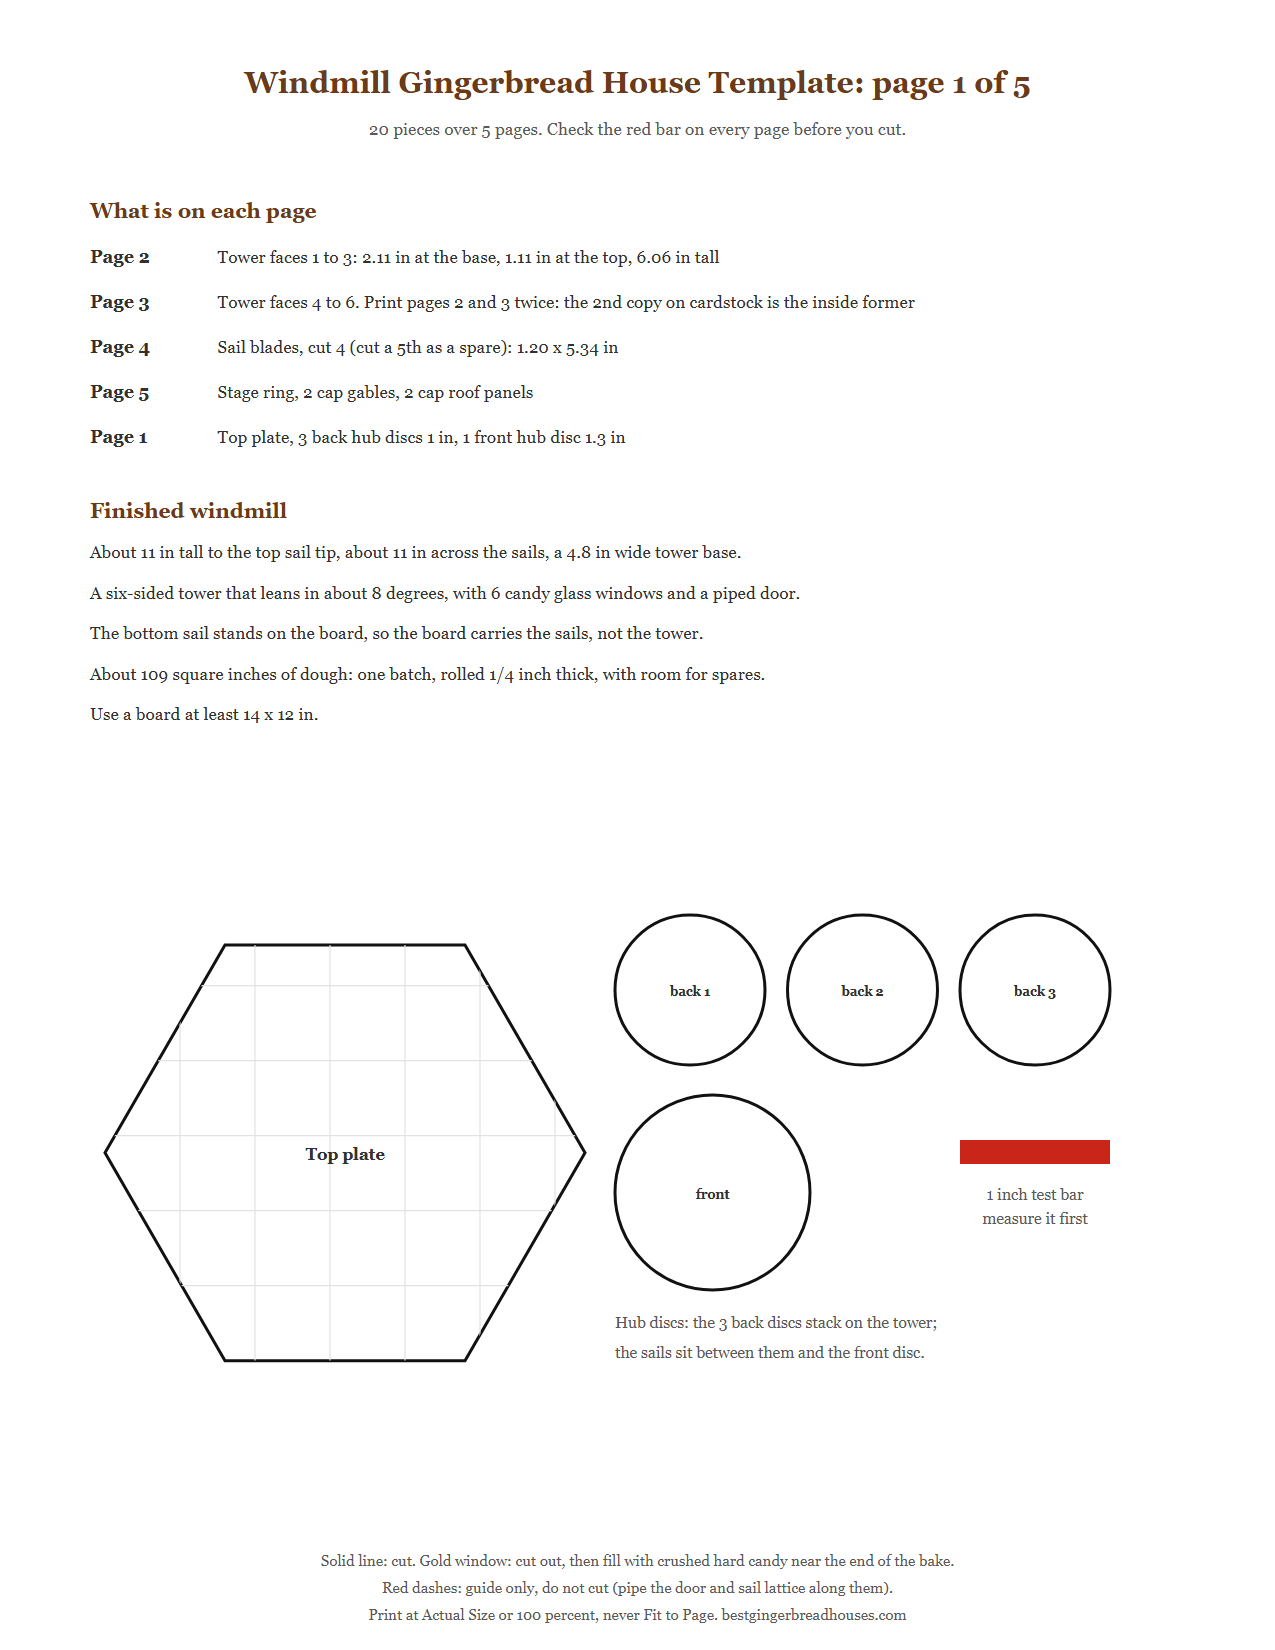
The template is five US Letter pages with every piece at true size over a faint 1/2 inch grid. Download the PDF, print it at Actual Size, and check that the red bar measures 1 inch before you cut anything. Gold shapes are candy glass windows. Red dashes are guides you pipe along or line things up with, never cut.
| Piece | Cut | Size |
|---|---|---|
| Tower faces | 6 | 2.11 in at the base, 1.11 in at the top, 6.06 in tall; windows on five, a piped door on one |
| Sail blades | 4, plus a spare | 1.20 x 5.34 in, a narrow stock with a sail panel on one side |
| Stage ring | 1 | A hexagon with a hexagon hole, 1.93 in sides inside |
| Top plate | 1 | A hexagon with 1.6 in sides |
| Cap gables | 2 | 1.8 in wide, 1.07 in tall |
| Cap roof panels | 2 | 2.6 x 1.55 in |
| Hub discs | 4 | Three 1 in back discs, one 1.3 in front disc |
The pieces come to about 109 square inches. One batch of our house dough covers about 225, so you have room for a test strip and a spare blade. Print pages 2 and 3 a second time on cardstock as well. Those copies become the inside former the tower leans on while it sets.

Why the Bottom Sail Stands on the Board
The sails are what make a windmill, and they are also what knocks most homemade ones over. Glue four long cookies to the front of a tower and every bit of their weight hangs out past the wall, pulling the top forward while the icing is still soft.
Real millwrights had the same problem at full size. Mostert’s Mill in Cape Town explains that tilting the windshaft helped carry the weight of the sails, and that this led to the familiar tower shaped like a cone with its top cut off, probably the work of Dutch millwrights in the sixteenth century. This template borrows both ideas.
The tower leans in. Each of the six faces tilts about 8 degrees toward the middle. As our six-sided gingerbread lighthouse showed, panels that lean in press against each other, so a tapered tower gets tighter under its own weight instead of splaying.
The bottom sail carries the load. The blades are cut just long enough that, with the sails in a plus, the bottom tip rests on the board. The board takes the weight. The tower only has to keep the sails upright, which a stack of hub discs does easily.
The sails lean with the tower. The hub sits on the sloping front face, so the whole sail cross tilts back about 8 degrees, much as the angled windshaft on a real tower mill tips its sails back. Three back discs hold it 3/4 inch out from the face, so the bottom sail clears the balcony on its way down.
The balcony finds its own height. The stage ring’s hole matches the tower at 2.8 inches. Drop it over the top and the taper stops it right there, level, with no measuring.
A paper former holds the lean. Six leaning walls will not stand on their own while the icing is wet. The cardstock copies of the tower faces tape into a tube that is exactly the inside of the tower, so every face has something to rest on.
Say you are building with a nine-year-old who wants to do the sails. Give them the flat jobs: piping the lattice and laying the four blades in a plus on the hub. Those are the parts kids enjoy, and none of them happen on a wet tower. Keep the standing faces for yourself.
Three Gingerbread Windmill Looks
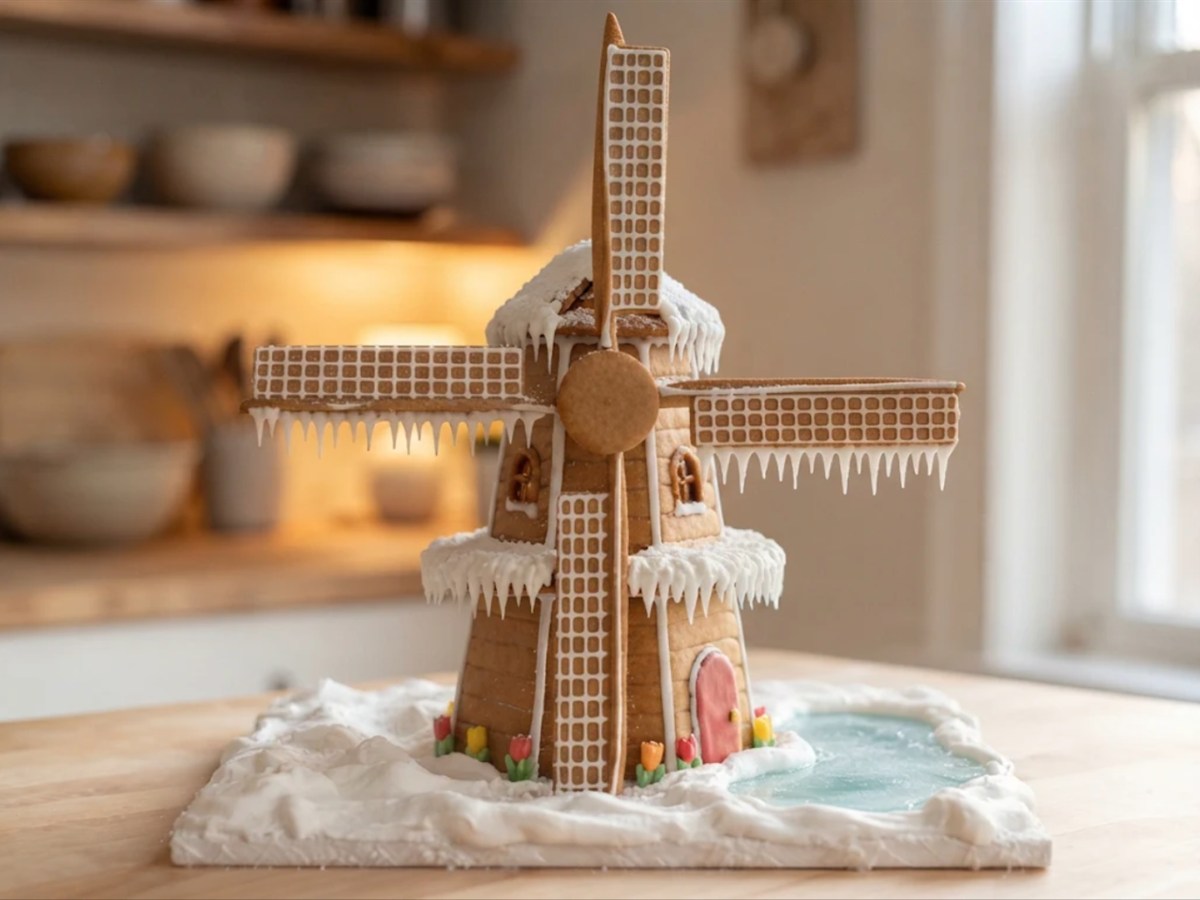
Spring tulip windmill. Leave the tower bare, pipe white plank lines and a white lattice on the sails, and flood the door red. Plant rows of gumdrop or candy-coated chocolate tulips on green piped stems around the base. This is the look that reads as Dutch from across the room.

Snowy winter windmill. Spoon snow onto the cap and the stage ring and let it drip into short icicles. Dust the sails with powdered sugar, cover the board in icing snow and add a frozen pond from melted blue candy. It sits well in a gingerbread village on a winter board, or next to a gingerbread barn and silo for a farm scene.
Glowing night windmill. Fill all six windows with amber candy and coil a warm white LED string inside the tower. On a dark board, the windows glow in a spiral up the tower. Battery lights only: our battery lights for a glowing windmill guide explains why candles and gingerbread do not mix.

What the Sail Position Means
Dutch millers use the sails to send messages. Per this guide to Dutch windmill sail positions, sails standing straight up and down mean a short break, and sails at 45 degrees, an X, mean a long rest. A top sail turned to about one o’clock means joy, and about eleven o’clock means mourning. The code varies a little by region.
This windmill stands in the plus, the short break. That is no accident: it is the only position where one sail points straight down to the board. An X would leave both lower tips hanging in the air, and the tower would be holding all four sails again.
Gingerbread Windmills Real Bakers Have Built
A Bake Off fan’s windmill. The Great British Bake Off gallery shows Matthew Barrell’s gingerbread windmill, made in Cardiff for Christmas 2020. He rated it hard, it took him over 4 hours, and his one tip was to chill the dough before rolling. Ours agrees: step 2 chills it for at least an hour.
The Dutch cookie windmill. In the Netherlands and Belgium, spiced speculaas cookies are pressed into windmill molds for St. Nicholas Day. Palatable Pastime describes the molds as much bigger than the usual cookies and often quite elaborate. Set a few windmill cookies at the foot of the tower and the scene tells its own story.
The coloring page version. Kids who cannot wait two days can start with the four-sailed windmill on our gingerbread windmill coloring page, then choose their colors for the real thing.
How Long It Takes, Day by Day
Plan on seven sessions over two days, about 6 1/2 hours of hands-on work. All the piping happens while the pieces lie flat on day 1, and the sails set overnight as one piece. Pick your finish time and the planner counts back for you.
| When | What you do | Hands-on | Then wait |
|---|---|---|---|
| Day 1, morning | Print, make and chill the dough, cut, bake, melt the candy glass and trim. | About 3 hours | About 30 minutes |
| Day 1, afternoon | Pipe the lattice, door and frames flat. Build the sails on the hub. Tape the former. | 1 hour | Overnight, pieces flat |
| Day 2, early morning | Stand the six tower faces around the former. | 40 minutes | 2 hours |
| Day 2, mid morning | Slide on the ring, add the light, set the top plate. | 25 minutes | 2 hours |
| Day 2, midday | Build the cap. | 25 minutes | 2 hours |
| Day 2, afternoon | Set the sails, bottom tip on the board. | 15 minutes | 4 hours |
| Day 2, evening | Finish the look and the yard. | 40 minutes | Overnight before you move it |
Windmill Build Day Planner
Pick when you want the windmill finished. The planner counts back through every drying time and tells you when to start baking.
For planning only: icing sets faster or slower with the weather, so treat each wait as a minimum and check that joints feel firm before moving on. Not professional baking advice. Nothing you enter leaves your browser.
How to Make a Gingerbread Windmill Step by Step
1.Print the template and measure the test bar
Print all five pages at Actual Size or 100 percent, never Fit to Page, and check that the red bar reads exactly 1 inch. Print pages 2 and 3 again on cardstock.
Why this matters: a template printed small shortens the blades, and the bottom sail no longer reaches the board.
2.Make the dough and chill it
Make one batch of house dough, split it in two, flatten each half into a thick disc, wrap and chill for at least an hour.
Why this matters: cold dough cuts clean, straight tower edges. Warm dough drags, and six faces that are each a little off will not close.
3.Roll and cut the six tower faces
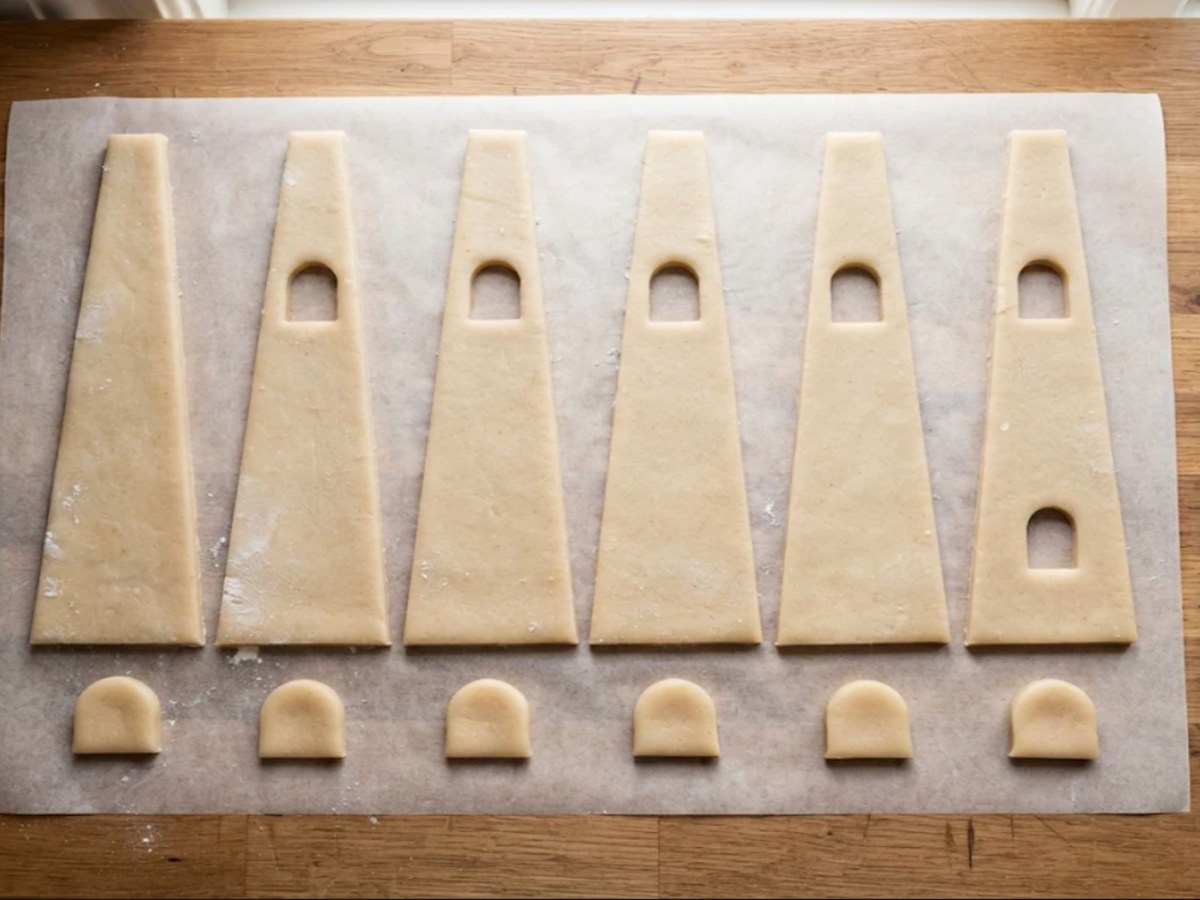
Roll a disc on parchment to an even 1/4 inch between guide strips. Cut all six faces right on the parchment, wide ends down, so you never lift a long piece raw.
Why this matters: every face must match. Cut each long edge in one clean stroke along the paper.

4.Cut out the windows before baking
With a small sharp knife, cut out the six arched windows and the wire notch at the base of face 4. Lift the cutouts away with the knife tip. Trace the door on face 2 with a toothpick, but do not cut it.
Why this matters: windows cut after baking crack the face, and a cut door would weaken the bottom of a wall that leans.
5.Cut the sails, the stage ring, the cap and the small pieces
From the second disc, cut four blades and a spare, the stage ring, the top plate, the two cap gables, the two cap roof panels and the four hub discs. Put the small pieces on their own pan.
Why this matters: the blades are long and narrow. A spare costs a few minutes now and saves the whole build if one snaps.

6.Bake the pieces, then melt in the candy glass
Bake at 300 degrees F. Large pieces take 22 to 30 minutes, until matte with a firm edge. The small pieces finish sooner, so check them early. Pull the pan with the windows about 5 minutes early, fill each opening with crushed candy about two pieces deep, and bake again until the candy has pooled flat and gone glassy.
Check as you go: hard crack, where candy flows, is 300 to 308 degrees F at sea level per Colorado State University Extension, so candy melts slowly at 300. If it is still lumpy after about 10 minutes, raise the oven to 325 degrees F and watch closely. At altitude that target drops by about 2 degrees F for every 1,000 feet, so check sooner.

7.Trim every piece while it is warm
Within two minutes of each pan coming out, lay the paper piece back on the baked one and trim any edge that spread. Leave the ring and the blades on the pan until fully cool.
Why this matters: a face that spread even a little will not meet its neighbors, and a warm blade or ring bends if you move it.
8.Pipe the details while the pieces lie flat
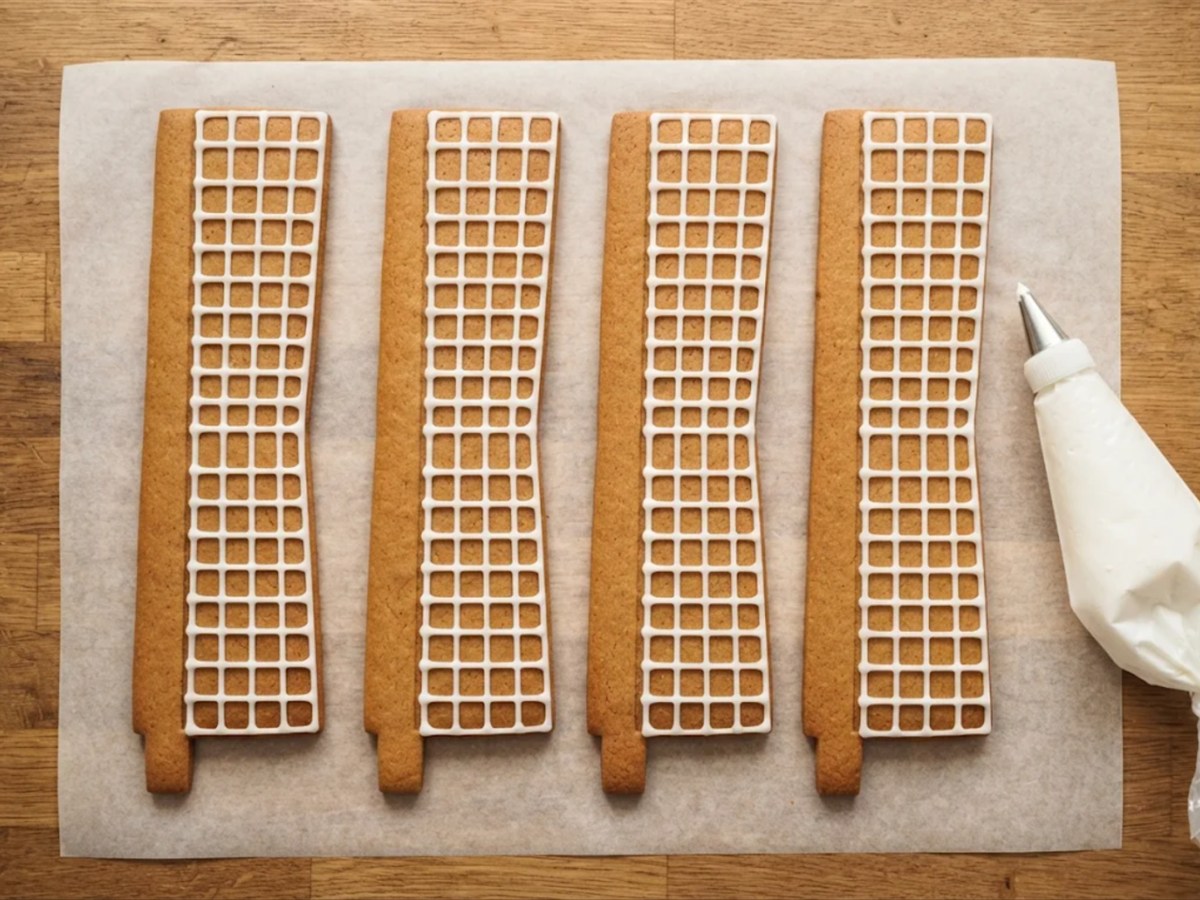
Pipe the lattice on each sail panel along the red guide lines, the door on face 2, a frame around each window, and plank lines if your look has them. Flood the door red or green.
Why this matters: lines piped on a leaning face slide downhill. Flat, they stay put.
9.Build the sails on the hub and leave them overnight
Stack the three back discs with icing between them. Lay the four blades in a plus on top, roots in, every sail panel on the same turning side, and press the front disc over the roots. Leave the sails and every flat piece alone overnight.
Why this matters: built flat, the four blades set as one rigid cross. Tomorrow you lift one piece instead of balancing four.
10.Tape the cardstock faces into the former
Cut out the six cardstock faces just inside the lines. Tape them edge to edge, wide ends down, into a six-sided tube that leans in like the tower.
Why this matters: the former is exactly the inside of the tower. It gives every wet face something to lean on.
11.Stand the six tower faces around the former
Set the former in the middle of the board, sails side facing front. Pipe a line of icing around its base. Lean face 1 against the front of the former, then add the other five in order, piping each inside edge as it goes up. Pipe a seam down every outside corner and wait 2 hours.
Why this matters: the faces are cut so their inside edges touch and leave a small V outside. Filled with icing, those six seams lock the ring.

12.Slide the stage ring down the tower
Lower the ring over the tower top and let it slide until it stops. Pipe a small bead under it all the way round.
Why this matters: the taper stops the ring at 2.8 inches, level on every side. If it stops higher, a corner seam is too thick; scrape it flat.

13.Add the light and set the top plate
For a lit windmill, switch the LED string on to test it, drop it into the tower and feed the wire out through the notch in face 4. Pipe icing round the tower top and set the top plate flat on it, then wait 2 hours.
Why this matters: once the plate is on you cannot reach inside.
14.Build the cap on the top plate
Stand the two cap gables on the top plate, one over the front and one over the back. Pipe their slopes and set the two roof panels so they meet at the ridge, then wait 2 hours.
Why this matters: the cap is small, but it sits right above the sails. It needs to be hard before you work just below it.

15.Set the sails with the bottom tip on the board
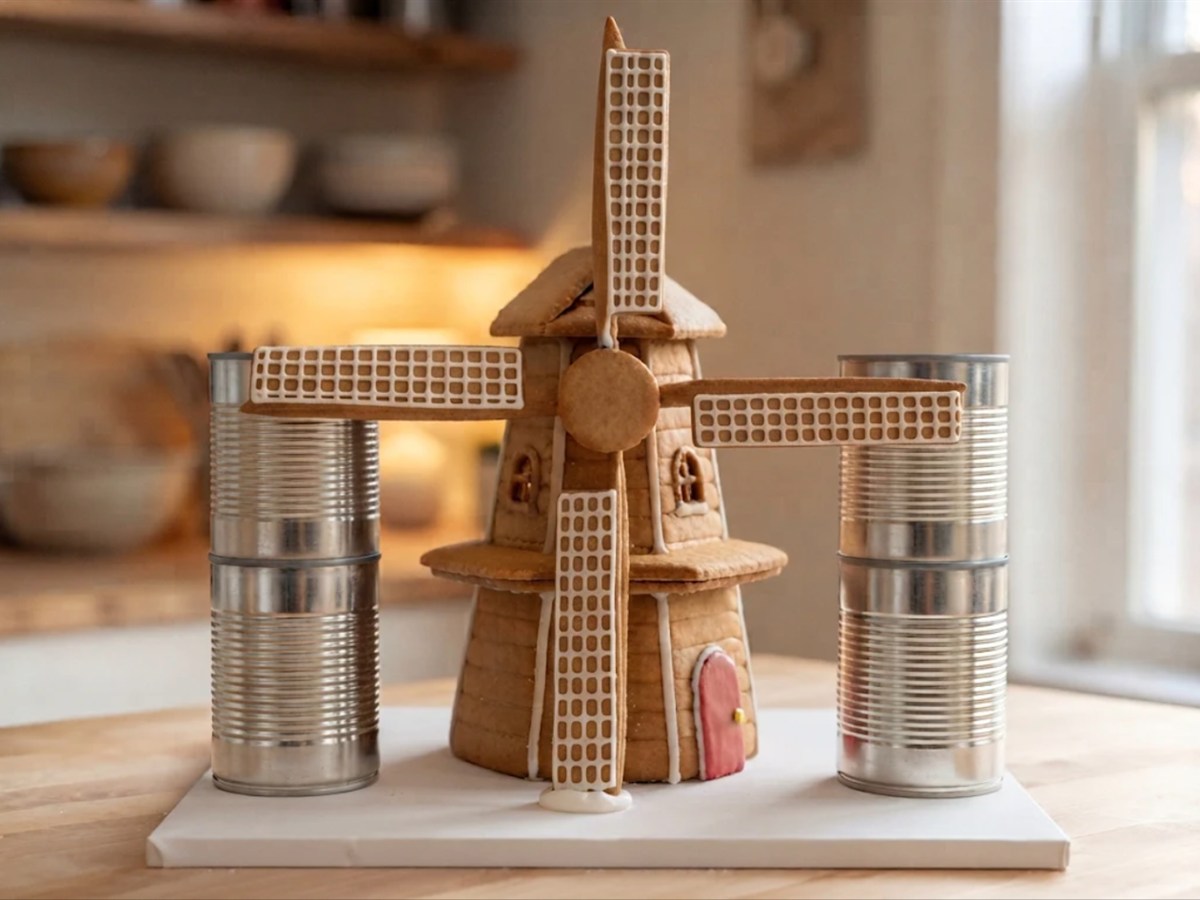
Pipe a thick ring of icing on the back of the hub stack and a dab on the board below face 1. Lift the sail cross, rest the bottom tip on the dab, and lean the hub onto the circle marked on face 1. Prop the side sails with stacked cans and wait 4 hours.
Why this matters: the board carries the weight through the bottom sail, so the hub joint only has to hold the cross upright.
16.Finish the yard and let it stand overnight
Spread icing over the board for grass or snow, add your tulips or snowdrifts, and pipe a path to the door. Leave the windmill where it is overnight, then lift it by the board, never by the sails.
Troubleshooting
| What you see | Why it happens | What to do |
|---|---|---|
| The six faces will not close | A face spread in the oven, or the faces went up wide end and narrow end mixed | Trim the long edges against the template. Every face goes wide end down. |
| The tower twists as it sets | The former is loose or taped crooked | Retape it so it stands straight, then press each face back against it. |
| The stage ring stops too high | Thick corner seams | Scrape the seams flat with a knife and try again. |
| The ring drops too low | The ring spread in the oven, or was cut wide | Pipe a thick bead under it at 2.8 inches and hold it level until it grabs. |
| The bottom sail floats above the board | Blades baked short, or the template printed small | Fill the gap with a candy stone or a blob of icing snow under the tip. |
| The bottom sail pushes the hub off the face | Blades spread long | Lift the cross off, shave the bottom tip, and set it again on fresh icing. |
| A blade snapped | It was moved warm or lifted raw | Use the spare. Next time, cut and bake the blades on parchment and leave them until cool. |
| The candy windows are cloudy or bubbly | Too little heat, or too much | Lumpy: bake a few minutes more at 325 degrees F. Brown and bubbling: pull it sooner next time. |
Bigger, Smaller and Quicker Versions
The template prints larger or smaller, but the dough stays 1/4 inch thick at every size, so a few things change with it. Set your size and see what you need.
Windmill Size Scaler
Slide to the print size you want. The scaler resizes the windmill, the board, the dough and the paper, and tells you how many hub discs keep the sails clear of the balcony.
Sizes come from the template script. Dough stays 1/4 inch thick at every size, which is why the hub disc count changes. Ovens and doughs vary, so bake a test piece first. Nothing you enter leaves your browser.
A Dutch street. For a whole scene, set the windmill beside a row of Dutch canal houses from our templates page. If you want another tall build with a taper, the gingerbread church with its board-standing tower solves its steeple the same way: the board carries the weight.
No-bake graham windmill. Stand a tall snack carton or a paper towel tube on a plate, glue graham crackers around it with icing, and top it with a square of graham. Cut sails from two graham crackers and pipe on the lattice. It takes about 30 minutes, and kids can each make one. See our no-bake graham cracker house that kids can glue for the icing that holds crackers.

Storage Instructions
Keep the windmill in a cool, dry room, away from the stove, a steamy kitchen and sunny windows. Damp air softens icing seams and makes candy glass sticky. Kept dry, it holds its shape through the season, and our guide to how long a gingerbread windmill keeps covers when to stop eating it and keep it for display.
FAQ
Can the sails turn?
Not on this build. The sails are glued in place, and the bottom one stands on the board to carry the weight. A spinning sail would need a pin and would put all of that weight back on the tower.
Can I set the sails in an X?
Only if you prop the two lower tips on something, such as two candy fence posts. Without that, the tower holds all four sails, which is the weak way to build it.
Do I need the paper former?
It is the easy way. Without it, you have to hold leaning faces in place by hand until the seams grab. The former stays inside the windmill, which is fine for a display piece.
Can I make it bigger?
Yes. At 120 percent it stands about 13 1/4 inches to the top sail tip and needs a 16 by 15 inch board, 3 batches of icing and 4 back hub discs. The scaler above works out every size.
More Gingerbread House Builds and Recipes
Browse gingerbread house ideas for your next build, or enter your windmill somewhere: our guide to how gingerbread competitions are judged covers what scores. When a tower will not stand straight, our fixes for a tower that leans work on any build. When you want a quicker project for the kids, pick a gingerbread house kit to build beside the windmill from our ranked list.